After testing hundreds of autoflower strains—from Northern Lights Auto to Gorilla Glue Auto—the single biggest mistake I see collectors make is treating them like photoperiods. Autoflowers are a completely different genetic beast, and their nutrient needs are far lower. Overfeeding is the #1 reason autoflower grows fail.
This guide explains exactly what, when, and how to feed your autoflowers for optimal results, backed by real-world testing data.
Quick Answer: Autoflower Nutrient Basics
✓ Start with less: Use 1/4 to 1/2 the recommended dose for photoperiods ✓ No nutrients for 2-3 weeks: A good quality potting mix has enough food for the seedling stage ✓ Avoid “hot” soils: Soils rich in manure or slow-release nutrients will burn autoflowers ✓ Focus on bloom nutrients: Autos have a very short veg phase, so they need bloom nutrients sooner ✓ Water is key: Proper pH and clean water are more important than heavy feeding
After testing hundreds of autoflower strains—from Northern Lights Auto to Gorilla Glue Auto—the single biggest mistake I see collectors make is treating them like photoperiods. Autoflowers are a completely different genetic beast, and their nutrient needs are far lower. Overfeeding is the #1 reason autoflower grows fail.
This guide explains exactly what, when, and how to feed your autoflowers for optimal results, backed by real-world testing data.
Quick Answer: Autoflower Nutrient Basics
✓ Start with less: Use 1/4 to 1/2 the recommended dose for photoperiods ✓ No nutrients for 2-3 weeks: A good quality potting mix has enough food for the seedling stage ✓ Avoid “hot” soils: Soils rich in manure or slow-release nutrients will burn autoflowers ✓ Focus on bloom nutrients: Autos have a very short veg phase, so they need bloom nutrients sooner ✓ Water is key: Proper pH and clean water are more important than heavy feeding
❓ Frequently Asked Questions
Do I need special “autoflower” nutrients?
No. Standard cannabis nutrients work fine, just use them at a much lower dose (1/4 to 1/2 strength). The “autoflower” branding is mostly marketing. Focus on quality base nutrients and proper feeding discipline.
What are the signs of overfeeding an autoflower?
Look for dark green, waxy leaves; yellow or brown leaf tips (nutrient burn); and curled or claw-like leaves. If you see these, flush with plain water and reduce feeding strength by half.
Can I grow autoflowers in organic living soil?
Yes, but the soil must be well-composted and not too “hot.” A super-soil mix can work well as it releases nutrients slowly, but avoid adding raw manure or heavy fertilisers. Start with light organic soil like BioBizz Light Mix for best results.
What pH should my water be for autoflowers?
Aim for 6.0-6.5 for soil and 5.8-6.2 for coco coir. Correct pH is more important than heavy feeding, as it allows the plant to absorb the available nutrients. Hydroponic growers should target 5.8-6.0.
Do autoflowers need Cal-Mag?
Sometimes, especially in coco coir or with LED lights. If you see yellowing between the leaf veins (interveinal chlorosis), a light dose of Cal-Mag (0.5ml/L) can help. Add it on a separate day from your main feed. Learn more about LED growing techniques.
Is it better to underfeed or overfeed an autoflower?
Always better to underfeed. An underfed plant can be corrected with a light feed in the next watering cycle. An overfed and stunted autoflower will never recover its full potential due to the short lifecycle.
How often should I feed my autoflower?
Typically, you feed with every other watering in soil: Feed → Water → Feed → Water. This helps prevent salt buildup in the soil. Coco coir growers feed with every watering at lower strength. Hydro systems feed continuously or daily.
My autoflower leaves are yellowing, should I add more nutrients?
Not necessarily. Yellowing can be caused by overwatering, incorrect pH, or nutrient lockout, not just deficiency. Check your watering schedule and pH first before adding more food. See our troubleshooting chart above for specific diagnoses.
These are conservative ranges. Start at the low end and increase only if plants show hungry signs (pale green, slow growth).
Can I use bloom boosters on autoflowers?
Yes, but with extreme caution. Use only during weeks 6-8 at 1/4 recommended strength, maximum once per week. Products like Advanced Nutrients Big Bud or Canna PK 13/14 can improve density but will cause lockout if overused.
What nutrients do fast-flowering autoflowers need?
Fast-finishing strains (8-week varieties like Lowryder genetics) need even lighter feeding since they have less time to process nutrients. Stick to 1/4 strength throughout and skip bloom boosters entirely.
Final Thoughts: Let the Plant Guide You
After 300+ documented autoflower grows, the single most important lesson is this: watch your plant, not the feeding chart.
Every strain is slightly different. Sativa-dominant autos like Amnesia Haze Auto tend to be lighter feeders. Indica hybrids like Purple Kush Auto can handle slightly more. A robust classic such as Auto Skunk #1 may also tolerate a little more, but should still be started conservatively. Your water quality, light intensity, and environmental conditions all affect nutrient uptake.
Start conservatively, observe daily, and adjust based on what you see. Healthy autoflowers have:
Light to medium green leaves (not dark, waxy green)
Disclaimer: This guide is for educational purposes for collectors and enthusiasts. Sacred Seeds sells cannabis seeds as collectible souvenirs. Germination and cultivation may not be legal in your jurisdiction. Always check local laws.
Understanding how to grow autoflowers successfully transforms the cultivation experience for beginners and experienced growers alike. Autoflowering cannabis plants have revolutionised home growing in Australia by eliminating the complexity of light cycles and dramatically reducing the time from seed to harvest. These robust plants flower automatically based on age rather than light exposure, making them ideal for Australia’s varied climate conditions. Whether you’re cultivating in Sydney’s humid summers or Melbourne’s unpredictable weather, autoflowers offer resilience and reliability that photoperiod varieties simply can’t match.
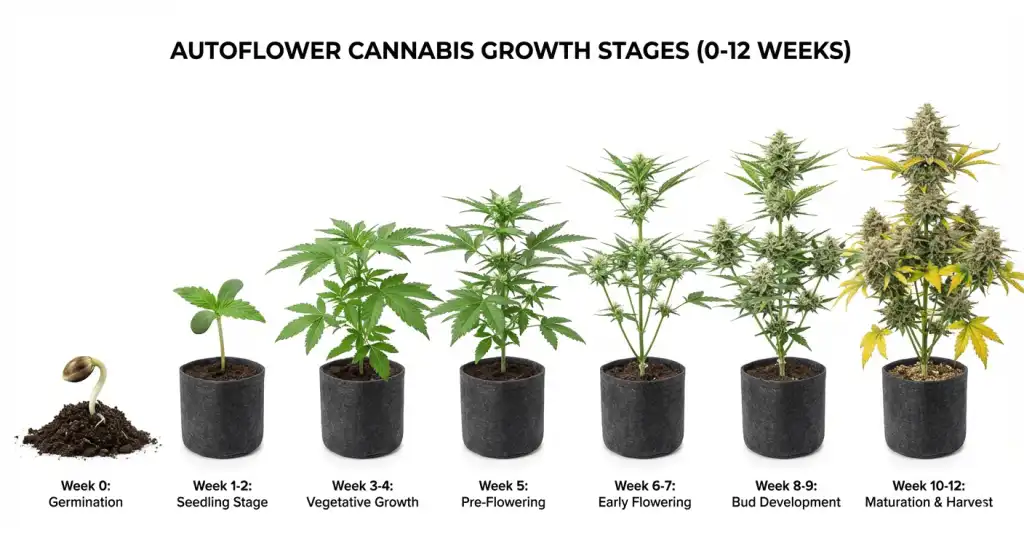
Autoflowers complete their entire life cycle in approximately 8-12 weeks, progressing through distinct developmental stages regardless of light schedules. This guide breaks down each week of growth, providing specific care instructions, common troubleshooting tips, and yield optimisation strategies. You’ll learn precise feeding schedules, environmental requirements, and the critical signs that indicate your plants are progressing healthily. By following this week-by-week roadmap, you can expect healthy plants, abundant harvests, and the confidence to tackle your next grow with improved techniques and knowledge.
Understanding Autoflowers: What Makes Them Different
Autoflowering cannabis seeds contain genetics from Cannabis ruderalis, a hardy subspecies originating from regions with short growing seasons in Russia and Central Asia. This ruderalis heritage grants autoflowers their signature trait: they begin flowering based on age, typically around 3-4 weeks from germination, rather than responding to changes in light cycles like photoperiod varieties. This fundamental difference means you can grow autoflowers under any light schedule, though most growers opt for 18-20 hours of light throughout the entire grow cycle for maximum yields.
The compact timeline of autoflowers—usually 8-12 weeks from seed to harvest—offers several distinct advantages for Australian growers. You can complete multiple harvests in a single outdoor season, work around unpredictable weather patterns, and maintain discretion with plants that typically remain under 1.2 metres tall. Additionally, autoflowers demonstrate remarkable resilience to temperature fluctuations, pests, and beginner mistakes compared to their photoperiod counterparts. However, this accelerated growth means there’s limited time to correct errors, making it essential to provide optimal conditions from day one.
Modern autoflowering cannabis seeds have evolved significantly since their early iterations. Today’s genetics produce potent, flavourful buds with THC levels rivalling photoperiod strains, whilst maintaining the speed and simplicity that made autoflowers popular initially. Auto Skunk #1 is a clear example of a classic photoperiod line adapted to this faster format. Understanding these unique characteristics helps you tailor your approach throughout each developmental stage, maximising both yield and quality from your autoflower grow.
If you’re new to growing, start with our guide to the 10 best beginner strains for Australian growers to set yourself up for success.
Week
Stage
Key Focus
0
Germination
Moisture, warmth
1–2
Seedling
Root development
3–4
Vegetative
Structure, nitrogen
5
Pre-flower
Transition nutrients
6–9
Flowering
Bud development
10–12
Ripening
Trichome monitoring
🌿 Not sure which auto to grow first?
Six questions, two minutes — three strains matched to your setup, experience level, and what you’re after.
Germination (Week 0): Starting Your Autoflower Journey
Successful germination sets the foundation for your entire autoflower grow. The most reliable method involves the paper towel technique, where seeds are placed between dampened paper towels inside a sealed container or plastic bag. Store this setup in a warm, dark location maintaining temperatures between 22-25°C. Within 24-72 hours, you should observe the seed shell cracking and a white taproot emerging. Once the taproot reaches approximately 1-2 centimetres, your seed is ready for planting.
Plant germinated seeds directly into their final container—this is crucial for autoflowers. Unlike photoperiod plants, autoflowers have limited vegetative time and respond poorly to transplanting stress. Any setback during their brief vegetative phase directly impacts final yield. Choose containers between 11-19 litres capacity with excellent drainage. Fill with a light, airy growing medium such as a quality soil mix with 30% perlite, or a coco coir blend. Plant the germinated seed approximately 1-1.5 centimetres deep with the taproot facing downward, then gently cover with soil.
Maintain consistent moisture without waterlogging during this critical phase. The growing medium should feel damp but not saturated. Place a humidity dome or clear plastic cup over the planting site to retain moisture and create a microclimate that encourages the seedling to break through the soil surface. Within 24-48 hours of planting, you should see the seedling emerge. Once visible, remove any covering and position your light source approximately 60-75 centimetres above the seedling to prevent stretching whilst avoiding light stress.
The seedling stage represents your autoflower’s most vulnerable period, requiring careful attention to environmental conditions. Your young plant will display its first set of true leaves (after the initial round cotyledon leaves) and begin establishing its root system. Temperature should remain between 20-25°C with relative humidity around 65-70%. Lighting can be relatively gentle during this phase—LED fixtures should be positioned 60-90 centimetres away, whilst HPS or MH lights require greater distance to prevent heat stress.
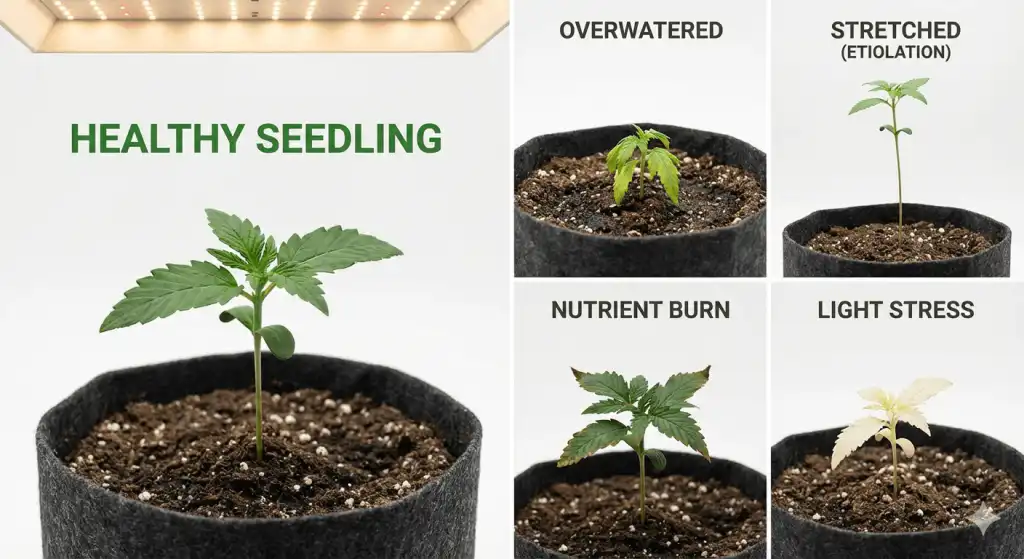
Watering discipline during the seedling stage proves critical. Overwatering remains the primary killer of cannabis seedlings, as their small root systems cannot process excess moisture, leading to oxygen deprivation and root rot. Water in a small circle around the seedling rather than saturating the entire container. Allow the top 2-3 centimetres of growing medium to dry before watering again. As roots develop, gradually increase the watering zone radius. By week two, roots should be spreading throughout the container, and you can begin watering the full pot whilst still maintaining dry periods between waterings.
Nutrition requirements remain minimal during the seedling phase. Quality soil contains sufficient nutrients for the first 2-3 weeks, so avoid introducing additional fertilisers that can overwhelm delicate roots. If using an inert medium like coco coir, introduce nutrients at quarter strength during week two. Monitor your seedlings for any signs of stress: yellowing leaves may indicate nutrient deficiency or overwatering, whilst burnt leaf tips suggest nutrient excess. Healthy seedlings display vibrant green leaves, steady upward growth, and develop new leaf sets every few days.
Vegetative Growth (Weeks 3-4): Rapid Development Phase
Weeks three and four mark the explosive vegetative growth period where your autoflower establishes the structure that will support future bud production. During this phase, plants develop rapidly, producing new leaf sets and branches daily. Node spacing, leaf size, and overall plant structure become established. Provide 18-24 hours of light daily—many experienced growers prefer an 18/6 or 20/4 schedule to balance growth with plant rest periods, though some cultivators report excellent results with continuous 24-hour lighting.
Nutritional demands increase significantly during vegetative growth. Your plants require nitrogen-rich fertilisers to support leaf and stem development. If using bottled nutrients, follow the manufacturer’s feeding schedule but consider starting at half strength and gradually increasing based on plant response. Organic growers should ensure their soil contains adequate nitrogen sources such as worm castings, blood meal, or composted manure. Water when the top layer of soil feels dry, and always water until you observe runoff from drainage holes—this prevents salt buildup that can lock out nutrients.
Environmental conditions should remain stable with temperatures between 22-28°C and humidity around 50-60%. Adequate airflow prevents mould and strengthens stems—oscillating fans that gently rustle leaves without causing excessive movement work ideally. By week four, many autoflowers begin showing pre-flowers at node sites, indicating the transition to flowering is imminent. Resist the temptation to perform heavy training techniques during this stage. Whilst low-stress training (LST) can be beneficial, high-stress methods like topping or FIMing often reduce autoflower yields due to recovery time eating into the flowering window.
Pre-Flowering (Week 5): The Transition Period
Week five typically marks the pre-flowering phase where your autoflower transitions from vegetative growth to flower production. You’ll notice pistils (white hairs) emerging from calyxes at node sites, confirming the plant’s sex and flowering initiation. Feminised autoflower seeds eliminate concerns about male plants, but it’s still worth examining your plants closely during this phase. Growth patterns shift as vertical stretching accelerates—expect plants to gain 50-100% of their vegetative height during the next few weeks.
Adjust your nutrient regimen to reflect changing plant needs. Begin reducing nitrogen whilst increasing phosphorus and potassium, which support flower formation and bud development. Most nutrient lines offer specific “bloom” formulations designed for this transition. Additionally, consider introducing supplements containing beneficial microbes, carbohydrates, or bloom boosters that enhance flower production. However, exercise caution with additives—more is not better, and overfeeding can harm yields more than underfeeding.
Environmental adjustments become important as flowering commences. Lower humidity to 40-50% to reduce mould risk as buds begin forming. Maintain temperatures between 20-26°C—slightly cooler than vegetative stage temperatures. Some strains display enhanced colour and resin production when experiencing a 5-8°C temperature drop between lights-on and lights-off periods. Ensure your lighting remains consistent without interruption during the dark period if you’re using a schedule with darkness, though autoflowers tolerate light interruptions better than photoperiod plants.
Flowering Stage (Weeks 6-9): Bud Development
The flowering stage represents the most exciting phase of your autoflower grow as buds swell and resin production intensifies. During weeks six through nine, flowers develop rapidly, transitioning from loose clusters of pistils to dense, resinous formations. Your plants’ distinctive aroma strengthens significantly—ensure adequate odour control measures are in place if discretion is required. Different strains display varying flowering patterns; sativa-dominant autoflowers typically produce longer, more airy buds, whilst indica-dominant varieties form tight, compact colas.
Nutritional management during flowering focuses on phosphorus and potassium whilst minimising nitrogen, which is no longer needed in large quantities. Continue feeding according to your nutrient schedule, but monitor plants for signs of nutrient burn (dark leaves with burnt tips) or deficiencies (yellowing leaves, purple stems). Some leaf yellowing in lower growth is normal as plants redirect energy to flower production. Maintain consistent watering practices, but be mindful that dense canopies and increased plant mass mean faster water uptake. Check soil moisture more frequently than during earlier stages.
Support structures may become necessary as buds gain weight. Bamboo stakes, plant ties, or trellis netting prevent branches from bending or breaking under the burden of heavy flowers. Defoliation should be approached cautiously during flowering—remove only leaves blocking light penetration to lower bud sites or those showing disease. Excessive defoliation stresses plants during this critical period. Monitor closely for pests or mould, which are attracted to flowering plants. Implement preventative measures rather than waiting for problems to emerge, as treatment options become limited once dense flowers form.
Late Flowering and Harvest (Weeks 10-12): The Final Stretch
The final weeks of your autoflower grow determine ultimate potency and yield. During weeks 10-12, bud development reaches its peak, with calyxes swelling and trichome production maximising. Pistils begin changing colour from white to orange, brown, or red, depending on genetics. This visual transformation often tempts growers to harvest prematurely, but patience during these final weeks significantly impacts quality and potency. Most autoflowers require the full 10-12 weeks, with some sativa-dominant varieties extending slightly longer.
Flushing—the practice of providing only plain water for the final 1-2 weeks before harvest—remains debated amongst growers. Proponents argue flushing improves flavour by removing residual nutrients from plant tissue, whilst critics suggest it unnecessarily stresses plants during their final production phase. If you choose to flush, begin approximately 10-14 days before your anticipated harvest date. Provide pH-adjusted water without nutrients until runoff appears clear. Plants may display rapid leaf yellowing during flushing as they consume remaining internal nutrient stores.
Environmental conditions during late flowering should emphasise mould prevention and resin production. Maintain humidity below 45% if possible, particularly during the final two weeks. Some growers reduce temperatures slightly (18-24°C) to stress plants beneficially, potentially increasing resin production and enhancing colour development in purple-tinged varieties. However, avoid drastic temperature swings that could shock plants. Lighting remains crucial through harvest day—any reduction in light intensity or duration can signal the plant to slow production.
Common Autoflower Mistakes to Avoid
Successfully growing autoflowers requires avoiding several common pitfalls that particularly impact these fast-flowering plants. The most frequent mistake involves transplanting, which stresses autoflowers during their limited vegetative window. Always germinate seeds directly in their final containers to maximise growth potential. Similarly, overtraining through techniques like topping or heavy defoliation often reduces yields rather than improving them. Autoflowers lack sufficient recovery time to compensate for the stress these methods create.
Overwatering and overfeeding account for numerous autoflower failures, particularly amongst new growers. Cannabis plants generally thrive with less water and fewer nutrients than beginners expect. Establish a watering schedule based on container weight and soil dryness rather than arbitrary timing. When introducing nutrients, start conservatively at half the recommended strength and increase gradually based on plant response. It’s far easier to add more nutrients than to correct nutrient burn or lockout.
Light-related issues frequently compromise autoflower potential. Insufficient lighting produces stretched, weak plants with minimal bud development, whilst excessive light intensity causes bleaching, heat stress, and reduced yields. Position lights according to manufacturer recommendations for your specific fixture and growth stage. Additionally, avoiding these common mistakes becomes easier by consulting comprehensive resources about successful cannabis cultivation practices that apply across various growing methods.
Environmental neglect represents another category of common errors. Temperature extremes, humidity issues, and poor airflow create conditions where pests, diseases, and stress thrive. Invest in basic environmental monitoring equipment—a thermometer, hygrometer, and timer cost relatively little but provide crucial data for maintaining optimal conditions. Finally, harvesting prematurely based on breeders’ timelines rather than actual plant indicators consistently disappoints growers. Every phenotype varies slightly in maturation speed, and environmental factors influence development rates significantly.
🌿 Browse our autoflowering seed range
Fast genetics, proven Australian results. Feminised autos from 8 weeks seed to harvest.
Identifying the optimal harvest window requires examining trichomes—the tiny, mushroom-shaped glands covering flowers and surrounding leaves. Invest in a jeweller’s loupe or digital microscope with at least 30x magnification. Trichomes progress through three distinct stages: clear (immature), cloudy/milky (peak THC), and amber (THC degrading to CBN). Most growers target harvest when 70-90% of trichomes appear cloudy with 10-30% turning amber, depending on desired effects.
Clear trichomes indicate immaturity and will produce less potent, potentially anxiety-inducing effects if harvested prematurely. Cloudy trichomes represent peak THC content and produce the most cerebral, energetic effects. Amber trichomes indicate THC converting to CBN, producing more sedative, body-focused effects. Understanding these stages allows you to customise your harvest timing based on preferences. Sativa enthusiasts might harvest earlier (mostly cloudy, minimal amber), whilst indica lovers often wait for increased amber percentage. For detailed guidance on this critical aspect, review information about amber trichomes and harvest timing.
Additional harvest indicators complement trichome examination. Most pistils should have darkened and curled inward, though some fresh white pistils may remain on the uppermost flowers. Leaves often display autumn colours as the plant senesces naturally. However, don’t rely solely on these secondary indicators—trichome development remains the most reliable harvest metric. According to research from Cannabis cultivation studies, harvest timing can influence cannabinoid profiles by up to 20-30%, making proper assessment essential for achieving your desired outcome.
Once you’ve determined harvest readiness, plan your post-harvest process. Prepare your drying space, trimming tools, and storage containers before cutting plants. Most growers harvest in the morning when resin production peaks and before lights warm the grow space. Cut entire plants at the base or harvest individual branches, depending on your drying setup and whether different parts of the plant display varying maturity. Remember that proper drying and curing significantly impact final quality, so view harvest as the beginning of the finishing process rather than the end of cultivation.
What you’re harvesting matters as much as how you harvest it. If you’re growing Auto Zkittlez, the full Zkittlez strain review covers exactly what to expect from the finished product.
Frequently Asked Questions About Growing Autoflowers
How long do autoflowers take from seed to harvest?
Most autoflower strains complete their full life cycle in 8-12 weeks from germination to harvest. Fast-finishing varieties can be ready in as little as 8-9 weeks, whilst some Sativa-dominant autos may extend to 12-13 weeks. The timeline depends on genetics, growing conditions, and environmental factors. Always base harvest timing on trichome development rather than breeder estimates, as individual plants can vary by 1-2 weeks from advertised timelines.
What’s the best light schedule for autoflowers?
Autoflowers don’t require specific light schedules to flower, but most growers use 18/6 (18 hours light, 6 hours dark) or 20/4 throughout the entire grow cycle. Some cultivators run 24/0 (continuous light) with success, though many prefer giving plants a dark period for metabolic processes. The key advantage is consistency—stick with whichever schedule you choose from seedling to harvest. More light generally means larger yields, but only if your plants can handle the intensity without stress.
Can I grow autoflowers outdoors in Australia?
Yes, autoflowers excel in Australian outdoor conditions. Their fast lifecycle (8-12 weeks total) allows multiple harvests per season in most climate zones. In Queensland and Northern NSW, you can grow year-round with careful timing. Southern states work best with spring/summer planting (September-February). Autoflowers handle Australia’s variable weather better than photoperiods because they’re not dependent on light cycles. However, they still need adequate sun exposure—aim for at least 6-8 hours of direct sunlight daily for decent yields.
What size pot do I need for autoflowers?
Use 11-19 litre (3-5 gallon) containers for autoflowers. Smaller pots (11-15L) work for compact strains or space-limited grows, whilst larger pots (15-19L) allow more root development and potentially larger yields. Always plant germinated seeds directly into their final container—autoflowers respond poorly to transplanting due to their limited vegetative phase. Fabric pots are ideal as they provide excellent drainage and air pruning, promoting healthier root systems.
Should I top or train my autoflowers?
Low-stress training (LST) works well for autoflowers—gently bending and tying branches to create an even canopy increases light exposure and yields. However, avoid high-stress techniques like topping, FIMing, or heavy defoliation. Autoflowers have limited time to recover from stress, and any setback during their brief 3-4 week vegetative phase directly impacts final yield. If you do train your autos, start LST early (week 2-3) and be gentle. When in doubt, it’s better to let autoflowers grow naturally than risk stunting them.
How much water do autoflowers need?
Autoflowers need less water than many beginners expect. During the seedling stage (weeks 1-2), water in a small circle around the plant every 2-3 days. By week 3-4, water the entire pot when the top 5cm of soil feels dry—this is typically every 2-4 days depending on container size, temperature, and humidity. Always water until you see runoff from drainage holes. Overwatering kills more autoflowers than underwatering. If you’re uncertain, wait an extra day—slight underwatering is preferable to waterlogged roots.
What nutrients do autoflowers need?
Autoflowers require lighter feeding than photoperiod plants due to their shorter lifecycle and typically smaller size. Use quality soil with nutrients for weeks 1-2, then introduce nutrients at half the recommended strength in week 3. Focus on nitrogen-rich fertilisers during vegetative growth (weeks 3-4), then switch to bloom nutrients higher in phosphorus and potassium from week 5 onward. Watch for nutrient burn (dark leaves, burnt tips) and back off if it occurs. It’s easier to add nutrients than fix overfeeding.
What yields can I expect from autoflowers?
Indoor autoflowers typically yield 30-100g per plant, with experienced growers occasionally achieving 100-150g under optimal conditions. Outdoor autoflowers in good Australian sun can produce 50-150g per plant, sometimes more with ideal conditions and genetics. Yields depend on genetics, container size, light intensity, growing skill, and environmental conditions. While autoflowers generally produce less than photoperiods, their fast turnaround allows multiple harvests in the time it takes to grow one photoperiod crop.
Can I clone autoflowers?
Technically yes, but it’s not practical. Autoflowers flower based on age, so any clone taken from an autoflower will have the same biological age as the mother plant. By the time roots develop, the clone immediately enters flowering with minimal vegetative growth, producing tiny plants with negligible yields. Unlike photoperiod plants, you cannot keep an autoflower mother plant in vegetative state. If you want to preserve genetics, you must purchase new seeds for each grow.
Why are my autoflower leaves turning yellow?
Yellowing leaves can indicate several issues depending on timing and location. Lower leaves yellowing during late flowering (weeks 8-10) is normal as plants redirect nutrients to bud development. Early yellowing typically signals nitrogen deficiency (entire leaf yellows), overwatering (lower leaves yellow with drooping), or pH issues preventing nutrient uptake. Yellow tips with burnt edges suggest nutrient burn from overfeeding. Check your watering schedule first, then review your feeding strength and pH levels. Some natural yellowing during the final 1-2 weeks is expected and not concerning.
When should I start counting weeks for my autoflower?
Week 0 is germination. Week 1 begins when the seedling breaks through the soil surface and the first set of round cotyledon leaves open. This standardised timing helps you follow feeding schedules and track development accurately. Some growers count from the day they place seeds in water, but counting from emergence provides more consistent developmental tracking since germination times vary (1-5 days typically).
Are autoflowers less potent than photoperiod strains?
Modern autoflowers rival photoperiod strains in potency, with many varieties testing at 20-25%+ THC. Early autoflower genetics (pre-2010) were notably weaker, which created the persistent myth about lower potency. Today’s breeders have perfected autoflowering genetics by backcrossing with potent photoperiod strains whilst maintaining the ruderalis auto-flowering trait. You can expect equivalent potency, flavour, and effects from quality autoflower genetics. The main trade-off is typically yield per plant rather than potency.
When growers talk about the most powerful cannabis strains available today, one name consistently dominates the conversation: Gorilla Glue, also known as GG4 or Original Glue. This legendary strain has earned its reputation not just through marketing hype, but through consistently delivering some of the highest THC levels found in modern cannabis genetics. For beginners entering the world of cannabis cultivation, understanding what makes Gorilla Glue so exceptionally strong—and what that means for your growing journey—is essential knowledge that will shape your expectations and approach to cultivation.
Gorilla Glue strength stems from multiple factors working in harmony: exceptional genetics combining Chem’s Sister, Sour Dubb, and Chocolate Diesel; a unique terpene profile dominated by caryophyllene, limonene, and myrcene; and cannabinoid levels that regularly test between 25-30% THC. This potency translates to intensely resinous flowers that literally glue scissors together during trimming, a powerful euphoric yet relaxing effect profile, and yields that reward skilled growers with abundant harvests of premium-quality buds. For cultivation purposes, Gorilla Glue demonstrates vigorous growth, moderate difficulty suitable for attentive beginners, and an 8-9 week flowering period that produces dense, trichome-covered flowers with exceptional bag appeal.
Understanding GG4 Genetics and Lineage
The remarkable strength of Gorilla Glue traces directly back to its exceptional genetic heritage. Created accidentally by breeder Joesy Whales when a Chem’s Sister plant hermaphrodited and pollinated his Sour Dubb, the resulting seeds were then crossed with Chocolate Diesel to create the powerhouse we know today. This genetic accident proved fortunate, as each parent contributed specific traits that amplified the overall potency profile.
Chem’s Sister brought diesel-fuel aromatics and intense cerebral effects, Sour Dubb contributed complex terpenes and dense bud structure, whilst Chocolate Diesel added sweetness and enhanced resin production. The combination created a hybrid that expresses the best traits of each parent whilst minimising weaknesses. This balanced hybrid typically shows 50/50 indica-sativa genetics, though some phenotypes may lean slightly in either direction.
The “GG4” designation refers to the fourth phenotype discovered during initial breeding trials, which demonstrated superior characteristics compared to other phenotypes. This particular expression became the most sought-after version, eventually becoming the standard for all Gorilla Glue genetics. Understanding this lineage helps growers appreciate why certain characteristics appear during cultivation, from growth patterns to final cannabinoid profiles.
The Cannabinoid Profile: Breaking Down the Numbers
When discussing gorilla glue strength, THC content naturally takes centre stage. Quality Gorilla Glue genetics consistently produce flowers testing between 25-30% THC, with exceptional phenotypes and growing conditions occasionally pushing beyond 30%. To put this in perspective, average cannabis strains typically range between 15-20% THC, making Gorilla Glue significantly more potent than standard varieties.
However, THC percentage alone doesn’t tell the complete story. Gorilla Glue also produces moderate levels of other cannabinoids including CBD (typically 0.1-0.3%), CBG (0.5-1.5%), and CBC (0.2-0.8%). Whilst these percentages seem small compared to THC, they contribute significantly to the overall effect through what researchers call the entourage effect, where multiple compounds work synergistically to enhance therapeutic and psychoactive properties.
The ratio between cannabinoids influences how the strain affects different individuals. Gorilla Glue’s high THC-to-CBD ratio creates predominantly psychoactive effects, yet the presence of other minor cannabinoids moderates the experience, preventing the anxiety or paranoia sometimes associated with pure THC extracts. For beginners, this means effects that are powerful but generally well-tolerated when consumed responsibly.
Testing labs use advanced chromatography techniques to measure cannabinoid content, but results can vary based on growing conditions, harvest timing, curing methods, and testing procedures. Responsible breeders provide representative test results, understanding that individual grows may produce slightly different profiles. When evaluating gorilla glue strength through lab reports, look for tests from reputable facilities that measure the full cannabinoid spectrum, not just THC.
Terpene Composition and Strength Synergy
Beyond cannabinoids, terpenes play a crucial role in gorilla glue strength and overall effects. These aromatic compounds don’t just provide the strain’s distinctive fuel-and-earth scent—they actively modulate how cannabinoids interact with our bodies. Gorilla Glue’s terpene profile is dominated by three primary compounds that work together to enhance potency and shape the experience.
Caryophyllene, typically the most abundant terpene in Gorilla Glue, contributes spicy, peppery notes whilst also binding to CB2 receptors in the endocannabinoid system. This unique characteristic means caryophyllene acts as both a terpene and a dietary cannabinoid, potentially contributing anti-inflammatory effects. Limonene adds citrus brightness whilst promoting mood elevation and stress relief, complementing THC’s euphoric properties. Myrcene, known for its earthy, musky aroma, may enhance THC’s ability to cross the blood-brain barrier, potentially intensifying psychoactive effects.
The concentration of these terpenes in cannabis can reach 2-3% of total flower weight in well-grown Gorilla Glue, which represents exceptional terpene density. This high terpene content contributes to the strain’s intense aroma, complex flavour profile, and enhanced effects through entourage synergy. Growers can maximise terpene production through proper environmental control, particularly during the final weeks of flowering when terpene synthesis peaks.
Growing Considerations for Maximum Potency
Achieving legendary gorilla glue strength requires more than just planting quality genetics—cultivation techniques significantly impact final potency. Gorilla Glue plants demonstrate vigorous vegetative growth, typically doubling or tripling in height during the flowering transition. This stretch characteristic requires adequate vertical space and may necessitate training techniques like topping, LST (low-stress training), or SCROG (screen of green) to manage canopy height.
Nutrient requirements follow typical hybrid patterns, with moderate nitrogen during vegetative growth transitioning to increased phosphorus and potassium during flowering. However, Gorilla Glue can be sensitive to overfeeding, particularly nitrogen excess during late flowering, which may reduce final THC percentages whilst promoting leafy growth. Conservative feeding with quality nutrients typically produces superior results compared to aggressive fertilisation schedules.
Environmental parameters critically influence cannabinoid and terpene production. Gorilla Glue thrives with daytime temperatures between 22-26°C during flowering, dropping to 18-22°C during dark periods. Humidity should gradually decrease from 60-65% in early flowering to 40-45% during final ripening to prevent mould whilst encouraging resin production. Adequate airflow prevents stagnant microclimates that harbour pathogens, particularly important given Gorilla Glue’s dense bud structure.
Lighting intensity and spectrum affect both yield and potency. Whether growing under photoperiod conditions with HPS, LED, or CMH lighting, providing adequate photon density (typically 600-1000 PPFD during flowering) ensures robust cannabinoid synthesis. Many growers report enhanced terpene profiles when incorporating UV-B supplementation during late flowering, though this requires careful implementation to avoid plant stress.
Effect Profile: What Gorilla Glue Strength Means
Understanding how gorilla glue strength translates to actual effects helps beginners set appropriate expectations and consumption guidelines. The high THC content produces potent psychoactive effects that typically begin with cerebral euphoria and mental uplift, creating a sense of happiness and sometimes giggly sociability. This initial head-focused phase gradually transitions into profound physical relaxation that spreads through the body without inducing complete sedation in most users.
The balanced hybrid genetics create what users describe as a “couch-lock” effect at higher doses, where the combination of mental contentment and physical relaxation makes movement seem unnecessary and undesirable. However, at moderate doses, many users report functional relaxation that doesn’t completely impair productivity. This versatility makes Gorilla Glue popular for various consumption contexts, from creative pursuits to evening relaxation.
Duration of effects typically extends 2-4 hours depending on consumption method, individual tolerance, and dosage. The comedown generally progresses smoothly without the crash sometimes associated with high-THC strains, likely due to the moderating influence of minor cannabinoids and terpenes. For beginners, starting with minimal doses (particularly when consuming concentrates or edibles made from Gorilla Glue) prevents overwhelming experiences whilst allowing gradual familiarity with the strain’s powerful effects.
Medicinal users appreciate Gorilla Glue for potential applications including chronic pain management, insomnia relief, stress reduction, and appetite stimulation. The pain-relieving properties stem from both THC’s analgesic effects and the anti-inflammatory potential of caryophyllene. However, the high potency means this strain may not suit those sensitive to THC or seeking primarily CBD-focused therapeutic benefits.
Cultivation Challenges and Solutions
Whilst Gorilla Glue’s strength makes it desirable, certain cultivation challenges require attention from beginners. The strain’s vigorous growth and substantial stretch during flowering transition can catch inexperienced growers off-guard, potentially resulting in plants that outgrow available space. Implementing height management techniques early in vegetative growth prevents this issue—topping plants at the 4th-6th node and using LST to create horizontal canopy development maintains manageable heights.
Heavy resin production, whilst desirable for potency, creates sticky conditions that can complicate maintenance tasks. Trimming scissors require frequent cleaning with isopropyl alcohol to maintain functionality, and excessive handling of flowers during growth can damage delicate trichome heads. Many growers wear nitrile gloves when working directly with plants during late flowering to prevent trichome damage and sticky hands.
The dense bud structure that contributes to impressive yields also creates microclimates within flower clusters where humidity accumulates. This characteristic makes Gorilla Glue somewhat susceptible to botrytis (bud rot) if environmental conditions aren’t properly managed. Maintaining proper airflow, controlling humidity during late flowering, and inspecting dense bud sites regularly helps prevent this devastating pathogen from destroying hard-earned harvests.
Nutrient sensitivity, particularly regarding nitrogen, requires attentive feeding management. Beginning growers often assume that stronger nutrients produce stronger plants, but Gorilla Glue responds better to conservative feeding that prevents toxicity. Following proven growing techniques and starting with half-strength nutrient solutions, gradually increasing only if plants show deficiency symptoms, produces superior results compared to aggressive feeding schedules.
Harvest Timing for Peak Potency
Determining optimal harvest timing critically influences final gorilla glue strength and effect profile. Trichome maturation follows a predictable progression that growers can observe using magnification tools like jeweller’s loupes or digital microscopes. During early flowering, trichome heads appear clear and glassy, indicating immature cannabinoid profiles with lower potency. As maturation progresses, trichomes transition to cloudy or milky appearance, signalling peak THC content.
For maximum psychoactive potency, most Gorilla Glue growers harvest when 70-80% of trichomes show cloudy colouration with minimal amber degradation. This window typically occurs around week 8-9 of flowering, though phenotype variation and environmental factors can shift timing by several days. Harvesting at this stage preserves peak THC levels whilst maintaining the uplifting cerebral characteristics that balance the strain’s physical relaxation.
Allowing trichomes to develop more amber colouration before harvest shifts the effect profile toward increased sedation as THC degrades into CBN (cannabinol). Some growers preferring more narcotic effects deliberately extend flowering until 20-30% of trichomes show amber colouration. This approach sacrifices some peak THC percentage but may enhance sleep-promoting properties valued by medicinal users treating insomnia.
Beyond trichome observation, other maturation indicators include pistil colouration (70-90% darkened and curled), swollen calyxes, and the cessation of new pistil production. However, trichome development remains the most reliable indicator of cannabinoid maturity. Taking small sample buds from different plant areas and examining them under magnification helps ensure accurate assessment, as maturation can vary between top colas and lower branches.
Comparing Auto, Photo, and Fast Versions
Modern breeders offer Gorilla Glue genetics in multiple formats, each with distinct characteristics affecting cultivation approach and final strength. Traditional photoperiod Gorilla Glue remains the standard by which others are measured, requiring light cycle manipulation (typically 18/6 vegetative, 12/12 flowering) to trigger and maintain flowering. These plants offer unlimited vegetative growth potential, allowing growers to achieve substantial sizes and yields whilst maintaining the authentic GG4 potency profile.
Autoflowering Gorilla Glue varieties incorporate ruderalis genetics that trigger flowering based on age rather than light cycles. Early autoflowering versions sacrificed potency. Modern auto genetics have closed this gap significantly. Quality auto GG4 now reaches 22–26% THC. While slightly below photoperiod versions, it remains exceptionally strong. Autos complete their lifecycle in 10–12 weeks and require no light cycle changes.
Fast version Gorilla Glue represents a middle ground, combining photoperiod control with accelerated flowering similar to autoflowers. These plants require traditional light cycle manipulation. However, they complete flowering in 6–7 weeks instead of 8–9. This shorter cycle offers high potency with reduced cultivation time. Fast versions are ideal for outdoor growers in regions with shorter summers. Sacred Seeds Australia offers fast version genetics that maintain exceptional potency whilst reducing total cultivation duration.
Choosing between versions depends on individual growing situations and priorities. Photoperiod GG4 suits growers seeking maximum potency and yield without time constraints. Autoflowers benefit those wanting quick, simple grows with respectable strength. Fast versions appeal to growers balancing potency with shorter flowering periods. All versions maintain the fundamental characteristics that define gorilla glue strength, adjusted to different cultivation parameters and experience levels.
The legendary status of Gorilla Glue comes from exceptional genetics, high cannabinoid content, and rich terpene profiles. Its cultivation traits also reward attentive growers. For beginners, understanding gorilla glue strength—from genetics to harvest timing—creates a strong foundation for successful grows. Whilst the strain’s potency demands respect both during cultivation and consumption, proper techniques and realistic expectations allow even novice growers to achieve impressive results. Whether choosing photoperiod, autoflowering, or fast version genetics, the GG4 lineage offers a masterclass in what modern cannabis breeding can achieve. By applying the principles outlined in this guide and starting with quality genetics from reputable sources, growers can experience firsthand why Gorilla Glue continues dominating potency discussions years after its accidental creation.
Frequently Asked Questions
How strong is Gorilla Glue (GG4)?
Gorilla Glue typically tests between 25–30% THC, making it one of the strongest cannabis strains available. Some phenotypes can exceed 30% under ideal conditions.
Is Gorilla Glue too strong for beginners?
Gorilla Glue can be overwhelming for beginners due to its high THC content. New users should start with very small doses and gradually increase as tolerance builds.
What makes Gorilla Glue so potent?
Its strength comes from elite genetics and high THC levels. A terpene profile rich in caryophyllene, limonene, and myrcene further enhances effects through the entourage effect.
Autoflower Gorilla Glue is slightly less potent than photoperiod versions. It typically reaches 22–26% THC but still delivers strong effects. Faster growth and easier cultivation make it a popular choice.
If you are standing right at the start of your first grow, the choice between autoflower and feminised seeds can feel like the first locked door. The words sound technical, every forum has a loud opinion, and it is genuinely hard to tell what actually matters and what is noise. I have grown hundreds of both over the years, so let me make this simple. By the end of this you will know which one suits you and, just as importantly, why.
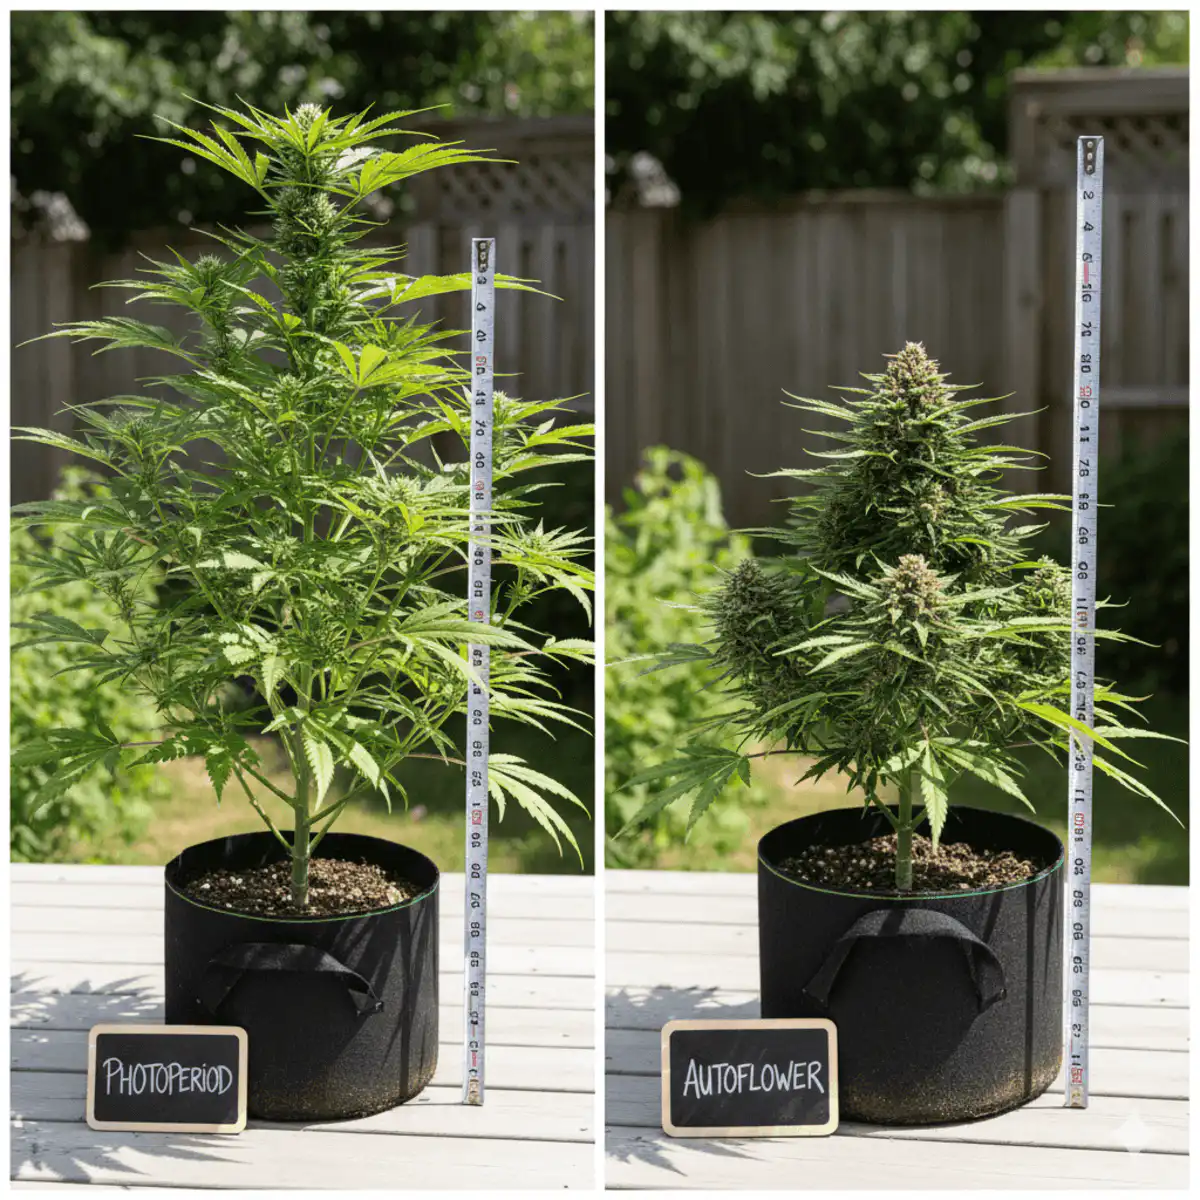
The short version: autoflowers flower on a fixed clock, about three to four weeks after they sprout, no matter what you do with the lights. Feminised photoperiod plants wait, and only begin flowering when you give them longer nights. Autos are faster, smaller and ask less of you on lighting. Feminised plants grow bigger, yield more and forgive your mistakes, but they take longer and you manage the light yourself. Neither is better than the other. They are built for different jobs.
A Quick Word on the Names
Before anything else, let us clear up the words, because they trip up nearly everyone at the start.
There are two completely separate things going on, and people muddle them constantly. The first is the plant’s sex. A feminised seed is simply one bred to grow into a female plant, and females are the ones that produce the buds you are after. The alternative is a regular seed, which can come up either male or female. Every single seed we sell at Sacred Seeds Australia is feminised, so you never have to learn to spot and remove males. That part is handled for you.
The second thing is how the plant decides when to flower, and this is the real choice in front of you. Here there are two types: autoflowering and photoperiod. Because everything in our range is already feminised, we label the two by the part that actually differs. The autoflowering ones we call autos, and the photoperiod ones we just call feminised. So when this guide says feminised, it means feminised photoperiod seeds. Do not let that wording throw you, because both types are in fact feminised. The only difference that matters from here on is the flowering trigger, and that is what the rest of this guide is about.
The One Real Difference: How the Plant Decides to Flower
A cannabis plant grows in two stages. First it puts on leaves and stems and gets bigger, which growers call the vegetative stage. Then at some point it switches over to making the buds, which is the flowering stage. The whole autoflower-versus-feminised question comes down to a single thing: what flips that switch.
Feminised photoperiod plants flower in response to light, or more precisely, to darkness. Out in nature they read the lengthening nights of late summer as the sign that autumn is coming, and that is their cue to start flowering before the cold sets in. Indoors, you play the part of the seasons. You keep them under long days, usually eighteen hours of light to six of dark, written as 18/6, for as long as you want them to keep growing. When you are ready for buds, you change the timer to twelve hours of light and twelve of dark, 12/12, and that longer night tells the plant that autumn has arrived. Until you make that change, a photoperiod plant will happily keep growing leaves for months.
Autoflowers ignore all of that. They flower on age alone. Roughly three to four weeks after the seedling pops up, the plant begins flowering on its own, and no light schedule will stop it, start it or speed it along. You can run the lights at 18/6 the whole way through and never touch the timer once. That is the headline convenience of an auto, and it is worth knowing where the trick came from.
That single genetic difference, light-triggered versus age-triggered, is the root of every other difference between the two types. Everything below flows from it.
Where Autoflowers Got Their Trick
The auto-flowering ability is not something breeders dreamed up from scratch. They borrowed it from a wild, scrappy cousin of the cannabis plant called Cannabis ruderalis.
While the indica and sativa plants we prize evolved nearer the equator, where the day length barely changes through the year, ruderalis grew up somewhere far less forgiving: Siberia, northern Russia, the steppes of Central Asia. Summers there are short and harsh. A plant that sat around waiting for the nights to draw in before flowering would freeze solid before it ever set seed. So ruderalis solved the problem another way. It evolved to flower on a built-in clock, a few weeks after sprouting, regardless of the light, so it could race through its entire life before the first frost.
The catch was that wild ruderalis is small, weak and barely worth smoking. The breakthrough, back in the 1970s and 80s, came when breeders realised they could cross that tough little survivor with elite indica and sativa genetics, then select over many generations to keep the automatic flowering while breeding the potency, flavour and yield back in. The early results in the 2000s were honestly mediocre, often only eight to twelve per cent THC. Modern autos are a different animal. Good ones from serious breeders now land comfortably in the low twenties for THC and finish the whole job in around ten weeks.
It is a genuinely clever piece of work when you stop to think about it. Every Gorilla Glue autoflower seed is carrying ancient cold-climate survival genes wrapped around the terpenes of a modern West Coast heavyweight, and it all breeds true. Decades of patient work sit inside something the size of a grain of rice.
What You Get With an Autoflower
Autos are built around speed and simplicity. From seed to harvest you are usually looking at eight to twelve weeks, the plants stay small, often sixty to a hundred centimetres, and you never have to fiddle with the light timer. Outdoors across much of Australia you can plant them through spring, summer and into autumn and pull more than one harvest in a single season, which a photoperiod simply cannot do. Auto Skunk #1 is the direct autoflowering counterpart to the photoperiod example below.
What I want you to understand, though, is that simple is not the same as forgiving, and a lot of advice online blurs those two words together. An auto runs on a fixed clock. If something goes wrong early, you overwater it, you shock it transplanting, you cook it under a light hung too close, the plant does not wait around for you to fix it. It flowers on schedule anyway, at whatever size it happened to reach, and you harvest a disappointment. There is no pause button. For the same reason, heavy training is risky, because the plant has no spare time to recover from the stress you put it under. You essentially get one clean run at it.
You also cannot really clone an auto. A clone carries the age of the plant it was cut from, so an auto clone just flowers almost straight away as a tiny runt. If preserving a plant you have fallen in love with matters to you, that is a job for a photoperiod.
What You Get With a Feminised (Photoperiod) Plant
Feminised photoperiod plants are the traditional choice, and they trade speed for control and size. Because you decide when to flip the lights to 12/12, you decide how big the plant gets. Want something small for a cupboard? Flip it after a couple of weeks of growth. Want a monster? Let it grow for eight weeks first. Yields per plant are far larger too, often a hundred to three hundred grams or more, against an auto’s thirty to eighty.
The quiet advantage, and the one I think matters most for someone still learning, is that photoperiods forgive you. Because the plant only flowers when you tell it to, time is on your side. If a young plant gets stressed or sick, you simply keep it in the growth stage for longer and let it bounce back before you flip. That recovery window is the whole difference between a ruined auto and a photoperiod that shrugs off a rough fortnight. They also clone perfectly and take every training technique in the book, from topping to mainlining to a full SCROG, because you can always hand them more time.
The price you pay is patience and a little responsibility. The whole run takes three to five months, and you have to manage the light switch yourself. Forget to change that timer and the plant just keeps growing leaves and never sets a single bud. For a straightforward example, Skunk #1 Feminised gives you the original balanced genetics with the recovery window and training control of a photoperiod.
Side by Side
What matters
Autoflower
Feminised (photoperiod)
Time to harvest
8 to 12 weeks, start to finish
3 to 5 months (you control the length)
Plant size
Compact, 60 to 100cm
100 to 200cm or more, your choice
Yield per plant
30 to 80g typical
100 to 300g or more possible
Light schedule
Any schedule works, no changes needed
18/6 to grow, then switch to 12/12 to flower
Forgiveness of mistakes
Low. The fixed clock punishes early errors
High. Extend the growth stage to recover
Training
Limited, no time to recover from stress
Excellent, takes topping, mainlining, SCROG
Cloning
Not practical
Easy and reliable
Outdoors in Australia
Several harvests across one season
One harvest, follows the natural seasons
So Which Should You Actually Choose?
Here is where I part ways with the standard advice. You will read everywhere that autoflowers are the beginner’s seed. That is half right, and the half it gets wrong can cost you a whole grow, so let me give it to you straight.
Autos do remove one of the things new growers find hardest, which is the light schedule. There is no flip to get wrong, no timer to forget, no stray light leak quietly ruining your flower. In that narrow sense they are simpler. But because of that fixed clock, an auto is the least forgiving plant in the shop when it comes to actual mistakes. A photoperiod hands you a recovery window for nearly everything an auto punishes you for. So whether “easiest for beginners” is true depends entirely on which kind of mistake you are more likely to make.
Lean toward autos if you want a harvest fast, you are short on space or growing on a balcony, you want the simplest possible lighting, or you want several smaller outdoor harvests across one season. Just go in knowing you need to treat that seedling gently, because there is no second chance.
Lean toward feminised photoperiods if you want the biggest yield, you want to control the size of the plant, you would like room to make a mistake and recover from it, or you want to clone and train. The cost is time and remembering to manage the lights.
My honest take after years of growing both: if you can handle one change of the light timer and you want the most room to learn without wrecking a grow, a forgiving feminised photoperiod makes a fantastic first plant. If you are tight on space or time and you will commit to babying the seedling through its first fortnight, an auto will get you to harvest sooner. Plenty of growers, me included, end up running both, autos for a quick turnaround and photoperiods for the main crop. There is no wrong answer here, only the one that fits your space and your patience.
The only real difference is the flowering trigger. Autos flower on age, feminised photoperiods flower when you shorten their daily light. Everything else follows from that.
Both types are feminised. Every seed we sell grows into a bud-producing female. In our shop, “auto” and “feminised” are just shorthand for autoflowering and photoperiod.
Autos are fast and simple, but not forgiving. Quick, compact and easy on lighting, yet the fixed clock punishes early mistakes and rules out cloning and heavy training.
Feminised photoperiods reward patience. They take longer and need a light change, but they yield far more, forgive your errors and let you clone and train freely.
“Beginner-friendly” is the wrong lens. Pick the type whose tradeoff fits your space, your time and how much room you want to make and fix mistakes.
Frequently Asked Questions
Are autoflowers less potent than feminised photoperiods?
No, modern autoflowers can match photoperiod potency. The early autos of the 2000s were weaker, but today’s genetics from serious breeders regularly test in the low twenties for THC or higher. The main difference is the size of the harvest, not the strength of it. A top-shelf auto delivers the same quality as a photoperiod in a smaller, faster package.
Can you clone an autoflower?
Technically yes, but in practice no. An autoflower clone keeps the age of the plant it was cut from, so it flowers almost immediately with hardly any growth behind it, leaving you with a tiny plant and a negligible yield. Photoperiods clone perfectly because you can hold them in the growth stage for as long as you like. If preserving genetics matters to you, a photoperiod is the only practical option.
Do autoflowers need 24 hours of light?
No. Some growers run them around the clock, but most run 18/6 or 20/4 for the whole grow. Autos will flower under any schedule, but a daily dark period still helps them grow well, and 18/6 is the sweet spot: plenty of light for strong growth without stressing the plant or running up the power bill for no reason.
Which yields more, an autoflower or a feminised plant?
A feminised photoperiod yields far more per plant, typically a hundred to three hundred grams or more against thirty to eighty for an auto. That said, autos finish so much faster that you can run two or three cycles in the time one photoperiod takes, so in a small space autos can produce more total over a year despite the smaller individual harvests.
Can you grow autoflowers outdoors in Australia?
Yes, and they do very well here. Unlike photoperiods, which follow the seasonal light and give you a single harvest a year, autos can go in across spring, summer and into autumn for multiple harvests. In warmer parts of the country you can manage three or four auto runs in a season, and their smaller size and faster finish make them less conspicuous.
What happens if you put an autoflower on a 12/12 light cycle?
It will still flower, because an auto flowers on age no matter what, but the yield suffers because the plant is getting far less total light through its life. You gain nothing by doing it. Keep autos on 18/6 or 20/4 throughout and let them have the light.
Are feminised seeds autoflower or photoperiod?
They can be either. “Feminised” only tells you about sex: the seed grows into a female plant. “Autoflower” and “photoperiod” describe how the plant flowers. You can have feminised autos, feminised photoperiods, regular autos or regular photoperiods. Because every seed we sell is already feminised, we use “feminised” in the shop as shorthand for the photoperiod type and “auto” for the autoflowering type, but rest assured both of ours are feminised.
Can you switch an autoflower to 12/12 mid-grow?
You can, but there is no benefit and it only costs you yield. Autos do not need a light change to flower, they do it on their own, so switching to 12/12 simply hands the plant less light energy and leaves you with a smaller result. Keep an auto on 18/6 or 20/4 from start to finish.
Sacred Seeds Australia sells cannabis seeds strictly as souvenirs and for genetic preservation, in accordance with local laws. In Australia it is illegal to germinate cannabis seeds unless you are in the ACT or hold a specific licence. Always be aware of your local laws.
{
"@context": "https://schema.org",
"@type": "FAQPage",
"mainEntity": [
{
"@type": "Question",
"name": "Are autoflowers less potent than feminised photoperiods?",
"acceptedAnswer": {
"@type": "Answer",
"text": "No, modern autoflowers can match photoperiod potency. The early autos of the 2000s were weaker, but today's genetics from serious breeders regularly test in the low twenties for THC or higher. The main difference is the size of the harvest, not the strength of it. A top-shelf auto delivers the same quality as a photoperiod in a smaller, faster package."
}
},
{
"@type": "Question",
"name": "Can you clone an autoflower?",
"acceptedAnswer": {
"@type": "Answer",
"text": "Technically yes, but in practice no. An autoflower clone keeps the age of the plant it was cut from, so it flowers almost immediately with hardly any growth behind it, leaving you with a tiny plant and a negligible yield. Photoperiods clone perfectly because you can hold them in the growth stage for as long as you like. If preserving genetics matters to you, a photoperiod is the only practical option."
}
},
{
"@type": "Question",
"name": "Do autoflowers need 24 hours of light?",
"acceptedAnswer": {
"@type": "Answer",
"text": "No. Some growers run them around the clock, but most run 18/6 or 20/4 for the whole grow. Autos will flower under any schedule, but a daily dark period still helps them grow well, and 18/6 is the sweet spot: plenty of light for strong growth without stressing the plant or running up the power bill for no reason."
}
},
{
"@type": "Question",
"name": "Which yields more, an autoflower or a feminised plant?",
"acceptedAnswer": {
"@type": "Answer",
"text": "A feminised photoperiod yields far more per plant, typically a hundred to three hundred grams or more against thirty to eighty for an auto. That said, autos finish so much faster that you can run two or three cycles in the time one photoperiod takes, so in a small space autos can produce more total over a year despite the smaller individual harvests."
}
},
{
"@type": "Question",
"name": "Can you grow autoflowers outdoors in Australia?",
"acceptedAnswer": {
"@type": "Answer",
"text": "Yes, and they do very well here. Unlike photoperiods, which follow the seasonal light and give you a single harvest a year, autos can go in across spring, summer and into autumn for multiple harvests. In warmer parts of the country you can manage three or four auto runs in a season, and their smaller size and faster finish make them less conspicuous."
}
},
{
"@type": "Question",
"name": "What happens if you put an autoflower on a 12/12 light cycle?",
"acceptedAnswer": {
"@type": "Answer",
"text": "It will still flower, because an auto flowers on age no matter what, but the yield suffers because the plant is getting far less total light through its life. You gain nothing by doing it. Keep autos on 18/6 or 20/4 throughout and let them have the light."
}
},
{
"@type": "Question",
"name": "Are feminised seeds autoflower or photoperiod?",
"acceptedAnswer": {
"@type": "Answer",
"text": "They can be either. Feminised only tells you about sex: the seed grows into a female plant. Autoflower and photoperiod describe how the plant flowers. You can have feminised autos, feminised photoperiods, regular autos or regular photoperiods. Because every seed we sell is already feminised, we use feminised in the shop as shorthand for the photoperiod type and auto for the autoflowering type, but rest assured both of ours are feminised."
}
},
{
"@type": "Question",
"name": "Can you switch an autoflower to 12/12 mid-grow?",
"acceptedAnswer": {
"@type": "Answer",
"text": "You can, but there is no benefit and it only costs you yield. Autos do not need a light change to flower, they do it on their own, so switching to 12/12 simply hands the plant less light energy and leaves you with a smaller result. Keep an auto on 18/6 or 20/4 from start to finish."
}
}
]
}
🌸 Feminised seeds produce female plants 99.9% of the time
🚫 No males means no wasted space or accidental pollination
🎯 Efficiency – every seed you plant becomes a flowering plant
🧬 Breeding technique uses stress or silver solutions to create female pollen
✅ Industry standard – most collectors choose feminised over regular seeds
Building your collection? Check out our full cannabis seed range, ready to dispatch Australia wide..
Understanding Feminised Cannabis Seeds
Feminised cannabis seeds are bred to produce only female plants—the ones that develop the resinous flowers collectors want. In regular (non-feminised) seeds, you get roughly 50/50 male and female plants, which means half your seeds produce males, and you must identify and remove them.
For most collectors, males serve no purpose. They don’t produce significant flowers, and if left near females, they’ll pollinate them—turning your flowering plants into seed factories instead of resin producers. Feminised seeds eliminate this problem entirely.
The practical benefit is simple: Plant 5 feminised seeds, get 5 female plants. Plant 5 regular seeds, get approximately 2-3 females and 2-3 males you’ll discard. For collectors with limited space or plant counts, feminised seeds make perfect sense.
I’ve tested thousands of feminised seeds from quality breeders, and hermaphrodite rates (plants showing both male and female flowers) are typically under 1% when grown properly. The technology has been refined over 20+ years to the point where feminised seeds are now the industry standard.
How Are Feminised Seeds Made?
Breeders create feminised seeds by inducing a female plant to produce viable pollen, then using that pollen to fertilise another female. Because both parents are XX, the offspring express female genetics in 99%+ of cases.
Common methods:
⚗️ Silver thiosulfate (STS): The professional standard. A precise silver-based spray temporarily suppresses ethylene signalling so the plant forms pollen sacs. STS is consistent, needs fewer applications, and produces stable, reliable feminised pollen when used correctly.
🔬 Colloidal silver: Effective for hobby use but requires daily spraying and is less consistent than STS.
🌿 Rodelization (stress pollen): Leaving a female to over-ripen can trigger a few male flowers. It’s largely outdated because it can pass on intersex tendencies.
At Sacred Seeds we only stock lines from breeders with documented feminisation protocols and stability testing (multi-site test runs, intersex tracking, and batch-level germination). That’s how we keep real-world hermaphrodite rates well under 1% when grown in stable conditions.
We store all lots in climate-controlled conditions (~6–8°C, 30–40% RH) and batch-test them before release; we also retest long-stored lots every six months.
Benefits of Feminised Seeds
✅ No Male Removal
You don’t need to identify and remove males during early flowering. Every plant you grow reaches harvest.
✅ Space Efficiency
Small grow spaces benefit hugely. If you can only grow 4 plants, you want all 4 to be female.
✅ Simplified Growing
Beginners don’t need to learn male/female identification. Plant, grow, harvest—it’s that simple.
✅ Consistent Results
You know exactly how many flowering plants you’ll have. No surprises, no wasted resources.
✅ Better for Autoflowers
Since autoflowers can’t be cloned, feminised autos ensure you get females every time without wasting fast-finishing plants on males.
✅ Preserves Rare Genetics
If you’ve sourced a hard-to-find strain, feminised seeds ensure you get a female to work with.
When Feminised Seeds Aren’t Ideal:
❌ Breeding classic male/female lines: You’ll need regular seeds to select true males
❌ Slight cost premium: Feminised lines are pricier due to the extra work; value evens out because every seed becomes a female
❌ Low-quality sources can herm: The real risk comes from cheap, poorly stabilised lines—stick to proven breeders and avoid grow stress (light leaks, heat swings)
Feminised vs Regular Seeds: Which to Choose?
Choose Feminised Seeds if:
✓ You want guaranteed female plants
✓ You have limited growing space
✓ You’re a beginner
✓ You’re growing autoflowers
✓ You don’t plan to breed your own seeds
✓ You want maximum efficiency
Choose Regular Seeds if:
✓ You want to breed your own strains
✓ You’re hunting for unique phenotypes
✓ You want to create mother plants for cloning (though feminised works fine for this too)
✓ You prefer traditional, unmanipulated genetics
My take: For 95% of collectors, feminised seeds are the smarter choice. They eliminate the male/female guessing game and ensure every seed produces a flowering plant. Regular seeds have their place in breeding projects, but for personal collections, feminised seeds simply make more sense.
Common Myths About Feminised Seeds
❌ Myth: Feminised seeds are less potent
Truth: Potency comes from genetics, not feminisation. Feminised seeds from quality breeders match or exceed regular seed potency.
❌ Myth: Feminised seeds produce hermaphrodites
Truth: Hermaphrodites come from genetics or stress, not feminisation. Quality feminised seeds have <1% hermaphrodite rates.
❌ Myth: You can’t clone feminised plants
Truth: Feminised plants clone perfectly. The feminisation process doesn’t affect cloning ability at all.
❌ Myth: Feminised seeds are “unnatural”
Truth: The technique mimics natural stress responses. Cannabis plants naturally produce some male flowers under stress—breeders just control this process.
❌ Myth: Feminised seeds don’t germinate as well
Truth: Germination rates depend on seed freshness and storage, not feminisation. Our feminised seeds show 95%+ germination rates.
Are Feminised Seeds Right for You?
Feminised seeds are ideal if you:
🎯 Want every seed to produce a flowering plant
🎯 Have limited space (balcony, small tent, strict plant limits)
🎯 Are new to growing and want simplicity
🎯 Don’t plan to breed your own strains
🎯 Want to maximize efficiency and minimize waste
The bottom line: Unless you’re specifically breeding or prefer traditional methods, feminised seeds offer clear advantages with no real downsides. They’ve become the industry standard for good reason—they work.
Feminised seeds produce female plants 99%+ of the time. True males from feminised seeds are extremely rare (under 0.1%). Occasionally, stressed plants may show a few male flowers (hermaphrodites), but this is usually due to environmental stress, not the seeds themselves. Quality feminised seeds from reputable breeders are highly reliable.
Are feminised seeds more expensive than regular seeds?
Yes, feminised seeds typically cost 20-40% more than regular seeds because of the extra breeding work required. However, they’re more cost-effective overall since every seed produces a usable plant. With regular seeds, you’re paying for males you’ll discard, making feminised seeds better value despite higher upfront cost.
Can you breed with feminised seeds?
Yes, you can breed with feminised seeds. Feminised plants can be used as mothers or pollen donors (using colloidal silver). However, breeding two feminised plants will only produce feminised offspring—you won’t get regular seeds. For traditional breeding with males, you need regular seeds.
Do feminised seeds take longer to grow?
No, feminised seeds grow at the same speed as regular seeds. Growth time depends on whether they’re autoflower or photoperiod, not whether they’re feminised. A feminised autoflower finishes in 8-12 weeks; a feminised photoperiod takes 3-5 months—same as their regular seed counterparts.
Will feminised seeds hermaphrodite?
Quality feminised seeds from stable genetics rarely hermaphrodite (<1% rate). Hermaphrodites usually result from stress (light leaks, temperature extremes, physical damage) or poor genetics, not from feminisation itself. Avoid stress and buy from reputable breeders to minimize hermaphrodite risk.
Can you clone feminised plants?
Yes, feminised plants clone perfectly. There’s no difference in cloning ability between feminised and regular plants. You can take cuttings from feminised plants and create identical copies just as easily as with regular seeds. The feminisation process doesn’t affect cloning at all.
Are all autoflower seeds feminised?
No, but most are. Autoflower seeds can be feminised or regular, though feminised autoflowers are far more common because they make more sense—you can’t clone autos, so getting guaranteed females is essential. Always check the seed description to confirm whether autoflowers are feminised or regular.
Do feminised seeds need special growing conditions?
No, feminised seeds grow under the same conditions as regular seeds. They need the same temperature, humidity, light, and nutrients. The only difference is the outcome—feminised seeds produce females. Growing requirements are identical to regular seeds.
You do not need amber trichomes to harvest cannabis, and in most Australian grow spaces you may never see them at all. The idea that amber is the signal to cut is one of the most repeated pieces of advice in growing, and it costs people potency every season. Amber does not mean the plant has finally matured. It means the THC in those resin glands has begun breaking down into something else.
I have talked thousands of Australian collectors through their first harvest, and the same question comes up more than any other: my plant looks done, but there is no amber, so what do I do? The answer is almost always that the plant was ready days ago and the amber was never coming. This guide explains what trichome colour actually tells you, why heat in this country so often prevents amber entirely, and the four-point check I use instead. You can browse the full range of cannabis seeds Australia for strain-specific flowering windows while you read.
Quick Answer: What You Need to Know
You do not need amber trichomes to harvest. Milky, cloudy trichomes indicate peak THC, which is the strongest and clearest expression the plant will give you.
High heat prevents amber development more reliably than genetics does. Many grows running above 28 to 30°C never show amber at all.
Harvest timing should rest on several indicators rather than trichome colour alone. Stopped pistil production, swollen calyxes, and mostly milky trichomes together mean the plant is ready, even where amber is minimal or absent.
Milky trichomes give a clear-headed, uplifting effect. Amber trichomes give something heavier as THC converts to CBN.
🌿 The Amber Trichome Myth
One of the most persistent grow myths is the idea that you must wait for amber trichomes before harvesting. It is simply untrue, and it does real damage. Collectors who believe it harvest too late, degrade the THC they spent months building, chase an amber window that may never arrive, and put themselves through a fortnight of unnecessary second-guessing at the most stressful point of the grow.
Amber trichomes do not indicate a fully mature plant. They indicate THC breakdown. Once you understand that one distinction, most of the second-guessing around harvest timing disappears.
🔬 Understanding Trichome Colours and What They Actually Mean
Cannabis trichomes change colour as cannabinoids develop and then degrade. Under magnification, ideally 40 to 60x, they look like tiny mushroom-shaped glands sitting on the surface of the flower and sugar leaves. A cheap jeweller’s loupe or a clip-on phone macro lens is all you need, and it is the single most useful tool you can own at this stage of the grow.
🔹 Clear or transparent trichomes. THC is still forming and the plant is not ready. Harvested here, the effect comes out racy, thin and underdeveloped, and you have given up yield and potency for nothing.
⚪ Milky or cloudy trichomes. This is peak THC production, with cannabinoids at maximum concentration. The effect is clear, strong and uplifting, and for most collectors this is the ideal harvest window.
🟤 Amber trichomes. THC is oxidising into CBN, which is a more sedating cannabinoid. Amber is not more mature, it is more degraded. The result is a heavier body effect with less of the bright psychoactivity that milky resin delivers. Some growers want exactly that, which is a legitimate choice rather than a mistake, and our guide to the cannabis entourage effect covers how cannabinoids and terpenes shape the experience together.
📘 Milky vs Amber: Quick Harvest Reference
Trichome State
What It Means
Mostly clear
Too early. THC is still forming.
70 to 90% milky
Peak THC. Strongest, most uplifting effect.
Milky with 10 to 20% amber
Balanced effect, slightly heavier.
30% or more amber
Noticeably heavier. THC degrading into CBN.
🌼 When to Harvest Without Amber Trichomes
If the following signs are present, your plant is ready even with zero amber.
Pistil production has stopped. No new white pistils are emerging, and the older ones have darkened and curled inward. This is the first thing I look at, because it is visible without any magnification at all.
Calyxes are swollen. Full, bulbous, tear-drop shapes across the bud indicate physiological maturity. A plant with slim, tight calyxes is still filling out regardless of what the trichomes are doing.
Trichomes are mostly milky. Somewhere between 70 and 90% cloudy is peak potency, and that is the number to aim for.
The plant has reached or passed the breeder’s flowering timeline. If you are past the stated window, trust the physical indicators in front of you over the number on the packet. Those windows are averages taken from ideal conditions, not promises.
When all four line up, harvest. The wider picture of reading the whole plant rather than just the resin is covered in our guide to when to harvest cannabis in Australia, which is the natural companion to this one.
✔ From a Sacred Seeds collector
“My White Widow, Moby Dick, and Jack Herer autos were well past their time. Pistils had stopped and calyxes were swollen, but no amber. Jess confirmed I was actually at risk of going too late, and the milky trichomes were spot on.”
Sativa-dominant strains tend to hold milky far longer than indicas do, and some barely amber at all. Jack Herer and Amnesia Haze both behave this way. It is entirely normal and not a sign that anything has gone wrong. If you are growing longer-flowering sativas outdoors, the regional sativa guide covers which ones actually finish in your part of the country.
🔥 Why Aren’t My Trichomes Turning Amber?
Amber may never appear, particularly in warm climates, which covers most of Australia for most of the season. There are five common reasons.
🌡️ Heat stress, and this is the big one. Above roughly 28 to 30°C, trichomes frequently go from milky straight to browned and degraded without ever passing through a proper amber stage. What you are looking at afterwards is damage rather than ripeness. This is why so many indoor and greenhouse growers in this country never see amber even on fully ripe flowers, and it is worth understanding your regional conditions through the Australian climate strain guide before you plan a season around it.
🧬 Genetics. Sativas and many modern hybrids simply do not produce much amber, no matter how patient you are.
💨 Direct airflow on the buds. A fan pointed straight at flowering colas can dry and damage trichome heads prematurely. Move the air around the canopy rather than through it, which matters most in a tight space. Our guide to growing cannabis in small spaces covers airflow placement in compact tents.
☀️ High light intensity. A light hung too close will bleach the top of the canopy and prematurely oxidise resin glands, which reads as degradation rather than maturity under the loupe.
⏰ You are checking too early. Amber develops slowly when it develops at all, and if the other maturity signs are not yet in place then trichome colour is not the thing to be watching.
Heat is the number one culprit in Australia, and it matters most in the final fortnight when growers are checking daily. After a run of very hot days, do not read early browning as your signal to chop. Judge ripeness across a cooler stretch and on the whole plant instead, which the outdoor growing guide covers alongside the autumn harvest window that shapes every outdoor season in this country.
🌙 Harvest Timing Based on the Effect You Want
Within the ripe window there is genuine room to steer the result, and this is where harvest timing becomes a preference rather than a right answer.
🌅 Earlier harvest, around 70% milky with 30% still clear. The effect is energetic, uplifting and cerebral, which suits daytime use and creative work. The trade-off is that you are cutting slightly before absolute peak.
☀️ Peak harvest, around 90% milky with 10% clear or amber. Balanced, strong and clear. This is maximum THC and where most collectors want to be. If you take one number from this guide, take this one.
🌙 Later harvest, around 70% milky with 30% amber. Heavier and more relaxing, which suits an evening or end-of-day preference. The trade-off is lower THC and higher CBN, so you are exchanging potency for character rather than gaining both. Growers who want that end of the spectrum are usually better served by choosing indica-dominant genetics in the first place than by degrading a sativa on the plant, and our piece on cannabis and the evening wind-down covers that thinking in more depth.
The line worth repeating: milky trichomes are not too early. They are the peak.
💬 Jess: What I Tell Collectors
Stop chasing amber. Use the four-point maturity test instead: pistils have stopped growing, calyxes are swollen, trichomes are mostly milky rather than clear, and the plant is at or near its expected timeline. If all four are true, harvest, regardless of what the amber is or is not doing. This goes double if your grow space is hitting 28°C or more, because in those conditions amber may never appear and waiting for it just costs you potency. The plant will tell you when it is ready. You only have to know which signals to read.
Getting the Timing Right Is Only Half of It
A perfectly timed harvest can still be undone in the fortnight that follows. The cannabinoids and terpenes you protected by cutting at the right moment are the same ones a rushed dry will strip out, so the work does not stop when the plant comes down. Our complete guide to drying cannabis and the guide to curing cover the two stages that decide what your harvest actually tastes like, and the cannabis terpenes guide explains what you are preserving.
Want strains with predictable harvest windows?
Answer six questions and we’ll match you to three strains based on your setup, experience, and goals.
Before you go back to the loupe, here is the whole thing in five lines.
Key Takeaways: Amber Trichomes and Harvest Timing
Amber is degradation, not maturity. It marks THC oxidising into CBN, so waiting for it costs potency rather than adding it.
Milky is the peak. Between 70 and 90% cloudy is where cannabinoid concentration is highest.
Heat is why you may never see amber. Above 28 to 30°C, trichomes often brown and degrade without a true amber stage, which is common across Australian grows.
Use four signals, not one. Pistils stopped, calyxes swollen, trichomes mostly milky, and the plant at or near its timeline.
Choose genetics for the effect you want. Steering effect at harvest works within a narrow band. Picking the right strain from the start does far more, and the strain finder quiz will narrow it to three.
❓ Frequently Asked Questions
What percentage of amber trichomes should I harvest at?
There is no universal number, and anyone quoting one is oversimplifying. Harvest based on the effect you want. For clear-headed, uplifting results aim for 80 to 90% milky. For something heavier, 20 to 30% amber will get you there. Plenty of Australian growers harvest successfully with zero amber at all.
Can I harvest with no amber trichomes at all?
Absolutely. If pistils have stopped, calyxes are swollen and trichomes are milky, your plant is ready. Amber is optional and in many grows it simply never arrives.
Why aren’t my trichomes turning amber?
Heat stress is the most common cause, followed by genetics, direct airflow on the buds, and light hung too close. All four are very common in Australian conditions, and none of them means the plant is unripe.
Do amber trichomes mean higher potency?
No, the opposite. Amber means lower THC and higher CBN, because the THC is breaking down. Peak potency occurs at milky and cloudy, before amber appears.
How long does it take for trichomes to turn amber?
From the milky stage, amber can take anywhere from 5 to 14 days. In hot conditions it may never appear, so treat it as a bonus rather than a milestone you are waiting on.
Should I harvest when pistils stop growing?
It is a key sign and the easiest one to spot without magnification, but confirm it against swollen calyxes and milky trichomes before you cut. One signal on its own is not enough.
What do milky trichomes look like?
Opaque and white, mushroom-shaped, with a visibly cloudy head rather than a glassy transparent one. You will want 40 to 60x magnification to judge it properly, since the difference between clear and milky is genuinely hard to call with the naked eye.
Can heat stress ruin trichomes?
Yes. Sustained heat can dry, collapse or degrade trichomes early. It does not ruin the flower, but it does mean you cannot read colour the way the guides describe, so adjust your harvest timing to lean on the other maturity signals instead.
Does this apply to autoflowers as well?
Yes, with one caveat. Autoflowers run on a fixed clock from germination, so there is less room to extend the finish while you wait for trichomes to catch up. The four-point check works exactly the same way, but the breeder timeline carries more weight than it does with a photoperiod. The week-by-week autoflower guide covers the final weeks in detail.
Seeds are sold strictly as novelty collector’s items. They contain no THC or CBD. This page does not constitute medical or legal advice. By purchasing you agree to our terms and conditions. Always check local laws before germinating or cultivating cannabis.
We offer top-quality heirloom, herb and cannabis seeds for souvenir purchases. We offer genuine domestic Australia shipping and support, and ship our seeds using 100% Earth-friendly and compostable packaging.
Get fresh Australia cannabis seeds delivered to your door in less than a week from payment.