I’ve helped thousands of Australian growers troubleshoot early-flowering photoperiods. The issue is extremely common — and 99% of the time, it has nothing to do with receiving the wrong seed type.
This guide explains every real cause, the science behind why they trigger flowering, and what to do next.
Quick Answer: Why Photoperiods Flower Early
Light leaks during the dark period (most common cause)
Seasonal light changes outdoors trigger early blooming
Understanding Early Flowering in Photoperiod Plants
One of the most frequent messages I get is:
“My photoperiod is flowering way too early — did you send me an auto?”
Short answer: No. Seed mix-ups are extremely rare (we hand-check and double-verify every order).
Long answer: Photoperiods flower from darkness — not from age — and many conditions can accidentally mimic a 12/12 cycle.
The Science: Photoperiod cannabis measures uninterrupted darkness using photoreceptor proteins (phytochromes). When the plant detects 12+ hours of continuous darkness, it triggers hormonal changes that shift from vegetative to flowering growth. If the plant thinks “days are shortening,” it will start flowering even if you’re running 18/6 or growing outdoors in summer.
Let’s break down the seven real causes, ranked by frequency.
The 7 Causes of Early Flowering (Ranked by Frequency)
1. Light Leaks (Most Common Indoor Cause)
Photoperiods measure hours of uninterrupted darkness. Even brief light exposure during the dark period disrupts the phytochrome system, signaling to the plant that days are still long (vegetative season). When this disruption stops or becomes inconsistent, the plant interprets it as autumn arriving.
Common hidden light sources:
LED indicator lights on power strips, fans, humidifiers
Door cracks or poorly sealed tent zippers
Street lights or room lights bleeding into tents
Entering the tent with your phone light
Moonlight-level leaks through vents
The test: If you can see your hand in a dark room after 5 minutes of darkness, there’s too much light.
Fix:
Cover all LEDs with electrical tape
Patch tent pinholes with duct tape
Never open the tent during dark hours
Seal vents or redirect airflow
Use light-proof ducting
Light leaks are the #1 cause of early flowering worldwide, based on years of troubleshooting with Australian growers.
2. Seasonal Light Changes (Most Common Outdoor Cause)
Outdoor plants respond directly to the sun’s photoperiod. In Australia:
Days shorten rapidly from late January onward
Even slight shortening (13.5 hours → 13 hours) triggers flowering in sensitive strains
Plants started too late may flower at only 20–40cm tall
Example: A plant started outdoors in February is guaranteed to flower early, no matter the strain. The plant detects shortening days and immediately shifts to reproduction mode.
Fix:
For full-size outdoor photoperiods → plant Sept–Oct (spring)
For late-season grows → expect earlier flowering + smaller plants
Consider light-dep techniques (covering plants to control photoperiod
3. Transplant Shock & Root Problems
Severe stress signals to the plant: “Conditions are bad — reproduce now before you die.”
This survival response can trigger premature flowering, especially in sexually mature plants (4+ weeks old).
The science: Stress hormones (ethylene, abscisic acid) can interact with flowering pathways, especially when combined with marginal light conditions.
Fix:
Transplant gently, keeping root ball intact
Avoid root damage
Maintain consistent watering schedule & pH (6.0–6.5 for soil)
Don’t transplant late into veg (wait until after stretch if needed)
4. Temperature Extremes
Photoperiod cannabis evolved in temperate climates with distinct seasons. Temperature cues help the plant determine what season it is.
Optimal range: 18–28°C
Triggers:
Night temps <15°C (signals autumn/winter)
Day temps >32°C (stress response)
Large day/night temperature swings (>15°C difference)
When temperatures fall outside this range, the plant may interpret it as seasonal change and begin flowering, especially if combined with other stress factors.
Fix:
Use heaters in cold climates (especially nights)
Provide shade/extraction in hot climates
Avoid extreme temperature swings
Monitor tent temps with min/max thermometer
5. Nutrient Stress
Severe nutrient deficiencies or toxicities can trigger early flowering:
Nitrogen deficiency in veg — plant thinks resources are scarce, shifts to reproduction
Excess phosphorus — high P/K ratios signal bloom phase
Nutrient lockout from incorrect pH — creates multiple deficiencies
Fix:
Maintain pH 6.0–6.5 (soil) or 5.5–6.0 (hydro)
Avoid bloom nutrients until ready to flower
Don’t overfeed phosphorus-heavy products during veg
Use balanced veg nutrients (higher N ratio)
6. Genetics & Strain Sensitivity
Some genetics are extremely light-sensitive and will flower with even minor photoperiod changes.
These strains flower early more often:
Afghani / Pakistani indicas (adapted to short growing seasons)
Early-finishing outdoor lines (bred for short summers)
“Fast versions” (photo × auto hybrids with some auto genetics)
Light-sensitive landrace varieties
Some strains begin flowering with 13–13.5 hours of light, not a strict 12/12. This is genetic variation, not a seed quality issue.
Fix:
For sensitive genetics: run 20/4 or 24/0 in veg (more buffer)
Outdoors: plant earlier (Sept–Oct) to give enough vegetative time
Research strain characteristics before growing
7. Plant Sexual Maturity (4–6 Weeks Old)
Once a plant reaches sexual maturity (typically 4–6 weeks from seed), it can flower if given the right environmental signals:
Slight stress
Slight reduction in light hours
Inconsistent light schedule
Temperature or nutrient stress
Important distinction:
Pre-flowers (normal):
Appear at nodes around week 4–6
Are single small flowers showing sex
Do NOT mean the plant is in bloom
True flowering (not normal in veg):
Budsites forming rapidly at branch tips
Pistil clusters growing
Stretch phase begins
Internode spacing increases
Many growers misread pre-flowers as “early flowering.” Pre-flowers are simply the plant showing its sex — it’s not in bloom yet.
How to Tell If You Actually Have Autoflowers
Autos and photoperiods behave very differently. Here’s how to know for certain:
Photoperiod traits:
Only flower with 12+ hours darkness (or severe stress)
Can stay in veg forever under 18–24 hours light
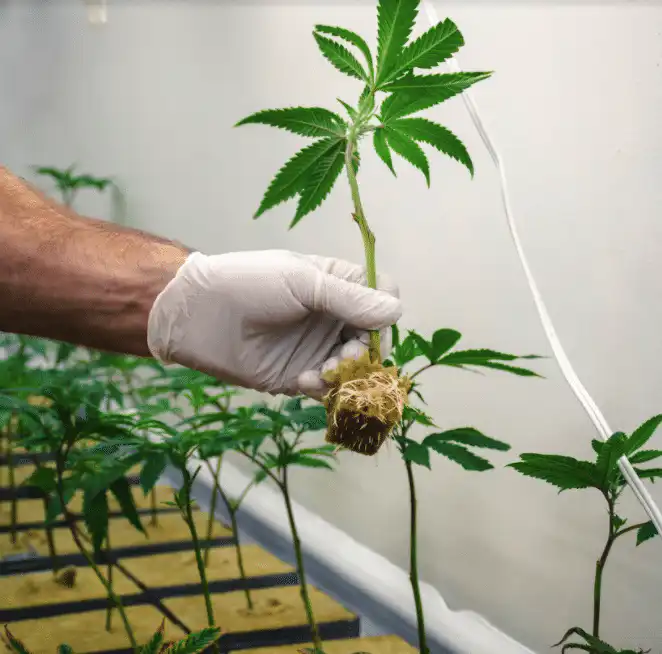
Can be cloned
Typically larger plants (1–2m+)
Respond to light schedule changes
Autoflower traits:
Flower automatically 3–4 weeks after sprouting
Cannot be kept in veg (age-based flowering)
Cannot be cloned successfully
Usually smaller (60–100cm)
Do not respond to light schedule changes
The definitive test: If a plant flowers exactly at 3–4 weeks, regardless of stress or light schedule → likely an auto.
If flowering begins later (6+ weeks) or after environmental triggers → it’s a photoperiod responding to conditions.
Real-World Example from a Sacred Seeds Collector:
“I had three photoperiod plants (Blue Dream, Northern Lights, and White Widow) all start flowering at week 7 under 18/6 light. I was convinced you’d sent me autos by mistake. Jason helped me check my tent — turned out my power strip had a tiny blue LED that was reflecting off my tent’s mylar lining during dark periods. Covered it with tape, and the plants reverted back to veg within 2 weeks. Lesson learned!”
— Marcus T., Melbourne
This is the most common scenario I see: a tiny, overlooked light source causing the issue.
How to Prevent Early Flowering (Checklist)
Indoors:
✓ Zero light leaks (do the hand test in complete darkness)
✓ High-quality digital timers (cheap mechanical timers can drift)
Yes — if the dark period is interrupted by light leaks or if the plant is severely stressed. Photoperiods measure darkness, not light. Inconsistent darkness is the most common trigger.
How do I tell if I got autos instead of photos?
Autos flower automatically at 3–4 weeks regardless of light schedule. Photoperiods only flower due to darkness (12+ hours) or severe stress. If flowering happens at week 6+ after environmental changes, it’s a photoperiod.
Do pre-flowers mean flowering has begun?
No. Pre-flowers simply show sexual maturity (male or female). True flowering means rapid bud formation at branch tips, pistil clusters, and stretch phase.
Can stress trigger early flowering?
Absolutely. Root damage, transplant shock, pH issues, temperature swings, and severe nutrient deficiencies can all trigger early flowering in sexually mature plants.
Will early-flowering photoperiods finish faster?
No. A plant that flowers early just becomes smaller — flowering time stays the same (8–10 weeks for most strains). You get less yield, not faster harvest.
Can I re-veg a photoperiod that flowered early?
Yes. Move it back to 18–20 hours light. It will revert to vegetative growth over 2–4 weeks, but growth slows significantly during this transition. It’s usually better to start fresh.
Do LED indicator lights really cause early flowering?
Yes. Even tiny LEDs (power strips, fans, humidifiers) can disrupt the dark period if they’re visible inside the tent. Cover all LEDs with electrical tape during lights-off.
How much light leak triggers flowering?
Very little. If you can see anything at all during the dark period after your eyes adjust (5 minutes), it’s enough to disrupt flowering hormones. The threshold is surprisingly low.
Cannabis seed viability all comes down to how you store them. Treat your seeds well and they’ll last years. Leave them sitting in heat, light, or moisture and they’ll age faster than you’d expect.
The truth is: Age matters far less than storage conditions.
Fresh seeds from reputable seed banks generally perform best because they’re kept cool, dry, and stable from the moment they’re harvested.
If you’re starting a collection or want to protect the strains you’ve worked hard to source, it pays to understand what keeps a seed alive — and what slowly kills it.
Real-World Seed Longevity: What I’ve Seen First-Hand
After testing batches ranging from fresh harvest to 5+ years old, I can tell you this with confidence:
I’ve seen five-year-old seeds pop at 90%+.
I’ve seen six-month-old seeds fail completely.
The difference isn’t the calendar — it’s how they were stored.
Seeds are living organisms in dormancy. They’re asleep, not dead. While they wait, three things slowly chip away at their viability:
Heat
Light
Moisture
Control these, and your seeds can outlast your expectations. Ignore them, and you shorten their lifespan dramatically.
What Affects How Long Cannabis Seeds Stay Viable?
1. Temperature (The Big One)
Heat ages seeds quickly. As a rough rule of thumb:
Every 5°C rise in storage temperature roughly halves a seed’s life.
At 25°C, seeds might stay viable 1–2 years.
At 5–10°C, seeds can last 5+ years with minimal decline.
This is why all Sacred Seeds inventory is stored in climate-controlled conditions at 5–10°C. It protects not just this month’s stock, but the batches that sit with us a little longer.
In Australia, a “cool cupboard” in summer can still hit 30°C — and at those temps seeds age fast.
If you’re storing long-term, the fridge (not freezer) is your best bet.
2. Moisture (The Silent Killer)
Humidity controls whether seeds stay dormant or begin to “wake up.”
Above 60% humidity: seeds start metabolic activity → they burn energy → mould risk skyrockets
Below 20%: seeds can dry out too far and become brittle
The sweet spot is 20–40% RH.
I use airtight glass containers with silica gel inside. Simple and effective.
3. Light Exposure
UV light breaks down the protective compounds in seed shells and speeds up degradation.
That’s why:
we store seeds in opaque containers
breeders use amber tubes or foil-lined packs
you should never keep seeds in clear bags on a sunny shelf
Keep seeds in complete darkness for best longevity.
4. Genetics & Initial Quality
A seed that’s properly bred, harvested at full maturity, and dried correctly will outlive a rushed or immature seed every time.
Part of why we’re selective with breeder partnerships is because longevity starts before the seed ever reaches your hands.
How Should I Store Cannabis Seeds for Maximum Shelf Life?
These are the exact guidelines I use personally and professionally:
– Airtight Containers
Glass jars with rubber seals, vacuum bags, or quality plastic containers all work.
The goal: no temperature swings, no moisture fluctuations.
– Cool, Dark Location
Long-term (1+ years): refrigerator, ideally the vegetable crisper
Short-term (under 6 months): a consistently cool, dark cupboard is fine
– Avoid Freeze–Thaw Cycles
Freezing can extend life if done perfectly — but any thawing introduces moisture stress.
If you freeze seeds, they stay frozen until use.
– Label Everything
Strain name + storage date.
Seeds all look identical after six months.
– Keep Original Breeder Packaging
It adds another moisture/light barrier.
Store it inside your airtight container for double protection.
– Test Older Batches
If you’re working with seeds 2+ years old, germinate one tester first.
JASON’S QUICK STORAGE CHECKLIST
✅ Temperature: 5-10°C for long-term (refrigerator), 15-20°C for short-term (cool cupboard)
✅ Humidity: 20-40% relative humidity (use silica gel packets)
✅ Light: Complete darkness (opaque containers)
✅ Container: Airtight glass or quality plastic
✅ Location: Refrigerator vegetable drawer or cool, dark cupboard
✅ Labels: Strain name and storage date on every container
Sacred Seeds Storage Guarantee
At Sacred Seeds, every pack we ship comes from climate-controlled storage and double-checked stock cycles. Your seeds arrive fresh — but once they’re in your hands, their shelf life depends on how you store them.
Follow these guidelines and your collection can stay viable for years.
Frequently Asked Questions
Can cannabis seeds go bad?
Yes, cannabis seeds lose viability over time, especially when exposed to heat, light, or moisture. Properly stored seeds can last 5+ years, but seeds stored in poor conditions (hot garage, clear plastic bags, high humidity) can lose viability within 6-12 months. Signs of bad seeds include pale color, soft or cracked shells, and failure to germinate.
How long do cannabis seeds last in the fridge?
Cannabis seeds stored in a refrigerator (5-10°C) in airtight containers with silica gel can last 5-10 years with minimal loss of germination rates. The cool, stable temperature dramatically slows seed aging. Store seeds in the vegetable crisper drawer to avoid temperature fluctuations from frequent door opening.
Should I freeze cannabis seeds for long-term storage?
Freezing can extend seed life beyond 10 years, but only if done correctly. Seeds must be completely dry (below 8% moisture content) and sealed airtight. Never freeze and thaw repeatedly—each cycle damages seeds. For most collectors, refrigerator storage (not freezing) is safer and sufficient for 5-10 year storage.
How do I know if old cannabis seeds are still good?
Viable seeds are firm, dark brown or tan with tiger stripes, and have intact shells. Green, soft, or cracked seeds are likely dead. The only reliable test is germination—try germinating 1-2 seeds from an old batch before committing to a full grow. Seeds stored properly can surprise you with high germination rates even after several years.
Do feminised seeds last as long as regular seeds?
Yes, feminised seeds have the same shelf life as regular seeds when stored properly. The feminisation process doesn’t affect seed longevity—storage conditions (temperature, humidity, light) are what determine how long any cannabis seed lasts, regardless of whether it’s feminised, regular, or autoflower.
Can I store different cannabis strains together?
Yes, you can store multiple strains in the same container or refrigerator as long as each strain is in its own sealed package or small jar. Keep strains separated and clearly labeled to avoid mixing them up. The storage conditions (temperature, humidity, darkness) are the same for all cannabis seeds regardless of strain.
What’s the best container for storing cannabis seeds?
Small glass jars with rubber-sealed lids (like spice jars or mason jars) are ideal. Add one small silica gel packet per jar to control humidity. Alternatively, vacuum-sealed bags or quality plastic containers with tight lids work well. Avoid clear containers—use opaque or amber glass to block light.
How long do cannabis seeds last in their original packaging?
In original breeder packaging stored in cool, dark conditions, cannabis seeds typically last 1-2 years with good germination rates. However, original packaging alone doesn’t provide optimal long-term storage. For best results, store the original packaging inside an airtight container with silica gel in a refrigerator.
If your cannabis seeds are not germinating, the problem is almost certainly environmental rather than the seeds themselves. After testing thousands of seed batches over the years, the pattern is consistent: germination failures come down to temperature, moisture, or water quality — in that order of frequency. Bad genetics cause germination problems far less often than growers assume. The same seeds that failed in one setup will often germinate perfectly when the variables are corrected.
This guide is for growers who’ve already attempted germination and hit a problem. It covers the specific causes of cannabis seeds not germinating, how to diagnose which one you’re dealing with, and exactly what to fix.
Where this guide fits in the germination series
This is the troubleshooting deep-dive — diagnosing why germination has failed and what to do about it. If you’re starting from scratch and want the overview of all three methods, see the complete cannabis seed germination guide. For the full step-by-step on the recommended method, see the paper towel germination guide. If water quality specifically is the suspected issue, the water quality guide covers what’s in Australian tap water and how to fix it. If germination worked but your seedlings are now dying in the first two weeks, see the damping off and stem rot guide.
Germination Troubleshooting — Quick Checklist
Temperature
22–25°C consistently — not ambient room temperature but actual temperature at the seed
Water quality
Filtered, distilled, or rainwater at pH 6.0–6.5 — not tap water
Paper towel moisture
Damp throughout like a wrung-out sponge — not dripping, not dry
Darkness
Seeds need complete darkness — no light exposure during germination
Timing
24–72 hours typical — up to 5 days for some strains, up to 7 days for older seeds
Seed viability
Dark, firm seeds with intact shells — pale, white, or soft seeds rarely germinate
Oxygen
If using a sealed bag, open briefly once or twice daily for air exchange
Temperature — The Most Common Reason Cannabis Seeds Don’t Germinate
Temperature is the variable growers most consistently underestimate — and the one most responsible for germination failures in Australian conditions. The issue isn’t that people don’t know seeds need warmth. It’s that they assume room temperature is adequate when it often isn’t, particularly in winter, in air-conditioned rooms, or in any space where the ambient temperature feels comfortable to a person but is actually below the 22–25°C optimal range for cannabis germination.
Seeds need consistent warmth at the germination site — not the ambient temperature of the room, but the actual temperature at the seed itself. A room that feels warm at 20°C is below the optimal range. A room that’s heated to 22°C during the day but drops to 16°C overnight is outside the optimal range for half the germination period. Fluctuation is as damaging as being consistently low — the enzyme systems that initiate germination slow significantly below 20°C and the risk of fungal infection increases as the seed sits in moist conditions at a temperature that slows its development.
The fix is straightforward: a seedling heat mat under the germination setup, set to 22–25°C with a thermostat if possible. This delivers consistent warmth at the seed regardless of what’s happening in the room around it. A heat mat is the single most cost-effective germination investment a grower can make — it removes the most common failure variable entirely.
🧠 Jason — On Temperature and Germination
I learned something about temperature from watching traditional cannabis farmers in Nepal. They placed seeds in warm spots near cooking fires — not because of any scientific understanding of enzyme kinetics, but because generations of experience had taught them that consistent warmth was what made seeds come to life. The science confirms what they knew intuitively: below a certain temperature threshold, germination slows and eventually stops. In Australia, especially during winter months, I see growers germinating in cold garages or on cool benchtops and wondering why nothing happens. Measure the actual temperature at the seed with a thermometer rather than estimating from how the room feels. Then get a heat mat. It’s not complicated.
Water Quality and Moisture Level — Two Separate Problems
Water causes germination failures in two distinct ways that are worth separating clearly: the quality of the water used, and the moisture level of the germination medium. Both matter and they have different fixes.
Water quality
Australian tap water contains chlorine or chloramines (disinfectants), fluoride, and in older pipe infrastructure, trace heavy metals. These compounds interfere with the enzyme activation and cellular division processes that drive germination. The seed is at maximum sensitivity to water chemistry during the imbibition phase — the initial water uptake that triggers the entire germination sequence — and whatever is in that water is in direct contact with the seed’s internal structures from that first moment.
Use filtered water, collected rainwater, or distilled water at pH 6.0–6.5. If you’ve been using tap water and seeds aren’t germinating, switch to filtered or distilled water, remoisten the paper towel, and give the seeds another 48 hours before drawing conclusions. For a full explanation of what’s in Australian tap water and how it affects germination, the water quality and germination guide covers it in detail.
Moisture level
The paper towel needs to be consistently damp — like a wrung-out sponge — throughout the germination period. Two moisture problems are common and they’re opposite to each other.
Too wet: If the paper towel is dripping or there’s standing water in the bag or between the plates, the seed is sitting in saturated conditions that deprive the embryo of oxygen and create the anaerobic environment that favours the pathogens responsible for seed rot. Seeds that don’t germinate in very wet setups often show softening or darkening of the seed coat — a sign of fungal infection rather than failed germination.
Too dry: If the paper towel has dried out since the last check — particularly overnight — the imbibition process may have stalled mid-way through germination. A seed that has begun absorbing water and then lost that moisture source can fail to complete the process. Check the setup every 12–24 hours and remoisten if the towel has dried. In Australian summer conditions, paper towels can dry faster than expected even in a sealed bag.
Seed Age and Storage — When the Problem Started Before Germination
Some germination failures originate before the grower does anything — in how the seeds were stored before purchase, or in the age of the seeds relative to their viability window. This is worth understanding because the diagnostic is different: if seeds have failed in a correctly managed germination environment, the problem may be the seeds themselves rather than the setup.
Cannabis seeds stored correctly — cool, dry, dark, airtight — retain meaningful viability for two to five years. Seeds stored improperly lose viability significantly faster. Heat and humidity are the most damaging storage conditions: seeds exposed to summer temperatures in an unsealed container, or stored in a humid environment, will decline in viability within months. Light accelerates degradation further.
The visual signs of compromised seed viability overlap with healthy seed appearance more than people expect — a seed can look normal and still have low viability if storage was poor. However, seeds that are pale green or white, very small, or soft when pressed between fingers are unlikely to succeed regardless of how correct the germination setup is. These seeds lack the stored energy to complete the germination process even if they begin it.
At Sacred Seeds, seeds are stored in airtight containers at controlled temperature and humidity from the moment they arrive until they ship. Every batch is tested using the paper towel method at 22°C before dispatch — confirmed viable seed is what gets sent out. If you’ve received seeds from us recently and they’re not germinating in a correctly managed setup, the issue is almost certainly the setup rather than the seeds.
Seeds Cracking But Not Sprouting
A seed that cracks open but doesn’t produce a taproot is a specific failure mode with a specific cause. The seed coat has softened and split — the imbibition process worked — but the embryo hasn’t developed the taproot that indicates active germination.
The most common cause is temperature being too low at the critical moment. The seed has absorbed enough water to crack the coat, but the enzyme systems responsible for the next stage of development — cellular division and taproot elongation — are operating too slowly in cool conditions to make visible progress. The result is a cracked seed that sits without developing further.
The second cause is seed energy depletion — older seeds that have partially lost viability may have enough stored energy to initiate germination but not enough to complete it. The seed cracks, begins the process, and then stalls because the embryo has run out of the energy reserves required to push the taproot through the seed coat.
If you see cracked seeds without taproot development, raise the temperature to 24–25°C and hold it consistently for another 48 hours before concluding the seed isn’t viable. If there’s still no taproot development after that, the seed is unlikely to progress further.
Planting Depth — Why Seedlings Sometimes Don’t Emerge
A germinated seed planted too deep uses its energy reserves reaching the surface rather than establishing a root system and beginning photosynthesis. Cannabis seeds planted at 2–3 cm depth in dense soil may germinate successfully but exhaust their stored energy before the seedling breaks the surface — producing a germinated seed with no visible plant.
The correct depth is 0.5–1 cm. At this depth the seedling has a short journey to the surface and can begin photosynthesis quickly, switching from stored energy to solar energy before the reserves run out. Deeper planting in loose, well-aerated growing medium can sometimes work, but the risk increases significantly with depth in denser media.
If seeds consistently germinate in the paper towel but seedlings don’t emerge after planting, planting depth and medium density are the first variables to check. Pre-moisten the growing medium before planting so it’s evenly damp throughout, and plant at 0.5–1 cm depth consistently.
How to Assess Cannabis Seed Viability Before Germinating
Visual assessment of seeds before germination won’t give you certainty — a healthy-looking seed can have low viability from poor storage, and some strains consistently produce smaller or lighter seeds that germinate well. But there are indicators worth checking before spending time on a germination attempt.
Signs of likely viability: Dark colouration — brown, grey-brown, or striped tan and brown. Firm when pressed between finger and thumb — no give. Intact seed coat with no cracks. Slight waxy sheen on the surface. Size appropriate for the strain — cannabis seeds vary naturally in size across varieties.
Signs of likely low viability: Pale green or white colouration. Soft when pressed — compresses rather than resisting. Cracked or damaged seed coat. Very small and shrivelled appearance. Seeds that were clearly exposed to heat or humidity during storage.
The float test — placing seeds in water to see which sink (viable) and which float (not viable) — is unreliable. Some viable seeds float because of air pockets in the seed coat rather than because of low viability. Don’t use it as a definitive test.
The most reliable viability indicator is purchasing from a source that batch-tests seeds before dispatch. The Sacred Seeds quality guarantee is backed by paper towel testing at 22°C on every batch — confirmed germination rate before seeds leave the facility.
Key Takeaways — Cannabis Seeds Not Germinating
Germination failures are almost always environmental rather than genetic. Temperature is the most common cause — verify the actual temperature at the seed with a thermometer and use a heat mat to maintain 22–25°C consistently. Water quality is the second most common cause — filtered, distilled, or rainwater at pH 6.0–6.5, not tap water. Moisture level needs to be consistently damp like a wrung-out sponge — not dripping, not drying out between checks. Seeds cracking without developing a taproot usually indicates temperature too low at the critical development stage, or seed energy depletion in older seeds. Seedlings not emerging after germination usually indicates planting depth too great — plant at 0.5–1 cm consistently. Seed age and storage conditions affect viability before the grower does anything — dark, firm seeds with intact coats from a batch-tested source are the most reliable starting point. If you’ve corrected all environmental variables and seeds still aren’t germinating after seven days, the seeds themselves may not be viable.
Cannabis Seeds Not Germinating — Frequently Asked Questions
How long should cannabis seeds take to germinate?
Most viable seeds in correct conditions — 22–25°C, consistent moisture, darkness — show a taproot within 24–72 hours. Some varieties, particularly older landrace genetics, can take up to five to seven days. If there’s no sign of germination after ten days in correctly managed conditions, the seed is unlikely to be viable. Don’t give up at 24 hours — 72 hours is the realistic window for most genetics in a correct setup.
What temperature is best for germinating cannabis seeds?
22–25°C consistently at the seed — not ambient room temperature. Use a seedling heat mat under the germination setup to deliver consistent warmth regardless of seasonal room temperature changes. Below 20°C germination slows significantly. Above 28°C the enzyme systems involved in germination become heat-stressed. Temperature fluctuation is as damaging as being consistently outside the optimal range.
Should I soak cannabis seeds before germinating?
Optional, and most useful for seeds with particularly hard or thick coats. A 12–24 hour soak in clean, lukewarm water (22–25°C) in a dark location can help moisture penetrate difficult seed coats. Don’t exceed 24 hours — seeds left in water after the taproot begins to emerge will drown. For most seeds from quality genetics, the paper towel method without pre-soaking is sufficient. The paper towel method guide covers the full step-by-step.
Why are my seeds cracking but not sprouting?
Two main causes. Temperature too low at the critical taproot development stage — the seed coat has softened enough to crack but the enzyme systems driving the next stage of development are operating too slowly. Raise to 24–25°C and hold consistently for 48 hours. Alternatively, seed energy depletion — older seeds may have enough stored energy to initiate germination but not enough to complete it. If there’s no taproot development after 48 hours at correct temperature, the seed is unlikely to progress.
Can I germinate seeds directly in soil?
Yes — direct planting into a container of pre-moistened growing medium works and has the advantage of not requiring transplanting during the seedling’s most fragile stage. Plant at 0.5–1 cm depth, maintain consistent moisture and 22–25°C temperature, and keep dark until the seedling emerges. The limitation is visibility — you can’t confirm germination has occurred until the seedling breaks the surface. The paper towel method’s visual confirmation is useful when troubleshooting germination problems. The complete germination guide compares all three methods.
How do I know if my cannabis seeds are still viable?
Dark colouration (brown, grey-brown, or striped), firm when pressed, intact seed coat, and slight waxy sheen are indicators of likely viability. Pale, green, white, soft, or cracked seeds are unlikely to germinate. The float test (viable seeds sink, non-viable float) is unreliable — some viable seeds float due to air pockets in the seed coat. Purchasing from a source that batch-tests seeds before dispatch is the most reliable viability assurance.
What’s the best water to use for germinating cannabis seeds?
Filtered, collected rainwater, or distilled water at pH 6.0–6.5. Tap water contains chlorine or chloramines, fluoride, and potentially trace heavy metals that interfere with the enzyme activation process during germination. If using a chlorinated supply, leaving tap water uncovered for 24 hours allows chlorine to off-gas — but chloramines (used by Sydney Water) don’t off-gas and require carbon filtration to remove. The water quality germination guide covers this in full.
Do cannabis seeds need light to germinate?
No — cannabis seeds germinate best in complete darkness. Light is only needed once the seedling has emerged from the growing medium and begins photosynthesis. Keep the germination setup in a drawer, cupboard, or covered location throughout the germination period. Exposure to light during germination doesn’t help and in some cases actively inhibits the process.
My seedling emerged but the seed shell is stuck on it — is that a germination problem?
No — this is called helmet head and it’s a post-germination issue. The seed germinated successfully but the seed coat failed to separate cleanly as the seedling emerged. Mist the stuck shell lightly with clean water twice a day and leave it — in most cases it softens and detaches on its own within 24–48 hours. Don’t try to pull it off forcefully; the cotyledons inside are attached to the shell and pulling them tears the seedling.
Seeds are sold strictly as novelty collector’s items. They contain no THC or CBD. This page does not constitute medical or legal advice. By purchasing you agree to our terms and conditions. Always check local laws before germinating or cultivating cannabis.
Learning how to grow weed seeds looks like a large undertaking until you break it into stages, at which point it is just a plant with different needs at different times. This guide walks the full arc: choosing a seed, germination, the seedling weeks, the vegetative growth spurt, the flip to flowering, harvest, and the drying and curing that decides how the final product actually turns out.
Each stage links to a dedicated guide that covers it properly. Think of this page as the map. The detail lives in the guides it points to.
Before you read on
We sell seeds as souvenirs and for genetic preservation. Cultivation is prohibited in most Australian states and territories, with the Australian Capital Territory the main exception for limited personal growing by adults. Treat this guide as educational. The guide to cannabis law in Australia sets out where each jurisdiction currently stands, and it is worth knowing what applies where you live.
With that said, here is what actually happens between a seed and a jar.
The ceiling on the whole grow is set before you start. A seed carries a range of genetic possibilities, and no amount of good technique lifts a plant above what its genetics allow. Everything after this point is about not falling short of that ceiling.
Three decisions matter. Feminised or regular, which determines whether you will be sexing and culling plants partway through. Autoflower or photoperiod, which determines whether you control the timeline or the plant does. And climate fit, which in Australia matters more than most guides admit, since a dense indica bred for arid mountains behaves very differently through a humid subtropical autumn.
A seed needs three things and nothing else: warmth at 22 to 25 °C, steady moisture, and darkness. Every germination method is a different way of delivering those. The paper towel method is the standard because you can see the taproot emerge before the seed goes anywhere near soil, which means you know it has worked rather than hoping.
Most viable seeds show a taproot inside 24 to 72 hours. Use clean water rather than tap, because chlorine and chloramines work against the enzyme systems involved, which the water quality guide explains in full. If nothing happens after a week in correct conditions, the troubleshooting guide works through the causes in diagnostic order.
The complete germination guide covers all three methods, planting depth, the first watering and the first week in detail. It is the right place to be for this stage and the next one.
Stage 3: The Seedling Weeks
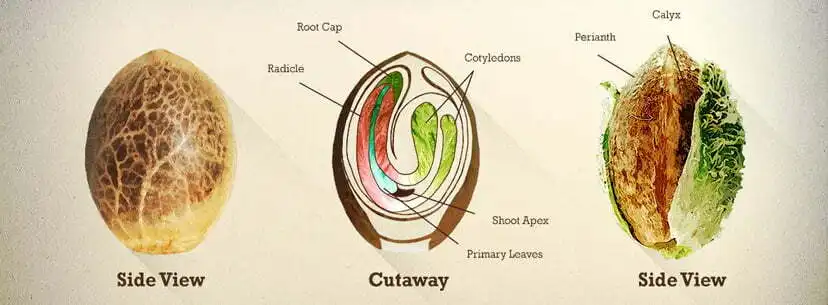
Two to three weeks, and the job is mostly restraint. The plant produces its cotyledons, the two smooth rounded leaves packed inside the seed, then its first true leaves. Growth above the surface looks slow because the plant is building roots, which is exactly what you want.
Hold humidity around 70 percent easing down to 60 as the true leaves come through, keep temperature between 21 and 25 °C, and give it 12 to 16 hours of light that is not too intense. The two things that kill seedlings are overwatering and insufficient light, and overwatering is the more common because it presents as drooping, which reads as thirst.
Plant into a small container rather than a large one, in a light medium rather than a rich one. The seedling medium guide and the container sizing guide cover both. Do not feed yet. If a seedling collapses at the base with a pinched darkened stem, that is damping off, and the damping off guide covers prevention, since treatment after the fact rarely works.
This is where the plant builds the structure that will carry the harvest, and it is the stage growers have the most control over. A plant does not produce more than its frame can support, so whatever size and shape you finish veg with is the ceiling on what flowering can deliver.
Growth accelerates sharply. The plant puts on height, thickens its main stem, and pushes out branches at each node. Give it 18 hours of light a day indoors, which is the practical standard, and feed nitrogen-heavy, because nitrogen drives leaf and stem production. Airflow matters more than people expect, since moving air strengthens stems and keeps humidity from settling in the canopy.
Feeding starts here rather than earlier. The feeding guide covers the trigger to watch for, which is the third node rather than a date. Build strength gradually, because tip burn from an over-eager first feed is one of the most common setbacks at this stage. If leaves start yellowing or spotting, the nutrient deficiency guide and the yellowing leaves guide will help you separate a real problem from normal senescence.
When roots fill the container, move up a size. Doing it late checks growth, and a root-bound plant in veg costs you final size. The transplanting guide covers timing and technique.
Training, and whether you need it
Training is optional and worth understanding rather than following blindly. Left alone, a cannabis plant grows one dominant central cola with smaller branches beneath, because the top of the plant suppresses the growth of everything below it. Training techniques all work by interrupting that.
Topping means cutting the growing tip, which turns one main cola into two and produces a bushier plant. Low stress training means bending and tying branches down rather than cutting, which spreads the canopy so more sites receive direct light. Both aim at the same outcome: an even canopy where light reaches many bud sites rather than one.
Neither is necessary. A plant left to grow naturally produces a perfectly good harvest, and training carries a recovery cost that a photoperiod plant absorbs easily and an autoflower often does not. If you are running an autoflower, the fixed timeline means recovery time comes directly out of production, so most growers either train very lightly or not at all.
Veg length is entirely your call with a photoperiod, which is the whole advantage of the format. Four to eight weeks is typical. Longer means a bigger plant and a bigger harvest, within whatever space you have. In a small space, ending veg earlier is how you keep the plant manageable, and the small space growing guide covers the tradeoffs.
Stage 5: Pre-Flower and Sexing
Before flowering properly begins, the plant shows its sex at the nodes where branches meet the stem. Females produce a small teardrop-shaped calyx with two wispy white hairs, the pistils, emerging from it. Males produce small round pollen sacs, usually described as looking like a tiny bunch of grapes.
This matters if you are running regular seed, because a male that opens and releases pollen will pollinate every female in the space. A pollinated female redirects its energy into producing seed rather than resin, and the harvest is substantially reduced. Males need removing before they open, which means checking daily once pre-flowers appear.
Feminised seed removes this job entirely, which is why most growers use it. The male and female seeds guide covers identification in detail, and the feminised seeds guide covers how they are produced and what that does and does not change.
Stage 6: Flowering
With a photoperiod plant you trigger flowering by switching to 12 hours of light and 12 hours of genuinely uninterrupted darkness. Uninterrupted is the operative word, because light leaks during the dark period can confuse the plant into reverting or producing pollen sacs on a female, and the guide to photoperiod plants flowering early covers what goes wrong and why. Outdoors the season handles the trigger for you as autumn light drops.
Autoflowers ignore all of this and flower on age regardless of the light schedule, typically starting two to four weeks from germination.
The stretch comes first. In the two to three weeks after the flip a photoperiod plant can double in height, sometimes more with sativa-leaning genetics. Plan for it, because a plant that fits your space at the flip may not fit it a fortnight later.
Bud formation follows. White pistils multiply at the nodes, then bud sites swell and merge into colas. Resin production ramps up, which is when trichomes become visible as a frosted coating and the aroma becomes noticeable.
Ripening is the final phase. Pistils darken from white through orange and brown, buds put on their last density, and trichomes shift from clear to cloudy to amber.
Feeding changes with the stage. Nitrogen demand drops and phosphorus and potassium demand rises, because the plant is producing flower rather than leaf. Humidity should come down, ideally to 40 or 50 percent by late flower, because dense buds and moist air is how bud rot begins. That risk is climate-dependent in Australia and it is the main reason a dense indica is harder work in Queensland than in Tasmania. The outdoor growing guide covers regional timing, and the pest control guide covers what to do when something else finds your plant first.
Flowering runs eight to twelve weeks for most photoperiod genetics, with sativa-dominant plants at the longer end.
Stage 7: Harvest
Harvest timing does more to determine the character of the final product than almost anything else in the grow, and it is the decision most growers rush.
Pistil colour is the rough guide and trichomes are the real one. Under magnification, trichomes progress from clear through cloudy to amber. Clear means immature. Cloudy is peak potency. Amber indicates the beginning of degradation, which produces a heavier, more sedating character. Most growers harvest somewhere between mostly cloudy and around thirty percent amber, and where exactly you land inside that window is a preference rather than a right answer.
The harvest timing guide covers the full set of signals, and the amber trichomes guide covers reading them properly, which needs a jeweller’s loupe or a cheap digital microscope rather than the naked eye.
A flush of plain water in the final week or two is common practice, on the reasoning that it lets the plant use up stored nutrients and improves the smoothness of the finished product. Opinions differ on how much difference it makes, and it is a low-cost step either way.
Stage 8: Drying and Curing
This is the stage that separates a good grow from a disappointing one, and it is where the most work gets undone. Months of careful growing can be spoiled in a week of bad drying, and there is no recovering it afterwards.
Drying takes seven to fourteen days, hung in a dark space at around 18 to 20 °C with humidity near 50 percent and gentle air movement that is not blowing directly on the plant material. Slow is the whole point. Rushed drying traps chlorophyll and produces the harsh, grassy character people describe as tasting like hay. The stems should snap rather than bend when it is done. The drying guide covers the setup and the common mistakes.
Curing follows in sealed glass jars, opened daily at first to release moisture and exchange air, then progressively less often. Two weeks makes a noticeable difference. Four to eight weeks is where most of the improvement in aroma and smoothness happens. The curing guide covers the process and the timeline.
Patience here pays more than patience anywhere else in the grow.
How Long the Whole Thing Takes
The honest answer is that it depends on format and genetics, and the range is wide.
Typical timelines
Germination
1 to 5 days
Seedling
2 to 3 weeks
Vegetative (photoperiod)
4 to 8 weeks, your choice
Flowering (photoperiod)
8 to 12 weeks
Drying and curing
3 to 10 weeks
Photoperiod, seed to jar
roughly 5 to 8 months
Autoflower, seed to jar
roughly 3 to 5 months
Autoflowers compress the front half of that by removing the vegetative stage you control, which is their appeal and also their constraint. The clock runs whether the plant is thriving or struggling, so a setback in week two comes straight out of the final result with no opportunity to make it up. That is why we do not describe autoflowers as beginner-friendly regardless of what the packaging says, and the autoflower versus photoperiod comparison works through the decision. If you are running one, the week by week autoflower guide maps the whole fixed timeline.
Key takeaways
A cannabis plant moves through clear stages with different needs at each: germination, seedling, vegetative, flowering, then harvest and cure. Treating them as one continuous task is what makes it feel complicated.
Genetics set the ceiling before you start. Vegetative growth sets the frame, and a plant will not produce more than its structure can carry.
Light is the master signal for a photoperiod plant. Eighteen hours keeps it growing, twelve hours of uninterrupted darkness starts it flowering. Autoflowers ignore this entirely and run on age.
Drying and curing decide how the harvest actually turns out, and rushing them undoes months of work with no way back.
How to Grow Weed Seeds: Frequently Asked Questions
How long does it take from seed to harvest?
Roughly five to eight months for a photoperiod plant including drying and curing, and three to five months for an autoflower. The variable you control is vegetative length on a photoperiod, which is four to eight weeks typically and sets the eventual size of the plant.
What are the first signs of a problem?
Leaves. Yellowing, spotting, curling or drooping usually point to watering, feeding or pests, in roughly that order of likelihood. The yellowing leaves guide and the nutrient deficiency guide cover how to tell them apart, since the symptoms overlap more than most charts suggest.
Can I grow on a windowsill?
It is difficult. A windowsill rarely delivers the light intensity needed, particularly through flowering, and the usual result is a tall, weak plant with sparse airy buds. If space is the constraint rather than light, the small space guide covers what does work in a confined area.
How big will the plant get?
It depends on genetics, container size and how long you run vegetative growth. Indica-leaning plants tend to stay short and bushy, sativa-leaning plants can get very tall, and a photoperiod plant will roughly double in height in the weeks after the flip. Plan your space around the post-stretch size rather than the size at the flip.
Do I need to prune or train?
No. A plant left alone produces a perfectly good harvest. Training spreads the canopy so light reaches more bud sites, which usually improves yield, but it costs recovery time. On an autoflower that recovery time comes directly out of the fixed timeline, so light training or none at all is the safer approach there.
My seedling fell over and looks weak.
Usually damping off, a fungal condition that takes hold in medium that has stayed too wet, and it presents as a pinched darkened stem at the base. It can also be a stretched seedling whose stem cannot support it, which points to insufficient light. The damping off guide covers prevention, which is the only reliable approach.
What water should I use?
Not untreated tap water. Filtered, collected rainwater or distilled is better, ideally at pH 6.0 to 6.5. Australian tap supply carries chlorine or chloramines and fluoride, and chloramines in particular do not off-gas by standing the water overnight. The water quality guide covers the detail.
How do I know when to water?
Check rather than follow a schedule. Push a finger a couple of centimetres into the medium, and water if it is dry at that depth. Lifting the container is even more reliable once you have felt the weight difference twice. Overwatering causes more losses than underwatering, particularly early.
When do I switch to 12 hours of light?
When the plant has reached roughly half the final size you want, since it will roughly double during the stretch. That is usually four to eight weeks into vegetative growth. The darkness has to be genuinely uninterrupted, because light leaks during the dark period can cause a plant to revert or to produce pollen sacs.
How do I know when to harvest?
Trichomes, viewed under magnification. Clear means immature, cloudy is peak, and amber signals the start of degradation and a heavier character. Most growers harvest between mostly cloudy and around thirty percent amber. Pistil colour is a rough secondary signal. The harvest timing guide covers the full picture.
Can I skip curing?
You can, and it is the most commonly regretted shortcut. Curing is where harshness drops away and aroma develops, and two weeks already makes a clear difference while four to eight weeks delivers most of the improvement. Nothing later in the process recovers what a rushed dry and cure costs you.
What is the difference between growing autoflowers and photoperiods?
Control. A photoperiod plant stays in vegetative growth until you switch the light schedule, so you decide the size and you have a recovery window if something goes wrong. An autoflower runs on a fixed internal clock, finishes faster, and gives you no opportunity to make up lost ground.
Sacred Seeds Australia sells cannabis seeds strictly as souvenirs and for genetic preservation. The Australian Capital Territory permits limited personal cultivation for adults. All other states and territories prohibit it. Nothing here is medical or legal advice. Always check the laws that apply where you live before germinating or cultivating.
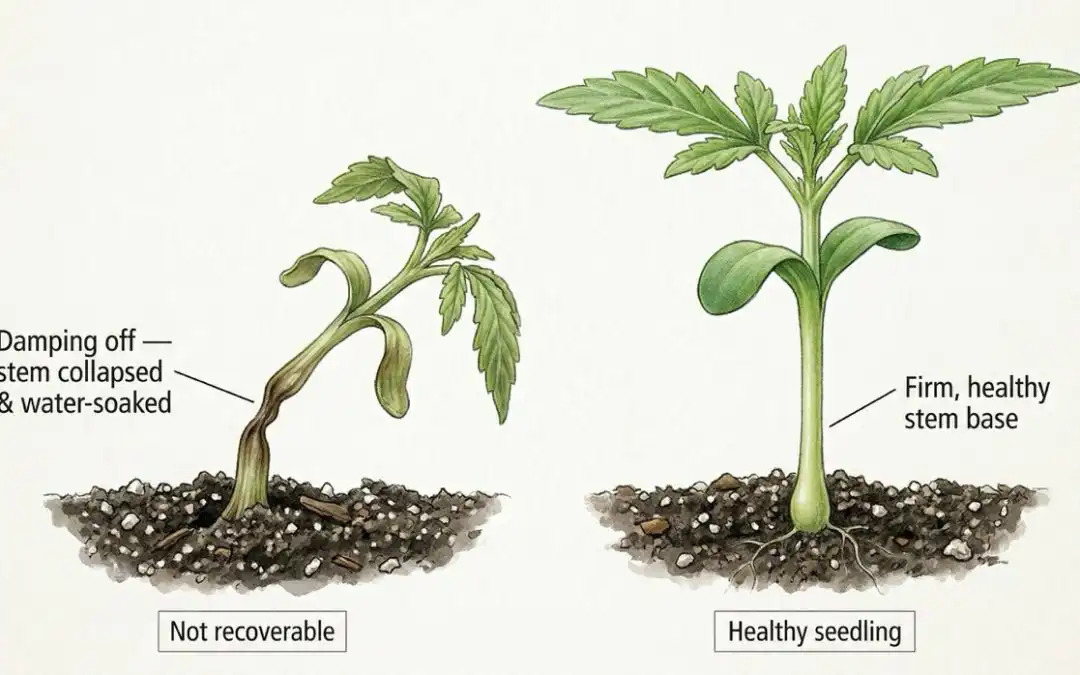
Damping off kills more cannabis seedlings than bad genetics ever will — and almost every case is preventable. I’ve had growers contact us convinced they received dead seeds, only to describe a germination setup that was almost perfectly designed to cause damping off: wet medium, no airflow, tap water, cold temperatures, seeds planted too deep. The seeds were fine. The environment killed them.
Stem rot and cannabis damping off are fungal and water mould diseases that attack seedlings at their most vulnerable — the two-week window between germination and the point where the plant has developed enough root mass and stem thickness to resist infection. Getting through that window successfully comes down to environmental management, not genetics. This guide covers what causes it, how to identify it before it’s too late, and the prevention strategies that work reliably in Australian growing conditions.
Cannabis Damping Off — At a Glance
Primary cause
Overwatering — wet medium is the single most common trigger
Pathogens responsible
Pythium spp., Rhizoctonia spp., Fusarium spp.
First visible symptom
Stem pinching and discolouration at soil level
Ideal temperature
21–27°C — consistent, not fluctuating
Ideal humidity
70–80% early seedling; reduce to 60–65% once cotyledons open
Critical window
Germination through to day 14 — highest vulnerability period
Water at soil level
In a ring around the seedling — never directly at the stem
Damping off and stem rot are related but distinct conditions. Understanding the difference matters because they have overlapping causes and identical prevention strategies — but slightly different presentations.
Damping off is caused by a group of soil-borne pathogens — primarily water moulds and fungi in the Pythium, Rhizoctonia, and Fusarium genera. These pathogens are present in most growing environments at low levels and cause no problems when conditions are right. The problems begin when the environment tips in their favour: saturated medium, poor airflow, inadequate drainage, or cold temperatures that slow the seedling’s development while the pathogen continues to reproduce. Once conditions favour the pathogen, it colonises the seedling’s stem at the soil line — the thinnest, most vulnerable point — and the plant collapses.
Stem rot is essentially the same process by a different name, sometimes used specifically when the fungal infection is visibly localised to the stem tissue rather than the root system. In practice, the two conditions look similar, have the same environmental causes, and respond to the same prevention and treatment approaches. The distinction matters less than the management.
What both conditions share is timing: they overwhelmingly affect seedlings in the first two weeks from germination, before the stem has lignified enough to resist infection and before the root system is extensive enough to handle moisture variation. After day 14 the risk drops significantly. Before day 14 — particularly in the first week — the seedling is genuinely fragile in a way that experienced growers sometimes forget.
🧠 Jason — On Blaming Genetics
The call I dread is the one where someone tells me their seedlings all died in the first week and they think we sent them bad seeds. In three years of running Sacred Seeds, I’ve had exactly two batches with genuine germination problems that were attributable to the seeds themselves. Every other case of early seedling death that’s come back to us has been environmental — and damping off from overwatering is far and away the most common. When all your seedlings die at the same stage, at the same point in the stem, that’s not genetics. That’s the environment. The seeds did their job. Something in the setup killed what came out of them.
How to Identify Cannabis Damping Off — Symptoms by Stage
Damping off moves quickly — a seedling that looks stressed in the morning can be collapsed by evening. Catching it at the earliest stage gives you the best chance of intervening before the entire batch is affected.
Pre-emergence damping off is the invisible version — seeds germinate, the radicle begins to develop, and then the pathogen attacks the stem before it breaks the surface. The seed never emerges. This is often misread as a germination failure and attributed to seed quality. If seeds have germinated in the paper towel test but fail to emerge after transplanting into medium, damping off at or below the surface is a likely explanation.
Early post-emergence is where the symptoms become visible. The stem develops a pinched, water-soaked appearance at soil level — a narrowing of the stem that makes the seedling look like it’s being strangled at the base. The cotyledons (the first seed leaves) may appear healthy while the stem below is already compromised. This is the window where intervention has any chance of working.
Collapse follows quickly from the pinching stage. The stem can no longer support the seedling’s weight and the plant tips over — the characteristic “floppy seedling” presentation. At this stage the infection is almost certainly fatal. The stem is soft, discoloured brown to grey, and the root tissue if examined will show stunted, grey-brown, or absent development.
Secondary signs in high-humidity conditions include fluffy white cobweb-like mycelial growth on or around infected tissue — the visible presence of the fungal pathogen. This is most common with Pythium in very wet, humid setups and is a reliable confirmation of damping off rather than mechanical damage or other causes.
Damping Off Symptom Checklist
Early warning signs — act now: Stem narrowing at soil level. Water-soaked appearance at the base. Cotyledons wilting despite moist medium. Seedling leaning without mechanical cause.
Advanced symptoms — likely fatal: Seedling collapsed or unable to support itself. Stem soft and discoloured brown to grey at soil line. Roots stunted, grey-brown, or absent when checked. White mycelial growth visible on or around stem base.
Pre-emergence — invisible but suspected when: Seeds germinated in paper towel test but failed to emerge from medium. Multiple seeds from the same batch fail to emerge at the same stage. Medium was wet at planting and remained wet during the emergence window.
What Causes Cannabis Damping Off in Australia
The pathogens responsible for cannabis damping off are opportunistic — they’re present in most growing environments and only cause problems when conditions favour them over the seedling. Understanding what shifts conditions in the pathogen’s favour is the key to prevention.
Overwatering is the primary cause — by a significant margin. Saturated medium deprives the root zone of oxygen, stresses the seedling’s development, and creates the anaerobic, high-moisture conditions that Pythium and other water moulds require to proliferate. A seedling in correctly moist medium — moist enough to sustain development, dry enough that the surface is slightly dry between waterings — is dramatically less vulnerable than one sitting in saturated growing media. This is the single most important variable to manage and the most commonly mismanaged one.
Poor drainage compounds overwatering — medium that doesn’t allow water to drain freely keeps the root zone wet long after watering. Containers without adequate drainage holes, medium compacted to the point of poor drainage, or growing mixes without sufficient aeration (perlite, coco coir) all extend the wet period after watering. In an Australian summer setup where the ambient humidity is already elevated, poor drainage in the container means the medium may never fully dry between waterings.
Inadequate airflow allows humidity to build around the seedling’s stem — the exact microclimate that favours pathogen growth. A humidity dome without ventilation can maintain conditions ideal for damping off even if the medium moisture level is correct. Gentle airflow — even just cracking the humidity dome — makes a measurable difference.
Cold medium temperature slows the seedling’s development while the pathogen continues to reproduce at its normal rate, widening the window of vulnerability. Medium temperatures below 18°C significantly increase damping off risk. In Australian autumn and winter grows, or in setups without bottom heat, medium temperature is often lower than ambient air temperature — a seedling heat mat under the tray addresses this directly.
Contaminated growing media or equipment introduce the pathogens directly. Reused pots and trays that weren’t sterilised between grows, garden soil used as a seedling medium, or growing mixes that were stored open and exposed to moisture all carry elevated pathogen loads. Fresh, high-quality seedling mix in sterilised containers starts the seedling with the lowest possible pathogen pressure.
Planting depth affects how much stem tissue is exposed to the saturated zone around the medium surface. Seeds planted deeper than 1 cm from the surface force the emerging seedling to push through more wet medium with more stem tissue at risk. Germinated seeds placed at 0.5–1 cm depth with the radicle pointing down minimises this exposure.
How Damping Off Pathogens Spread
Understanding the transmission routes explains why good sanitation is as important as correct watering technique — and why a single infected plant in a tray can rapidly become a lost batch.
Pythium, Rhizoctonia, and Fusarium persist in soil and plant debris and can be introduced into a clean seedling setup through previously used pots and trays that weren’t sterilised, airborne spores (particularly Fusarium, which spreads through air movement), fungus gnats whose larvae carry and spread pathogens through the medium as they move, contaminated hands and tools that have contacted infected soil, and irrigation water that has splashed from infected medium to healthy plants.
Once introduced, these pathogens move through shared irrigation water and by growing directly through the growing medium — which is why a single collapsed seedling in a tray represents a real risk to neighbouring plants. Remove affected seedlings immediately and isolate healthy ones if possible once damping off is confirmed in a multi-seedling setup.
Fungus gnats deserve specific mention in the Australian context. The warm, humid conditions of Australian summers create ideal conditions for fungus gnat populations, and their larvae are a meaningful vector for damping off pathogens in continuously wet medium. Sticky yellow traps above the growing area and allowing the medium surface to dry between waterings both address fungus gnat risk alongside the damping off prevention they’re already doing.
Prevention — The Only Reliable Strategy Against Cannabis Damping Off
By the time damping off is visible, the seedling is almost always past saving. Prevention is not a secondary consideration — it’s the only reliable approach. These are the strategies that consistently make the difference.
Growing medium selection and preparation
Use a purpose-made seedling mix or create one from organic potting soil, sterilised coco coir, and 10–20% perlite for drainage and aeration. Avoid garden soil entirely — it carries pathogen loads that make damping off almost inevitable in seedlings. Pre-moisten the medium before use so it’s evenly damp but not wet — it should clump slightly when squeezed but not drip. Starting with correctly moistened medium means the first watering can be delayed until the seedling genuinely needs it, rather than the medium requiring water immediately after planting.
Equipment sterilisation
Soak all reused pots, trays, and tools in a 10% bleach solution (one part bleach to nine parts water) for 30 minutes, rinse thoroughly, and allow to fully dry before use. For growing medium that needs sterilisation — coco coir, or potting mix being reused — a 1:9 hydrogen peroxide and water solution soaked through and fully drained is effective. Heat sterilisation (spreading medium on a baking tray at 82°C for 30 minutes) works for soil-based mixes. The point is not sterility for its own sake — it’s reducing the pathogen load the seedling starts with.
Watering technique
Water in a ring around the seedling, not directly at the stem. The root system grows outward from the seed and the watering ring encourages roots to grow toward the moisture. Direct stem watering saturates the most vulnerable tissue. Use clean water at room temperature — cold water (below 18°C) slows root development and increases infection risk. For the best water for cannabis germination, filtered or collected rainwater at pH 6.0–6.5 is significantly better than unfiltered tap water. Allow the surface of the medium to dry slightly between waterings — not bone dry, but not continuously wet.
Temperature and airflow
Maintain medium temperature at 21–27°C consistently. A seedling heat mat with a thermostat under the tray is the most reliable way to achieve this regardless of ambient temperature. Keep ambient humidity at 70–80% during the first few days after emergence, then reduce to 60–65% as the cotyledons open and the seedling begins to develop. A humidity dome is useful early — but it needs ventilation. A slightly cracked dome, or one with ventilation holes, maintains humidity while allowing enough airflow to prevent the stagnant, humid microclimate that favours damping off pathogens.
Planting depth
Germinated seeds should be planted no deeper than 1 cm from the surface, with the radicle pointing downward. Deeper planting increases the length of stem tissue exposed to the wet zone around the medium surface and forces the seedling to develop through more medium before reaching light — prolonging the period of maximum vulnerability without benefit.
Lighting
Adequate light from emergence is important not just for photosynthesis but because light-deprived seedlings develop elongated, weak stems — less structural resistance to the pinching effect of damping off infection. Twelve to sixteen hours of proper grow light or strong fluorescent at the correct distance. Seedlings reaching toward a distant or weak light source are more vulnerable than those developing compact, robust stems under correct lighting.
🧠 Jason — The Watering Mistake That Kills Most Seedlings
Most damping off cases I see come down to one thing: the medium was never allowed to dry between waterings. People start with pre-moistened mix, plant the seed, then water again the next day because they’re anxious about the seedling drying out. And then again the day after. The medium never gets a chance to develop the moisture differential that drives root growth outward, and the stem sits in wet medium continuously through the most vulnerable period of its life. In a correctly set up germination environment — humidity dome with ventilation, heat mat, 22–24°C — the medium you moistened before planting will sustain the seedling for three to five days without additional watering. Wait for the surface to lighten in colour slightly before you add more water. That surface drying is the seedling telling you it’s ready.
Treatment Options When You Catch It Early
To be direct about this: if a seedling has visibly collapsed — stem soft, plant tipped over — it’s gone. There is no reliable recovery from advanced damping off. The treatment options below address very early-stage infection, where the stem is showing stress signs but the plant hasn’t yet collapsed. They are management tools, not cures.
Improve airflow immediately. Remove or fully open the humidity dome. Add a gentle fan if you don’t already have one. Reducing the humidity at the stem surface is the most impactful immediate step — it slows the pathogen’s spread even if it doesn’t reverse existing infection.
Allow the medium to dry. Stop watering and let the medium surface dry to the point where the top centimetre is dry to the touch. This removes the moisture the pathogen requires to continue spreading. Do not let the medium dry completely — the seedling still needs moisture — but a drying cycle after early symptom detection is the right response.
Neem oil solution applied as a drench around (not at) the stem base has antifungal and antibacterial properties. Mix to manufacturer’s recommended dilution. Effective against Pythium and Fusarium at early stages. Apply once and monitor — repeated applications at seedling stage can cause phytotoxicity.
Cinnamon powder applied lightly around the stem base has natural antifungal properties from its cinnamaldehyde content. A light dusting on the medium surface around the stem — not on the stem itself — creates a hostile environment for the pathogen without stressing the seedling.
Chamomile tea spray (cooled, diluted 1:1 with clean water) contains antifungal compounds and is gentle enough for seedling-stage application. Less reliable than neem but non-toxic and worth trying if neem isn’t available.
If early intervention doesn’t halt visible progression within 24 hours, remove the affected seedling and isolate remaining healthy seedlings. The priority becomes protecting the rest of the batch, not saving a seedling that’s already past the point where recovery is realistic.
What Healthy Cannabis Seedlings Look Like
Knowing what to look for in a healthy seedling is as useful as knowing the damping off symptoms — it calibrates the baseline you’re aiming for and helps distinguish normal development from early stress signals.
A healthy cannabis seedling at day three to five has a robust, straight stem that holds the cotyledons (the first round seed leaves) level and steady without leaning or drooping. The stem is green or very slightly purple at the base — not discoloured, not pinched, not soft. The cotyledons are symmetrical, vibrant green, and horizontal — catching light effectively.
By day seven to ten the first true leaves — the serrated cannabis leaves — are developing from the growing tip. The stem is visibly thickening. The seedling is actively growing rather than just holding position. Root tips may be visible at drainage holes in smaller containers, indicating the root system is developing normally.
By day fourteen the plant is transitioning out of the highest-risk window. The stem has begun to lignify — developing the structural rigidity that makes it naturally more resistant to damping off infection. From this point, standard cannabis seedling care protocols apply and the acute damping off risk is significantly reduced.
Not sure which strain suits your setup?
Answer six questions and Jess will match you to three strains based on your experience, space, and goals.
Cannabis damping off and stem rot are caused by Pythium, Rhizoctonia, and Fusarium pathogens that attack seedlings in the first two weeks from germination — the window before the stem has lignified enough to resist infection. Overwatering is the primary cause in almost every case: saturated medium creates the anaerobic, high-moisture conditions these pathogens require. Prevention is the only reliable strategy — by the time a seedling has visibly collapsed it cannot be saved. The prevention framework is straightforward: correctly moistened medium (not wet), clean water at pH 6.0–6.5, containers with adequate drainage, airflow through the growing area, medium temperature at 21–27°C, and planting depth no greater than 1 cm. Sterilise all equipment between grows. Allow the medium surface to dry slightly between waterings — this is the single most impactful habit change most growers can make. For the full germination setup see the paper towel germination guide, and for what comes after successful germination see the cannabis seedling care guide.
Cannabis Damping Off — Frequently Asked Questions
What is cannabis damping off?
Damping off is a disease of cannabis seedlings caused by soil-borne fungal and water mould pathogens — primarily Pythium, Rhizoctonia, and Fusarium species. It attacks seedlings at soil level, pinching and rotting the stem tissue during the first two weeks from germination when the plant is most vulnerable. It’s almost always an environmental problem rather than a genetics problem — the same seeds in a correctly managed setup will germinate and thrive.
What causes damping off in cannabis seedlings?
Overwatering is the primary cause in the vast majority of cases — saturated medium creates the conditions Pythium and other water moulds require to proliferate. Poor drainage, inadequate airflow, cold medium temperatures, contaminated growing equipment, and planting seeds too deep all contribute. In Australian growing conditions, high ambient humidity in summer setups with poor ventilation is a significant compounding factor.
How do I know if my seedling has damping off?
The first visible sign is stem pinching and a water-soaked discolouration at soil level — a narrowing of the stem that makes the plant look strangled at the base. This progresses to the seedling leaning and eventually collapsing, unable to support its own weight. In humid conditions, white fluffy mycelial growth may be visible around the base. Pre-emergence damping off is invisible — seeds that germinated successfully but never broke the surface are the indication.
Can damping off be treated?
Very early stage infection can sometimes be slowed with improved airflow, reduced watering, and fungicide applications like diluted neem oil or cinnamon powder around the stem base. A collapsed seedling cannot be saved. Prevention is the only reliable strategy — the treatment options are damage limitation rather than cure.
How do I prevent damping off in my cannabis seedlings?
Use fresh, high-quality seedling mix in sterilised containers with adequate drainage holes. Pre-moisten the medium before planting and resist watering again until the surface lightens in colour. Water in a ring around the seedling rather than at the stem. Maintain medium temperature at 21–27°C with a heat mat. Provide airflow through the growing area — a slightly cracked humidity dome rather than fully sealed. Use clean filtered water at pH 6.0–6.5 rather than tap water.
How long are cannabis seedlings vulnerable to damping off?
The highest-risk window is germination through to approximately day 14. During this period the stem is thin, unlignified, and most susceptible to fungal infection at soil level. After day 14 the stem begins to develop structural rigidity and the risk drops significantly. By the time the plant has four to six true leaves it’s essentially past the damping off risk window entirely.
Does bad genetics cause damping off?
No. Damping off is an environmental disease caused by specific pathogens in specific conditions. Genetics plays no role. If your seedlings are dying from damping off it means the growing environment favoured the pathogens over the seedling — not that the seeds were poor quality. The same seeds in a correctly managed setup will germinate successfully.
What is the difference between damping off and stem rot?
In practice, the terms describe the same process — fungal infection of the seedling stem at soil level leading to collapse. Damping off is sometimes used specifically for pre-emergence failure or very early post-emergence collapse, while stem rot describes the visible rotting of stem tissue in slightly more developed seedlings. The causes, prevention strategies, and treatment approaches are identical for both.
Related Reading
Cannabis seedling care in Australia — the complete guide to the seedling stage from emergence through to early veg, including watering, lighting, and feeding.
Seeds are sold strictly as novelty collector’s items. They contain no THC or CBD. This page does not constitute medical or legal advice. By purchasing you agree to our terms and conditions. Always check local laws before germinating or cultivating cannabis.
The single most common reason healthy seeds fail to germinate is tap water. Not bad genetics. Not incorrect temperature. Not a faulty paper towel technique. Town water — straight from the tap, full of chlorine, chloramines, fluoride, and whatever else the municipal treatment process adds — is being used by growers every day to germinate seeds that cost them real money, and then those growers wonder why their germination rates are disappointing.
I batch-test every seed line we stock at Sacred Seeds. The paper towel method, 22°C, controlled conditions. When germination rates come back lower than expected, the first question I ask is always about the water. And the answer, more often than not, is tap water. This isn’t a minor variable. Cannabis germination water quality is one of the most impactful things a grower can get right — and one of the most commonly ignored.
This guide covers what’s actually in Australian tap water, what it does to germinating seeds at a biochemical level, and the practical solutions that make a measurable difference. The fix is simpler than most people think.
What Actually Happens During Germination — And Why Water Quality Matters
Germination is a sequence of precise biochemical events, not a single moment. Understanding the sequence explains why contaminants cause the specific problems they do.
The first stage is imbibition — the seed absorbs water, which softens and breaks down the seed coat. This initial water uptake is the point at which whatever is in that water first makes contact with the seed’s internal structures. The embryo, the enzyme systems, and the nutrient stores are all exposed to the water chemistry from this first moment.
Enzyme activation follows. The absorbed water triggers the conversion of stored nutrients — starches into sugars, proteins into amino acids — into the forms the embryonic plant can actually use for cellular division and growth. These enzyme systems are chemically sensitive. They operate within specific pH ranges and are disrupted by oxidising agents, heavy metals, and compounds that alter the soil or medium chemistry around the seed.
Cellular division then begins as the radicle — the embryonic root — pushes through the softened seed coat and anchors into the growing medium. This is the stage where root development problems from water contamination become visible: slow emergence, weak radicles, uneven germination across a batch.
The sensitivity of this sequence to water chemistry is why the same seeds, germinated identically except for water source, can produce meaningfully different results. The biochemistry is not forgiving of oxidising agents, pH disruption, or mineral interference at these concentrations — and Australian municipal water contains all three.
🧠 Jason — On Tap Water and Germination
I’ve been testing seed germination for years. When someone contacts us about low germination rates on a batch that tested well before dispatch, I go through the same checklist every time. Temperature, paper towel moisture level, darkness, timing. But the question I always get to is: what water did you use? And when the answer is tap water — which it is more often than I’d like — the conversation becomes straightforward. We spend real money sourcing and testing quality genetics. Using tap water to germinate them is the equivalent of buying good coffee and making it with water from a garden hose. The water matters. It has always mattered. People just don’t think about it until something goes wrong.
What Australian Tap Water Contains — and Why It Affects Cannabis Germination
Australian municipal water is treated to standards designed for human consumption — not for the biochemical sensitivity of germinating seeds. The treatment processes that make tap water safe to drink introduce several compounds that are actively problematic during germination.
The specific contaminant profile varies by city and region — Sydney water uses chloramination, Melbourne uses chlorine, some regional areas have higher fluoride and mineral loads than metropolitan supplies. But the categories of concern are consistent across Australian municipal water: disinfectants, fluoride additives, and whatever the local pipe infrastructure contributes in the way of heavy metals and minerals.
Chlorine and Chloramines — The Disinfectants That Don’t Discriminate
Chlorine is added to municipal water as a disinfectant. It kills pathogens by oxidising their cellular structures — disrupting cell membranes, denaturing proteins, and interfering with enzyme function. This is effective for making water safe for humans. The problem is that chlorine doesn’t discriminate between the pathogens it’s meant to kill and the enzyme systems in germinating seeds, or the beneficial microbial life in a germination medium.
At typical municipal concentrations of 0.5–2 mg/L, chlorine can disrupt the enzyme activation phase of germination, damage the beneficial microorganisms in a seed-starting mix that support early root development, and interfere with the seed’s natural protective coating in ways that increase vulnerability to fungal pathogens.
Chloramines — a compound of chlorine and ammonia used increasingly by Australian water authorities including Sydney Water — are a more persistent problem. Unlike chlorine, which off-gasses when water is left standing uncovered, chloramines are stable and remain in the water. Leaving chloraminated water out overnight does nothing. They require active removal — carbon filtration or a Campden tablet (potassium metabisulfite) to neutralise.
Chlorine vs Chloramines — What Works to Remove Each
Chlorine
Chloramines
Standing 24 hrs uncovered
✓ Effective
✗ Does not work
Carbon filtration
✓ Effective
✓ Effective
Campden tablet
✓ Effective
✓ Effective
Reverse osmosis
✓ Effective
✓ Effective
Boiling
✓ Effective
✗ Does not work
Check your local water authority’s website to confirm whether your municipal supply uses chlorine or chloramines — Sydney Water uses chloramination; Melbourne Water uses chlorine. The distinction determines which removal method you need for cannabis germination water quality.
Fluoride — The Additive That Accumulates
Fluoride is added to most Australian municipal water supplies at concentrations around 0.6–1.0 mg/L. For plants, fluoride interferes with enzyme activity during germination and accumulates in plant tissues over time, where it can disrupt the uptake of calcium and magnesium — two minerals that are directly involved in cellular division and early root development.
The effect is typically cumulative rather than acute. A single germination attempt with fluoridated water may not produce visibly different results to one with pure water. But fluoride that accumulates in the growing medium and in the seedling’s early tissue can compound through the plant’s development, producing stunted growth and mineral deficiencies that appear weeks later and are often misdiagnosed as nutrient problems.
Fluoride cannot be removed by standing water, boiling, or carbon filtration at standard carbon filter capacity. Reverse osmosis removes it effectively. Distilled water and collected rainwater contain none.
Heavy Metals and Hard Water — Infrastructure Problems
Heavy metals — primarily lead, copper, and zinc — enter tap water through ageing pipe infrastructure rather than through the treatment process itself. Australian plumbing in older buildings, particularly those constructed before the 1970s when lead pipes were standard, can introduce meaningful concentrations of these metals between the treatment plant and the tap.
Even trace concentrations of heavy metals accumulate in the tender tissues of emerging seedlings and disrupt cellular function at critical development stages. Root growth inhibition is the most immediate effect — the radicle is the first structure to encounter the growing medium and whatever water chemistry has saturated it. Lead, copper, and zinc at elevated concentrations all produce measurable inhibition of root elongation in germinating seeds.
Hard water — characterised by high dissolved calcium and magnesium mineral loads — creates a different problem. These minerals are not intrinsically harmful to plants, but at high concentrations they alter the pH of the germination medium and can form deposits around seeds that physically impede water uptake. Australian inland and semi-arid regions tend toward harder water than coastal cities — growers in these areas have more reason to test and treat their water than metropolitan growers on average.
Practical Solutions for Cannabis Germination Water Quality — From Simplest to Most Thorough
1. Collected rainwater — the best free option
Rainwater is naturally soft, slightly acidic to neutral (pH 5.6–7.0 depending on local atmospheric conditions), and free from chlorine, chloramines, fluoride, and heavy metals. It contains trace minerals that are beneficial rather than harmful for germination. In most Australian climate zones there’s enough rainfall to collect meaningful quantities — even a modest tank or barrel fed from a roof downpipe produces more than enough water for germination and seedling care.
The only considerations: store collected rainwater in a sealed container away from light to prevent algae growth, and check pH before use if your roof material is metal — some metal roofing can alter runoff pH.
2. Carbon-filtered water — the practical everyday option
A carbon filter — countertop, under-sink, or a simple jug filter — removes chlorine and, at sufficient carbon density, chloramines. It reduces heavy metal concentrations and improves taste and odour. It does not remove fluoride or dissolved minerals effectively. For most Australian growers in chlorinated (non-chloraminated) water areas, a carbon filter plus pH adjustment to 6.0–6.5 is an adequate and affordable upgrade from raw tap water — the practical minimum for cannabis germination water quality.
If you’re on chloraminated supply (Sydney Water is the most common example), confirm your carbon filter is rated for chloramine removal — not all standard jug filters are. Look for filters rated to NSF Standard 42 and 53, or specifically labelled for chloramine removal.
3. Reverse osmosis water — the most complete solution
Reverse osmosis systems remove virtually all contaminants — chlorine, chloramines, fluoride, heavy metals, dissolved minerals, and anything else in solution. The output is near-pure water with an EC close to zero. For germination purposes this is ideal. The one practical step with RO water is pH adjustment — pure RO water has a low but unstable pH that needs to be buffered to 6.0–6.5 before use.
RO systems require an upfront investment of $150–500 for a basic under-sink unit, but the per-litre cost of water produced is very low. For growers who invest in quality genetics and want to eliminate water quality as a variable entirely, RO is the right solution.
4. Distilled water — reliable but inconvenient at scale
Distilled water is available at supermarkets and pharmacies — it’s the same product sold for use in steam irons, car batteries, and CPAP machines. It’s completely free of minerals and contaminants and provides consistent quality. At germination volumes (you don’t need much) it’s a practical option. Adjust pH to 6.0–6.5 before use, as with RO water.
5. Standing tap water — a partial fix, not a solution
Leaving tap water uncovered for 24 hours allows chlorine to off-gas. This is better than using water straight from the tap in chlorinated areas. It does nothing for chloramines, fluoride, heavy metals, or dissolved minerals. In chloraminated supply areas it provides essentially no benefit over tap water. It’s a partial measure that’s worth doing if it’s all you have, but it’s not a substitute for filtration or collected rainwater.
🧠 Jason — The Simple Fix Most People Won’t Bother With
The fix here is not complicated. If you’re on town water, get a basic carbon filter — the jug type is fine for germination volumes. Adjust the pH to 6.2–6.5. That’s it. You’ve eliminated the chlorine issue and given your seeds water at the right pH. If you’re serious about water quality — and if you’re germinating genetics that cost you real money, you should be — collect rainwater when you can, or invest in a small RO unit. But the minimum viable fix is cheap and takes five minutes. The frustrating part is watching people spend serious money on quality seeds and then germinate them in straight tap water without a second thought. The seeds are doing everything they can. Give them the conditions to actually succeed.
Best Practices During Germination
Water quality is the focus of this guide, but it sits alongside several other variables that determine germination outcomes. The summary below covers the essentials — for the full method see the paper towel germination guide.
Water quality is the most commonly neglected variable, but it’s one of several that determine germination outcomes. With the water sorted, these are the other conditions worth getting right.
Temperature: 20–25°C consistently. Not fluctuating — a seedling heat mat with a thermostat is a worthwhile investment for anyone germinating regularly. Below 18°C, germination slows significantly. Above 28°C, the enzymes involved in germination become heat-stressed. Consistent warmth matters more than any specific temperature within the 20–25°C range.
pH: 6.0–7.0, ideally 6.0–6.5. Check with a basic pH meter or reliable pH drops — neither is expensive. Adjust filtered or RO water to this range before use. A pH that’s outside this range reduces the effectiveness of the enzyme systems driving germination even if the water is otherwise clean.
Moisture level: The germination medium should be moist — not wet, not damp. Wet conditions invite damping off and fungal problems. Damp conditions don’t provide enough moisture for the imbibition process. If you’re using the paper towel method, the towel should hold moisture without dripping when lifted.
Darkness: Most seeds germinate better in darkness. Light is not required and in some species actively inhibits germination. Keep seeds covered during the germination period.
Gentleness: Handle germinating seeds as little as possible. The radicle is fragile — once it emerges, any bending or breaking of it ends the plant’s development. If you need to check progress, do it carefully and return seeds to their position without disturbing the radicle orientation.
Advanced Options for Difficult or High-Value Seeds
For rare genetics, older seeds with reduced viability, or seeds with particularly hard seed coats, there are additional treatments worth considering beyond water quality alone. If your seeds have failed despite optimal water and conditions, the cannabis seeds not germinating guide covers diagnosis and the full set of fixes.
Hydrogen peroxide solution (0.1–0.3%): A dilute hydrogen peroxide solution increases oxygen availability in the germination medium and has mild antifungal properties that reduce damping off risk. Use food-grade hydrogen peroxide diluted to 0.1–0.3% in your clean germination water. This is particularly useful for older seeds where the seed coat has hardened.
Scarification: For seeds with unusually hard coats, very light scarification — gently rubbing the seed against fine sandpaper to thin the coat — improves water uptake during imbibition. Used carefully on seeds that have failed to germinate despite optimal conditions, it can make the difference for difficult genetics.
Kelp extract: A dilute kelp solution provides trace elements including natural cytokinins that support cell division in germinating seeds. Use at 0.1–0.2 ml per litre of clean water. The effect is modest but measurable for seeds under marginal conditions.
Willow water: Soaking willow twigs or bark in clean water for 24 hours produces a solution containing salicylic acid and indolebutyric acid — natural compounds that promote root development. An old remedy that has biochemical support — salicylic acid in particular plays a documented role in plant stress responses and root initiation.
Not sure which strain suits your setup?
Answer six questions and Jess will match you to three strains based on your experience, space, and goals.
Key Takeaways — Water Quality and Seed Germination
Australian tap water contains chlorine or chloramines, fluoride, and in older infrastructure areas, heavy metals — all of which interfere with the enzyme systems, beneficial microbiology, and pH conditions that germination depends on. Chlorine off-gasses from standing water but chloramines do not and require active removal. Carbon filtration handles both chlorine and chloramines. Fluoride and heavy metals require reverse osmosis or distillation to remove. Collected rainwater sidesteps all municipal treatment problems and is free. The minimum viable fix for most growers is a basic carbon filter plus pH adjustment to 6.0–6.5. Germination temperature of 20–25°C consistent, darkness, and correct moisture level matter alongside water quality. For high-value or difficult seeds, hydrogen peroxide solution and kelp extract provide additional support beyond water chemistry alone. For Sacred Seeds’ full germination process see the paper towel germination guide and the complete germination guide.
Water Quality and Seed Germination — Frequently Asked Questions
Why is tap water bad for germinating seeds?
Australian tap water contains chlorine or chloramines (disinfectants), fluoride, and in older pipe infrastructure areas, trace heavy metals. These compounds interfere with the enzyme activation and cellular division processes that drive germination — disrupting the biochemistry that converts a dormant seed into an emerging seedling. The effect is measurable: germination rates, speed, and seedling vigour are all affected by water quality.
Does leaving tap water out overnight fix the problem?
Partially, and only for chlorinated supplies. Chlorine is volatile and off-gasses when water is left uncovered for 24 hours. Chloramines — used by Sydney Water and increasingly common in Australian municipal supplies — are stable and do not off-gas. For chloraminated water, standing overnight provides essentially no benefit. Carbon filtration or a Campden tablet (potassium metabisulfite) is needed to neutralise chloramines. Check your local water authority’s website to confirm which disinfectant system your supply uses.
What is the best water for germinating cannabis seeds?
Collected rainwater is the best free option — naturally soft, slightly acidic to neutral pH, free of municipal additives. RO (reverse osmosis) water is the most complete treatment option if you have the system — adjust pH to 6.0–6.5 before use. Carbon-filtered tap water with pH adjustment is the practical minimum for most growers. Distilled water from a supermarket works well for germination volumes.
What pH should germination water be?
6.0–7.0, with 6.0–6.5 being the optimal range for most seeds. Outside this range the enzyme systems driving germination operate less efficiently, even if the water is otherwise clean. Check pH with a basic pH meter or pH drops and adjust as needed — pH Up (potassium hydroxide) or pH Down (phosphoric acid) in small amounts bring filtered or RO water into range quickly.
Does fluoride in tap water affect seed germination?
Yes. Fluoride interferes with enzyme activity during germination and accumulates in plant tissue, where it can disrupt calcium and magnesium uptake. The effect is often cumulative rather than immediately visible — stunted growth and mineral deficiencies appearing weeks into the plant’s development are sometimes traceable to fluoride exposure during germination. Fluoride cannot be removed by carbon filtration at standard filter capacity or by standing water. Reverse osmosis, distillation, or collected rainwater are the solutions.
What is the difference between chlorine and chloramines in tap water?
Chlorine is a single-element disinfectant that off-gasses from water left standing uncovered for 24 hours — it’s volatile and escapes into the air. Chloramines are a compound of chlorine and ammonia that are chemically stable and do not off-gas. Both are harmful to germination enzyme systems and beneficial soil microorganisms. Chloramines require carbon filtration or a Campden tablet to remove. Sydney Water uses chloramination; Melbourne Water uses chlorine. Check your local authority for confirmation.
Can I use a standard Brita filter for germination water?
A standard Brita jug filter uses activated carbon and removes chlorine, some heavy metals, and improves taste. It does not reliably remove chloramines, fluoride, or dissolved hard water minerals. In chlorinated water areas it provides a useful improvement. In chloraminated water areas (Sydney Water) a standard Brita is not sufficient — you need a filter specifically rated for chloramine removal. RO is the more complete solution if fluoride and minerals are also concerns.
How do I germinate cannabis seeds correctly?
Use clean water (filtered, rainwater, or RO) at pH 6.0–6.5 and 20–25°C. The paper towel method — damp (not wet) paper towel, seeds placed between two sheets, sealed in a bag or container, kept dark and warm — is reliable and allows easy progress monitoring. Handle the emerging radicle with extreme care. For the full step-by-step process see the paper towel germination guide. If your seeds have failed despite correct water and conditions, see the germination troubleshooting guide.
Why aren’t my cannabis seeds germinating? — diagnostic guide for failed germination attempts. Covers temperature, water quality, seed age, and the common scenarios that cause seeds to crack but not sprout.
Seeds are sold strictly as novelty collector’s items. They contain no THC or CBD. This page does not constitute medical or legal advice. By purchasing you agree to our terms and conditions. Always check local laws before germinating or cultivating cannabis.
We offer top-quality heirloom, herb and cannabis seeds for souvenir purchases. We offer genuine domestic Australia shipping and support, and ship our seeds using 100% Earth-friendly and compostable packaging.
Get fresh Australia cannabis seeds delivered to your door in less than a week from payment.