Organic Pest Control for Cannabis: How to Identify and Eliminate the Big 4

Organic Pest Control for Cannabis: How to Identify and Eliminate the Big 4

The first time I found spider mites in a grow, I did what a lot of new growers do — I panicked and reached for the strongest thing I could find at the garden centre. The infestation cleared. But so did the healthy microbial life in my soil, the beneficial insects I’d been cultivating, and any confidence I had in the final product. I’d traded one problem for three.

That experience pushed me toward a philosophy I’ve held ever since: work with nature, not against it. Organic cannabis pest control isn’t just the safer choice — it’s the more effective one over the long term. Healthy plants in a well-managed environment resist pests naturally. When something does break through, targeted organic interventions handle it without the collateral damage that broad-spectrum chemicals cause to soil biology, beneficial insects, and the final product.

This guide covers how to identify and eliminate the four most common cannabis pests without reaching for harsh chemicals — and the prevention habits that make infestations less likely in the first place.

A healthy cannabis leaf with a ladybug on it, symbolising natural pest control in a cannabis grow.

Three Principles Before You Touch Anything

These apply to every pest situation you’ll encounter, regardless of what you’re dealing with.

Identify before you act. Don’t spray anything until you know exactly what you’re dealing with. Spider mites and thrips look similar at a glance but require different treatments. Misidentify and you’ll waste time, stress the plant, and potentially make the infestation worse. A jeweller’s loupe kept near the grow is worth more than any spray bottle.

Start with the gentlest intervention. Work up from physical removal and beneficial insects before reaching for any spray — even organic ones. The least disruptive solution that works is always the right one. Introducing predatory insects when you first spot a problem will handle most infestations before they become serious.

Prevention beats treatment. A vigorous plant in a clean, well-managed environment is your best defence. Most serious infestations start in neglected or stressed grows — stressed plants put out different volatile signals that actively attract certain pests. Build the environment right and you’ll rarely need to treat anything.

The Four Most Common Cannabis Pests — Identification and Treatment

1. Spider Mites

What to look for: Tiny moving dots — red, black, or yellow — on the underside of leaves. You’ll need a jeweller’s loupe or phone macro lens to see them clearly. The unmistakable sign of a developed infestation is fine silky webbing across leaves and bud sites. If you’re seeing webbing, it’s already serious and you need to act immediately.

The damage: Spider mites pierce individual plant cells and extract the contents, leaving a characteristic pattern of tiny white or yellow flecks across the leaf surface called stippling. Heavy infestations cause leaves to yellow and die, and webbing over bud sites can ruin the harvest entirely. They reproduce rapidly in warm, dry conditions — an Australian summer indoor grow without adequate humidity management is ideal spider mite habitat.

Organic solution 1 — predatory mites: Release a sachet of Phytoseiulus persimilis — predatory mites that hunt and consume spider mites with remarkable efficiency. They won’t harm plants and will work through the population systematically. This is particularly valuable in late flower when you can’t safely spray anything near the buds.

Organic solution 2 — neem oil spray: Mix one teaspoon of cold-pressed neem oil and half a teaspoon of organic insecticidal soap into one litre of warm water. Shake well and spray the entire plant, paying particular attention to the undersides of leaves where mites live. Apply every three days and repeat for at least two weeks to break the egg cycle. Do not spray flowering buds — neem oil affects flavour and aroma if it penetrates flower tissue.

2. Fungus Gnats

What to look for: Small black flies — they look like tiny mosquitoes — crawling on the soil surface or hovering around the base of your plants. The adults are harmless annoyances. What you can’t easily see is the real problem: their larvae in the soil.

The damage: Fungus gnat larvae feed on tender root tissue and the beneficial fungi that support healthy root development. The result is stunted growth, nutrient uptake problems, and increased vulnerability to root rot and disease. A bad infestation can devastate a plant that looks otherwise healthy from above — which is why they’re so frequently misdiagnosed as deficiency or overwatering.

Organic solution 1 — beneficial nematodes: Water a solution of Steinernema feltiae (beneficial nematodes) into the growing medium. These microscopic organisms actively hunt down and kill fungus gnat larvae in the soil without harming roots, earthworms, or beneficial biology. Yellow sticky traps placed at soil level will monitor and catch adult populations simultaneously.

Organic solution 2 — dry the topsoil: This one costs nothing. Fungus gnats need consistently moist topsoil to lay viable eggs. Let the top 2–3 cm of medium dry out completely between waterings. It won’t eliminate an existing larval population but it breaks the reproductive cycle and prevents re-infestation — and it’s the right watering practice regardless of whether gnats are present.

3. Aphids

What to look for: Small, pear-shaped insects clustering on stems and the undersides of new growth. They come in green, black, yellow, or pink depending on species — all cause the same problems. New growth is their preferred target, so check your canopy tips first. They’re visible to the naked eye once populations establish, but a loupe makes early detection much easier.

The damage: Aphids extract sap from plant tissue, weakening growth and causing leaves to yellow and distort. They also excrete a sticky waste product called honeydew that coats leaf surfaces and creates ideal conditions for sooty mould — a secondary problem that compounds the damage and can affect the final harvest quality if it reaches bud sites.

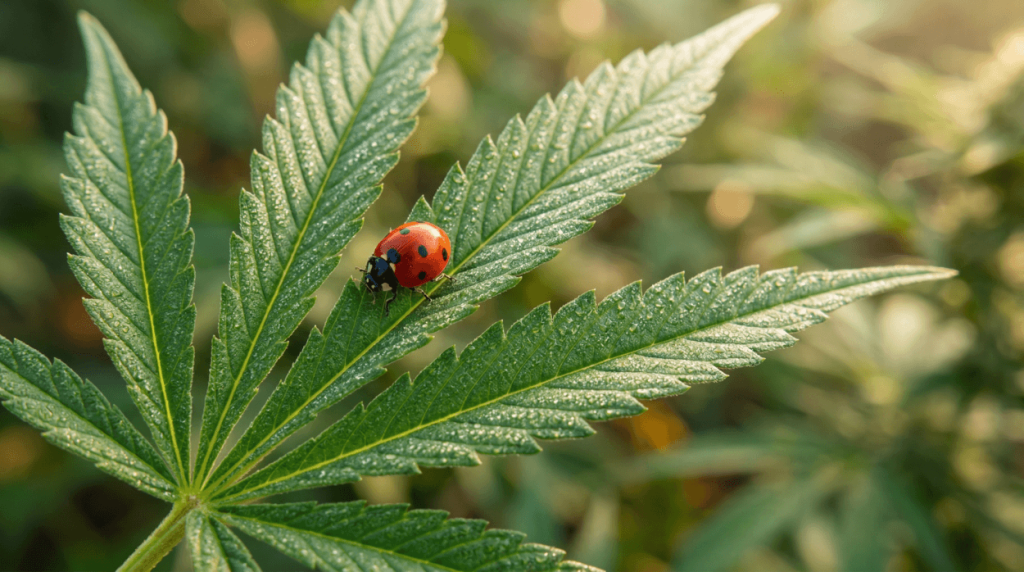
Organic solution 1 — ladybugs: A bag of live ladybugs released into your grow space will consume hundreds of aphids per day. Indoors, some will find their way out of the tent into the wider room — they’re completely harmless and won’t establish a population in your home. Outdoors, they’re the most effective aphid control available. For smaller infestations, physically wiping aphids off with a damp cloth is worth trying before reaching for any spray.

Organic solution 2 — insecticidal soap spray: A direct spray of diluted insecticidal soap dehydrates and kills soft-bodied aphids on contact. It leaves no residual, breaks down quickly, and won’t harm the plant when used correctly. Concentration matters — follow the label, and test on a small area before full application.

4. Thrips

What to look for: Slender, fast-moving insects about 1–2 mm long skittering across leaf surfaces. Look for their signature damage: irregular silvery or bronze patches on leaves where the surface has been scraped and the cell contents removed, accompanied by tiny black specks of excrement on or near the damaged areas. Thrips are harder to see than aphids but their damage pattern is distinctive.

The damage: Thrips scrape the outer layer of leaf tissue and feed on the contents beneath, leaving behind scarred, discoloured patches that reduce photosynthesis. In large numbers they can severely weaken a plant, and like aphids, their waste encourages mould. They also move between plants readily, which makes containment important once identified.

Organic solution 1 — predatory mites: Amblyseius cucumeris predatory mites are highly effective against thrips larvae, which spend part of their lifecycle in the growing medium. Introducing them early — even as a preventative measure in environments where thrips have been a problem before — can stop an infestation from establishing.

Organic solution 2 — spinosad spray: Derived from naturally occurring soil bacteria, spinosad is one of the most effective organic insecticides available for thrips. It’s approved for organic use and works through both contact and ingestion. Follow label directions carefully — overuse can lead to resistance in the local population, which defeats the purpose.

Visual identification chart showing four common cannabis pests: spider mites with webbing on a leaf, fungus gnats on soil surface, aphids clustering on a stem, and thrips with silver leaf damage.

Prevention — The Best Pest Control of All

Reactive pest management is always harder than preventing the problem in the first place. These habits reduce your risk significantly and require nothing beyond good grow practice.

Keep a clean grow space. Remove dead leaves promptly — they’re shelter and breeding habitat for pests. Wipe down walls and surfaces periodically. Pests establish themselves in disorder and neglect.

Inspect daily. Five minutes of close observation each day — particularly the undersides of leaves — will catch an infestation when it’s still manageable rather than after it’s taken hold. Most infestations that become serious were detectable a week earlier by someone who was paying attention.

Maintain good airflow. Strong, consistent air circulation makes it harder for flying pests to establish and land. It also prevents the humid, stagnant conditions that attract fungus gnats and encourage mould.

Don’t overwater. Consistently soggy soil is an open invitation for fungus gnats and root rot. Let the medium partially dry between waterings — the right watering practice handles this naturally. The container sizing guide covers pot selection that helps prevent overwatering structurally.

Start with healthy genetics. Vigorous plants are naturally more resistant to pest pressure than stressed or weakened ones. Genetics that grow with real energy and structural robustness — Northern Lights, White Widow, GG4 — handle environmental challenges including pest pressure better than more sensitive genetics. Browse the full catalogue for genetics bred for outdoor and environmental resilience.

🧠 Jason — On Organic Pest Management Philosophy

The instinct when you find pests is to reach for the most powerful thing you have. I understand it — the infestation is visible and you want it gone immediately. But broad-spectrum chemical pesticides don’t distinguish between the spider mite you’re trying to kill and the predatory mite that would have eaten it for you. They destroy the soil biology that builds plant immunity. They leave residues in tissue you’re going to consume. The organic approach isn’t slower or less effective — it’s just less immediately gratifying. Introduce predatory insects early, maintain the environment well, and most of the time pests never become a problem worth treating. When they do, targeted interventions handle them without the collateral damage.

Looking for resilient genetics that handle stress well?

Answer six questions and Jess will match you to three strains based on your setup, experience, and goals.

Find Your Strain →

Key Takeaways — Organic Cannabis Pest Control

Identify before acting — spider mites and thrips look similar but need different treatments, and misidentification wastes time and stresses the plant. Start with the gentlest intervention: physical removal and beneficial insects before any spray, even organic ones. Spider mites: predatory mites (Phytoseiulus persimilis) or neem oil spray — never neem on flowering buds. Fungus gnats: beneficial nematodes (Steinernema feltiae) for larvae, yellow sticky traps for adults, dry topsoil to break the reproductive cycle. Aphids: ladybugs or insecticidal soap spray — physical removal works for small infestations. Thrips: Amblyseius cucumeris predatory mites or spinosad spray. In late flower, predatory insects are the only safe intervention — no sprays near buds. Prevention is more effective than treatment: clean grow space, daily inspection, good airflow, correct watering, and healthy genetics that resist stress.

Organic Cannabis Pest Control — Frequently Asked Questions

Is neem oil safe to use on cannabis?

Yes, with one important qualification: don’t use it on or near buds during the flowering stage. Neem oil can affect flavour and aroma if it penetrates flower tissue — the azadirachtin compounds responsible for its effectiveness are also responsible for the off-flavour in neem-treated buds. Use it freely during vegetative growth, and transition to predatory insects or spinosad for any flowering-stage interventions.

Can I use ladybugs in an indoor grow tent?

Yes — they’re effective indoors and harmless in the wider home environment. Some will find their way out of the tent, but they won’t establish a breeding population in a house without suitable outdoor conditions. The minor inconvenience of finding the occasional ladybug in your living room is a reasonable trade for effective aphid control.

What are beneficial nematodes and are they safe?

Beneficial nematodes are microscopic roundworms that live naturally in healthy soil. They’re predators of many soil-dwelling pests including fungus gnat larvae, thrips pupae, and certain other grub species. They’re completely safe for plants, humans, pets, earthworms, and all beneficial soil biology — they specifically target pest species and leave everything else alone.

My plant is in late flower. What can I safely use?

Predatory insects are your safest option at this stage — they won’t affect the buds at all. If you need to spray, a very diluted insecticidal soap solution is the least impactful option. Avoid neem oil entirely once flowering is established. The goal in late flower is containment rather than eradication — accept that you may not fully clear the infestation before harvest and focus on preventing it from spreading to bud sites.

How do I deal with spider mites in late flower specifically?

Predatory mites are your best tool. You can also try physically removing mites and webbing with a gentle handheld vacuum or a soft brush dipped in very diluted isopropyl alcohol — working carefully to avoid damaging trichomes. It’s painstaking but effective in targeted areas. The key is acting immediately when you spot the first signs rather than waiting for the infestation to develop.

Can I reuse soil that had a pest infestation?

I’d avoid it. Eggs and larvae survive in the medium through what looks like a clean surface — you can’t reliably sterilise infested growing medium without also destroying the biology that makes it useful. The risk of reintroducing the same problem into your next grow isn’t worth the saving on a bag of potting mix. Start clean.

Are conventional pesticides like Raid ever acceptable?

No. General-purpose pesticides are not designed for edible plants and contain compounds that are genuinely dangerous when inhaled or ingested. They also kill beneficial insects, destroy soil biology, and leave residues that affect the final product. The organic methods in this guide are more targeted, more effective for cannabis specifically, and don’t carry those risks.

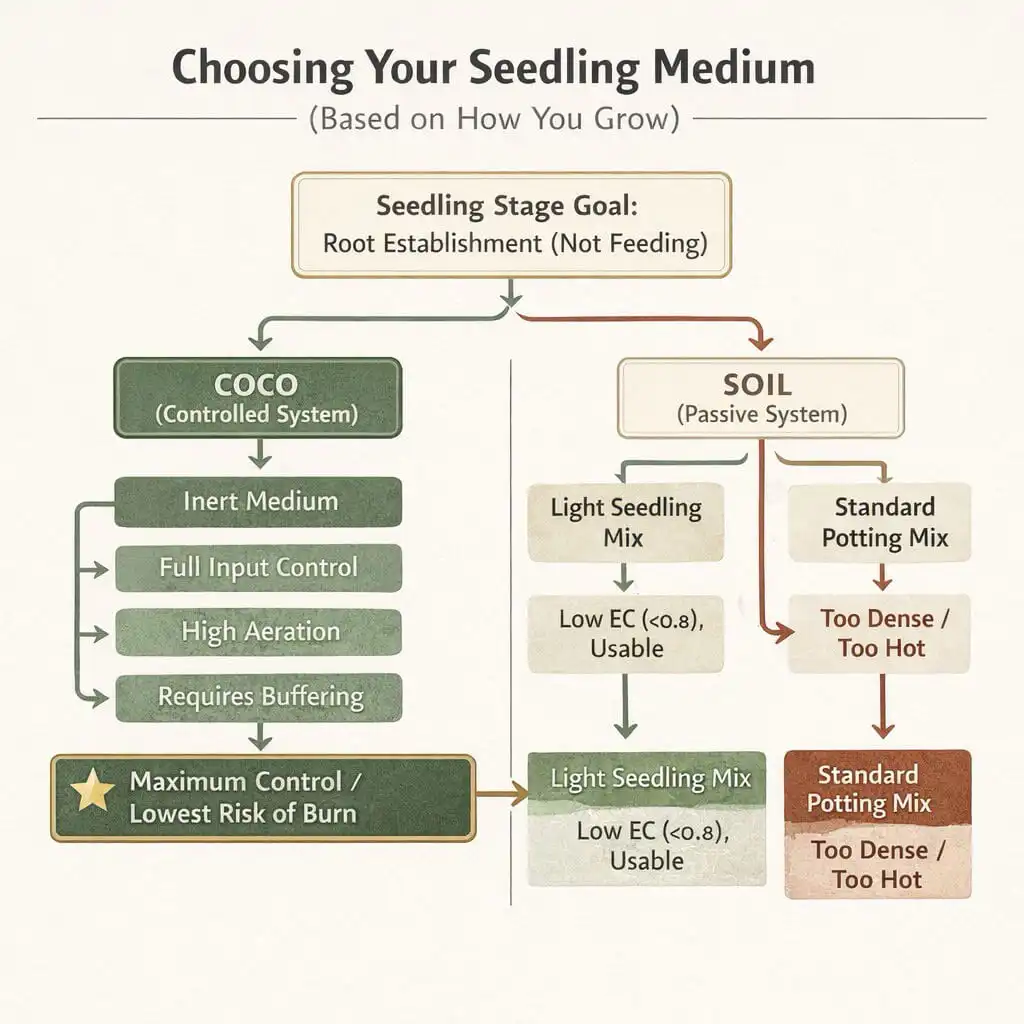
What soil to use for cannabis seedlings — starting with the right medium builds the microbial foundation that supports natural pest resistance.

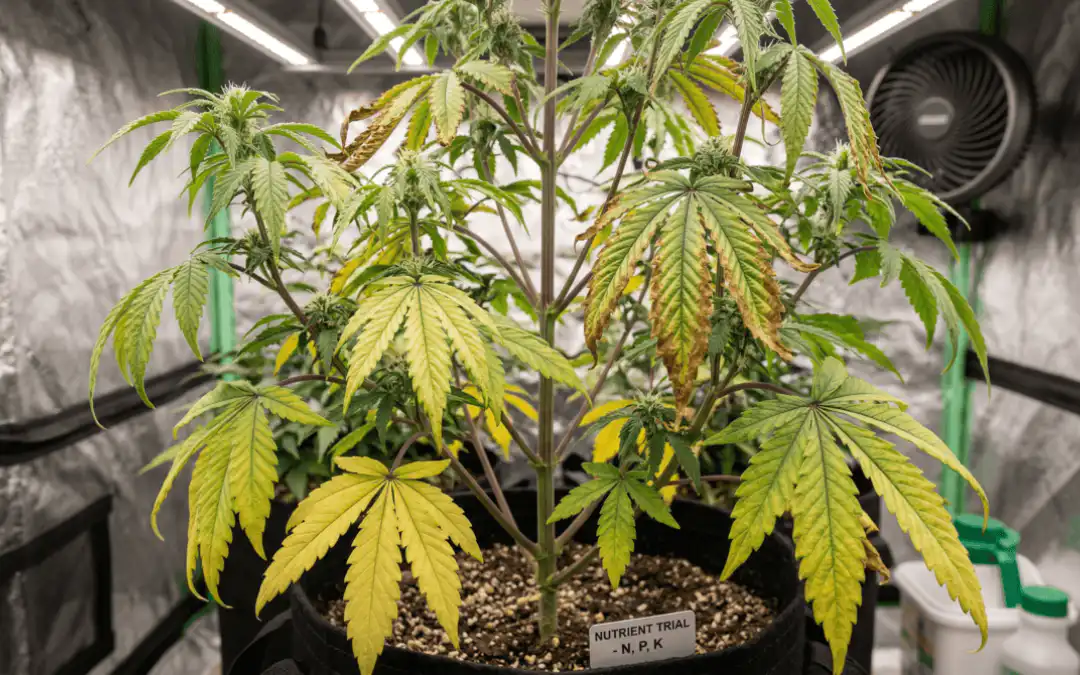
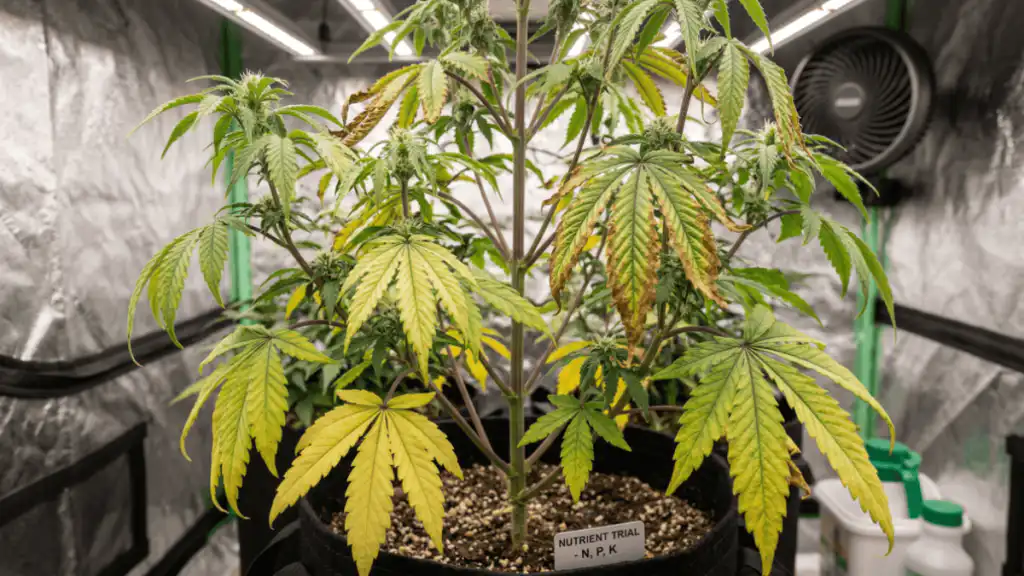
Why are my cannabis leaves turning yellow? — distinguish pest damage from nutrient deficiency and other causes of leaf discolouration.

Cannabis nutrient deficiencies — fungus gnat root damage is frequently misdiagnosed as nutrient deficiency.

Container sizing for cannabis seedlings — correct pot sizing prevents the overwatering that attracts fungus gnats.

Cannabis damping off — the related seedling disease that shares environmental causes with fungus gnat infestations.

Browse all cannabis seeds — feminised, autoflower, and photoperiod strains shipped from Australia.

Seeds are sold strictly as novelty collector’s items. They contain no THC or CBD. This page does not constitute medical or legal advice. By purchasing you agree to our terms and conditions. Always check local laws before germinating or cultivating cannabis.

Transplanting Cannabis: When and How to Do It Right

Transplanting Cannabis: When and How to Do It Right

Transplanting cannabis seedlings correctly is one of the higher-leverage skills in the grow — get it right and you’ll see a growth surge within a week; get it wrong and you’re looking at two weeks of stunted recovery that you won’t get back. Most transplant failures come down to impatience: moving the plant before the root ball has knitted together, pulling by the stem, or dropping an undersized root ball into a pot three times too large and wondering why it’s struggling to establish. The technique itself is straightforward once you understand what the plant actually needs during the transfer.

This guide covers when to transplant, how to do it without causing unnecessary stress, the autoflower exception, and pot sizing progression. The related articles on container sizing and seedling soil selection cover the surrounding decisions in more detail.

A person carefully transplanting a small cannabis plant from a small pot into a larger one, showing the healthy white root ball.

Before You Start — Four Rules That Apply to Every Transplant

Regardless of strain, medium, or grow setup, these principles hold across every transplant situation.

Transplant when the plant tells you it’s ready, not when it’s convenient. The timing signals from the plant — covered below — are more reliable than any calendar rule. A plant that isn’t ready to move will punish you for rushing it.

Go up in pot size gradually. Moving a seedling straight into a large final pot seems efficient but usually creates overwatering problems — a small root system in a large volume of wet medium can’t dry at the right pace, creating conditions for root rot. Each step up gives the roots something to grow into without drowning in excess medium.

Transplant in the evening or under dimmed lights. Reduced light intensity lowers transpiration demand during the recovery period and gives the plant the night cycle to begin re-establishing root contact with the new medium before full light resumes.

If you’re growing autoflowers, the default answer is don’t transplant. More on this below.

When Is the Right Time to Transplant?

Transplant too early and the root ball hasn’t knitted together — it will fall apart the moment you try to move it, exposing roots to air and light. Transplant too late and the plant is root-bound, with roots circling the base of the pot and choking off their own access to water and nutrients. The target is slightly root-bound but not strangling itself. Three signals tell you when you’re there.

The leaf rule. Look down at the plant from above. If the canopy extends well beyond the edges of the pot — leaves clearly wider than the container — the root system below is likely just as wide and running out of room. This isn’t definitive on its own but it’s a useful first indicator.

The root check. Gently squeeze the sides of a soft pot, or tap the base of a hard pot, and ease the plant out carefully. The root ball should hold its shape firmly and show healthy white roots visible on the outside. What you don’t want to see: thick brown roots spiralling the bottom or dense tangled masses with no visible soil between them.

The watering tell. If the medium is drying out within 24 hours of a thorough watering and the plant is showing early wilt by the following morning, the roots have exhausted the available space. The pot is too small for the plant’s current water demand.

🧠 Jason — On Transplant Timing

The most common timing mistake I see is moving too early — a grower sees a healthy plant at two weeks and decides it must be ready for a larger pot. Lift the plant out carefully and the root ball crumbles because it hasn’t formed yet. You’ve just exposed the root system to light and air for no reason. Wait for the root check to confirm the ball holds its shape before committing to the move. A plant that isn’t ready to move will tell you — it just won’t have the root structure to hold together when you try.

Autoflowers — Why the Rule Is Different

If you’re growing photoperiods you can skip this section. If you’re growing autoflowers, read it carefully because the transplanting calculus is fundamentally different.

The general rule for autoflowers is to plant directly into the final container and never transplant. Their life cycle runs 70–80 days from seed to harvest on a fixed timeline — there’s no buffer for recovery time. A week of transplant shock on a photoperiod is an inconvenience the plant can recover from during an extended veg period. On an autoflower, that same week represents a meaningful percentage of the entire vegetative window, and the yield loss is permanent.

If you genuinely need to start in a smaller container — germinating in a cup to control moisture, for example — limit it to one transplant, do it very early at around day ten to fourteen at the absolute latest, and treat it as the most delicate operation in the entire grow. The container sizing guide covers final pot size recommendations for autos by growing situation.

How to Transplant Cannabis Seedlings — Step by Step

Step 1 — Prepare the new pot

Fill the new container with fresh, quality potting mix. Don’t compress it — you want it aerated and loose so roots can explore easily. Dig a hole in the centre roughly the size of the old pot. A useful technique: press the old pot into the soil to create a perfect mould, then remove it. The root ball will sit in it exactly.

Lightly moisten the new medium before the transfer. Not wet — just enough that it isn’t bone dry and won’t pull moisture away from the root ball on contact.

Side-by-side comparison of a healthy cannabis root ball with white visible roots and a root-bound cannabis plant with dense brown circling roots.

Step 2 — Let the old pot dry slightly before the move

This is counterintuitive but it matters. If the soil in the old pot is too wet, the root ball becomes heavy and tends to slump or crumble during transfer. Slightly dry soil holds together cleanly and slides out without drama. Skip one watering cycle so the medium is moist rather than saturated — don’t let it get so dry that the plant is visibly stressed, just dry enough that the ball will hold its shape.

Step 3 — The transfer

Turn the pot upside down and cradle the base of the stem between two fingers with your hand flat against the soil surface. The plant’s weight should rest in your palm, not on the stem. Gently squeeze or tap the bottom of the pot until the root ball eases out. It should slide free with minimal persuasion if the timing is right and the soil isn’t waterlogged.

Do not pull the plant by its stem. This is the single most common cause of root damage during transplanting and it’s entirely avoidable — let gravity and light pressure do the work, not your grip on the stem. Place the entire root ball directly into the prepared hole at roughly the same depth it was in the old pot. No deeper, no shallower.

Step 4 — Backfill and water in

Fill the gaps around the root ball with fresh medium. Pat down lightly — firm enough to eliminate air pockets, gentle enough not to compact it. Water thoroughly with pH-balanced water to help the medium settle around the roots and signal to the plant that it has a larger environment to explore. For soil target pH 6.0–7.0. For coco target 5.5–6.5.

Step 5 — Let it recover

Dim the lights or move the plant out of direct intense light for the first few hours. Don’t push nutrients immediately — the fresh medium already has what the plant needs, and a stressed root system doesn’t benefit from high EC feeds. Plain pH-balanced water for the first three to five days. A root stimulant product containing mycorrhizal fungi or humic acid is the one addition worth considering at this stage, as both support rapid root establishment in new medium.

Pot Sizing Progression — Don’t Skip Steps

A common mistake is moving a seedling straight into a large final pot hoping to avoid future transplants. The logic seems sound but the result usually isn’t — a young root system in a large volume of wet medium can’t dry at the right pace, creating conditions for root rot and overwatering problems that are harder to fix than a transplant.

A sensible progression for indoor photoperiod soil grows: seedling cup (100–150 ml) → 0.5–1 litre → 3–5 litre → 15–20 litre final pot. Each step gives the roots something to grow into without drowning in excess medium. Outdoor plants with long veg periods can go larger at the final stage — 25–40 litres for full-season outdoor photoperiods in good conditions.

Fabric pots are worth the switch at every stage if you haven’t made it already. Air-pruning at the pot wall encourages the plant to develop a denser, more efficient root system rather than circling roots — and makes the plant less likely to become severely root-bound between transplants.

Not sure which strain suits your setup?

Answer six questions and Jess will match you to three strains based on your setup, experience, and goals.

Find Your Strain →

Key Takeaways — Transplanting Cannabis Seedlings

Transplant when the root ball holds its shape and white roots are visible on the outside — not before, not long after. The three timing signals are the leaf rule (canopy wider than the pot), the root check (ball holds shape with white visible roots), and the watering tell (medium drying within 24 hours). Never pull by the stem — cradle the root ball in your palm and let gravity do the work. Let the old pot dry slightly before the move so the ball holds together cleanly. Skip nutrients for three to five days after transplanting — fresh medium has what the plant needs and a stressed root system doesn’t benefit from high EC feeds. Autoflowers go straight into their final container and are never transplanted — the fixed timeline has no buffer for recovery. Go up in pot size gradually — seedling cup to 3–5 litres to 15–20 litre final is the standard indoor progression. Fabric pots reduce root-binding and improve root architecture at every stage.

Transplanting Cannabis — Frequently Asked Questions

What is transplant shock and how long does it last?

Transplant shock is a stress response to root disturbance — symptoms include wilting, drooping, and temporary yellowing as the plant redirects energy to re-establishing root contact with the new medium. A well-executed transplant produces minimal shock, perhaps a day of mild droop before the plant resumes normal growth. Poor technique — pulling by the stem, transferring a wet crumbling root ball, or moving into bone-dry medium — can extend recovery to a week or more.

My plant is wilting after transplanting. Should I water it again?

Probably not. Wilting immediately after transplanting is almost always a temporary stress response rather than a water shortage — if you watered in thoroughly during step four, the medium is moist enough. Keep the plant in lower light, check that the medium isn’t bone dry, and wait 24–48 hours before intervening. The instinct to water a drooping plant is strong. Resist it — overwatering a stressed plant adds to the problem rather than solving it.

Can I transplant during flowering?

Avoid it. Moving a flowering plant causes serious stress at exactly the wrong moment — the plant is directing all resources toward bud development and root disturbance diverts energy away from that process. The yield and quality cost of transplanting in flower is real and not worth whatever problem you’re trying to solve. If you’re in this situation, do everything possible to avoid the move, and if you absolutely must, be as gentle as possible and accept the cost.

What if the roots are already badly tangled?

Gently tease the outer roots apart with your fingers before placing in the new pot. Loosening the circling outer roots encourages outward growth into the new medium rather than continued inward spiralling. Work carefully — you’re handling living tissue, not untangling cord. Any root you break is a setback; the goal is to redirect without damaging.

Fabric pots or plastic for cannabis?

Fabric pots are worth using at every stage. Air-pruning at the container wall — where roots hit the fabric, dry out, and generate new lateral branching rather than circling — produces a denser, more efficient root system throughout the pot. More root surface area means better water and nutrient uptake and a plant that handles the demands of mid-flower more efficiently. They also make the plant less likely to become severely root-bound between transplants, reducing the urgency of timing.

Should I add nutrients straight after transplanting?

No — hold nutrients for three to five days after transplanting and water with plain pH-balanced water only. Fresh potting mix already contains available nutrients, and the root system needs to establish contact with the new medium before it can process a feed effectively. Introducing fertiliser to a disrupted root system adds salt load without the plant being in a position to use it. Resume normal feeding once you see clear signs of recovery — new growth at the tips and no persistent drooping.

How many times should I transplant a photoperiod plant?

Once is ideal — from seedling container directly to the final pot. Two transplants are justified for large outdoor plants or sativa-dominant genetics with long veg periods where a mid-veg step-up to an intermediate pot is genuinely beneficial. Three or more is rarely necessary for home growers and each additional transplant adds cumulative stress with diminishing returns.

Container sizing for cannabis seedlings — pot size recommendations by strain type and grow situation, including autoflower final container sizing.

What soil to use for cannabis seedlings — choosing the right medium for the seedling stage and what to look for in a quality potting mix.

When to start feeding cannabis seedlings — why fresh medium does the work in the early weeks and when to introduce the first feed.

Cannabis seedling care in Australia — the complete seedling stage guide covering the first two weeks from germination.

Browse all cannabis seeds — feminised, autoflower, and photoperiod strains shipped from Australia.

Seeds are sold strictly as novelty collector’s items. They contain no THC or CBD. This page does not constitute medical or legal advice. By purchasing you agree to our terms and conditions. Always check local laws before germinating or cultivating cannabis.

Container Sizing for Cannabis Seedlings — and When to Transplant

Container Sizing for Cannabis Seedlings — and When to Transplant

Before we get into sizes and timing, one rule worth stating plainly at the top: if you’re growing autoflowering seeds, you don’t transplant. You pick your final container before the seed goes in the ground and you don’t move the plant again. If that’s your situation — skip to the autoflower section below and treat it as its own guide. The transplanting advice that follows is for photoperiod growers.

Autoflowering Seeds — Start in the Final Container, Full Stop

Autoflowers run on a fixed seed-to-harvest timeline. The plant begins developing its flower sites at 3–4 weeks from germination regardless of what you’re doing to it, and there’s no veg stage you can extend to compensate for lost time. Transplanting — even a careful one — sets the plant back 5–7 days while it recovers. That’s a week of its fixed timeline gone. You cannot get it back.

For autoflowering seeds, the right container size is the one the plant finishes in. Indoors: 10–15 litres. Outdoors: 15–20 litres minimum. Germinate directly into that container. If the seedling looks small and lost in a large pot for the first two weeks, that’s fine — water in a small ring around the seedling rather than flooding the whole medium, and resist the urge to move it somewhere more proportionate. It will catch up.

The medium you choose for the final container needs to work at the seedling stage too — which is another reason I prefer coco with perlite for autos. What to use is covered in the seedling soil guide. Light, airy, inert — it suits a seedling with minimal roots and scales into an established plant without any changes.

Why I Don’t Like Transplanting

I’ll tell you my preference upfront: I don’t like transplanting, and I avoid it where the grow situation allows. Every time you move a plant you’re introducing a recovery period, and recovery periods are time the plant isn’t building root mass or canopy. Photoperiod plants can absorb that cost during a long veg stage — but it’s still a cost, and it adds up across a grow.

The growers who swear by progressive transplanting — small cup to mid-size container to final pot — argue that a root system that fills each container before moving develops more vigorously than one that starts in a large volume. There’s something to that. A seedling in a 15-litre pot of coco has a lot of medium it can’t yet reach, which makes overwatering much more likely and root development slower in those outer zones. Starting smaller gives the seedling a more manageable environment.

My preference is to find a middle ground: start in a container large enough that I only transplant once, not twice. One move, well-timed, is something most photoperiod plants handle without much drama. Two moves is pushing it. Three is unnecessary stress with no real payoff for a home grower.

Cannabis seedling containers shown in relative sizes=

Container Sizes for Photoperiod Seedlings

The standard starting container for a photoperiod seedling is 0.5–1 litre — a small plastic pot, a cut-down milk container, or a seedling tray cell. The goal is a volume of medium that dries out at a rate the seedling can manage, which reduces overwatering risk dramatically. A small container also means the roots fill it relatively quickly, which is your signal to move.

From there, the path depends on how big you intend the plant to get:

Small indoor plants (SOG, SCROG, limited tent space): Seedling container → 3–5 litre → final pot of 8–12 litres. One transplant, or two if you’re running SOG and want very short veg time in small pots before flipping.

Standard indoor plants: Seedling container → 10–15 litre final pot. One transplant. This is the approach I’d use for most indica-dominant and shorter hybrid genetics where you’re not chasing maximum size.

Large indoor or outdoor plants: Seedling container → 10 litre intermediate → 20–30 litre final pot. Two transplants — only justified if you’re running sativa-dominant genetics with long veg periods, or large outdoor plants where root volume genuinely matters for yield.

The rule of thumb that holds across all of these: the final pot should be large enough that the plant never becomes root-bound before harvest. A root-bound plant in late flower is harder to manage than one with room to grow, and the yield hit from restriction late in the cycle isn’t worth whatever space you saved.

Container size by strain type

Starting container, final container, and how many transplants to expect

Format Container path Transplants

Auto — indoor
auto

Fixed timeline — no veg stage

10–15 L final pot

Germinate directly into final container
None

Auto — outdoor
auto

Fixed timeline — no veg stage

15–20 L final pot

Germinate directly into final container
None

Photo — small indoor
photo

SOG, SCROG, limited tent
0.5–1 L

8–12 L final
Once

Photo — standard indoor
photo

Most indica and hybrid genetics
0.5–1 L

10–15 L final
Once

Photo — large outdoor
photo

Sativa-dominant, long veg
0.5–1 L

10 L

20–30 L final
Twice

Autoflowers are never transplanted. The fixed seed-to-harvest timeline means any transplant stress costs time the plant cannot recover. Start in the final container from day one.

Why Fabric Pots — and One Thing Most Growers Don’t Know About Them Outdoors

My preference across the whole grow is fabric pots. The reason is air pruning. In a standard plastic pot, roots hit the wall and have nowhere to go — they spiral around the inside, eventually choking themselves and blocking drainage. In a fabric pot, when roots reach the wall they’re exposed to air, the tip dries out and stops growing, and the plant responds by throwing out new lateral roots from the same point. The result is a dense, fibrous root mass through the entire volume of medium rather than a circling knot around the edges.

More roots means more surface area for water and nutrient uptake. The practical difference shows up most clearly in how well the plant handles high feed EC in mid-flower — an air-pruned root system is better equipped to manage it than one that’s been circling plastic for eight weeks.

The thing most growers don’t know: for outdoor grows in Australian summer, fabric pots regulate root zone temperature significantly better than black plastic. Black plastic containers can push substrate temperature 8–10°C above ambient on a hot day — that’s roots sitting at 32–35°C when your ambient temperature is 25°C. Root stress above 26°C reduces nutrient uptake noticeably. Fabric pots, particularly white or light-coloured ones, allow constant heat exchange with ambient air and keep root zone temperature 4–6°C cooler. For outdoor summer grows in Queensland and northern NSW, that difference is meaningful.

The one adjustment with fabric pots: they dry out faster than plastic because moisture evaporates from the sides as well as the top. You’ll water more frequently, which most growers find is a feature rather than a problem — it’s harder to overwater when the medium dries out at a reasonable rate.

When to Transplant — What the Plant Is Telling You

Most guides give you a timeframe — “transplant at 3–4 weeks.” I’d rather you watch the plant than the calendar, because strain variation, environment, and medium all affect how quickly a seedling fills its container.

The most reliable signal is roots showing at the drainage holes. If you can see white root tips emerging from the bottom of the pot, the plant has explored the full volume of medium available to it and needs more room. Don’t wait past this point — a root-bound seedling goes into transplant stress from a worse starting position than one moved at the right time.

Secondary signals that together suggest the plant is ready: the medium is drying out within 24 hours of a full watering (the roots are consuming the available water faster as they develop), growth has visibly slowed despite healthy feeding and lighting, and the plant looks proportionally large relative to its container.

One signal that’s often misread: leaf colour alone is not a transplant indicator. A seedling showing pale or yellowing leaves may need nutrients or a pH correction, not a bigger pot. Check drainage holes and medium dry-down rate before concluding the container is the problem.

How to Transplant Without Stressing the Plant

Water 12–24 hours before transplanting. The medium should be moist but not saturated — moist soil holds its structure around the roots, which means the root ball stays intact when you remove it. Dry medium crumbles, disturbs the root system, and dramatically increases transplant shock risk. This is the single most important preparation step and it’s regularly skipped.

Prepare the new container first. Fill it with your medium, make a hole in the centre sized to the root ball of the plant you’re moving, and water the new medium before the transplant. You want the new environment to be ready before the plant is out of its old one — roots exposed to dry medium and dry air for even a few minutes adds unnecessary stress.

Remove the plant root ball intact. For plastic pots — squeeze the sides gently to break the medium away from the wall, then turn upside down with your hand supporting the base of the stem and let gravity do the work. Don’t pull the stem. For fabric pots being used as seedling containers — these are harder to remove cleanly, which is another reason I prefer to start seedlings in plastic and move to fabric for the final container. If you are using a small fabric pot, cut it away rather than trying to pull the plant out.

Transfer directly into the new container. Root ball goes into the pre-made hole in the new medium. Backfill gently around the sides without compressing the medium — you want structure, not compaction. The root ball should sit at the same depth it was in the previous container. Don’t bury the stem.

Transplant at lights-off, or in the evening for outdoor grows. Moving a plant into intense light immediately after transplanting adds heat and photosynthetic demand at a moment when the root system is disrupted and can’t meet it. Indoor growers should transplant right before the light schedule goes dark — the plant gets several hours to settle before it has to work again. Outdoor growers: evening transplants, same logic.

Water in and hold nutrients for 5–7 days. Water gently after transplanting to settle the medium around the root ball. Then hold nutrient feeding for the first five to seven days — plain pH-adjusted water only. The root system needs to establish in the new medium before it can process nutrients effectively, and adding fertiliser to a disrupted root system contributes to salt stress rather than helping recovery.

How to Tell If the Transplant Went Well

Some drooping in the first 24–48 hours after transplanting is normal and not a cause for concern. The root system is re-establishing its ability to take up water and the plant may look softer than usual. As long as the medium is appropriately moist and temperature is stable, this resolves on its own.

The recovery indicator worth watching for is new white root tips at the drainage holes of the new container, usually visible within 4–7 days of a successful transplant. New root growth is the clearest sign the plant has settled in and is expanding into the new medium. If you see no new growth at the surface and no recovery from drooping after 5–7 days, check pH, check medium moisture, and check root health by carefully inspecting the base of the container.

Persistent drooping, yellowing that started after the transplant, or slowed growth that doesn’t resolve in a week are signs the transplant caused more stress than usual — most likely from root disturbance, temperature shock, or medium issues in the new container. Hold feeding and reassess timing using the seedling feeding guide.

The full range of cannabis seeds available from Sacred Seeds Australia — autoflowering, photoperiod, and fast version — each have different container requirements from day one. Getting that decision right before germination is easier than correcting it mid-grow.


Frequently Asked Questions — Container Sizing and Transplanting Cannabis Seedlings

Can I start a cannabis seedling in its final large container?

Yes — but it requires more careful watering. A seedling in a large volume of medium has a small root system relative to the available moisture, which makes overwatering the most likely mistake. Water in a ring around the seedling rather than flooding the full pot, and let the medium dry appropriately between waterings. Many growers prefer to start in a smaller container and transplant once specifically to avoid this, but starting in the final container works if you’re disciplined with watering volume. For autoflowering seeds, starting in the final container isn’t optional — it’s required.

What size container does an autoflower need?

10–15 litres indoors, 15–20 litres for outdoor grows. These are the final containers — autoflowers are never transplanted, so the size you start in is the size you finish in. Going smaller limits the root volume available during the fixed grow window and costs yield. Going significantly larger doesn’t hurt the plant but increases overwatering risk in the seedling stage, which needs to be managed with careful watering volume in the early weeks.

How do I know when to transplant a cannabis seedling?

Watch for roots emerging from the drainage holes — that’s the clearest signal the plant has used the available root space and needs more. Secondary signals include the medium drying out within 24 hours of a full watering and visibly slowed growth despite good conditions. Don’t rely on timing alone — strain variation and environment affect how quickly different plants fill a container, and moving too early is almost as disruptive as moving too late.

How many times should I transplant a photoperiod cannabis plant?

Once if you can manage it — seedling container to final pot. Starting in a container large enough to go straight to the final size reduces recovery periods and simplifies the grow. Two transplants are justified for large outdoor plants or sativa-dominant genetics with long veg periods where root volume genuinely contributes to final size. Three or more transplants is rarely necessary for home growers and adds cumulative stress with diminishing returns.

Why are fabric pots better than plastic for cannabis?

Fabric pots allow air to reach the outer root zone through the container walls. When roots hit the fabric they’re exposed to air, the tip dries out and stops extending, and the plant generates new lateral roots from that point. Over a full grow this produces a dense, branched root mass through the entire pot rather than circling roots around the inside wall. More root surface area means better water and nutrient uptake, better drainage, and a plant that handles higher feed concentrations more efficiently in mid-flower. For outdoor growers in Australian summer, fabric pots also regulate root zone temperature better than black plastic — a meaningful advantage when ambient temperatures push above 30°C.

Should I use nutrients right after transplanting?

No — hold nutrients for 5–7 days after transplanting and water with plain pH-adjusted water only. The root system needs to establish contact with the new medium before it can process nutrients effectively. Introducing fertiliser to a disrupted root system adds salt load without the plant being in a position to use it. Resume normal feeding once you see signs of recovery — new growth at the surface and no persistent drooping.

Can I transplant an autoflower if I started in too small a container?

Strongly not recommended. The fixed timeline of an autoflower means any stress-related growth pause costs time the plant cannot recover. Even a careful transplant sets most autos back 5–7 days. If you’ve germinated an auto in too small a container, your best option is to manage the situation where it is — water carefully, feed appropriately for its size, and accept the yield impact rather than making it worse. Next time, start in the correct final container size from day one.

When to Start Feeding Cannabis Seedlings

When to Start Feeding Cannabis Seedlings

The most consistent mistake I see from growers who’ve had reasonable success elsewhere — in the veggie garden, with other plants, even with cannabis at the later stages — is feeding cannabis seedlings too early. It’s not laziness or carelessness. It usually comes from a logical place: the plant is growing, nutrients help plants grow, so nutrients should help now. That logic breaks down completely at the seedling stage, and understanding why is the whole point of this article.

A cannabis seedling in its first two to three weeks has almost no root mass. What’s down there is a taproot and the earliest hints of lateral branching — a structure with very limited surface area for uptake and almost no capacity to buffer excess salt. When you feed that plant, most of what you’re putting in sits in the medium and accumulates. The seedling can’t flush it, can’t process it, and can’t grow through it. It just sits there building salinity until the symptoms show up on the leaves.

The good news is that a seedling in a properly prepared medium doesn’t need anything from you for the first two to three weeks. What a good seedling medium provides is covered in the soil guide. Your job in that window is to water correctly, maintain stable temperature and humidity, and watch — not feed.

What Good Seedling Medium Already Provides

If you’re running coco coir that’s been properly buffered with a Cal-Mag solution before use, the cation exchange sites are saturated — the coco isn’t going to rob calcium and magnesium from your seedling before it can access them. That’s all you need at this stage. The seedling isn’t asking for nitrogen, phosphorus, or potassium in week one. It’s asking for stable moisture, oxygen at the root zone, and light.

If you’re using a quality organic seedling mix or a light cannabis-specific base soil, there’s typically enough slow-releasing organic matter present to carry the plant comfortably through weeks one and two without any additions. The EC of good seedling medium — if you test a slurry sample — should read 0.5–0.8. That’s a small but real amount of available nutrition. It’s exactly what the plant needs at that stage and not significantly more.

Where growers run into trouble is using a potting mix that reads 1.5–2.0 EC in a slurry test and then adding nutrients on top of it. The medium is already hot by seedling standards, and anything added on top pushes it into territory where tip burn is essentially guaranteed within the first two weeks. Check your medium before you germinate. It saves a lot of headaches later.

The Trigger — When the Plant Is Ready

I don’t use days as the trigger for first feed. I use the plant. The indicator I watch for is the third node — the third pair of true leaves developing clearly — combined with a root system that’s visibly active. In coco you can sometimes see the first roots at the drainage holes by this point. In soil it’s less visible, but the medium drying down at a reasonable rate (rather than staying wet for days) tells you the roots are working.

In practice this usually falls somewhere between days 14 and 21 from germination, but I’ve seen it as late as day 28 in slower-developing phenotypes or cooler environments. The calendar is a rough guide. The plant is the actual benchmark.

A useful secondary check before the first feed: look at the cotyledons — the round first leaves that emerge with the seedling. In a healthy seedling with no nutrient needs, they’ll be pale green and beginning to yellow naturally as the plant draws on them and moves nutrients upward. That natural yellowing of cotyledons is not a deficiency signal — it’s the plant doing exactly what it should. If the cotyledons are yellowing heavily and the true leaves are also pale or showing symptoms, that’s a different situation and worth investigating before feeding.

Diagram showing cannabis seedling development from cotyledons through to node 3 — the third node with roots visible at drainage holes is the trigger for first feed

What to Start With — and What EC to Target

My preference for first feeds is a biostimulant or organic liquid before anything resembling a standard nutrient solution. Seasol — the straight seaweed extract, not the Seasol PowerFeed blend — at well below label rate is something most Australian growers already have on hand and it’s a genuinely good first feed for seedlings. It introduces beneficial compounds and gentle root stimulation without the salt load of a conventional nutrient feed. If you’re running a purpose-built organic line through the whole grow — Aptus, Gaia Green, Dr Greenthumbs — follow the seedling rate on the product and halve it for the first application.

For growers who want to stay in the Bunnings ecosystem entirely, Nitrosol at 1ml per litre is a well-tested starting point that Australian growers have used for years. It’s a fish and kelp liquid fertiliser — organic, low salt, and forgiving enough that it won’t burn a seedling at that dilution. Switch to PowerFeed (the red bottle) once the plant is in early flower. It’s not sophisticated, but it works, and that’s worth saying plainly.

EC targets: First feed should land at 0.4–0.6 EC in the final solution going in. That’s well below what most nutrient calculators recommend for “seedling stage” — and deliberately so. You’re not trying to push growth at this point, you’re introducing the root system to the concept of nutrient solution without stressing it. By the end of week three, building toward 0.8–1.0 EC is reasonable as the plant establishes. Don’t chase the numbers on the nutrient label — those are written for established plants, not seedlings.

One practical note: always pH your feed solution after adding nutrients, not before. Nutrient additions change pH, sometimes significantly. Target 6.2 at the point of application for soil and coco grows. Why 6.2 and how to hit it consistently is explained in the seedling soil guide.

What Overfeeding Looks Like — and Why It’s Easy to Miss Early

The first sign of overfeeding in a cannabis seedling is tip burn — the very tips of the serrated leaf edges turn brown and curl slightly. It looks minor. Most growers see it and assume it’s a one-off or a handling mark. It isn’t. Tip burn on a seedling is the plant telling you the salt concentration at the root zone is higher than it can manage, and the damage is being expressed at the extremity of the leaf where water delivery is weakest.

Diagnostic guide comparing natural cotyledon yellowing versus nutrient tip burn in cannabis seedlings — cotyledon yellowing is normal, brown crispy leaf tips indicate overfeeding

The instinct when you see tip burn is sometimes to water more, thinking the plant is dry. In an overfed seedling this makes it worse — you’re adding more solution to a root zone that’s already carrying excess salt. The correct response is to water with plain pH-adjusted water for the next one or two waterings and let the root zone flush through naturally before reintroducing nutrients at a lower rate.

Beyond tip burn, other overfeeding symptoms that show up slightly later include: leaf edges cupping downward (a classic sign of nitrogen toxicity — the leaf is trying to reduce surface area exposed to excess nutrient uptake), deep, almost blue-green colouration in the leaves (again, nitrogen excess), and in more severe cases, leaf clawing where the tips hook downward sharply. By the time you’re seeing clawing in a seedling, the root zone has been under significant salt stress for a while and recovery will take time the plant — particularly an auto — doesn’t have.

What makes early overfeeding easy to miss is that the plant often looks healthy for a few days after the damage is done. The tip burn appears 3–5 days after the overfeed event, not immediately. Growers who feed on a schedule sometimes don’t connect the symptom to the feed because there’s a delay between cause and effect. This is why watching the plant — rather than following a fixed feeding schedule — matters at this stage.

Autoflowers — Why the Feeding Rules Are Stricter

Everything above applies to both autoflowering and photoperiod seedlings, but the stakes are higher for autos. A photoperiod plant that gets overfed in week two loses time recovering — you can hold it in veg while it rights itself and the overall impact on the final plant is manageable. An auto that gets overfed in week two loses days from a fixed timeline it cannot extend. The damage carries through to harvest.

For autoflowering seeds specifically, I’d push the no-feed window to three full weeks rather than two, and I’d start even lower — 0.3–0.4 EC for the first application, building slowly. The genetics that carry through in auto crosses — OG, Cookies, Haze — tend to carry the nutrient sensitivity of their photoperiod parents alongside the ruderalis autoflowering trait. An Auto OG or Auto GSC will show tip burn from overfeeding just as readily as the photoperiod version, and it has less time to recover.

The growers who do best with autos in the seedling stage are the ones who understand that restraint at this point isn’t timid growing — it’s the setup for everything that follows. A seedling with an undisturbed, healthy root system entering week three is in a fundamentally better position than one that spent its first two weeks fighting salt stress.

Building From the First Feed

Once you’ve introduced the first feed at 0.4–0.6 EC and the plant has responded well — no tip burn, continued new leaf development, healthy colour — you build from there. Week three to four: 0.8–1.0 EC. Week four into early veg: 1.0–1.2 EC. These are gradual steps, not jumps. Each increment gives the root system time to adapt before the next increase.

Watch the tips at every stage. They’re the early warning system. A bit of tip discolouration tells you to hold the current EC rather than increase it. Clear, clean leaf edges tell you the plant is handling what it’s receiving. That feedback loop — feed, observe, adjust — is how experienced growers dial in a feeding programme. Not by following the nutrient label, and not by guessing.

How you feed connects directly to the containers you’re running and whether you’ve transplanted. The container sizing and transplanting guide covers how medium volume and root development affect feeding readiness. A seedling that’s just been transplanted needs a hold on nutrients for 5–7 days regardless of where it was in the feeding cycle — the root system needs to re-establish before it can process anything.

The full range of cannabis seeds available from Sacred Seeds Australia spans genetics with varying nutrient sensitivities — from robust ruderalis-heavy autos to finicky OG and Haze crosses. Whichever you’re running, the seedling feeding principles are the same. Start later than you think you need to, start lower than the label suggests, and let the plant tell you when to move forward.


Frequently Asked Questions — Feeding Cannabis Seedlings

When should I start feeding cannabis seedlings?

When the third node is clearly developing — the third pair of true leaves showing — and the root system is visibly active. In practice this is usually days 14–21 from germination, but the plant is the benchmark rather than the calendar. A seedling in good medium doesn’t need nutrients before this point and overfeeding early causes more damage than holding off does.

What EC should I use for the first feed?

0.4–0.6 EC in the final solution. That’s deliberately conservative — below most nutrient label recommendations for seedling stage, which are written for established plants. The goal at first feed is to introduce the root system to nutrient solution without stressing it. Build toward 0.8–1.0 EC by the end of week three as the plant establishes, then continue increasing gradually from there.

What nutrients should I use for cannabis seedlings?

A biostimulant or dilute organic liquid before anything resembling a full nutrient feed. Seasol (straight seaweed extract, not PowerFeed) at well below label rate is a solid starting point that’s widely available in Australia. If you’re running a full organic programme — Aptus, Gaia Green, Dr Greenthumbs — halve the seedling rate for the first application. For growers sticking to Bunnings products, Nitrosol at 1ml per litre is a proven low-risk starting feed. Start conservative regardless of the line you’re running.

What does overfeeding a cannabis seedling look like?

Tip burn first — the very tips of the leaf edges browning and curling slightly, appearing 3–5 days after the overfeed event. Later signs include leaves cupping downward, deep blue-green colouration indicating nitrogen excess, and in severe cases, leaf clawing where tips hook sharply downward. If you see tip burn, water with plain pH-adjusted water for the next couple of sessions before reintroducing nutrients at a lower rate.

Do cannabis seedlings need Cal-Mag?

Not as a nutrient feed, but as a buffer if you’re using raw coco coir. Coco has a natural affinity for calcium and magnesium — it will pull them from your feed water and bind them before the plant can access them unless the cation exchange sites are pre-saturated. Buffer raw coco with a Cal-Mag solution before use (water through to runoff, wait 30 minutes, water through again) and this issue is resolved. Pre-treated coco from quality brands handles this before bagging. In soil, Cal-Mag supplementation at the seedling stage is rarely needed unless you’re using reverse osmosis water with no mineral content.

Should I feed autoflower seedlings differently to photoperiod seedlings?

Same principles, stricter application. The no-feed window for autos should extend to three full weeks rather than two, and the first feed EC should start at 0.3–0.4 rather than 0.4–0.6. Autoflowers have a fixed timeline — damage done in week two carries to harvest without a recovery window. Many popular auto genetics also carry the nutrient sensitivity of their photoperiod parents. An Auto OG or Auto GSC will show tip burn from overfeeding as readily as the full photoperiod version, with less time to recover from it.

Why do my seedling leaves look yellow even though I haven’t fed yet?

Check which leaves are yellowing. Natural yellowing of the cotyledons — the round first leaves — is normal and expected. The plant is drawing the nutrition stored in them upward as it develops true leaves, and they’ll yellow and drop off in the first two to three weeks. This is not a deficiency. If the true leaves — the serrated ones that develop after the cotyledons — are yellowing or pale, that’s a different issue and worth investigating: check pH, check medium EC, and check watering frequency before reaching for a nutrient bottle.

How quickly should I increase EC after the first feed?

Gradually, over one to two weeks. First feed at 0.4–0.6 EC, then build toward 0.8–1.0 EC by the end of week three, and 1.0–1.2 EC into early veg. Watch the leaf tips at each stage — they’re the most reliable indicator of whether the plant is handling the current level. Any tip discolouration means hold the current EC rather than increasing. Clean, crisp leaf edges mean you can move forward. Never jump EC based on the calendar alone.

What Soil to Use for Cannabis Seedlings

What Soil to Use for Cannabis Seedlings

The seedling stage is where more grows go wrong than at any other point, and most of the damage happens before the seed even germinates. Growers spend money on good genetics, get the germination right, and then pot into whatever mix they have on hand — often something too rich, too dense, or too wet-retaining for a seedling that has no root mass yet to draw on. I’ve seen it enough times to know it’s worth writing about properly.

This covers what I use, what the seedling actually needs in its first few weeks, and what to avoid. Whether you’re running autoflowering seeds or photoperiods, the seedling stage requirements are the same — but for auto growers especially, getting the medium right from the start matters more, because there’s no recovery window if something goes wrong in week one.

Cross-section diagram comparing optimal vs poor cannabis seedling medium structure — aeration, drainage, root penetration, salt buildup

What a Cannabis Seedling Actually Needs From Its Medium

A seedling’s root system is minimal for the first two to three weeks. It cannot access nutrients the way a mature plant can, and it has almost no tolerance for salt build-up. What it needs from a growing medium is not nutrition — it’s structure. Specifically: good drainage so water moves through rather than sitting, aeration so the roots can access oxygen, and a light enough texture that the taproot can push through without resistance.

The nutrition comes later. The soil or coco mix you start in should provide almost nothing in the way of available nutrients. A seedling in a rich, hot mix will show tip burn and early nitrogen toxicity before it has its third set of leaves. Correcting that in an auto is difficult. Correcting it in a photoperiod costs you time. Better to start light and introduce nutrients deliberately once the plant is established.

pH sits at 6.2 for soil grows. That’s the target at the root zone, not just in the water going in. A consistent 6.2 keeps all the major and minor nutrients available without locking any out. Drift higher toward 7.0 and you start seeing iron and manganese deficiencies. Drop below 6.0 and calcium and magnesium uptake suffers. Get a decent pH pen and use it every time.

Why I Prefer Coco Coir for Seedlings

My preference for seedlings is coco coir or cocopeat — not a soil-based mix. I’ll explain why, because I know it’s not what most people start with.

Coco is inert. It contains no nutrients of its own, which sounds like a disadvantage but is exactly what you want for seedlings. You control what goes in. There’s no guessing what the mix already contains, no risk of a hot base soil burning roots that can’t yet handle it. Coco also has a naturally high air-to-water ratio — it retains moisture well enough that you’re not watering every day, but it drains freely enough that roots aren’t sitting in saturation. For a seedling with minimal root mass, that balance is hard to beat.

The other advantage is consistency. Soil mixes vary batch to batch and brand to brand. Coco is predictable. Once you know how it behaves, you can dial in your watering and feeding routine and trust it will respond the same way every time.

What to add to coco for seedlings: Run coco at roughly 70–80% with 20–30% perlite. The perlite improves drainage and aeration further, which matters most in the seedling stage when overwatering is the biggest risk. For seedlings I go toward the higher end of perlite — 30% — and reduce it slightly for the established plant in its final container.

Pre-treating coco: If you’re using raw coco coir bricks or loose coco, rinse and buffer before use. Coco naturally contains high levels of sodium and potassium, and it has a strong cation exchange affinity for calcium and magnesium — meaning it will pull Cal-Mag out of your feed water and bind it before the plant can access it. Buffering with a Cal-Mag solution (follow the product rate, water to runoff, leave 30 minutes, water through again) saturates the cation exchange sites so they don’t rob your seedlings. Pre-treated coco from reputable brands handles this before bagging, but it’s worth knowing.

If You’re Using Soil — What to Look For

Not everyone wants to run coco, and that’s fine. Soil works well for seedlings when it’s the right mix. The key is choosing something light and airy rather than a heavy potting mix designed for vegetables or flowering plants. Standard potting mixes from hardware stores are typically too dense, too nutrient-rich, and too water-retentive for cannabis seedlings. They’re formulated to hold moisture and deliver nutrition — two things that will cause problems at the seedling stage.

What you want is something marketed as a seedling mix or propagation mix, or a quality cannabis-specific base soil. Look for perlite already in the mix, or add it yourself to bring it up to 20–30%. Peat-based mixes work, though they tend to become hydrophobic once dry — water carefully and evenly. Cocopeat-based mixes (which is essentially the same thing as coco coir in compressed form) are my preference if you’re going soil-adjacent rather than full coco.

What to avoid: Slow-release fertiliser granules in the base mix — these are common in Australian potting mixes and will overfeed seedlings regardless of what you’re adding in water. The Osmocote range at Bunnings is a good example: the seed raising mix is reasonable for seedlings, but the premium potting mixes contain slow-release fertiliser that makes them too hot at the seedling stage. Heavy, bark-based mixes that compact when wet. Anything described as “premium” or “enriched” for established plants. Water-crystals or gel additives that hold moisture.

The Scotts Osmocote seed raising mix — the plain one, not the potting mix — comes up regularly in Australian grower forums as a workable seedling medium when you’re not running full coco. It’s light, drains reasonably well, and the nutrient load is low enough for the seedling stage. Mix in 20–30% perlite and it’s a solid starting point.

A useful test before you commit to a soil: check the EC of a slurry sample (1:1 soil to pH-neutral water, stir, let settle, test the water). Seedling-appropriate soil should read 0.5–0.8 EC. Anything above 1.2 is too hot for a seedling and will cause problems within the first two weeks.

Flowchart showing how to choose cannabis seedling medium — coco coir vs soil options, EC levels and burn risk for Australian growers

Container Size and the Seedling Stage

The medium you start in and the container you start in are related decisions. Getting both right is covered in the companion guide to container sizing and transplanting. For now, the short version: seedlings do not benefit from large volumes of medium. A small container — 0.5 to 1 litre — dries out at a rate the seedling can manage, which makes overwatering much less likely. A seedling in a 10-litre pot of coco is sitting in a large volume of wet medium it has no roots in yet, and root rot risk goes up significantly.

The exception is autoflowering seeds, where you start in the final container from day one. This is a non-negotiable rule for autos — transplanting at any stage disrupts the fixed timeline and costs yield that the plant cannot recover. For auto growers, that means choosing a medium with seedling-appropriate properties that also suits the established plant: coco with 20–25% perlite handles both stages well.

When Feeding Starts

Not at the seedling stage. A seedling in good coco or a light seedling mix does not need nutrients for the first two to three weeks. When to start feeding cannabis seedlings covers the timing and EC targets in detail. The short answer: watch the plant, not the calendar, and don’t reach for the nutrient bottle because a week has passed.

The most consistent mistake I see in growers who’ve had success with outdoor vegetable gardens is applying the same feeding logic to cannabis seedlings. Garden plants in established beds have mature root systems buffered by soil biology. A cannabis seedling in week one has almost nothing — a short taproot and the first hints of lateral growth. Feed it like a hungry teenager and you’ll burn it.

What to Use — The Short Version

My preference: Coco coir or cocopeat mixed with 20–30% perlite. Pre-buffered if using raw coco. pH your water to 6.2 before it goes in. Feed nothing for the first two to three weeks. Simple and repeatable.

If using soil: Light propagation or seedling mix, or a quality cannabis-specific base soil. Check EC before using — below 0.8 is appropriate. Add perlite to 20–30% if not already present. Avoid anything with slow-release nutrients, heavy bark content, or moisture crystals.

What matters most: Good drainage, aeration, low initial nutrient load, and pH at 6.2. The genetics you’re growing will take care of the rest if the foundation is right. Browse the full range of cannabis seeds available from Sacred Seeds Australia — auto, photoperiod, and fast version — and match your medium setup to the format you’re running.


Frequently Asked Questions — Soil for Cannabis Seedlings

Can I use regular potting mix for cannabis seedlings?

Most standard potting mixes sold in Australian hardware stores and nurseries are not suitable for cannabis seedlings. They’re typically too dense, hold too much moisture, and contain slow-release fertilisers that will overfeed a plant with no root mass to handle it. If potting mix is what you have, cut it heavily with perlite (at least 30%) and check the EC before use. A seedling-appropriate medium reads below 0.8 EC in a slurry test. Anything significantly above that is going to cause tip burn within the first two weeks.

Is coco coir better than soil for seedlings?

For most setups, yes — and specifically because it’s inert. There’s no pre-loaded nutrient content to manage, no variability between batches, and the drainage and aeration properties are better suited to the seedling’s minimal root system. The trade-off is that you’re responsible for everything the plant gets from day one, which means a more attentive watering and feeding routine as the plant establishes. For growers who want less active management, a good quality light soil or seedling mix with added perlite is a reasonable alternative.

What pH should my water be for cannabis seedlings in soil or coco?

6.2 is my target for soil and coco-based grows. Not a range — a target. Consistent pH at 6.2 keeps all the major nutrients available at the root zone without locking anything out. Check your pH every time before watering, especially in coco where pH drift can happen quickly if you’re not monitoring it.

Do I need to add perlite to my seedling mix?

Almost certainly, yes. Most commercial seedling mixes and base soils benefit from added perlite, and for coco grows it’s essentially non-negotiable. 20–30% perlite by volume improves drainage and oxygen availability at the root zone significantly. Without it, the medium holds too much water for the seedling’s root system to manage, and overwatering becomes the path of least resistance.

Why shouldn’t I feed cannabis seedlings straight away?

Because the root system at week one has almost no capacity to process nutrients, and any excess sits in the medium and builds salinity. The seedling’s job in the first two to three weeks is to establish its root network — and it can do that from the small amount of nutrition present in a good seedling mix or buffered coco without any additional input from you. Adding fertiliser to a seedling that’s not ready for it causes tip burn, root stress, and slowed development. The full guide to when to start feeding cannabis seedlings covers first feed timing and EC targets.

Can I use the same medium for autoflowers and photoperiods?

Yes — the seedling medium requirements are the same. The key difference is what you do at transplant time. Photoperiod plants move from a small seedling container to a larger vegetative container to their final pot as they develop. Autoflowering seeds start in their final container from day one and do not get transplanted. This means your coco or soil mix needs to work for the full lifecycle of the auto plant from the first day — which is another reason I prefer coco with perlite for autos specifically. It performs well at the seedling stage and scales into the established plant without any changes.

Cannabis Nutrient Deficiencies: How to Diagnose and Fix Them

Cannabis Nutrient Deficiencies: How to Diagnose and Fix Them

Cannabis leaves are a communication system. When they start yellowing, developing spots, curling, or changing colour in patterns that don’t look right, the plant is telling you something is wrong with its nutrient supply. The problem most growers run into isn’t identifying that something is wrong — it’s knowing which nutrient is missing, why it’s missing, and what to do that will actually fix it rather than making it worse.

This guide gives you the framework to diagnose cannabis nutrient deficiencies correctly and fix them before they cost you yield. The starting point is a concept that most guides skip past too quickly — and it’s the one that makes the difference between systematic diagnosis and guesswork.

The One Concept That Changes Everything: Mobile vs Immobile Nutrients

Before looking at any specific symptom, you need to understand how the plant moves nutrients internally. This is the master key that makes deficiency diagnosis logical rather than guesswork — and most growers either don’t know it or don’t apply it consistently.

Mobile nutrients — nitrogen, phosphorus, potassium, magnesium — can be relocated by the plant. When supplies run low, the plant cannibalises older, lower leaves to feed new growth at the top. This means mobile deficiencies always show up on the bottom of the plant first, working upward as the deficiency progresses.

Immobile nutrients — calcium, sulphur, iron, manganese, zinc — get locked into plant tissue permanently once delivered. The plant can’t retrieve and relocate them. So when these run short, new growth suffers first because the plant can’t pull from existing tissue to compensate. The problem appears at the top of the plant, on the newest leaves.

Your two-step starting point for any deficiency diagnosis: is the problem on the lower, older leaves? Mobile nutrient deficiency. Is the problem on the upper, newer growth? Immobile nutrient deficiency. That single observation cuts your diagnostic list in half immediately and points you toward the right category of fix.

Mobile vs immobile nutrient deficiencies in cannabis — top leaves affected vs bottom leaves affected

The Mobile Nutrient Deficiencies — What Shows Up on Lower Leaves

Nitrogen Deficiency

Nitrogen deficiency is the most common deficiency in cannabis and one of the easier ones to identify correctly. It shows as a uniform, pale yellowing across the entire leaf — not patchy, not spotted, just an even fade from green to yellow starting on the oldest, lowest leaves and progressing upward as the plant continues cannibalising lower foliage to feed new growth. Affected leaves will eventually wilt and drop.

It’s most common during the vegetative stage because nitrogen is the primary driver of leaf and stem growth — a fast-growing plant in active veg can burn through available nitrogen quickly. The fix is straightforward: feed with a nitrogen-rich grow formula and the plant will respond visibly within a week.

One important caveat: don’t reach for high-nitrogen nutrients during flowering. Excess nitrogen late in the grow suppresses bud development and affects the final smoke quality. Natural yellowing of lower fan leaves in weeks six to eight of flower is expected and correct — it’s the plant redirecting resources to bud production, not a deficiency that needs correcting.

Phosphorus Deficiency

Phosphorus deficiency is easy to misread because it doesn’t present as straightforward yellowing. Instead, affected leaves develop a dark, bluish-green discolouration. The specific giveaway is the stems and leaf petioles — look closely for a purplish or reddish tint there, which combined with the dark leaf colour is a reliable indicator of phosphorus shortage rather than other causes. Growth slows noticeably and plants look generally stressed without an obvious single cause.

It’s most common in the flowering stage, because phosphorus is critical for bud formation. A phosphorus deficiency during flower will reduce your final yield more significantly than almost any other deficiency because it’s affecting the plant at exactly the moment it’s doing the most important work. Switch to or increase your phosphorus-rich bloom formula. For organic growers, bone meal worked into the medium is an effective longer-term solution.

Note: purple stem colouration also occurs in some genetics as a normal phenotypic expression — particularly in Afghani and Kush-lineage indicas — and from cold temperatures. Don’t confuse this with phosphorus deficiency. The diagnostic check is whether the dark leaf colour and slow growth accompany it.

Potassium Deficiency

Potassium deficiency has a distinctive pattern once you know what to look for: yellowing and browning that starts at the leaf edges and tips while the centre of the leaf stays green. It looks like the margins of the leaf have been lightly scorched. Don’t confuse this with nutrient burn — burn typically affects tips only and presents alongside dark green leaves rather than general yellowing.

Potassium deficiency can strike at any stage but it’s particularly damaging during flowering, when potassium demand spikes alongside phosphorus. A balanced bloom nutrient addresses most potassium shortfalls. Kelp meal is a good organic supplement. If the issue persists after correct feeding, check pH — potassium uptake is sensitive to pH imbalance and the nutrient may be present but unavailable.

Cannabis nutrient deficiencies chart showing yellow leaves purple stems and burnt leaf edges by deficiency type

The Immobile Nutrient Deficiencies — What Shows Up on New Growth

Calcium Deficiency

Calcium deficiency appears as irregularly shaped brown or rust-coloured spots on young leaves. New growth may be stunted, twisted, or come in misshapen. The spots aren’t uniform — they look like random splashes of damage rather than a consistent pattern, which distinguishes them from other deficiency presentations.

The important thing to understand about calcium deficiency is that more often than not, the calcium is already present in the medium — the plant just can’t access it because pH is outside the absorption range. This is especially common in coco coir, which has almost no natural buffering capacity and requires calcium supplementation from day one regardless of what else you’re feeding.

Check pH first before adding calcium. For soil, target 6.0–7.0. For coco and hydro, target 5.5–6.5. Once pH is corrected, supplement with a Cal-Mag product. In coco, Cal-Mag should be a non-negotiable part of every feed from seedling through harvest.

Magnesium Deficiency

Magnesium is technically a mobile nutrient but most often presents on middle to lower leaves and frequently co-occurs with calcium issues — which is why Cal-Mag addresses both simultaneously. The distinctive symptom is interveinal chlorosis: the areas between leaf veins turn yellow while the veins themselves stay green, creating a striped or marbled appearance that’s fairly easy to identify once you’ve seen it. Leaf edges may curl upward.

Cal-Mag covers both calcium and magnesium, which is why it’s such a useful staple. If you want a simple standalone fix for confirmed magnesium deficiency, Epsom salts work well — dissolve one teaspoon per four litres of pH-balanced water and feed as normal. Results are typically visible within five to seven days.

Quick Diagnosis Reference

Symptom Location Likely cause
Uniform yellowing, leaf drop Lower / older leaves Nitrogen (N)
Bluish-green leaves, purple stems Lower / older leaves Phosphorus (P)
Yellowing / browning at leaf edges and tips Lower / older leaves Potassium (K)
Brown spots, stunted or twisted new growth Upper / new growth Calcium (Ca) — check pH first
Yellow between veins, veins stay green Mid to lower leaves Magnesium (Mg)
Dark green leaves, crispy brown tips only Tips throughout Nutrient burn — too much, not too little
Multiple deficiency symptoms at once Anywhere pH lockout — check pH before anything else

The Most Overlooked Cause: Nutrient Lockout

This is where most growers lose weeks of time and a lot of money in unnecessary nutrients. The problem often isn’t a lack of nutrients at all — it’s lockout. Nutrients are physically present in the medium but chemically unavailable to the plant because the pH is outside the absorption window.

Cannabis can only uptake nutrients within a relatively narrow pH range. Stray outside it and no amount of feeding will solve the problem. The plant keeps looking sick, you keep adding nutrients, and you end up with toxic salt buildup on top of everything else. Multiple simultaneous deficiencies are a lockout signature — not a multi-nutrient shortage. When multiple symptoms appear at once, always check pH before adjusting any nutrients.

pH targets by medium: soil targets 6.0–7.0 with the sweet spot around 6.5. Coco coir and hydro target 5.5–6.5. These ranges aren’t suggestions — they’re the windows within which each nutrient becomes chemically accessible. A pH of 7.5 in coco will lock out calcium, magnesium, and iron simultaneously regardless of how much of each is present in your feed.

🧠 Jason — On pH and Nutrient Diagnosis

The number of growers I’ve spoken to who spent weeks trying to fix a calcium or magnesium deficiency that was actually a pH problem is genuinely frustrating. They keep adding Cal-Mag, the symptoms persist, they add more Cal-Mag, and the problem gets worse because the salt load is climbing while the plant still can’t access the nutrients. A quality pH pen is the highest-return investment in any grow kit. Check it before every feed, check it at the root zone if you’re seeing persistent symptoms, and correct it before you start chasing specific deficiencies. Most of what growers diagnose as a deficiency is lockout — and lockout doesn’t respond to more nutrients.

Nutrient Burn — The Opposite Problem

It’s worth addressing nutrient burn here because it’s frequently confused with deficiency, and the treatment is the opposite. Nutrient burn presents as dark green leaves with crispy, brown-burnt tips — the darkness of the green is the first indicator that the plant has excess nutrient salts rather than insufficient ones. The tips brown because the plant is pushing excess salts to the outer extremities.

If you see this: stop feeding immediately, flush with plain pH-balanced water at two to three times the volume of your pot, and let the medium dry slightly before resuming at a significantly reduced feeding rate. Feeding more when you see nutrient burn makes it worse — the instinct to reach for nutrients when the plant looks sick is the most common way growers escalate a manageable problem into a serious one.

Looking for genetics bred for resilience?

Answer six questions and Jess will match you to three strains based on your setup, experience, and goals.

Find Your Strain →

Key Takeaways — Cannabis Nutrient Deficiencies

Mobile nutrients (N, P, K, Mg) deficiencies show on lower, older leaves — the plant cannibalises old growth to feed new. Immobile nutrients (Ca, S, Fe, Mn, Zn) deficiencies show on upper, new growth — the plant can’t relocate these from existing tissue. Multiple symptoms appearing simultaneously almost always indicates pH lockout rather than multiple actual deficiencies — check and correct pH before adding any nutrients. A pH pen is the highest-return tool in any grow kit: check before every feed, correct before diagnosing. Nutrient burn (dark green leaves, crispy tips) is the opposite of deficiency — flush rather than feed. Natural lower-leaf yellowing in weeks six to eight of flower is expected and shouldn’t be treated as a deficiency. When in doubt, stop feeding, check pH, wait and observe before making any changes. The full nutrient requirements by growth stage are covered in the autoflower nutrients guide.

Cannabis Nutrient Deficiencies — Frequently Asked Questions

What’s the difference between nutrient deficiency and nutrient burn?

They’re opposite problems. Nutrient deficiency is a shortage of one or more nutrients — the plant can’t access enough to function correctly. Nutrient burn is excess — too much nutrient salt in the medium, presenting as dark green leaves with crispy brown tips. The treatment for deficiency is corrected feeding; the treatment for burn is flushing and reducing feed. Treating burn as deficiency by adding more nutrients will make it significantly worse.

Should I check pH every feed?

Yes — every feed, without exception. A quality pH pen is the highest-return tool in any grow kit and the check takes thirty seconds. Most stubborn deficiency problems trace back to pH being out of range rather than an actual nutrient shortage. Many growers would have saved weeks of stress by checking pH before reaching for any other solution.

Can I use the same nutrients from seed to harvest?

Not optimally. Vegetative growth demands nitrogen-heavy grow formulas. Flowering demands phosphorus and potassium-heavy bloom formulas. Using a grow formula into flower is one of the most common reasons growers end up with small, airy buds — excess nitrogen suppresses bud development. The transition from grow to bloom nutrients should happen at the flip or shortly after pre-flowers appear.

Are organic nutrients better for avoiding deficiencies?

Organics are more forgiving — the microbial ecosystem in living soil buffers against both deficiencies and overfeeding, releasing nutrients slowly as the plant needs them. Synthetics feed the plant directly and are more precise but less forgiving of errors in either direction. Neither is universally better, but for growers who are still developing feeding discipline, organics offer a wider margin for error.

My plant has several problems at once. Where do I start?

Stop adding nutrients. Check pH. Correct it if it’s out of range. If salt buildup is suspected from overfeeding, flush with plain pH-balanced water at two to three times the pot volume. Wait three to five days and observe before making any further adjustments. Chasing multiple symptoms with multiple simultaneous fixes is how you turn a manageable problem into a dead plant. Multiple deficiency symptoms at once almost always means lockout — fix the pH and most of the symptoms will resolve without any additional intervention.

Why are my lower leaves yellowing in late flower?

This is almost certainly not a deficiency — it’s the plant redirecting resources from fan leaves to bud production as it approaches harvest. Some yellowing of lower fan leaves from week six of flower onward is a normal part of the plant’s senescence process. The diagnostic check: is the yellowing progressing rapidly upward through the canopy, or staying on the lower leaves only? Rapid progression warrants investigation; slow yellowing confined to lower leaves during late flower generally doesn’t.

Why are my cannabis leaves turning yellow? — the full guide to leaf yellowing including causes beyond nutrient deficiency.

Autoflower nutrients guide — feed schedules, EC targets, and nutrient timing by growth phase for autoflowering genetics.

Cannabis seedling care in Australia — the first two weeks after germination including early feeding and overwatering avoidance.

Why aren’t my cannabis seeds germinating? — troubleshooting failed germination before the nutrient stage begins.

Browse all cannabis seeds — feminised, autoflower, and photoperiod strains shipped from Australia.

Seeds are sold strictly as novelty collector’s items. They contain no THC or CBD. This page does not constitute medical or legal advice. By purchasing you agree to our terms and conditions. Always check local laws before germinating or cultivating cannabis.