People make germinating cannabis seeds sound like delicate surgery, and it isn’t. You don’t need a laboratory or special equipment. You need to give a seed what it has been waiting for: warmth, moisture and darkness. That is the whole mechanism. Every germination method is just a different way of delivering those three conditions, and once you understand that, the choice between methods becomes a lot less mysterious.
This guide covers the full journey from choosing a seed through to the end of the first week, at which point you have an established seedling and the job changes. It covers how to germinate cannabis seeds using the paper towel method we use and recommend, two alternatives with an honest assessment of each, and then what happens next: planting into medium, the first watering, introducing light, and getting through the first seven days without losing the plant.
Cannabis Seed Germination at a Glance
| Recommended method | Paper towel, for visible confirmation before soil contact |
| Ideal temperature | 22 to 25 °C, consistent. A heat mat is the most reliable way to hold it |
| Water to use | Filtered, distilled or collected rainwater at pH 6.0 to 6.5, never tap |
| Typical timeframe | 24 to 120 hours. Most viable seeds show a taproot within 48 to 72 |
| Planting depth | 0.5 to 1 cm, taproot pointing down, covered lightly |
| Light during germination | None. Darkness encourages the taproot to emerge and anchor |
| How we test at Sacred Seeds | Paper towel at 22 °C, every batch before dispatch |
The sections below run in the order you will actually need them, so you can work straight down the page from the moment you choose a seed to the moment the first true leaves open.
In this guide
Stage 1: Choosing a Seed
Good technique will not rescue a bad seed. A seed with compromised viability, whether from age, poor storage or physical damage, does not have the stored energy to complete germination no matter how carefully you manage temperature and moisture. The genetics inside the shell determine what is possible before you start.
Healthy, viable cannabis seeds are firm and hard when pressed between your fingers, and they do not compress. They are typically dark, brown or grey-brown or striped, with a slight waxy sheen on the surface. Seeds that are pale green, white, very small or soft under pressure are unlikely to germinate. Size variation within a batch is normal, and larger seeds do not germinate faster or grow more vigorously than smaller ones from the same genetics.
Age matters as much as appearance. Seeds stored badly lose viability noticeably after two to three years, and even well-stored seeds show declining rates past five. If you are working from an older stash, the guide to how long cannabis seeds last sets out realistic expectations, and the seed storage guide for Australian conditions covers keeping the next batch viable.
Choosing the right type for your setup
Beyond viability, there are three decisions worth making before you germinate anything, because they are much harder to change later.
The first is feminised or regular. Feminised seeds produce female plants, which is what almost every grower wants, and they remove the need to identify and remove males partway through the grow. The second is autoflower or photoperiod. An autoflowering plant runs to a fixed timeline and finishes fast, which suits short seasons and small spaces, but the fixed clock means there is no recovery window if something goes wrong early. A photoperiod plant is slower and more forgiving, and for a first grow that forgiveness is worth more than speed.
The third is climate fit, and in Australia it is the one people skip. A dense indica bred for an arid mountain climate behaves very differently through a humid Queensland autumn than it does in Tasmania. Our guide to the best strains for the Australian climate works through the regional picture, and the beginner strain guide narrows it further if this is your first run.
If you would rather answer a few questions than read three guides, the strain finder matches you to three options based on your setup and experience, and the full cannabis seeds Australia catalogue is there when you have decided.

Seed quality beats technique
We batch-test every seed line we stock using the paper towel method at 22 °C before dispatch. The germination guarantee page explains how that testing works. Starting from genetics that have been tested and confirmed viable is the single most useful thing you can do before germination begins, because everything after this point is damage limitation on a decision you already made.
The Three Things Every Cannabis Seed Needs
Before getting into methods it helps to understand what is actually happening, because every method is just delivering the same three conditions in a slightly different way.
A cannabis seed in dormancy is a complete plant in suspended animation, waiting for environmental signals that tell it conditions are safe. The signals it is waiting for are warmth, moisture and darkness.
Warmth signals that winter has passed. Cannabis seeds germinate most reliably at 22 to 25 °C. Below 18 °C the process slows badly and pathogen risk climbs, because the seed is developing slowly while the environment has more time to work against it. Above 28 °C the enzymes involved become heat-stressed. Consistency matters more than hitting an exact number inside that range, and fluctuation does more damage than sitting a degree or two outside it. A seedling heat mat under the setup is the most reliable way to hold temperature regardless of what the room is doing.
Moisture is the trigger that starts everything. Water penetrates the seed coat, activates the enzyme systems that convert stored nutrients into usable energy, and initiates the cell division that produces the taproot. The level needs to be steady: not so wet that the seed drowns or turns vulnerable to fungal infection, not so dry that the process stalls. Moist, not soaked, is the target.
Darkness encourages the emerging taproot to grow downward and anchor rather than reacting to light. A germinating seed has no use for light. That comes later, once the seedling has emerged and needs to photosynthesise.
Jason on germination basics
We test every batch we stock using the paper towel method at 22 °C before it goes out. What I have learned from doing that across hundreds of batches is that failures almost always come down to one of two things: the seed was not viable, or the conditions were not right. Temperature is the most commonly underestimated variable. People assume room temperature is adequate and it often isn’t, particularly through an Australian winter or in an air-conditioned room. A heat mat is a cheap fix that removes temperature as a variable entirely. After that it is water quality and patience.
Why Water Quality Matters
The water you germinate in is not a minor detail. Australian tap water contains chlorine or chloramines, fluoride, and in older pipe infrastructure some trace heavy metals. These interfere with the enzyme systems driving germination and damage the beneficial microbiology in a seed-starting medium at exactly the point the seed is most sensitive to it.
Use filtered water, collected rainwater or distilled water, pH adjusted to 6.0 to 6.5. On a chlorinated municipal supply, leaving tap water uncovered for 24 hours lets the chlorine off-gas. On a chloraminated supply, and Sydney Water is the common Australian example, standing it overnight achieves nothing, because chloramines need carbon filtration to remove.
For the full detail on what is in Australian tap water and how it affects germination, the water quality and seed germination guide covers it properly. The short version: use the best water you have access to, and untreated tap water is the worst option available to most growers.
Stage 2, Method 1: The Paper Towel Method
The paper towel method is what we use to batch-test every seed line before dispatch, and it is what we recommend to growers for one reason above the others: you can visually confirm germination before the seed ever touches soil. That visibility means you know a seed has germinated before you commit it to a pot, and it lets you catch a temperature or moisture problem while there is still time to fix it.
The setup is simple. Moisten a paper towel with clean, pH-adjusted water so it is damp throughout but not dripping. Place your seeds on one half with enough space that emerging taproots will not tangle, then fold the other half over. Put the folded towel between two plates or inside a zip-lock bag to hold humidity steady, and place it somewhere warm and dark: a drawer, a cupboard, or on a heat mat under something opaque.
Check every 12 to 24 hours. You are looking for the white taproot emerging, which typically appears within 24 to 72 hours for a viable seed in the right conditions, though some take up to five days. Once the taproot reaches 0.5 to 1 cm the seed is ready to plant. Handle it by the seed body and never by the taproot, which is fragile enough that bending or breaking it at this stage ends the plant.
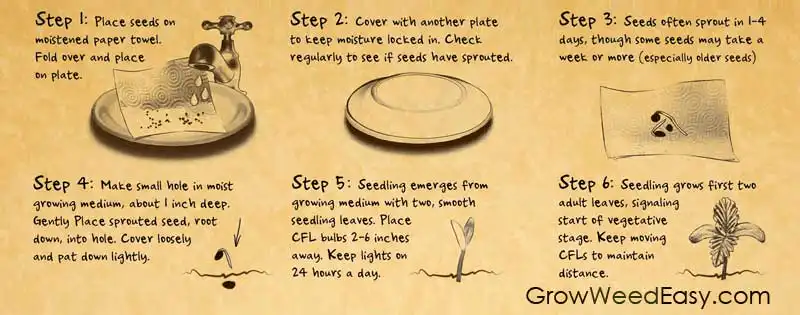
Paper towel method, step by step
Step 1. Moisten a paper towel with clean, pH-adjusted water at 6.0 to 6.5. Damp throughout, not dripping when lifted.
Step 2. Place seeds on one half with 2 to 3 cm spacing. Fold the towel over to cover them.
Step 3. Put the folded towel between two plates or in a zip-lock bag, somewhere warm at 22 to 25 °C and dark.
Step 4. Check every 12 to 24 hours without disturbing the setup. Remoisten lightly if the towel has dried.
Step 5. Once the taproot reaches 0.5 to 1 cm, plant taproot-down in pre-moistened medium at 0.5 to 1 cm depth.
Step 6. Cover lightly. Do not water again immediately, because the pre-moistened medium will sustain the seedling for the first few days.
For the complete version with troubleshooting for every common problem, see the dedicated paper towel germination guide.
Method 2: Water Soaking
Soaking means placing seeds in a glass of clean, lukewarm water at 22 to 25 °C in a dark, warm spot for 24 to 48 hours. The seed absorbs water directly, which softens the coat and triggers germination. Seeds sinking as they saturate is a positive sign, and a small crack in the shell with an emerging taproot means it is ready to plant.
The real use case is seeds with particularly hard or thick coats that have been slow to respond to the paper towel. Direct water contact ensures full saturation where a damp towel might take longer. For most seeds from quality genetics the paper towel method is both sufficient and preferable, because soaking leaves no margin for error on timing. A seed left in water after the taproot emerges will drown. If you use this method, check every 12 hours from the 24-hour mark and plant the moment the taproot appears.
Never soak in tap water. The seed sits in direct, extended contact with whatever is in it, so any chlorine, chloramines or heavy metals are working on the seed for the entire soak. Distilled or filtered only.
Method 3: Direct Planting
Direct planting is what it sounds like, placing a seed straight into moist growing medium with no separate germination step. It is how cannabis seeds sprout in nature and it works. The advantage is that the seedling is never handled or transferred during its most fragile stage, because it germinates and establishes its root system in the medium it will grow in.
Pre-moisten the medium thoroughly so it is evenly damp throughout, poke a hole 0.5 to 1 cm deep in the centre of the container, and place the seed in. With an ungerminated seed any orientation is fine, since the taproot will orient itself downward. Cover lightly, and optionally cover the container with plastic wrap to create a humidity dome for the first few days.
The limitation is visibility. You cannot confirm germination until the seedling breaks the surface, so any seed that fails is only discovered after several days of waiting. With reliable genetics and a settled setup that is a minor cost. For a first grow, or for anyone already troubleshooting germination problems, the paper towel method’s visibility is worth the extra step.
Stage 3: Planting Into Medium
This is the moment most beginners get wrong, and the mistakes are all in the same direction: too deep, too big, too rich.
Too deep is the most common. Half a centimetre to one centimetre is the whole range. The seedling is running on the energy stored inside the seed and nothing else until the cotyledons open and start photosynthesising, so every extra centimetre of medium it has to push through is drawn from a fixed and small fuel tank. Plant at two or three centimetres and a viable seed can simply run out of energy before it reaches the surface.
Too big is the next one. A germinated seed does not go into a twenty litre pot. A small container, a party cup with drainage holes or a small nursery pot, gives the root system a volume of medium it can actually colonise, which means the medium dries at a sensible rate. In a large pot the tiny root system cannot use the surrounding moisture, the medium stays wet for far too long, and you get the conditions that damping off thrives in. The container sizing guide covers what to start in and when to move up.
Too rich is the quiet one. Seedlings need almost nothing in the way of nutrients for the first two weeks, and a hot pre-fertilised potting mix will burn them before they have leaves to show it. A light seed-raising mix, or coco, or a gently amended soil is what you want. The guide to soil for cannabis seedlings in Australia covers the specifics of what to use and what to avoid.
Practically: pre-moisten the medium so it is evenly damp before the seed goes anywhere near it, make the hole with a pencil or your finger, place the germinated seed taproot-down, and cover lightly without compacting. Do not press the medium down over the top.

Stage 4: The First Watering
The counterintuitive part is that if you pre-moistened the medium properly, the first watering is not on planting day. It is three to five days later.
Overwatering kills more seedlings than anything else, and it does not look like overwatering while it is happening. It looks like drooping, which reads as thirst, which prompts more water. The root system at this stage is a taproot a centimetre or two long with a few fine laterals. It cannot drink meaningfully, and saturated medium starves it of oxygen while creating exactly the conditions fungal pathogens want.
When you do water, water in a ring around the seedling rather than at the stem. Roots grow toward moisture, so a ring encourages outward development and gets the root system spreading rather than sitting in a wet column directly under the crown. Keep the volume small, enough to dampen the surrounding medium and no more, and let the surface dry slightly between waterings. Lifting the container is the most reliable gauge you have, since the weight difference between damp and dry is obvious once you have felt it twice.
Use the same clean, pH-adjusted water you germinated in. The seedling is no less sensitive now than the seed was.
Stage 5: The First Light
Light goes on when the seedling breaks the surface, not before. Until then the seed is working in darkness by design.
Once it emerges it needs 12 to 16 hours of light a day if you are indoors. A seedling under insufficient light stretches, producing a long thin stem reaching for a source that is too far away or too weak, and a stretched seedling is structurally fragile and much more vulnerable to damping off and physical damage. If the stem between the medium and the cotyledons is getting long and pale, the light is too far away or not strong enough.
The opposite error is less common but real. Too much intensity too close will bleach and stress a seedling that has barely any leaf area to work with. Under LED, start further back than you think and close the distance over the first week as the plant shows it can handle it. A gentle, generous light period beats an intense short one at this stage.
Outdoors the equivalent mistake is putting a fresh seedling straight into full Australian summer sun. Start it somewhere with bright indirect light or morning sun only, and harden it off over several days. The outdoor growing guide for Australia covers timing and placement in more detail.
Stage 6: The First Week
Knowing what normal looks like is most of the battle here, because almost every first-week intervention makes things worse and the temptation to intervene is strongest when you don’t know what you are looking at.
Days one to three. Nothing visible above the surface, or a bent stem pushing up. This is the phase where people dig the seed up to check on it, which ends the plant. Leave it alone.
Days two to four. The seedling breaks the surface and the cotyledons open, the two smooth rounded leaves that came packed inside the seed. They are not true leaves and they will yellow and drop later, which is normal and not a deficiency. Occasionally the seed shell comes up still attached, which growers call helmet head. Mist it lightly and leave it, because it usually falls away within a day or two once softened.
Days four to seven. The first true leaves appear, single-bladed at first, then the familiar serrated shape. Growth looks slow above the surface because the plant is investing in roots. That is exactly what you want.
Through all of it, hold humidity around 70 to 80 percent for the first few days and ease it down to 60 to 65 percent as the cotyledons open fully. Keep temperature steady in the low twenties. Do not feed. A seedling in a decent medium has everything it needs for the first two weeks, and the most common cause of first-week damage after overwatering is a well-meaning early feed. The guide to when to start feeding seedlings sets out the actual trigger to watch for, which is the third node rather than a date on a calendar.
Two things to watch for. If a seedling collapses at the base with a pinched, darkened stem, that is damping off, and the damping off and stem rot guide covers prevention, since treatment after the fact rarely works. If leaves yellow in a pattern that is not the cotyledons fading, the yellowing leaves guide will help you separate a real problem from a normal one.

Stage 7: Where to Go From Here
At the end of the first week you have an established seedling with true leaves and a working root system, and the job changes. The germination questions are behind you and the seedling questions begin: feeding schedules, transplant timing, training, and the transition into vegetative growth.
The cannabis seedling care guide picks up exactly where this one finishes and carries you through to early vegetative growth. When the roots fill that first small container, the transplanting guide covers moving up a pot size without checking the plant’s growth. If you are running an autoflower, the week by week autoflower guide maps the whole fixed timeline from here to harvest.
Everything from this point rewards patience more than intervention, which is the same lesson the first week teaches.
Key takeaways
Every germination method delivers the same three conditions: warmth at 22 to 25 °C, steady moisture, and darkness. The paper towel method is our recommendation because it confirms germination visually before the seed touches soil.
Use clean, pH-adjusted water at 6.0 to 6.5, whether filtered, rainwater or distilled. Australian tap water contains chlorine, chloramines and fluoride that work against germination.
Plant shallow at 0.5 to 1 cm, in a small container, in a light medium. Too deep, too big and too rich are the three planting errors that cost most beginners their first seedling.
Do not water on planting day if the medium was pre-moistened, do not feed in the first fortnight, and do not dig the seed up to check on it. The first week rewards leaving things alone.
How to Germinate Cannabis Seeds: Frequently Asked Questions
What is the best way to germinate cannabis seeds?
The paper towel method is the most reliable for most growers. It gives you consistent temperature and moisture control and lets you confirm germination visually before the seed contacts soil. Place seeds between moist paper towels, hold 22 to 25 °C in the dark, and check every 12 to 24 hours. It is also what we use to batch-test every line before dispatch. The paper towel method guide has the full step-by-step.
How long does it take for cannabis seeds to germinate?
Most viable seeds in correct conditions show a taproot within 24 to 72 hours. Older seeds and those with hard coats can take up to five days. If nothing has happened after seven days in good conditions the seed is unlikely to be viable. Do not give up at 24 hours. If yours are not germinating despite correct conditions, the germination troubleshooting guide works through the causes.
Can I use tap water to germinate cannabis seeds?
Australian tap water contains chlorine or chloramines, fluoride, and in older infrastructure some trace heavy metals, all of which interfere with germination. Use filtered, collected rainwater or distilled at pH 6.0 to 6.5. On a chlorinated supply, standing tap water uncovered for 24 hours off-gasses the chlorine. On a chloraminated supply such as Sydney Water, standing it does nothing and you need carbon filtration. The water quality guide covers it in full.
What temperature is best for germinating cannabis seeds?
22 to 25 °C, held consistently. Below 18 °C germination slows and pathogen risk rises. Above 28 °C the enzyme systems involved get heat-stressed. A seedling heat mat is the most reliable and inexpensive way to hold that range regardless of ambient temperature, which matters through an Australian winter or in an air-conditioned room where the air is cooler than it feels.
How deep should I plant a germinated seed?
Half a centimetre to one centimetre, taproot pointing down, covered lightly without compacting. Deeper is the most common beginner error. The seedling runs purely on energy stored in the seed until the cotyledons open, so every extra centimetre it has to push through comes out of a small fixed supply. Planting at two or three centimetres can exhaust a perfectly viable seed before it reaches the surface.
What should I plant my seedling into?
A small container with drainage, a party cup or small nursery pot, filled with a light seed-raising mix, coco, or gently amended soil. Avoid hot pre-fertilised potting mixes, which will burn a seedling before it has leaves to show the damage. The seedling medium guide covers the options, and the container sizing guide covers when to move up.
When should I water for the first time?
If you pre-moistened the medium before planting, three to five days after, not on planting day. Water in a ring around the seedling rather than at the stem, keep the volume small, and let the surface dry slightly between waterings. Overwatering is the leading killer of seedlings and it presents as drooping, which is easily mistaken for thirst.
When do I turn the light on?
When the seedling breaks the surface, not before. Then 12 to 16 hours a day. Too little light produces a stretched, fragile stem, and too much intensity too close will stress a plant with almost no leaf area. Under LED, start further back than feels right and close the distance across the first week.
Should I feed my seedling in the first week?
No. A seedling in a decent medium has everything it needs for roughly the first fortnight, and early feeding is one of the most common causes of first-week damage. The feeding guide explains the trigger to watch for, which is the third node rather than a set number of days.
What if my cannabis seeds are old?
Older seeds germinate at lower rates. Viability drops noticeably after two to three years without proper storage and declines even in good storage past five. Light scarification, gently rubbing the coat on fine sandpaper to thin it, can help moisture penetrate. Soaking is also worth trying for hard-coated older seeds. The seed longevity guide sets out what to expect by age.
My seedling came up with the shell stuck on it. What should I do?
That is helmet head, where the seed coat has not separated cleanly. Leave it alone and mist it lightly with clean water to soften the shell. It usually falls off on its own within 24 to 48 hours. Pulling it off manually frequently decapitates the seedling, because the cotyledons inside are attached to the shell and tear if forced before the coat has softened.
Do I need a heat mat?
Not strictly, but it is worth having. A heat mat provides consistent gentle warmth and removes temperature as a variable, which is the most commonly underestimated factor in germination failure. In Australia it matters most through the cooler months or in air-conditioned rooms, where ambient temperature sits well below 22 °C without feeling cold.
What do healthy cannabis seeds look like?
Firm and hard, not compressing when pressed between your fingers. Typically dark, brown or grey or striped brown and tan, with a slight waxy sheen. Pale green, white, very small or soft seeds are unlikely to germinate. Size variation inside a batch is normal, and larger seeds do not germinate faster or grow more vigorously than smaller ones from the same genetics.
Should I start with feminised or autoflower seeds?
For a first grow, feminised photoperiod seeds are the more forgiving choice, because a photoperiod plant has a recovery window if something goes wrong early while an autoflower runs to a fixed clock. The autoflower versus photoperiod comparison works through the tradeoffs, and the beginner strain guide narrows down which genetics suit a first run.
What happens after the first week?
You have an established seedling and the job shifts to seedling care: feeding, transplant timing, and the move into vegetative growth. The seedling care guide picks up precisely where this guide ends.
Related Reading
Paper towel germination method, the full step-by-step with troubleshooting for every common problem.
Water quality and seed germination, why Australian tap water undermines germination rates and what to use instead.
Why aren’t my cannabis seeds germinating, a diagnostic guide for failed attempts covering temperature, water, seed age and the seeds that crack but never sprout.
Cannabis seedling care in Australia, the complete guide to the fortnight after germination.
Why seedlings die: damping off and stem rot, the most common cause of failure in the first two weeks and how to prevent it.
Sacred Seeds germination guarantee, how we test every batch before dispatch.
Browse the full range, feminised, autoflower and photoperiod genetics shipped from within Australia.
Seeds are sold strictly as novelty collector’s items. They contain no THC or CBD. This page does not constitute medical or legal advice. By purchasing you agree to our terms and conditions. Always check the laws that apply where you live before germinating or cultivating.