The Paper Towel Method for Cannabis Seeds β€” Complete Guide

The Paper Towel Method for Cannabis Seeds β€” Complete Guide

The paper towel method is how we germinate cannabis seeds at Sacred Seeds β€” every batch, before dispatch, at 22Β°C. It’s the method we recommend to growers because it gives you something no other germination approach offers: visual confirmation that a seed has germinated before it ever contacts soil. You can see the taproot emerging, assess its health, and plant with confidence rather than hoping something is happening underground. This guide covers the paper towel method for cannabis seeds from setup through to transplanting β€” including the troubleshooting scenarios that catch people out.

Where this guide fits in the germination series

This is the deep-dive on the paper towel method. If you’re new to germination and weighing up your options, start with the complete cannabis seed germination guide β€” it covers all three methods with honest assessments. If your seeds have already failed and you need to troubleshoot, see why cannabis seeds aren’t germinating. If germination worked but your seedlings are dying in the first two weeks, the damping off and stem rot guide covers what’s happening.

Please note: we write this guide specifically for growers in the ACT where personal cultivation is permitted, and for growers in legal jurisdictions overseas. Seeds sold by Sacred Seeds Australia are sold strictly as souvenir and collectable items in accordance with Australian law.

Paper Towel Method β€” At a Glance

Ideal temperature 22–25Β°C consistent β€” heat mat recommended
Water to use Filtered, distilled, or collected rainwater at pH 6.0–6.5 β€” never tap water
Paper towel moisture Damp throughout β€” not dripping when lifted
Seed spacing 2–3 cm apart β€” room for taproots to emerge without tangling
Typical timeframe 24–72 hours for most viable seeds β€” up to 5 days for older seeds
When to plant When taproot is 0.5–1 cm long β€” don’t wait for 2 cm+
Planting depth 0.5–1 cm β€” taproot pointing down, covered lightly

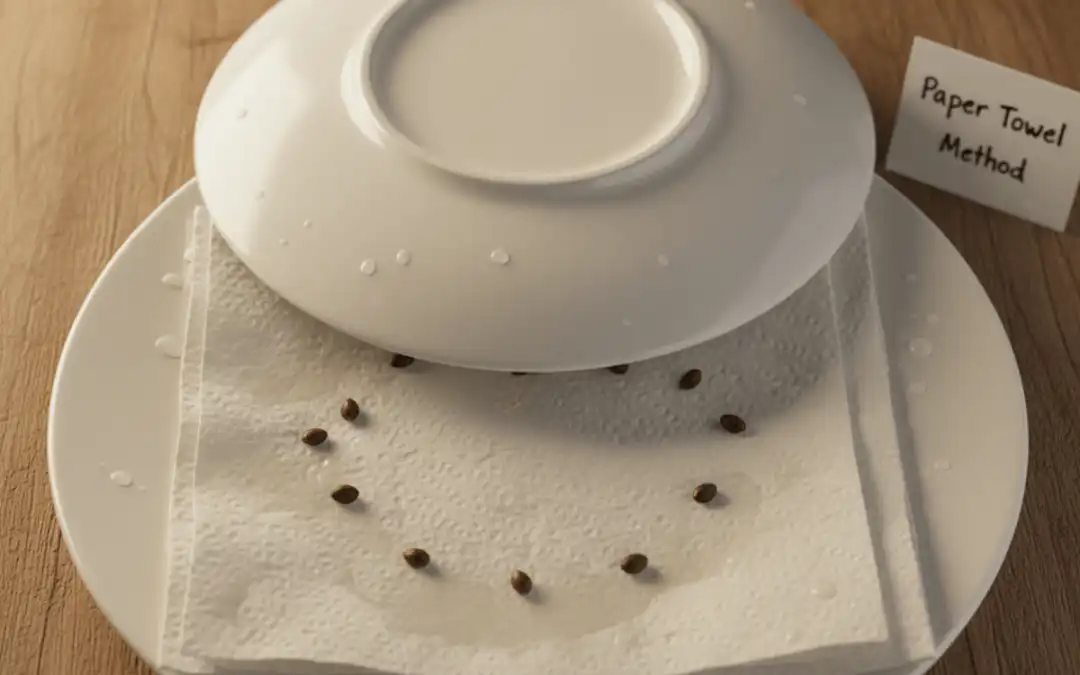
Cannabis seeds ready for germination using the paper towel method β€” showing seed placement and moisture level

Why the Paper Towel Method Works for Cannabis Seeds

The paper towel method works because it delivers the three conditions a germinating cannabis seed requires β€” warmth, consistent moisture, and darkness β€” in a controlled, visible environment. Unlike direct planting in soil, you can see exactly what’s happening at every stage. That visibility is the method’s primary advantage over alternatives.

A moist paper towel maintains even moisture contact with the seed coat throughout the germination process β€” more consistent than soil, which can have dry and wet pockets depending on how evenly it was moistened. The enclosed environment of a bag or between two plates maintains humidity without requiring constant attention. And because the taproot emerges in open air rather than into soil, you can assess its health β€” length, colour, vigour β€” before committing the seed to a growing medium.

The method also works well for a wide range of seeds beyond cannabis β€” herbs, vegetables, and flowers with longer germination times all respond well to the controlled moisture and warmth environment. But for cannabis specifically, where the seeds represent a meaningful investment and germination rate matters, the paper towel method’s visibility advantage is particularly valuable.

🧠 Jason β€” Why We Use This Method

We use the paper towel method at 22Β°C to test every seed batch before it leaves us. It’s the most reliable way to confirm germination rate before seeds go out to growers. What I’ve learned from doing this consistently is that the method itself is almost foolproof when the variables are right β€” the right temperature, the right water, the right moisture level in the towel. When germination fails, it’s almost always one of those three things, not the method. The visibility is what makes it useful for testing β€” you know within 72 hours whether the seeds are performing as expected, and you can identify individual seeds that are slower or faster without disturbing the rest of the batch.

Water Quality β€” The Most Overlooked Variable in the Paper Towel Method

The water you use is not a minor detail. Australian tap water contains chlorine or chloramines (disinfectants added by municipal water authorities), fluoride, and in areas with older pipe infrastructure, trace heavy metals. These compounds interfere with the enzyme systems that initiate germination and can damage the beneficial microbiology that supports seedling development β€” all at exactly the point when the seed is most sensitive to those disruptions.

Use filtered water, collected rainwater, or distilled water. Adjust pH to 6.0–6.5 before use β€” a basic pH meter and pH adjustment solution are inexpensive and remove pH as a variable. If you’re on a chlorinated municipal supply, leaving tap water uncovered for 24 hours allows chlorine to off-gas. If you’re on a chloraminated supply β€” Sydney Water uses chloramination β€” standing water overnight does nothing, and carbon filtration is needed to remove the chloramines.

For the full explanation of what’s in Australian tap water and how it affects germination, the water quality and seed germination guide covers it in detail. The short version: use the best water you have access to, and tap water straight from the tap is the option most likely to undermine an otherwise correct germination setup.

Step-by-Step: The Paper Towel Method for Cannabis Seeds
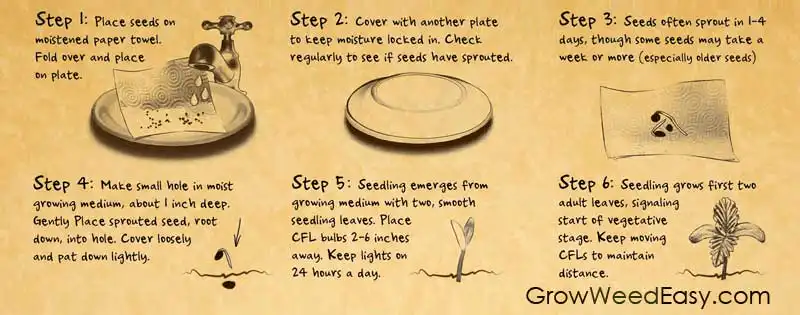
Step-by-step paper towel germination setup showing moistened towel, seed placement and folding technique

The Paper Towel Method β€” Six Steps

Step 1 β€” Optional pre-soak (6–12 hours): For seeds with particularly hard or thick coats, a brief soak in a small cup of clean, lukewarm water (22–25Β°C) in a dark spot can help moisture penetrate the seed coat before the paper towel stage. Not required for most seeds β€” skip this step unless you’ve had seeds be slow to respond in previous grows.

Step 2 β€” Moisten the paper towel: Dampen a paper towel thoroughly with clean, pH-adjusted water. It should be moist throughout β€” damp and consistent when you hold it up. Not dripping, not just surface-damp. Squeeze out any excess water if it drips when lifted. The moisture level here is the most important variable you control directly.

Step 3 β€” Place seeds and fold: Lay seeds on one half of the paper towel with 2–3 cm of space between each one. Fold the other half over to cover them. Place the folded towel between two plates β€” creating a dome that maintains humidity β€” or inside a zip-lock bag. Both work; the plate method allows slightly more airflow, the bag maintains humidity more consistently.

Step 4 β€” Find the right location: Place the setup in a warm, dark location. A drawer, a cupboard, or on top of a seedling heat mat covered with something opaque. Target 22–25Β°C consistently. In Australia, a north-facing windowsill is the sunniest indoor position β€” but the paper towel setup needs darkness, not light, so keep it away from windows. On top of a heat mat with a consistent thermostat is the most reliable setup regardless of ambient temperature.

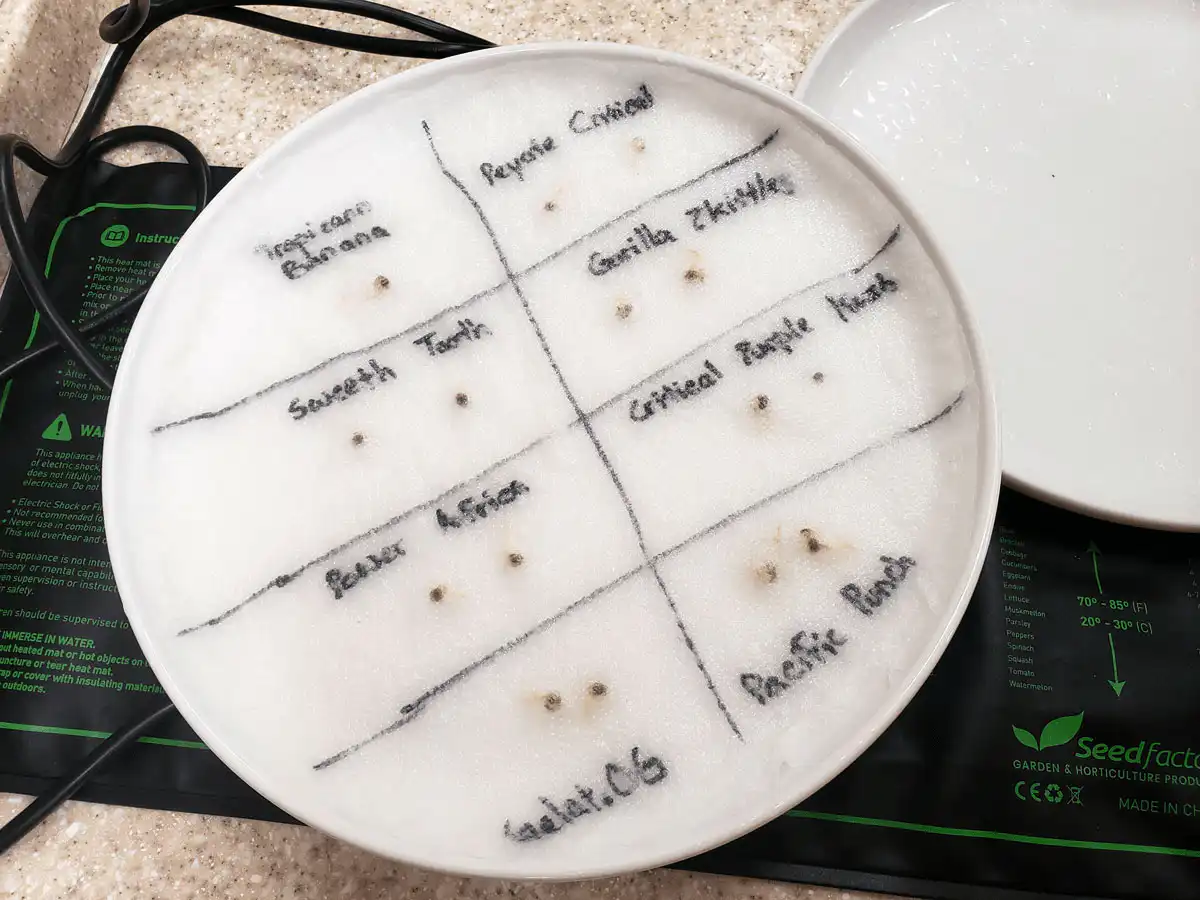
Step 5 β€” Monitor daily: Check the setup every 12–24 hours without disturbing it significantly. You’re looking for the white taproot emerging from the seed β€” typically within 24–72 hours for viable seeds in correct conditions. If the paper towel has dried out, remoisten lightly with clean water. If there’s condensation building up inside the bag or on the plates, crack it slightly for a few hours to allow airflow.

Step 6 β€” Plant when ready: Once the taproot is 0.5–1 cm long it’s time to plant. Don’t wait until the taproot is 2 cm+ β€” longer taproots are more fragile and more likely to be damaged during transplanting. Handle the seed by its body, not the taproot. The transplanting process is covered in detail in the next section.

🧠 Pro Tip β€” Labelling Multiple Varieties

If you’re germinating several different strains at once, divide the paper towel into clearly labelled sections using a waterproof pen before you place the seeds. Mark each section with the strain name. This sounds basic but it’s worth doing β€” germination timelines vary between strains and between individual seeds, and mixing up varieties at planting is an easy mistake that’s impossible to correct later.
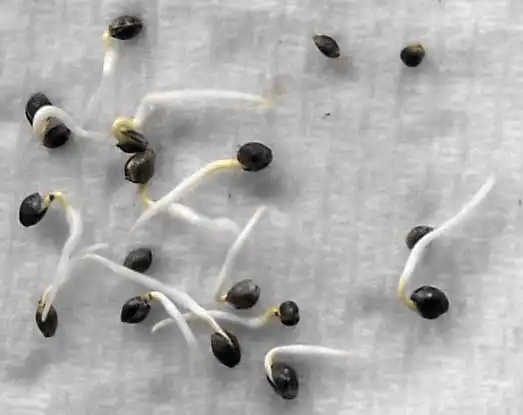
Paper towel divided into labelled sections for germinating multiple cannabis seed varieties simultaneously

Transplanting Germinated Cannabis Seeds into Growing Medium

Transplanting is where most paper towel germination attempts go wrong β€” not because the method failed but because the handling at this stage damaged the taproot. The taproot emerging from a germinated cannabis seed is fragile. Any bending, breaking, or compression of it at this stage ends the plant’s development.

Prepare your growing medium before you open the paper towel. Pre-moisten the medium so it’s evenly damp throughout β€” not wet, not dry. Poke a small hole 0.5–1 cm deep in the centre of the container using a pencil or similar. Have everything ready before you handle the germinated seed.

Pick up the germinated seed by its body β€” not the taproot. Tweezers are useful here but they must be used with extreme care; gripping the taproot with tweezers is one of the most common causes of transplant damage. If you use tweezers, grip the seed coat only. Lower the seed into the hole taproot-first, pointing downward. The taproot goes into the medium, the seed body sits just below the surface. Cover lightly with growing medium β€” a thin layer, not packed down.

Do not water immediately after planting. The pre-moistened medium contains enough moisture to sustain the seedling for the first several days. Adding water on top of an already moist medium creates exactly the oversaturated conditions that lead to damping off. Wait until the surface of the medium lightens in colour slightly before the first post-planting watering.
Germinated cannabis seed being transplanted with taproot pointing down into pre-moistened growing medium

Troubleshooting Common Paper Towel Method Problems

This section covers the problems specific to the paper towel method itself. For broader germination troubleshooting β€” seeds not germinating at all, diagnosing whether it’s the seeds or the setup β€” the cannabis seeds not germinating guide covers it in full.

Seeds not germinating after 72 hours

Check the three variables in order. Temperature first β€” is the setup actually at 22–25Β°C, or are you assuming room temperature is adequate? A thermometer placed in the setup for an hour will tell you. Moisture second β€” is the paper towel still damp, or has it dried out since you last checked? It should be consistently moist throughout, not just in the centre. Water quality third β€” if you used tap water, the chlorine or chloramines may be the problem. Remoisten with filtered or distilled water and give the seeds another 24–48 hours.

Older seeds may take up to five days rather than the typical 72 hours. If seeds haven’t shown any sign of germination after seven days in correct conditions, they’re unlikely to be viable. Seeds that are pale, white, or soft when pressed between your fingers before germination are unlikely to succeed regardless of method or conditions.

Paper towel too wet β€” seeds at risk of rot

If you can see standing water in the bag or the paper towel drips significantly when lifted, it’s too wet. Open the setup, allow it to drain slightly, and reseal with less moisture. Seeds sitting in saturated conditions for extended periods are at risk of fungal infection β€” the same pathogens that cause damping off in seedlings are active in overly wet germination media. Moist and damp is correct; wet and dripping is too far.

Roots growing into the paper towel

This happens when a seed is left in the paper towel longer than necessary β€” the taproot, having nowhere else to go, begins to penetrate the paper fibres. The best fix is to not let it happen: check daily and plant when the taproot reaches 0.5–1 cm. If roots have already grown into the paper, don’t try to separate them. Cut around the embedded roots and plant the seed along with the small piece of paper β€” it will break down in the soil without harming the plant. Coffee filters are worth using as an alternative to standard paper towels β€” their tighter weave makes root embedding significantly less likely.

Helmet head β€” seed shell stuck on the emerging seedling

Helmet head occurs when the seed coat fails to separate cleanly as the seedling emerges from the growing medium. The cotyledons (first seed leaves) are trapped inside the shell, unable to open. The instinct is to pull the shell off β€” resist it. The cotyledons are attached to the inside of the shell and pulling forcefully will tear them.

Mist the shell lightly with clean water two or three times a day and leave it. In most cases the moisture softens the shell enough for it to detach on its own within 24–48 hours. If it hasn’t detached after three to four days and the seedling is clearly struggling, you can very gently attempt to loosen it with tweezers β€” but only once the shell is visibly softened by moisture, and with extreme care. A successful cotyledon stage is critical to early seedling development β€” damaging them trying to remove a stuck shell causes more harm than the shell itself.

Lack of oxygen in a sealed bag

Seeds sealed in a zip-lock bag for several days can experience reduced oxygen levels that slow or inhibit germination. If you’re using the bag method and seeds haven’t germinated within 48 hours, open the bag briefly once or twice a day to allow fresh air exchange. This is less of an issue with the plate method, which allows slight airflow around the edges of the plates.

Not sure which strain to germinate?

Answer six questions and Jess will match you to three strains based on your setup, experience, and goals.

Find Your Strain β†’

Key Takeaways β€” Paper Towel Method for Cannabis Seeds

The paper towel method is Sacred Seeds’ recommended germination approach because it provides visual confirmation of germination before the seed contacts soil. The three variables that determine success are temperature (22–25Β°C consistently β€” heat mat recommended), water quality (filtered, distilled, or rainwater at pH 6.0–6.5 β€” not tap water), and paper towel moisture level (damp throughout, not dripping). Plant when the taproot is 0.5–1 cm β€” not before, not significantly after. Handle the seed by its body not the taproot during transplanting, into pre-moistened medium at 0.5–1 cm depth, taproot pointing down. Don’t water again immediately β€” the pre-moistened medium will sustain the seedling for the first few days. For troubleshooting beyond germination β€” damping off, seedling care β€” see the damping off guide and the seedling care guide.

Paper Towel Method Cannabis Seeds β€” Frequently Asked Questions

Should I plant cannabis seeds directly in soil instead of using the paper towel method?

Direct planting into a container of growing medium works and has the advantage of not requiring the seedling to be handled during its most fragile stage. The limitation is visibility β€” you can’t confirm germination has occurred until the seedling breaks the surface, which takes longer and means any seeds that fail to germinate are only discovered after several days of waiting. For growers who want confirmation before committing seeds to a container, the paper towel method is preferable. The one situation to avoid is planting ungerminated seeds directly into outdoor garden soil β€” drainage, oxygen levels, and pathogen exposure in uncontrolled outdoor soil create conditions that make germination unreliable. The complete germination guide compares all three methods if you’re still deciding.

Can I use the paper towel method for seeds other than cannabis?

Yes β€” the paper towel method works for vegetables, herbs, and flowers, particularly those with longer germination times or hard seed coats. It’s commonly used for chilli peppers, tomatoes, and various herb seeds where pre-germination allows growers to identify viable seeds before committing growing space. The same principles apply: consistent moisture, 22–25Β°C, darkness, and clean water.

What is the ideal location for the paper towel method in Australia?

A warm, dark location with stable temperature β€” a drawer, a cupboard, or on top of a seedling heat mat. In Australia, north-facing positions get the most sun indoors (the opposite of the Northern Hemisphere), but the paper towel setup needs darkness not light, so keep it away from windows. The most reliable setup is a seedling heat mat with a thermostat set to 22–25Β°C, covered with something opaque β€” this delivers consistent temperature regardless of seasonal ambient temperature changes.

My seeds aren’t germinating β€” what could be the problem?

Check temperature first β€” is it actually 22–25Β°C, or are you assuming room temperature is adequate? Then moisture β€” has the paper towel dried out since you last checked? Then water quality β€” tap water chlorine or chloramines may be inhibiting germination. Older seeds may take up to five days rather than the typical 72 hours. If seeds show no signs of germination after seven days in correct conditions, they are unlikely to be viable. The full germination troubleshooting guide covers each cause and the exact fix.

The roots have grown into the paper towel β€” what should I do?

Cut around the embedded roots and plant the seed into growing medium along with the small piece of paper β€” it will break down in the soil without harming the plant. To avoid this in future, check seeds daily and plant when the taproot reaches 0.5–1 cm rather than allowing it to extend further. Coffee filters are worth using as an alternative to standard paper towels β€” their tighter weave significantly reduces root embedding.

How do I know when to transfer the germinated seed to soil?

When the taproot is 0.5–1 cm long. This is long enough to confirm successful germination and handle the seed safely, but short enough that the root is still rigid and undamaged. Don’t wait until the taproot is 2 cm or longer β€” longer taproots curl and tangle in the paper towel and are more easily damaged during transplanting.

Why should I use a heat mat for cannabis seed germination?

A heat mat provides consistent, gentle warmth that removes temperature as a variable β€” the most commonly underestimated factor in germination failures. Room temperature in Australian homes varies significantly with season and air conditioning, and what feels comfortable to a person (20Β°C) is below the optimal germination range for cannabis seeds. A basic seedling heat mat set to 22–25Β°C ensures the seeds are in the right temperature environment regardless of what’s happening in the rest of the room.

Related Reading

How to germinate cannabis seeds β€” the complete guide β€” all three germination methods covered with honest assessments of each. The hub article for the cluster.

Why aren’t my cannabis seeds germinating? β€” diagnostic guide for failed germination attempts. Covers temperature, water quality, seed age, and the common scenarios that cause seeds to crack but not sprout.

Water quality and seed germination β€” why Australian tap water undermines germination rates and what to use instead.

Why seedlings die β€” damping off and stem rot β€” the most common cause of seedling failure in the first two weeks after germination.

Cannabis seedling care in Australia β€” what comes after successful germination.

Sacred Seeds germination guarantee β€” how we test every seed batch before dispatch using this method.

Browse all cannabis seeds β€” feminised, autoflower, and photoperiod strains shipped from Australia.

Seeds are sold strictly as novelty collector’s items. They contain no THC or CBD. This page does not constitute medical or legal advice. By purchasing you agree to our terms and conditions. Always check local laws before germinating or cultivating cannabis.
Cannabis Seedling Care β€” Avoiding the Mistakes That Kill Young Plants

Cannabis Seedling Care β€” Avoiding the Mistakes That Kill Young Plants

More cannabis seedlings die in the first two weeks than at any other point in the grow β€” and almost all of them die from the same cause. Not from disease, not from pests, not from bad genetics. From overwatering. A seedling that has just pushed its taproot into a medium has no root system yet. There’s nothing down there to drink. Water sitting in that medium around an undeveloped root system creates exactly the conditions that kill seedlings β€” oxygen-starved, waterlogged soil where fungal pathogens thrive and damping off takes hold. I’ve watched experienced growers lose entire seedling batches this way. The instinct to water is strong. The seedling looks small, the pot looks dry, and the impulse is to give it a drink. Resist it.

This guide covers cannabis seedling care in Australia from the moment the taproot goes into the medium through to week two or three, when a real root system has established and the plant can begin to manage its own water uptake. If you haven’t germinated yet, we cover the paper towel germination method and how to germinate cannabis seeds in separate guides. Get this window right and the rest of the grow follows. Get it wrong and no amount of skill in flower will recover what was lost at the start.

Cannabis Seedling Care β€” At a Glance

Watering β€” weeks 1–2 Small amounts in a ring around the seedling β€” never saturate the medium
Watering frequency Only when top 2–3 cm of medium is dry
Feeding β€” week 1 Nothing β€” plain pH-adjusted water only
Feeding β€” week 2 1/4 strength maximum if signs of deficiency β€” EC below 0.6
Temperature 22–26Β°C β€” stable, no cold drafts
Humidity 65–70% RH β€” dome or humidity tent helps
Light β€” indoor 18/6, low intensity β€” 200–300 Β΅mol/mΒ²/s, lights further away than in veg
Light β€” outdoor Indirect or dappled light for first week β€” not direct full sun
pH β€” soil 6.0–6.5
pH β€” coco/hydro 5.8–6.2
Autos β€” critical rule Germinate directly in the final container β€” no transplanting

The Number One Cannabis Seedling Mistake β€” Overwatering Before a Root System Exists

Understanding why overwatering kills seedlings requires understanding what a seedling actually is at this stage. When a germinated seed goes into medium, the taproot is a single thin thread β€” often just 1–2 cm long with no lateral roots yet. That taproot is not a drinking system. It’s an anchor and a sensing mechanism. The seedling is getting almost all the moisture it needs from the humidity in the air around its cotyledons, not from the medium below.

When you saturate the medium at this stage, several things happen simultaneously. Oxygen is displaced from the root zone β€” cannabis roots require oxygen as much as water, and waterlogged medium suffocates them. Moisture sits stagnant at the surface and in the medium around a root mass that isn’t drawing it down, creating the ideal conditions for fungal pathogens. And the taproot, attempting to grow downward in search of moisture, finds saturated medium instead β€” this slows root development significantly because roots grow toward moisture gradients, not through standing water.

The result is a seedling that looks healthy on day one, develops a slight droop by day three, shows its first yellowing by day five, and is dead or severely compromised by day seven. The medium was wet the whole time. That’s not a coincidence β€” that’s cause and effect.

🧠 Jason β€” On Overwatering

The growers I see lose seedlings this way aren’t careless β€” they’re attentive. They check the seedling twice a day, they see the medium surface looks dry, and they water it. What they’re missing is that the medium surface can look dry while the medium below is still saturated. Pick the pot up. If it feels heavy, it has water in it. If it feels light, it’s ready to water. Your hands are more accurate than your eyes at this stage.

What Is Damping Off β€” and Why Overwatering Causes It

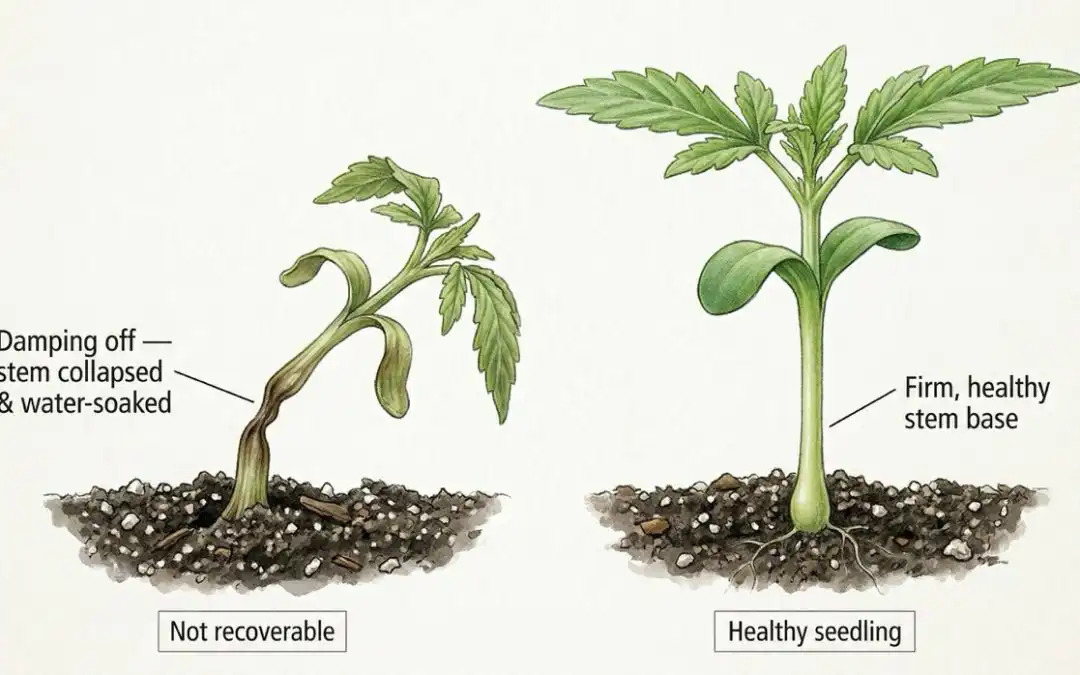
Damping off is the name for a group of fungal and fungal-like pathogens β€” primarily Pythium, Fusarium, and Rhizoctonia species β€” that kill seedlings at or just below the soil line. The characteristic symptom is a seedling that appears healthy above ground, then suddenly collapses at the stem. The stem at the soil line becomes thin, water-soaked, and discoloured β€” often brown or grey. The seedling topples. It doesn’t recover.

What makes damping off particularly devastating is the speed. A seedling can look perfect in the morning and be dead by evening. And because the pathogens that cause it are ubiquitous β€” present in most growing environments β€” the question is never whether they’re present but whether conditions allow them to take hold. Those conditions are consistently the same: excess moisture, poor airflow, and a seedling without the root mass to absorb water quickly enough to prevent stagnation.

Overwatering is the primary enabler. The pathogens that cause damping off are water moulds β€” they require saturated or near-saturated conditions to proliferate. A medium that dries out between waterings, with good airflow at the surface, denies them the environment they need. A medium that stays consistently wet provides exactly what they’re looking for.

Diagram showing the ring watering method for cannabis seedlings β€” water applied 3–5 cm from stem to encourage taproot development

Prevention β€” the only effective approach

There is no reliable treatment for damping off once it has taken hold in a seedling. The stem damage is structural and the pathogen load at the root zone is already established. Prevention is the entire strategy.

Correct watering is the most important prevention measure β€” covered in detail in the next section. Beyond that: use fresh, sterile medium for seedlings rather than reused soil that may carry pathogen load from a previous grow. Ensure good airflow around the seedlings β€” not wind directly on them, but air movement in the space that prevents the stagnant humid pockets where damping off thrives. Keep the medium surface from staying permanently wet β€” if the surface is dry but the medium below is moist, that’s the correct state. And maintain temperature stability β€” the pathogens that cause damping off thrive at cooler temperatures, so keeping the root zone at 22–26Β°C reduces their activity.

🧠 Jason β€” On Damping Off

If you see a seedling with a pinched, thin stem at the soil line, it’s damping off and it’s not recoverable. The best thing you can do is remove it immediately so the pathogen doesn’t spread to neighbouring seedlings, identify what allowed it to happen β€” almost always overwatering or poor airflow β€” and correct that before the next seedling goes in. Don’t replant immediately into the same medium without replacing it.

For a deeper look at the specific pathogens involved and how stem rot develops, the stem rot and damping off guide covers the biology in more detail.

How to Water Cannabis Seedlings Correctly

The correct watering technique for a seedling without an established root system is fundamentally different from watering a plant in veg or flower. The goal is not to hydrate the entire medium β€” it’s to create a moisture gradient that encourages the taproot to grow downward in search of water while keeping the immediate root zone aerated.

The ring method

Water in a ring around the seedling rather than directly at the base of the stem or over the whole medium surface. The ring should be approximately 3–5 cm away from the stem. This places moisture in the zone the taproot is growing toward rather than at the surface immediately around the stem β€” the most vulnerable area for damping off β€” and encourages lateral root development as the root system grows outward to reach the water.

The volume of water per watering in the first two weeks should be small β€” 30–50 ml for a seedling in a 10–15 L container is often enough. The goal is to moisten the ring zone, not saturate the surrounding medium.

Diagram showing the ring watering method for cannabis seedlings β€” water applied 3–5 cm from stem to encourage taproot development

The pot weight method

Pick the pot up before and after watering and develop a feel for the weight difference. A fully saturated pot and a correctly watered pot feel significantly different. Once you know what a dry pot feels like β€” light, almost hollow β€” and what a correctly moist pot feels like, you can judge watering need accurately without having to probe the medium or rely on surface appearance alone. This is the most reliable method for the seedling stage and it takes about three waterings to develop the reference point.

Watering frequency

Wait until the top 2–3 cm of medium is dry before watering again. In a correctly set-up seedling environment at 22–26Β°C, this typically means watering every two to three days in week one and every one to two days in week two as the plant develops and begins drawing water more actively. In Australian summer heat, the interval may shorten. In cooler conditions, it may extend. The medium state, not the calendar, determines when to water.

pH of water matters immediately

pH-adjust all water from the first watering. For soil: 6.0–6.5. For coco or hydro: 5.8–6.2. Incorrect pH at the seedling stage locks out the few nutrients the plant is beginning to access from the medium, which causes deficiency symptoms that are easily confused with overwatering or underfeeding. Getting pH right from day one eliminates this confusion. The water purity and seed germination guide covers why water quality affects early plant development in more detail.

🧠 Jason β€” On Pot Weight

The single most useful thing you can do for your seedlings is get a feel for pot weight. I’ve been growing for a long time and I still pick up seedling pots rather than relying on surface inspection. The surface can be misleading β€” medium can be dry on top and saturated below, particularly in cooler conditions where evaporation is slower. The weight tells you the truth about the whole pot, not just the surface.

Temperature, Humidity, and Light for Cannabis Seedlings

Temperature

22–26Β°C is the target range for the seedling stage. Temperature stability matters as much as the number β€” fluctuations stress seedlings whose root systems aren’t yet capable of managing the plant’s water balance under changing conditions. Keep the grow space away from cold drafts, air conditioning vents blowing directly on plants, or surfaces that get significantly colder at night. A heat mat under the tray or pot during cooler months maintains root zone temperature without heating the entire space.

Humidity

65–70% RH at the seedling stage. This is higher than veg or flower targets because the seedling is absorbing a significant proportion of its moisture through its cotyledons and early leaves rather than through its root system. Higher ambient humidity reduces the transpiration demand on the plant and reduces the pressure to water the medium frequently β€” which directly supports the overwatering prevention goal.

A humidity dome or propagation tent over seedlings during the first week maintains this RH without requiring a room-level humidifier. Remove it for short periods each day to allow air exchange and prevent the stagnant high-humidity conditions that favour damping off β€” ventilation and humidity management work together, not against each other.

Light β€” indoors

Seedlings need less light intensity than plants in veg or flower. The commonly made mistake of placing seedlings close to a high-intensity LED from day one causes light stress in a plant that has no developed root system to support recovery. Start with 200–300 Β΅mol/mΒ²/s PPFD β€” significantly further from the light source than you’ll use in veg. 18/6 is the standard schedule for photoperiod seedlings and the correct schedule for autoflower seedlings. Increase intensity gradually as the plant develops its first true leaves and demonstrates healthy growth.

Light β€” outdoors

Seedlings going outdoors should not go straight into full direct sun. Dappled or indirect light for the first five to seven days allows the seedling to develop without the stress of full solar intensity on a plant with no root system to support it. In Australian summer this is particularly important β€” full afternoon sun in January in Queensland or NSW will stress a seedling that has been growing under controlled conditions. Introduce it gradually.

When to Start Feeding Cannabis Seedlings

Cannabis Seedling Feeding Schedule

Week 1: Nothing. Plain pH-adjusted water only. A germinated seed carries enough stored energy in the cotyledons to sustain it through the first seven days without any supplemental nutrition. Feeding in week one adds salts to the medium around a root mass that isn’t yet capable of managing them β€” this causes nutrient burn at the root tips before the plant has any meaningful root tip area to speak of.

Week 2: 1/4 strength maximum, and only if the plant is showing signs that it’s exhausted the cotyledon energy reserves β€” cotyledons yellowing, first true leaves slow to develop, plant looking pale rather than healthy green. If the plant looks healthy in week two, continue with plain water. There’s no advantage in feeding a plant that isn’t asking for it.

Week 3 onward: Build feeding gradually. Move from 1/4 to 1/2 strength as the first true leaves are fully developed and the plant is visibly in active growth. EC targets: 0.4–0.6 in week two if feeding, 0.8–1.0 in week three, 1.0–1.4 by week four. Watch the leaf tips β€” any browning means back off before damage accumulates. Tip burn at this stage is a direct signal that the root system isn’t yet capable of managing the nutrient load being applied.

🧠 Jason β€” On Feeding Too Early

I’ve seen growers start feeding at day three because the seedling “looked hungry.” Cannabis seedlings don’t look hungry at day three β€” they look small. There’s a difference. A small healthy seedling and a nutrient-deficient seedling look nothing alike once you’ve grown enough of them. If the cotyledons are green and the first true leaves are developing, the plant is not hungry. Leave it alone and water correctly. That’s the entire job for the first week.

Autoflower Seedling Care β€” Additional Rules

Everything above applies to autoflower seedlings β€” and then there are additional rules specific to the auto format that matter more at the seedling stage than at any other point in the grow.

Germinate directly in the final container

This is non-negotiable for autos. An autoflower operates on a fixed genetic timeline from germination β€” typically 70–85 days depending on the strain. Transplanting at any point during that timeline causes stress that the fixed schedule cannot recover from. A transplant stress event in week two of an auto costs yield in week eight. There’s no veg phase to absorb the recovery time.

Germinate directly into the container the plant will finish in β€” 10–15 L indoors, 15–20 L outdoors. This means the seedling goes into a large volume of dry medium with a very small root system. The correct response to this situation is not to water the whole pot β€” it’s to water in a small ring around the seedling as described above, allowing the root system to grow into dry medium rather than saturated medium. The ring method was developed specifically for this situation.

No transplanting under any circumstances

Even a careful transplant from a small pot to a large pot on an auto costs 5–7 days of recovery. On a 75-day strain, that’s nearly 10% of the total grow time lost to a mistake that’s entirely avoidable with planning. Germinate in the final container. If you’ve already germinated in a small pot, don’t transplant β€” leave it and accept the root-bound limitation as the lesser of two costs.

For more detail on the full autoflower growing process from seedling through harvest, the autoflower week-by-week grow guide covers each phase in detail.

Cannabis Seedling Care in Australian Conditions

Summer heat β€” QLD, NSW, WA, NT

Above 30Β°C the seedling stage becomes significantly harder to manage. Evaporation from the medium surface increases, which can create the misleading impression that the medium is drying faster than it is β€” the surface dries while the medium below stays moist. The pot weight method is more important in summer than any other season. Keep seedlings out of direct afternoon sun and away from heat-reflective surfaces. If growing outdoors in summer, mornings only until the root system is established β€” move to shade in the afternoon. Indoors, ensure the grow space isn’t accumulating heat from lighting in an unventilated space.

Coastal humidity β€” QLD and NSW

Coastal growers in Queensland and NSW often run ambient humidity of 70–80% RH through summer β€” which is actually near-ideal for seedlings from an RH standpoint. The risk is that high ambient humidity combined with overwatering creates the perfect damping off environment. In high-humidity coastal conditions, err even more conservatively on watering. The seedling is already absorbing moisture from the air β€” it needs less from the medium. The medium surface may appear dry less quickly than in drier climates, but the medium below is likely still moist.

Dry inland conditions β€” SA, WA inland, central NSW

Low ambient humidity β€” 30–40% RH β€” puts more moisture demand on the seedling through transpiration and can cause the medium to dry faster. A humidity dome is more important in dry inland conditions than in coastal areas. Without it, the seedling may show stress from low humidity before the root system is capable of compensating through increased water uptake. Monitor closely and use a dome for the first week.

Seasonal outdoor timing

For outdoor growers, seedlings going into the ground in spring β€” September through October β€” are starting in conditions that generally suit the seedling stage well: moderate temperatures, increasing day length, manageable humidity. Summer starts (November onward) require more careful heat management in the first two weeks. Autumn starts are possible in Queensland and Northern NSW where temperatures remain warm through March β€” the seedling window is manageable but the overall grow season is shortened. Victoria, SA, and Tasmania: stick to spring starts. The seedling stage in those climates through winter is not practical without indoor establishment first.

Diagnosing Common Cannabis Seedling Problems

Cannabis Seedling Problem Diagnosis

Symptom Most likely cause Less likely cause Action
Drooping, wilting leaves β€” medium is wet Overwatering Root damage from transplant Stop watering. Allow medium to dry out. Do not water again until pot feels light.
Drooping, wilting leaves β€” medium is dry Underwatering Root rot from previous overwatering Water immediately using ring method. Check medium moisture daily.
Thin, pinched stem at soil line β€” seedling collapsing Damping off Physical stem damage Not recoverable. Remove immediately. Replace medium before replanting.
Yellowing cotyledons β€” first true leaves green Normal β€” cotyledons exhaust energy reserves naturally Nitrogen deficiency if true leaves also pale No action needed if true leaves are green. Begin 1/4 strength feed if true leaves are also pale.
Brown leaf tips on first true leaves Nutrient burn from overfeeding pH-related lockout Stop feeding. Flush with plain pH-adjusted water. Check pH of input water.
Pale, stretching, leggy seedling Insufficient light or lights too far away Temperature too high Move lights closer or increase intensity. Bury stretched stem slightly deeper if transplanting photoperiod β€” not for autos.
Clawed, curling leaves β€” tips pointing down Nitrogen toxicity from overfeeding Overwatering Stop feeding immediately. Flush with plain water. Back off EC significantly before resuming.

Not sure which strain suits your setup?

Answer six questions and Jess will match you to three strains based on your experience, space, and goals.

Find Your Strain β†’

Cannabis Seedling Care β€” Frequently Asked Questions

Why do cannabis seedlings die in the first two weeks?

Overwatering is the primary cause. A seedling with no established root system cannot process the water sitting in the medium β€” the waterlogged conditions around the taproot displace oxygen and create the environment where damping off pathogens thrive. The fix is watering in small amounts using the ring method and waiting until the top 2–3 cm of medium is dry before watering again.

What is damping off and can it be treated?

Damping off is a group of fungal pathogens β€” primarily Pythium, Fusarium, and Rhizoctonia β€” that kill seedlings at the stem base. The characteristic sign is a seedling that looks healthy, then suddenly collapses with a thin, water-soaked stem at the soil line. It cannot be treated once established. Prevention through correct watering, fresh sterile medium, good airflow, and stable temperature is the only effective approach.

How often should I water cannabis seedlings?

Only when the top 2–3 cm of medium is dry β€” typically every two to three days in week one, every one to two days in week two as the plant develops. Use the pot weight method: pick the pot up before and after watering and develop a feel for the difference between a dry pot and a correctly moist one. Never water on a schedule in the seedling stage β€” water based on medium state.

When should I start feeding cannabis seedlings?

Not before week two, and only at 1/4 strength if the plant is showing signs of hunger β€” yellowing cotyledons alongside pale true leaves. A healthy seedling in week one needs nothing but pH-adjusted water. Adding nutrients to a medium around a root system that isn’t yet capable of processing them causes tip burn and root damage that sets the plant back further than not feeding at all.

What humidity do cannabis seedlings need?

65–70% RH. At this stage the seedling is absorbing moisture through its leaves as much as through its roots β€” higher humidity reduces the transpiration demand and supports the plant while the root system develops. A humidity dome or propagation tent over seedlings maintains this without needing a room-level humidifier. Ventilate briefly each day to prevent stagnant conditions.

Can I transplant autoflower seedlings?

No. Autoflowers operate on a fixed genetic timeline from germination β€” transplanting at any point causes stress the fixed schedule cannot recover from. Germinate directly into the final container: 10–15 L indoors, 15–20 L outdoors. Use the ring watering method to manage the large volume of dry medium around a small seedling. For more on growing autoflowers, the autoflower week-by-week grow guide covers the full timeline from seed to harvest.

What temperature do cannabis seedlings need?

22–26Β°C, stable. Temperature fluctuations stress seedlings whose root systems aren’t yet capable of managing the plant’s water balance under changing conditions. In Australian summer, keep seedlings away from heat-accumulating spaces and out of direct afternoon sun. In cooler months, a heat mat under the tray maintains root zone temperature without heating the entire space.

How much light do cannabis seedlings need?

Less than you’d give a plant in veg. Indoors: 200–300 Β΅mol/mΒ²/s PPFD, lights further from the canopy than you’ll use once the plant is established. 18/6 schedule for both photoperiod and autoflower seedlings. High light intensity on a seedling with no root system to support recovery causes stress that slows development. Outdoors: indirect or dappled light for the first five to seven days before introducing direct sun gradually.

What’s the difference between seedling care for photoperiods and autos?

The core care is identical β€” watering, temperature, humidity, and feeding rules apply to both. The critical difference is transplanting: photoperiod seedlings can be started in small pots and transplanted once before the flip, which can actually benefit root development. Autoflowers must be germinated in their final container and never transplanted. Everything else β€” correct watering, no feeding in week one, stable environment β€” is the same for both formats. See the autoflower vs photoperiod guide for a full format comparison.

Related Reading

Paper towel germination method β€” the step before this guide, covering how to germinate cannabis seeds using the paper towel method.

How to germinate cannabis seeds β€” full germination guide covering methods, timing, and what to do when seeds don’t pop.

Why seedlings die β€” stem rot and damping off β€” a deeper look at the pathogens behind damping off, how stem rot develops, and strain-specific susceptibility.

Water purity and seed germination β€” why water quality and pH affect early root development and how to get it right from day one.

How to grow autoflowers week by week β€” the full autoflower grow guide from seedling through harvest, covering every phase in detail.

Autoflower vs photoperiod seeds β€” format differences explained, including why transplanting rules differ between the two.

Autoflower nutrients guide β€” when and how to feed from seedling through flush, with EC targets for each phase.

Best cannabis strains for Australian conditions β€” strain selection and seasonal timing for outdoor growers across all Australian states.

Browse all cannabis seeds β€” feminised, autoflower, and photoperiod strains shipped from Australia.

Seeds are sold strictly as novelty collector’s items. They contain no THC or CBD. This page does not constitute medical or legal advice. By purchasing you agree to our terms and conditions. Always check local laws before germinating or cultivating cannabis.