Fat Bastard Strain Review: Effects, Genetics & Complete Grow Guide for Australian Growers

Fat Bastard Strain Review: Effects, Genetics & Complete Grow Guide for Australian Growers

If you’re researching Fat Bastard feminised seeds Australia, you’re already asking the right question. This is one of the most rewarding strains we stock — a plant that grows with the kind of confidence and density that makes you stop and appreciate what good genetics actually look like in the ground.

Fat Bastard is a Blimburn Seeds original, and that matters. We met the Blimburn team at a cannabis conference in the States a few years back and came away with a lot of respect for how seriously they approach their breeding work. These aren’t marketing-first genetics dressed up with a provocative name. The stability, the resin density, the flavour complexity — it all traces back to a breeding programme that genuinely gives a damn. Fat Bastard is a cross of Goldmember and Monkey Spunk that manages to combine THC levels most breeders don’t even attempt with genuinely accessible growing characteristics. Not an easy thing to pull off.

You can buy Fat Bastard feminised seeds from Sacred Seeds Australia — but read the full guide first. There’s a lot worth knowing before you germinate.

Fat Bastard Strain Review: Genetics, THC, and What to Expect

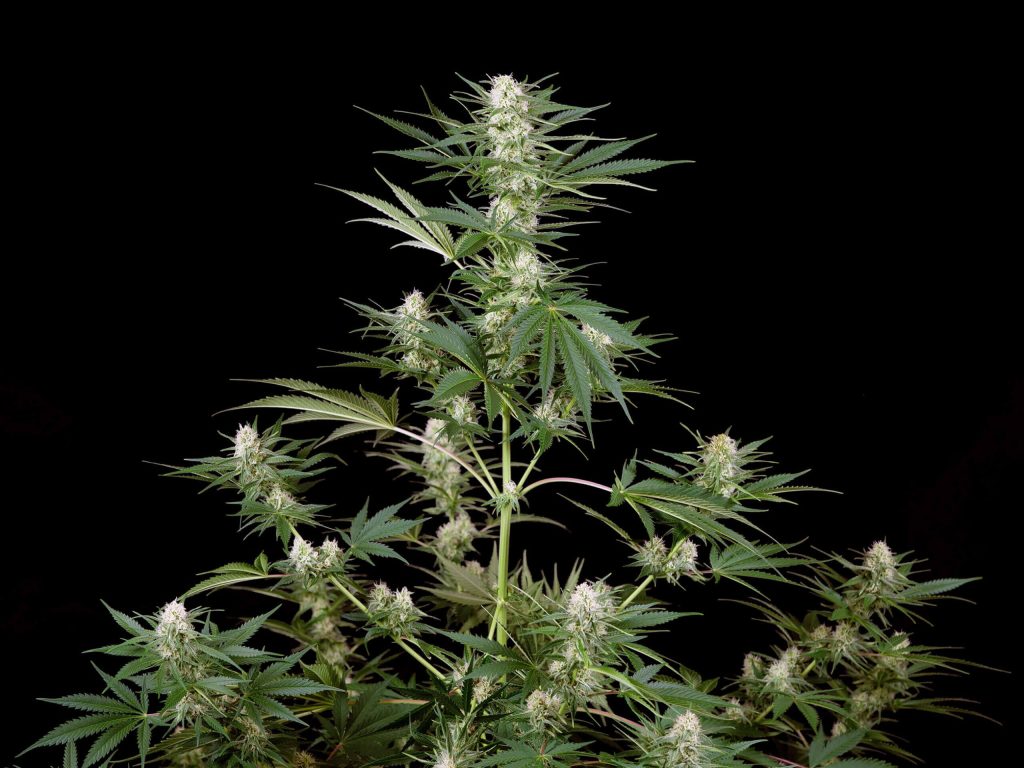
Fat Bastard is a true 50/50 hybrid — equal parts indica and sativa — which explains a growth pattern that doesn’t quite fit either archetype neatly. You get the bud density and resin production of strong indica genetics alongside the structural openness and slightly longer internodal spacing of sativa influence. In practice this means a plant that fills out impressively without collapsing into an unmanageable bush, and a canopy that responds well to training without needing constant intervention.

The parent genetics tell the story clearly. Goldmember (OG Kush x Gold Leaf) is where the body comes from — the pungent, heavy aroma, the dense calyx structure, the deep physical effect. Monkey Spunk (Gorilla Glue #4 x Lilac Diesel) contributes the cerebral onset, the fuel and berry notes, and a potency ceiling that is genuinely exceptional. Put them together and you get a strain that hits hard on both levels rather than splitting the difference.

The THC range — 30–38% — puts Fat Bastard among the most potent high-THC cannabis seeds available in Australia. I want to be straightforward about what that means: this is serious medicine and serious recreational material. The effect profile runs euphoric, powerful, and relaxed. The onset is a genuine cerebral rush before the physical relaxation takes over. At higher doses this will put experienced consumers firmly on the couch. Newer consumers should approach with real caution and start with a fraction of what they’d normally use.

The terpene profile driving a lot of that experience is caryophyllene, myrcene, and humulene. Caryophyllene is the one I find most interesting — it’s peppery and spicy on the palate, but it’s also the only terpene that directly activates cannabinoid receptors (specifically CB2), which contributes to the body-effect profile in ways that go beyond flavour. Myrcene is the classic sedative terpene: earthy, slightly fruity, and responsible for enhancing cannabinoid permeability across the blood-brain barrier. There’s a reason myrcene-dominant strains hit harder than their THC numbers alone suggest — this is why. Humulene brings a woody, hoppy character (the same terpene prominent in many craft beers) and has demonstrated appetite-suppressing properties, which makes Fat Bastard’s effect profile more nuanced than straight indica sedation.

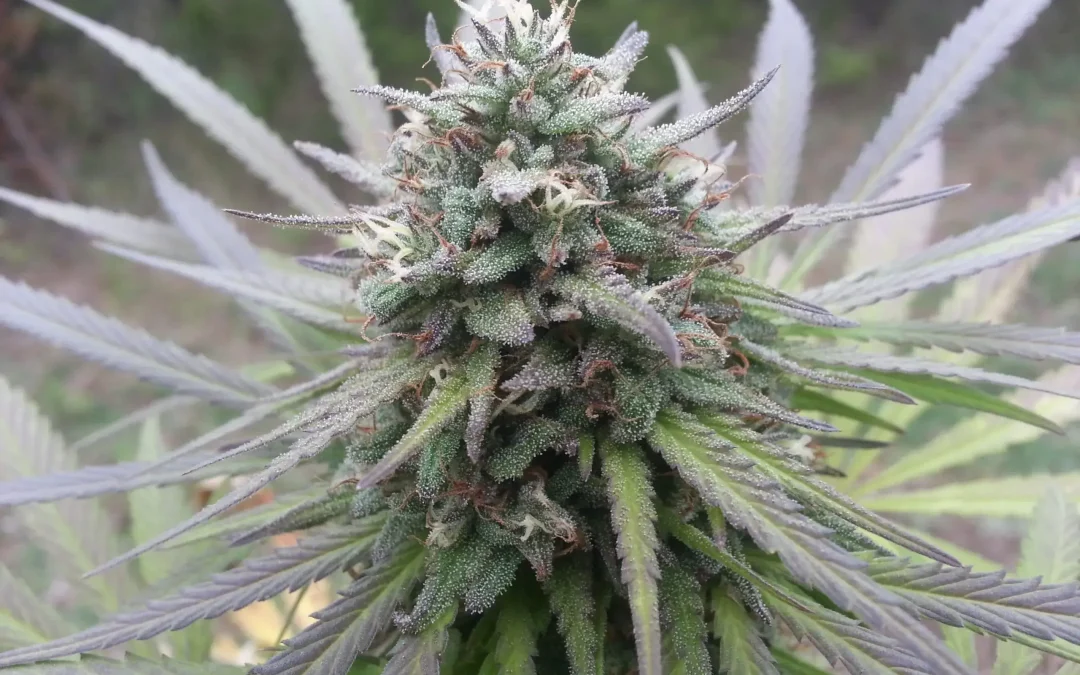
The flavour you’re working toward with a proper cure: fruity and skunky on the front end, developing into more complex resinous notes as the weeks progress. Some phenotypes will express berry or grape undertones in the final two weeks if they’ve seen slightly cooler temperatures — an anthocyanin response worth encouraging if your climate allows it. The exhale carries a distinctive fuel quality that signals the resin density you’re working with.

Fat Bastard — Official Blimburn Specs

Breeder Blimburn Seeds
Lineage Goldmember x Monkey Spunk
Phenotype 50% indica / 50% sativa
THC 30–38%
Terpenes Caryophyllene, Myrcene, Humulene
Flavours Fruity, Skunk, Fuel
Effects Euphoric, Powerful, Relaxed
Flowering time 8–10 weeks
Indoor yield 400–600 g/m²
Outdoor yield 700–900 g/plant
Height ~1.5m
Preferred climate Dry
Seed type Feminised photoperiod
Beginner friendly Yes (the plant) — approach the product with experience

Why Feminised Seeds Make Sense for Australian Home Growers

Fat Bastard is available as feminised photoperiod cannabis seeds, and for most home growers in Australia that’s the format that makes the most sense.

Feminised seeds are bred to produce exclusively female plants. The process involves stressing select females to produce pollen containing only female (XX) chromosomes, which then fertilises other females — the resulting seeds carry no male genetic material. Reputable breeders like Blimburn achieve feminisation rates above 99.5%. The rare hermaphrodite that does appear is almost always stress-induced (heat, light leaks, physical damage) rather than a genetic flaw in the seed.

The practical upside is straightforward: if you’re working within a limited plant count, every seed you germinate should produce a flowering plant. With regular seeds you’d need to germinate roughly twice as many, sex them at 4–6 weeks, and cull the males — wasted time, wasted space, wasted nutrients. There’s also the accidental pollination risk: a single missed male can seed an entire crop, redirecting plant energy from resin to seed development and tanking your cannabinoid concentration. Not a problem you want to discover at harvest.

For a deeper look: how feminised cannabis seeds work and when they’re the right choice.

Ready to grow Fat Bastard?

Genuine Blimburn genetics. Feminised. Discreet shipping across Australia.

Buy Fat Bastard Feminised Seeds →

Fast Bastard feminised seeds Australia

Germination and Seedling Stage

Fat Bastard germinates reliably — Blimburn’s stabilised genetics mean you’re not gambling on inconsistent seeds. The method I’d recommend for Australian conditions is the paper towel technique: place seeds between two damp (not saturated) paper towels, seal inside a ziplock bag or between two plates, and keep in a warm dark spot at 22–26°C. Taproots typically emerge within 24–72 hours. Once the taproot reaches 1–2cm, transfer to your growing medium with the root facing down, 1cm deep.

Alternatively, direct sow into a small seedling pot filled with a light germination mix — avoid heavy potting soils at this stage as they can compact around delicate new roots. Keep the medium moist but not wet, and don’t feed until the seedling has developed its second set of true leaves. Overfeeding at the seedling stage is one of the most common ways growers stress plants before they’ve even had a chance to establish.

Seedlings want warmth and gentle, indirect light. Indoors, fluorescent or low-intensity LED at 18/6 is ideal for the first two weeks. Outdoors, protect young seedlings from direct afternoon sun until they have at least three to four nodes — the intensity can bleach new growth and check early development. Keep humidity higher during the seedling stage (60–70% RH) and begin reducing it gradually once plants are established.

Germination tip: water temperature matters

For the paper towel method, use water at room temperature — not cold tap water. Cold water slows germination noticeably, particularly in winter or in air-conditioned environments. If you’re germinating in late August for an outdoor season, your indoor ambient temperature may be lower than you think. A heat mat set to 24°C underneath the plates makes a meaningful difference to germination speed and consistency.

Growing Fat Bastard Seeds in Australia: Climate and Timing

Blimburn classify Fat Bastard as a dry-climate strain, and that’s the most important piece of environmental information to carry into your planning. Dense buds and humidity are a bad combination — botrytis takes hold fast in tight colas when airflow is poor and moisture is consistent. This doesn’t mean Fat Bastard can’t be grown in subtropical conditions, but it does mean you need to plan around it rather than hope for the best.

For most of temperate and semi-arid Australia — inland New South Wales, Victoria, South Australia, much of Western Australia — the dry climate preference is an advantage. Coastal and subtropical growers (northern NSW, Queensland) can absolutely make this work, but site selection for airflow becomes more critical than sun exposure. A plant with 7 hours of sun in a breezy spot will reliably outperform one with 10 hours in a still, humid microclimate with this strain.

On timing: in temperate zones, germinate indoors in late August or early September and transplant once frost risk passes — typically late September to early October. This gives plants a solid vegetative window before shortening autumn days trigger flowering naturally, landing harvest in late March to mid-April. In subtropical zones, a February–March start targets an autumn harvest and sidesteps peak summer humidity — the better choice for this strain over a spring start.

Environmental targets to aim for across the grow cycle:

Stage Day temp Night temp Humidity (RH)
Seedling 22–26°C 18–22°C 60–70%
Vegetative 22–28°C 18–22°C 50–70%
Early flower 20–26°C 16–20°C 40–50%
Late flower 18–24°C 14–18°C 35–45%

The humidity reduction during flowering is non-negotiable with Fat Bastard. Those dense colas trap moisture at their core, and sustained humidity above 55% during weeks 6–10 of flower creates ideal conditions for botrytis to establish before you can see it on the surface. If you’re growing outdoors and late-season rain is forecast, see the problems section below.

Vegetative Growth: What to Expect Week by Week

Fat Bastard enters vegetative growth with noticeable vigour. Once established, it moves quickly — expect 3–5cm of vertical growth per week under good conditions, with lateral branches developing simultaneously rather than sequentially. This is the 50/50 hybrid showing itself: more branching activity than a pure indica, more compact internodal spacing than a pure sativa.

Weeks 1–2 from transplant are establishment weeks. The plant is building its root system rather than putting on visible above-ground growth. Don’t be concerned if growth looks slow — if the leaves are a healthy dark green and no deficiency symptoms are present, it’s doing what it needs to do. Transplant stress is real but brief with Fat Bastard; fabric pots help here by air-pruning roots and encouraging lateral root development rather than circling.

Weeks 3–5 are when growth accelerates visibly. Lateral branches push outward, the canopy starts to fill, and this is your primary training window. Node spacing tightens as the plant matures, which is ideal for SCROG work — the short internodal gaps mean dense, productive bud sites rather than stretched, airy ones.

For outdoor grows, allow 8–10 weeks of vegetative growth from transplant before the shortening days trigger flowering. Plants that have had a full veg period develop the branching structure and root volume that translate to genuinely impressive outdoor yields. Cutting the veg period short to 5–6 weeks is the most common reason outdoor Fat Bastard underperforms relative to its potential.

Indoors, I’d recommend a minimum of 4 weeks veg on 18/6 before flipping, and 5–6 weeks if you’re running SCROG and want to fill the net properly before locking it down. Fat Bastard responds well to an extended veg period — the extra time directly translates to more main colas and a fuller final canopy.

Feeding Fat Bastard: Working With the Soil

My preference with high-THC outdoor strains is to work with the soil biology rather than around it. A well-amended organic grow will produce a more complex terpene expression than a synthetically fed equivalent, and with a terpene profile as interesting as Fat Bastard’s, that’s worth caring about. The difference shows up most clearly in the cure.

Fat Bastard is a moderate-to-heavy feeder across all growth stages. Here’s how I’d structure the feed programme:

Seedling (weeks 1–2): No additional feeding if using a quality seedling mix. The cotyledons provide sufficient nutrition for early growth. Introduce nutrients at quarter-strength once the second set of true leaves has developed fully.

Vegetative (weeks 3–8 outdoors / weeks 3–6 indoors): Prioritise nitrogen with an NPK around 3-1-2. For organic grows, top-dress with quality compost and worm castings every 2–3 weeks. Compost teas brewed with worm castings, kelp, and mycorrhizal fungi inoculant support microbial activity in the root zone and improve nutrient uptake noticeably — not hype, there’s solid evidence behind it. Increase feeding frequency as the plant grows and root volume expands.

Transition (weeks 1–2 of flower): Begin reducing nitrogen and shifting toward phosphorus and potassium. An NPK of around 1-2-2 bridges veg nutrition with bloom requirements while the plant stretches. Don’t cut nitrogen entirely at this stage — the plant is still putting on significant vegetative mass during the first two weeks of flowering.

Flowering (weeks 3–8): Full bloom nutrition, NPK around 1-3-2. For organic grows, transition to a phosphorus-rich amendment like seabird or bat guano. Potassium supports both resin production and disease resistance — worth emphasising with a strain as susceptible to botrytis as Fat Bastard. Reduce feeding frequency in the final two weeks as the plant begins natural senescence.

Pre-harvest flush (final 7–10 days): Water only with pH-adjusted water to clear residual nutrient salts. This is not optional with Fat Bastard — the dense bud structure traps residual nutrients that will directly affect the smoothness and flavour of the final product. A properly flushed Fat Bastard will have measurably cleaner smoke than an unflushed one.

Always pH-adjust to 6.0–6.5 for soil, 5.5–6.0 for coco or hydro. Even the best nutrient programme delivers nothing useful if the pH is off and uptake is blocked.

Grower’s note: Cal-Mg vs iron deficiency

If you’re collecting rainwater or running reverse osmosis, supplement calcium and magnesium from the start. Cal-Mg deficiency is the most common issue I see in otherwise well-managed organic grows, and it’s frequently misidentified as iron deficiency because the visual symptoms look similar.

The key distinction: calcium and magnesium are immobile nutrients — the plant can’t relocate them from old tissue to new growth. Deficiency always appears on newer leaves first. Iron deficiency also hits new growth, but the yellowing is more uniform across the leaf blade rather than interveinal. Get the diagnosis right and you solve it in days rather than weeks.

Training Fat Bastard for Maximum Yield

Fat Bastard’s 50/50 structure — bushy enough to fill space, open enough to work with — makes it one of the more rewarding strains to train. Left alone it’ll still produce well. Put some consistent time into shaping it during veg and the difference at harvest is material. I’ve seen untrained Fat Bastard plants yield 400g outdoors and trained ones from the same batch yield over 700g. The genetics are the same; the result isn’t.

Low Stress Training (LST)

The entry point for most growers and highly effective with this strain. Begin when plants reach 20–30cm — bend the main stem to roughly horizontal and secure it with soft plant ties to the container edge or a stake. As lateral branches develop, continue bending and tying outward to maintain an even radial canopy. What you’re creating is a structure where every bud site gets equivalent light and the plant’s energy isn’t funnelled into one dominant apex at the expense of everything else. Visit the plant every 2–3 days during active veg and redirect new growth as it emerges.

SCROG (Screen of Green)

Takes LST further by weaving branches through a horizontal net positioned 30–40cm above the medium. As growth pushes through the screen openings, tuck it back and redirect to fill empty squares. Fat Bastard’s natural branching tendency makes it particularly well-suited to SCROG — it fills screens efficiently and the short internodal spacing means dense, productive bud sites at each node rather than gaps. Indoors, this is consistently the highest-yielding configuration per watt for this strain. The trade-off is access and mobility, so plan your watering and inspection logistics before you set the screen — once it’s filled you can’t easily move individual plants.

Topping

Removing the newest growth tip (the apical meristem) at the 5th or 6th node eliminates apical dominance and causes the two branches below the cut to become co-dominant main colas. Top once for 2 mains, top again once those have developed for 4 mains, top again for 8. Most growers get the best results from one or two toppings giving 4–8 main colas — beyond that the recovery time and veg extension starts to erode the yield advantage. Combined with LST, this is the setup I’d recommend for most growers: straightforward to execute, reliably better than an untrained plant, and works both indoors and out.

Lollipopping and defoliation

In the first week of flowering, remove all growth from the bottom third of the plant. These lower bud sites are too shaded to develop into meaningful flowers and they’re drawing resources away from the productive upper canopy. This single step — lollipopping — concentrates plant energy where it counts and significantly improves airflow through the lower structure, which matters enormously with Fat Bastard’s eventual bud density.

Light defoliation during veg (removing large fan leaves that are blocking bud sites or creating humidity pockets) is also worthwhile, but do it incrementally — remove no more than 20–25% of foliage at any one time and spread it over several days to avoid stressing the plant during critical growth phases. Stop all training and significant defoliation by week 3 of flower and let the plant focus its energy on bud development.

Training timeline summary

Week 2–3 of veg: Begin LST — first bend on main stem

Week 3–4 of veg: First topping at node 5 or 6

Week 4–6 of veg: Continue LST on all lateral branches; second topping if running SCROG

Week 6–8 of veg (SCROG): Fill screen — tuck and redirect growth

Week 1 of flower: Lollipop — remove all lower third growth

Week 3 of flower: Stop all training. Let the plant build.

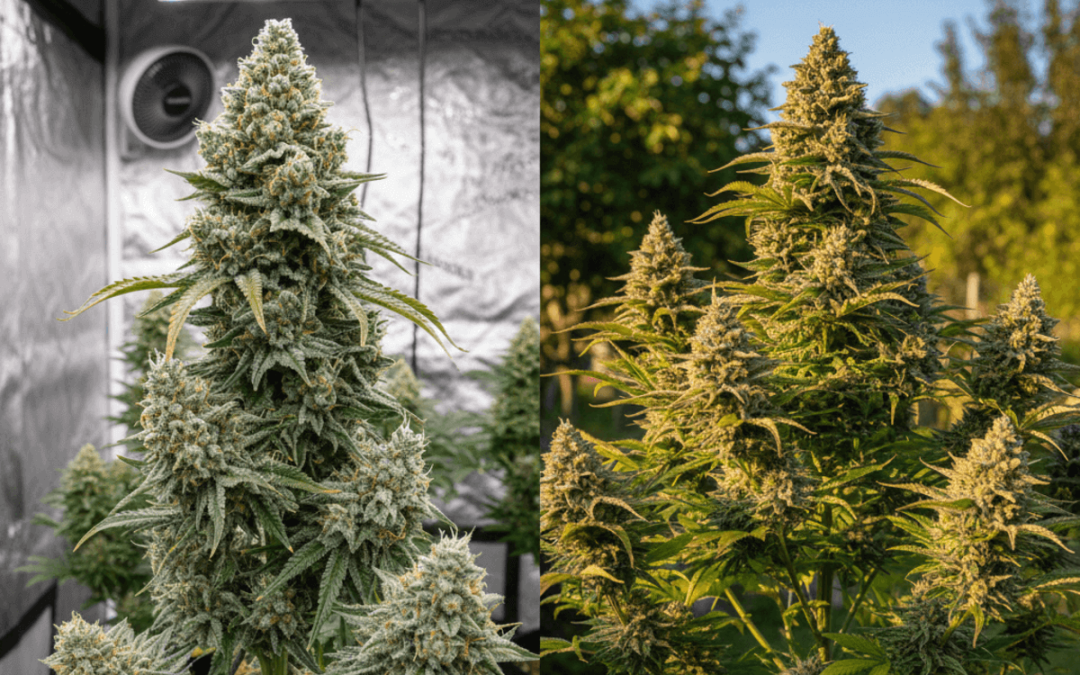
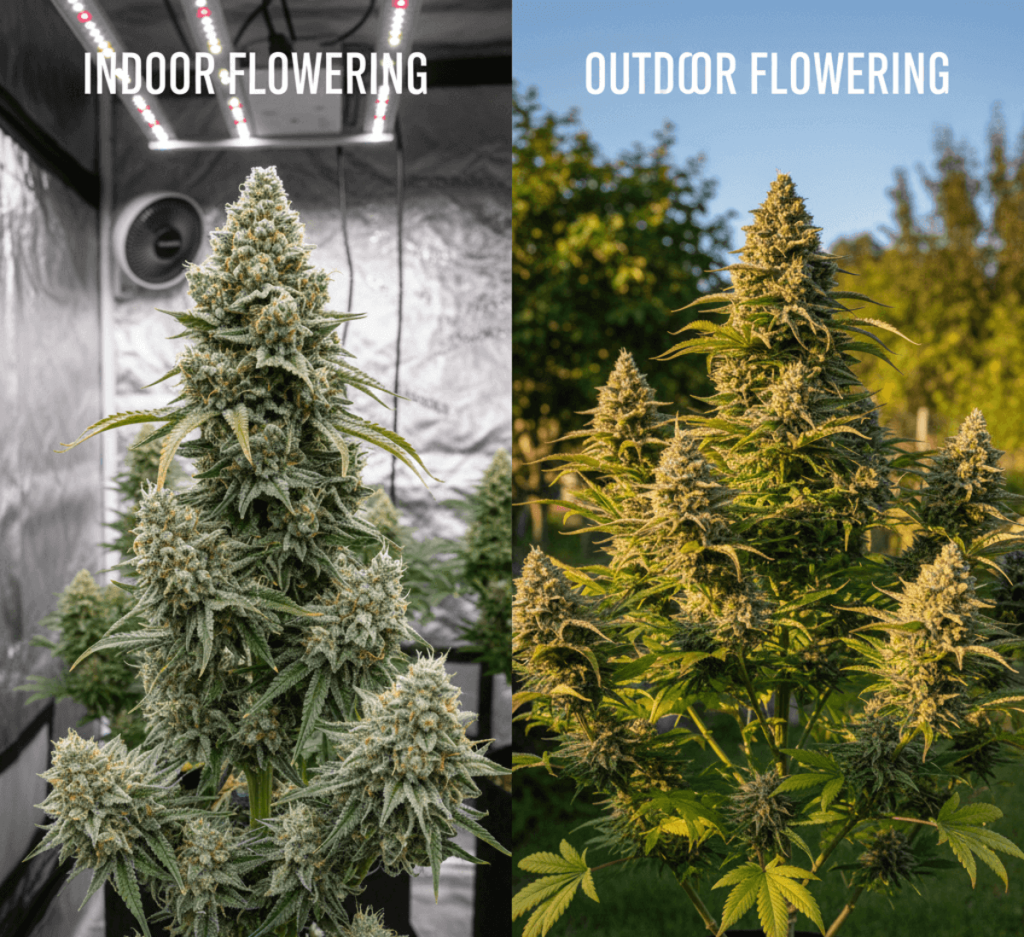
Flowering Stage: Managing Fat Bastard’s Dense Structure

Fat Bastard’s flowering period runs 8–10 weeks from initiation. The first two weeks are stretch — expect 30–50% additional height as the plant redirects energy from lateral growth to vertical extension and initial bud site formation. This stretch is useful: it opens up the canopy, improves light penetration to lower sites, and the sativa genetics mean it stretches with better structure than a pure indica would. Manage it with your LST ties during this period, continuing to direct branches outward as they extend.

By weeks 3–4, bud sites are clearly forming and the stretch is largely complete. This is when you’ll start to appreciate the strain’s calyx-to-leaf ratio — Fat Bastard produces tight, resinous buds with relatively few excess leaves, which makes trimming at harvest considerably more manageable than its yield figures would suggest.

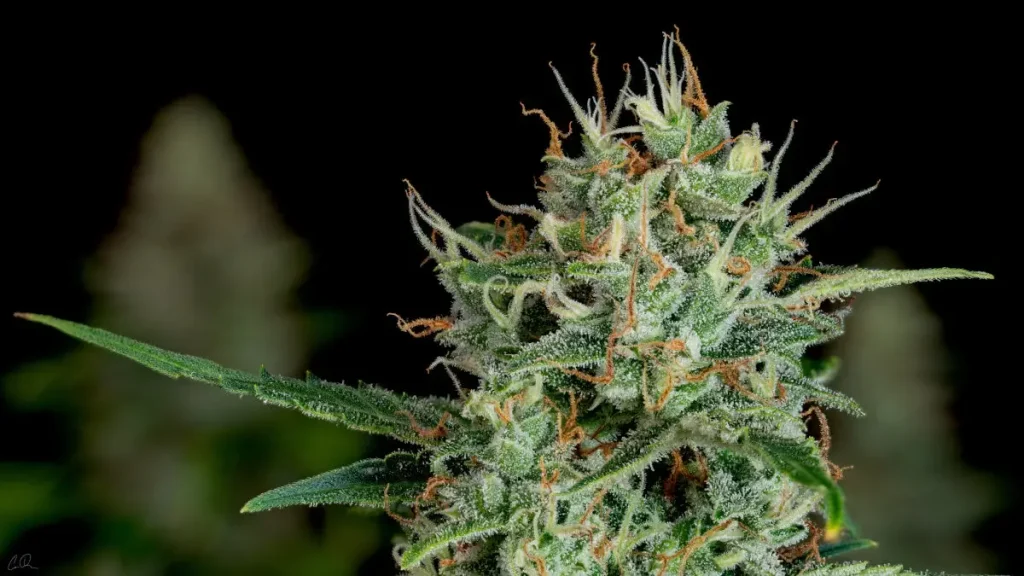
Weeks 5–7 are the bulk-building phase. Buds put on the majority of their mass during this period and resin production accelerates noticeably. Trichomes will be clearly visible to the naked eye by week 6. This is also when the density becomes a liability if your environment isn’t managed — airflow through and around the canopy needs to be consistent, and humidity should be actively managed downward toward 40–45% RH. Oscillating fans inside the canopy are not optional with this strain.

Weeks 8–10 are the finishing phase. Buds complete their final swell, trichomes mature, and the plant begins natural senescence — fan leaves yellowing and dropping as nutrients are redirected into the flowers. Support heavy colas with stakes or trellis netting during this period. The weight of mature Fat Bastard colas will snap unsupported branches, particularly after rain or heavy dew outdoors.

In the final two weeks, a deliberate temperature differential between day and night (dropping night temps to 14–18°C) can trigger anthocyanin expression in some phenotypes, producing purple hues in the buds and leaves. This doesn’t affect potency but it does affect visual appeal and is worth inducing if your climate allows it.

Common Problems and How to Solve Them

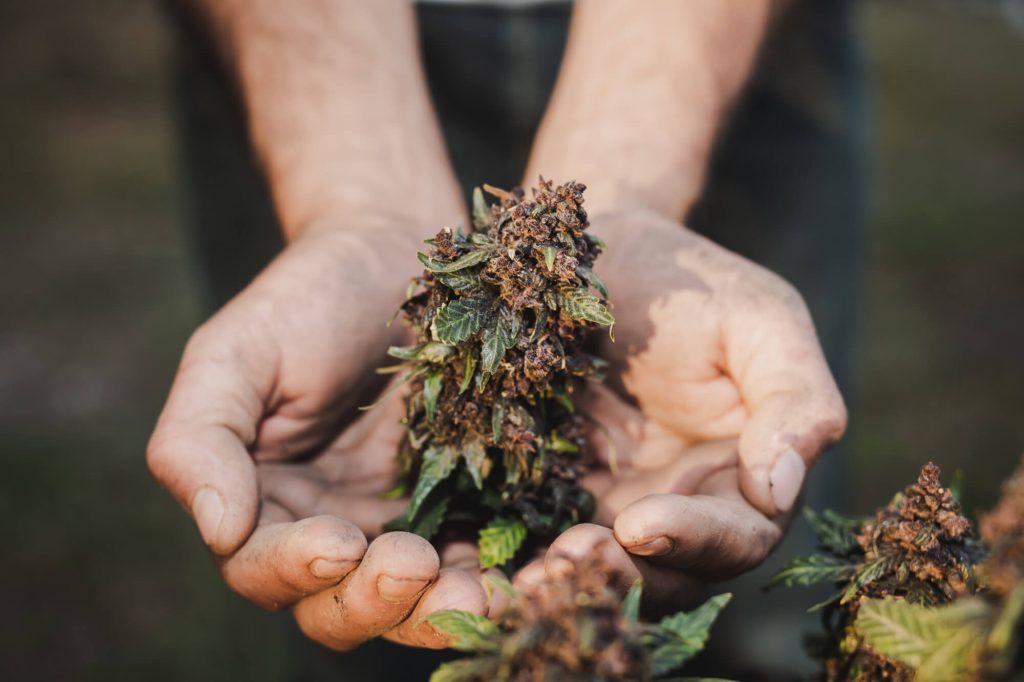
Botrytis (bud rot) — the primary risk

This is the threat most specific to Fat Bastard and it deserves serious attention. Botrytis cinerea is a fungal pathogen that thrives in the humid, warm conditions common to Australian autumn harvests. In dense-budded strains like Fat Bastard, it establishes at the bud’s core before becoming visible on the surface — by the time you can see the grey-brown rotting tissue, it has typically already spread several centimetres inward.

Prevention is everything with botrytis. Keep humidity below 50% during flowering, ensure excellent airflow around and through the canopy, avoid watering overhead during the flowering period, and inspect colas closely every 2–3 days from week 6 onward. If you find infected tissue, remove it immediately with clean scissors — cut at least 5cm below the visible infection — and bag and dispose of it away from the garden. Do not compost infected material. Treat the surrounding area with a potassium bicarbonate solution and dramatically improve environmental conditions.

For outdoor Australian growers, the autumn rain window (late February–April on the east coast) is the critical period. If sustained rain is forecast — three or more consecutive days — and your plant is past 65% cloudy trichomes with mostly brown pistils, seriously consider harvesting before it arrives. You’ll sacrifice some peak potency but that’s recoverable. Bud rot at harvest is not.

Nutrient deficiencies

The most common issues with Fat Bastard in Australian conditions are calcium/magnesium deficiency (interveinal chlorosis on new growth, as covered above), nitrogen deficiency in mid-veg (general yellowing starting on older lower leaves), and phosphorus deficiency in early flower (dark green or purplish leaves, slowed bud development). All three are most commonly caused by pH imbalance locking out available nutrients rather than actual nutrient absence — check and correct pH before adding more feed.

Spider mites

More prevalent indoors but a risk in outdoor grows, particularly during hot, dry periods. Fat Bastard’s dense foliage can harbour mite colonies that are difficult to detect early. Inspect leaf undersides with a loupe every 1–2 weeks. Early intervention with neem oil or insecticidal soap is effective; later-stage infestations during flowering require more targeted miticide treatment. Maintain adequate airflow and avoid excessive heat to discourage establishment.

Heat stress

Sustained temperatures above 30°C cause leaf tacoing (edges curling upward), slowed growth, and reduced resin production. Outdoors in Australian summers, shade cloth during peak afternoon heat and adequate irrigation are the primary tools. One specific issue worth knowing: temperatures above 35°C can cause premature trichome ambering on exposed top colas. This is heat stress, not ripeness — if top colas are showing heavy amber while mid-plant buds still look cloudy and white, read the middle of the plant for your actual harvest indicator.

When to Harvest Fat Bastard: Reading Trichomes, Not the Calendar

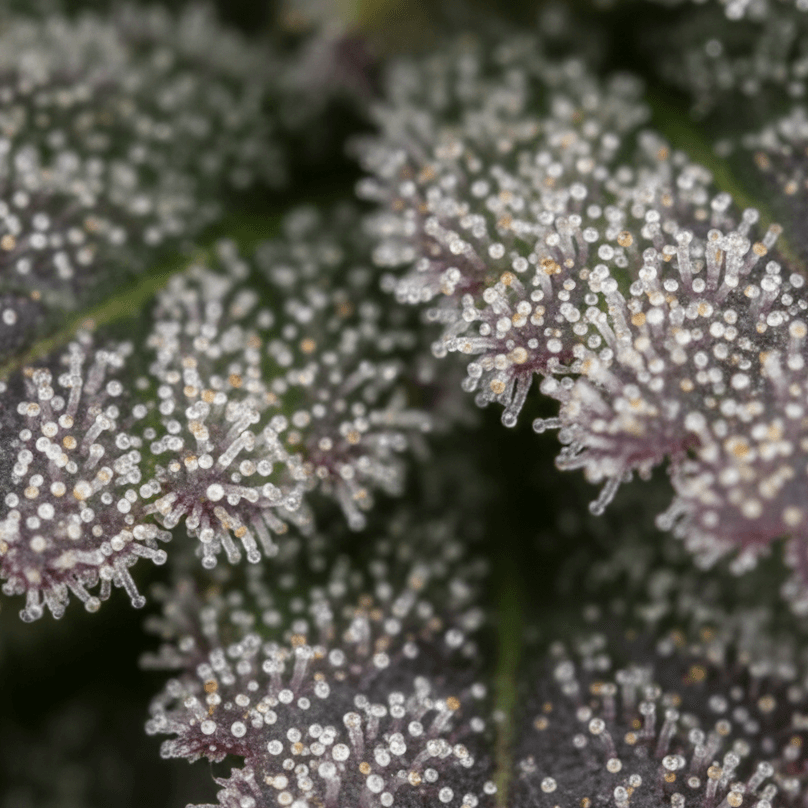
The 8–10 week flower window is a guide, not a signal. Your actual harvest indicator is trichome development. Get a jeweller’s loupe or basic digital microscope (30–60x, around $20 online) and use it — the difference between harvesting at the right moment versus a week early or late is significant in both potency and effect profile.

Trichomes progress from clear (immature — cannabinoids still developing) to cloudy/milky (peak THC — your target) to amber (THC converting to CBN, increasingly sedative). The “wait for 30% amber” advice that circulates in cannabis communities is wrong for a strain at this potency level. By the time you hit 30% amber across the plant, you’ve deliberately allowed a significant portion of your THC to degrade. For Fat Bastard’s characteristic profile — euphoric onset moving into powerful physical relaxation — harvest when 70–80% of trichomes are cloudy with 10–20% just beginning to turn amber.

Two important technique notes: check trichomes on the bud calyxes themselves, not the sugar leaves — sugar leaves mature 5–7 days earlier and will give you a misleading early reading. And check multiple bud sites at different heights, since top colas always mature faster than lower growth, sometimes by a full week.

If you prefer heavier, more sedative effects — for sleep or pain management — pushing to 20–30% amber is a legitimate choice. Just understand you’re trading THC potency for CBN sedation. There’s no free lunch in cannabis chemistry.

Two harvest techniques worth building into your routine

48-hour darkness: Run plants in complete darkness for the final 48 hours before cutting. There’s reasonable evidence this triggers a final resin push as the plant responds to what it reads as an extended night period. Easy to implement indoors; outdoors, cover plants with lightproof material.

Harvest in the morning: Terpene concentrations are highest early in the day before temperatures rise and volatile compounds begin evaporating. Handle branches minimally — trichome heads are fragile and shear off easily — and get plants into your drying environment within a few hours of cutting.

Drying and Curing Fat Bastard: Don’t Rush This Part

Most growers who tell me their Fat Bastard was good but not exceptional rushed the cure. The genetics deliver a complex terpene profile — but that complexity develops during the cure, not during the grow. Pull it from jars at two weeks and you’re not experiencing what this strain is actually capable of.

Dry in a dark, well-ventilated space at 15–21°C with 45–55% relative humidity. Hang whole branches rather than individual buds — the slower dry from retaining stem moisture produces better terpene retention and allows chlorophyll to break down more evenly, which directly affects smoothness. Fat Bastard’s density creates a specific risk during drying: the exterior of a cola can feel dry while significant moisture remains at the core. Test dryness by squeezing buds gently — no moisture should release — and by bending small stems, which should crack rather than snap cleanly. At 10–14 days in appropriate conditions you should be ready for jars.

Once in airtight glass jars, burp daily for the first two weeks — open each jar for 10–15 minutes to release excess moisture and exchange air. Watch for any ammonia smell in the first few days: this signals too-moist bud going into jars. If you detect it, spread buds on a rack for 24 hours before returning to jars. By week three, properly curing Fat Bastard will have shifted noticeably in aroma — the raw chlorophyll note fades, the fruity-skunk character sharpens, and the overall profile becomes rounder and more complex. After two weeks, reduce burping to 3–4 times weekly. Minimum four weeks for a proper cure. Six to eight weeks produces a meaningfully superior result if you can manage the patience.

For long-term storage, Boveda 62% humidity packs inside sealed jars maintain optimal RH without daily monitoring. Store away from light and heat — a dark cupboard at room temperature is ideal. Well-cured Fat Bastard stored properly will hold its quality for 12 months or more.

Is Fat Bastard the Right Strain for Your Garden?

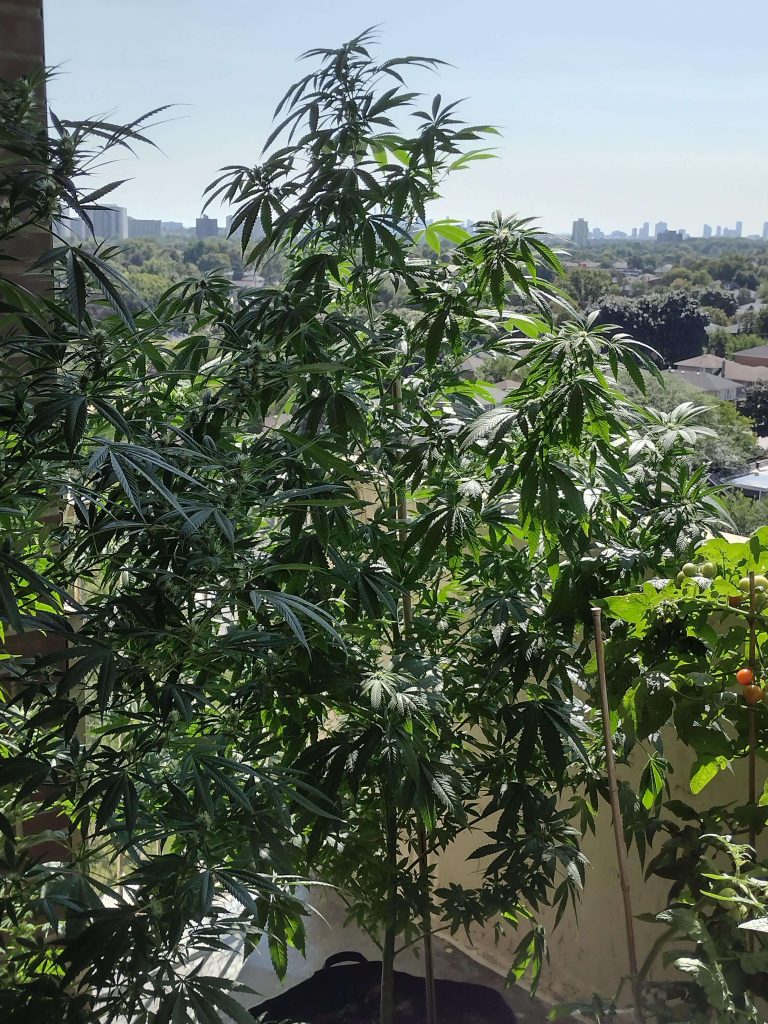
If you’re looking for a potent, high-yielding strain that performs in real Australian conditions — outdoors, in natural soil, with variable weather — Fat Bastard feminised seeds belong on your shortlist. The 50/50 genetics make it more versatile and accessible as a plant than many strains in this THC range. The dry-climate preference suits a wide range of Australian growing environments. The yield potential is exceptional when the conditions are right.

Where it’s not the right fit: if you’re in a consistently high-humidity environment without the ability to manage airflow carefully, the botrytis risk with those dense buds is real and worth thinking through before you commit. In that case, look at something with a lighter bud structure or a faster flowering time that gets you out before the worst of the humid season. We have strains on both ends of that spectrum — browse our full range of cannabis seeds for Australian growers and filter by flowering time if that’s your primary constraint.

The Blimburn name behind it matters to us. These are people we’ve met, whose approach to breeding we respect, and whose genetics we’re confident stocking. When we put our name behind a strain, that’s not a throwaway endorsement.

If you want to explore other feminised photoperiod cannabis seeds before deciding, start there. And if you’re not sure which strain suits your specific setup, reach out — we’re growers, not a call centre.

Get Fat Bastard Seeds — Delivered Discreetly Across Australia

Blimburn genetics. Feminised. Genuine stock, honest advice.

Buy Fat Bastard Feminised Seeds →

Key Takeaways

  • Fat Bastard is a Blimburn Seeds original — Goldmember x Monkey Spunk, a true 50/50 hybrid with verified THC levels of 30–38%.
  • Beginner-friendly as a plant. The smoke is not — approach 30–38% THC with real caution.
  • Dry-climate preference suits temperate and semi-arid Australia well. Airflow management is non-negotiable in humid coastal areas.
  • Outdoor yields of 700–900g per plant are achievable with adequate root space, a full veg period, and good training.
  • Botrytis in dense buds is the primary risk — keep humidity below 50% during flowering and inspect colas regularly.
  • Harvest at 70–80% cloudy trichomes, not 30% amber — that’s degraded THC, not peak ripeness.
  • Cure for minimum 4 weeks, ideally 6–8. This is where the terpene complexity the strain is capable of actually develops.

Frequently Asked Questions: Fat Bastard Seeds

What are Fat Bastard’s parent strains?

Fat Bastard is a Blimburn Seeds original bred from Goldmember and Monkey Spunk. Goldmember is a cross of OG Kush and Gold Leaf — responsible for Fat Bastard’s pungent aroma and deep body effect. Monkey Spunk is a cross of Gorilla Glue #4 and Lilac Diesel, contributing cerebral potency and complex skunky-berry notes. Together they produce a true 50/50 hybrid with THC of 30–38%.

Is Fat Bastard suitable for beginner growers?

As a plant, yes — Blimburn classify it as beginner-friendly and grower reports back that up. It germinates reliably, grows vigorously, and is forgiving of minor cultivation errors. Where caution is needed is with the end product: 30–38% THC can be genuinely overwhelming for inexperienced consumers. The grow is accessible. The smoke demands respect.

How long does Fat Bastard take to flower?

Blimburn’s spec is 8–10 weeks from flower initiation. For Australian outdoor growers that typically means a late March to mid-April harvest depending on latitude and when you germinated. Use the calendar as a starting point only — trichome development is always the reliable harvest indicator.

What yields can I realistically expect from Fat Bastard?

Blimburn’s figures are 400–600g/m² indoors and 700–900g per plant outdoors. Hitting the top of those ranges requires dialled conditions, quality lighting indoors, solid training, and a full vegetative period outdoors. A well-managed plant in a 100–200 litre container with properly amended soil can genuinely reach the upper end outdoors in a good Australian temperate season.

Is Fat Bastard indica or sativa?

A true 50/50 hybrid. Effects move from an initial sativa-leaning cerebral euphoria into a progressively deeper indica body stone. It doesn’t sit cleanly at either end of the spectrum, which is part of what makes it versatile.

What climate does Fat Bastard prefer?

Blimburn classify it as a dry-climate strain. Australian temperate and semi-arid zones suit it well. Coastal and subtropical growers can succeed with it but need to prioritise airflow and humidity management to protect dense buds from botrytis, particularly during late flowering.

What does Fat Bastard taste and smell like?

Fruity and skunky — exotic fruit notes over a sweet, pungent skunk base, with a distinctive fuel quality on the exhale. The terpene profile (caryophyllene, myrcene, humulene) adds peppery, earthy, hoppy character that develops significantly during the cure. Some phenotypes express berry or grape undertones with cooler late-flower temperatures.

Can Fat Bastard be grown outdoors in Australia?

Yes, and outdoor is where it shines — 700–900g per plant is possible in good Australian temperate conditions. Germinate indoors in late August, transplant after frost risk passes in late September or October, and target a late March to mid-April harvest in temperate regions. Subtropical growers should start in February to avoid peak humidity during the critical late flowering period.

How do I prevent bud rot on Fat Bastard?

Keep humidity below 50% during flowering — ideally 40–45% in late flower. Ensure strong airflow through and around the canopy, not just above it. Avoid overhead watering during the flowering period. Inspect colas every 2–3 days from week 6 onward — botrytis establishes at the bud’s core before becoming visible on the surface. If sustained rain is forecast outdoors and the plant is past 65% cloudy trichomes, seriously consider harvesting early. Bud rot is unrecoverable; a slightly early harvest is not.

Where can I buy Fat Bastard seeds in Australia?

We stock Fat Bastard feminised seeds with discreet shipping across Australia. If you have questions about the strain or whether it suits your setup, get in touch — we’re growers, not a call centre.

Gorilla Glue Flowering Time (Indoor vs Outdoor)

Gorilla Glue Flowering Time (Indoor vs Outdoor)


Understanding the flowering timeline of your gorilla glue cannabis plants is essential for maximising yields and achieving the potent, resinous buds this legendary strain is famous for. Whether you’re cultivating indoors under controlled conditions or harnessing the natural Australian climate outdoors, knowing precisely when your plants will flower and how long the process takes empowers you to plan your grow cycles, optimise environmental conditions, and harvest at peak potency. This comprehensive guide will walk you through every aspect of gorilla glue flowering time, providing actionable insights for Australian cultivators.

The gorilla glue flowering time typically ranges from 8 to 9 weeks for indoor grows using photoperiod feminised seeds, whilst outdoor cultivators in Australia can expect harvest around late March to early April when growing photoperiod varieties. Autoflowering gorilla glue variants complete their entire lifecycle in approximately 8-10 weeks from germination, with the flowering phase occupying roughly 6-7 weeks of that timeframe. These timelines can vary slightly depending on environmental conditions, phenotype variations, and your specific growing techniques. Understanding these parameters allows you to create optimal conditions throughout the flower cycle, ensuring you harvest dense, trichome-laden buds at their absolute peak.

Featured image of Gorilla-Glue-Flowering-Time-Indoor-vs-Outdoor comparison

Understanding Gorilla Glue Genetics and Flowering Characteristics

Gorilla glue, also known as GG4 or Original Glue, represents a balanced hybrid strain with indica-leaning tendencies, typically expressing a 60/40 indica to sativa ratio. This genetic makeup significantly influences its flowering behaviour and timeline. The strain’s parentage—combining Chem’s Sister, Sour Dubb, and Chocolate Diesel—contributes to its relatively compact flowering period and exceptional resin production.

The strain exhibits classic photoperiod characteristics when grown from standard feminised seeds, meaning it requires specific light cycle changes to initiate flowering. Indoor growers trigger flowering by switching from an 18/6 vegetative light schedule to a 12/12 flowering schedule. This mimics the natural reduction in daylight hours that outdoor plants experience as seasons change. Additionally, understanding the differences between feminised photoperiod seeds and their autoflowering counterparts is crucial for planning your grow timeline.

Autoflowering gorilla glue varieties contain ruderalis genetics, which allows them to flower based on age rather than light cycle changes. These plants typically begin flowering automatically around 3-4 weeks from germination, regardless of photoperiod. This characteristic makes autoflowering versions particularly appealing for Australian growers seeking multiple harvests per year or cultivating in regions with less predictable seasonal patterns.

Photoperiod vs Autoflowering Flowering Timelines

When selecting between photoperiod and autoflowering gorilla glue seeds, the flowering timeline represents one of the most significant differences. Photoperiod varieties offer growers complete control over vegetative duration, allowing you to grow plants to your desired size before initiating flowering. Once you flip to 12/12 lighting, expect 8-9 weeks until harvest readiness.

Autoflowering gorilla glue completes its entire lifecycle in 8-10 weeks total, with flowering occupying approximately 6-7 weeks of that period. Whilst you sacrifice some control over plant size, you gain speed and simplicity. For Australian growers working within specific seasonal windows or seeking discreet, fast-turnaround grows, the autoflowering option presents compelling advantages.

How to Manage Indoor Gorilla Glue Flowering Time

Indoor cultivation provides maximum control over gorilla glue flowering time through precise environmental manipulation. Successfully managing this timeline requires understanding the key factors that influence flowering speed and implementing best practices throughout each phase. The controlled environment allows you to optimise every variable, potentially shortening flowering time slightly whilst maximising quality.

Step 1: Initiate Flowering with Proper Light Cycle Changes

For photoperiod gorilla glue plants, flowering begins when you switch your lighting schedule from 18/6 (18 hours light, 6 hours darkness) to 12/12. This dramatic reduction in daylight hours signals the plant that autumn is approaching, triggering hormonal changes that initiate flower development. Ensure your dark period remains completely uninterrupted—even brief light leaks can stress plants and delay flowering or cause hermaphroditism.

Maintain consistent timing for your light cycles, as irregular schedules stress plants and extend flowering duration. Use quality timers to ensure precision, and never manually adjust cycles once flowering has commenced. The plant’s internal clock is remarkably sensitive during this transition period, and consistency produces the fastest, most uniform flowering response.

Step 2: Adjust Environmental Parameters for Flowering

Temperature and humidity requirements shift as gorilla glue enters flowering. During the vegetative stage, you may have maintained temperatures around 24-28°C with relative humidity of 60-70%. As flowering commences, gradually reduce humidity to 40-50% to prevent bud rot and mould whilst maintaining temperatures between 20-26°C. Lower nighttime temperatures (around 18-22°C) can enhance resin production and bring out purple hues in susceptible phenotypes.

Air circulation becomes increasingly critical as dense buds develop. Position oscillating fans to maintain gentle, constant airflow throughout the canopy without directly blasting flowers. This prevents stagnant microclimates where moisture accumulates, reducing pathogen risks. Monitor your grow space’s VPD (vapour pressure deficit) to optimise transpiration rates, which directly influence nutrient uptake and flowering speed.

Step 3: Transition to Flowering Nutrients

As flowering initiates, gorilla glue’s nutritional requirements shift dramatically from nitrogen-heavy vegetative formulas to phosphorus and potassium-dominant flowering nutrients. Begin transitioning your nutrient regimen during the first week after switching to 12/12 lighting. Reduce nitrogen levels gradually whilst increasing phosphorus and potassium to support bud development and resin production.

Most quality cannabis nutrient lines offer specific flowering formulations designed for this phase. Follow manufacturer guidelines but remain attentive to your plants’ responses. Gorilla glue typically exhibits moderate to heavy feeding requirements during flowering, though individual phenotypes may vary. Monitor leaf colour and growth patterns to fine-tune your feeding schedule, avoiding both deficiencies and nutrient burn that can extend flowering time.

For growers seeking premium genetics with proven flowering characteristics, the Gorilla Glue Feminized Seeds from our catalogue offer reliable, consistent performance with the classic 8-9 week flowering timeline. Alternatively, the Auto Gorilla Glue Feminized Seeds provide the same potent genetics in a faster, more forgiving autoflowering format perfect for beginners or time-conscious cultivators.


Gorilla Glue Feminized Seeds

Gorilla Glue Feminized Seeds

$75.00

View Product

Auto Gorilla Glue Feminized Seeds

Auto Gorilla Glue Feminized Seeds

$75.00

View Product


Mastering Outdoor Gorilla Glue Flowering Time in Australia

Outdoor gorilla glue cultivation in Australia follows natural photoperiod changes, with flowering typically initiating as daylight hours decrease through late summer and autumn. Understanding your specific region’s latitude and seasonal light patterns is essential for predicting flowering onset and harvest timing. Australian growers benefit from diverse climate zones, but this also means flowering times vary significantly between regions.

Step 1: Determine Your Region’s Natural Flowering Timeline

In most Australian regions, photoperiod cannabis plants including gorilla glue begin flowering naturally when daylight hours drop below approximately 14 hours per day. This typically occurs in late February to early March across most of southern Australia, though timing varies with latitude. Northern tropical regions may experience later flowering initiation due to less dramatic photoperiod changes.

Once flowering commences naturally outdoors, gorilla glue follows the same 8-9 week flowering timeline as indoor plants. This positions harvest in late March through April for most Australian growers, aligning perfectly with autumn’s cooler temperatures and lower humidity—ideal conditions for final bud maturation. Coastal growers should monitor weather forecasts carefully during this period, as autumn rains can threaten nearly-mature crops with mould and bud rot.

Step 2: Plant at the Right Time for Optimal Flowering

Timing your outdoor gorilla glue grow requires working backwards from your region’s expected first frost date and natural flowering initiation period. Most Australian growers plant outdoors in spring (September-October) after the last frost risk has passed. This provides 4-5 months of vegetative growth before natural photoperiod changes trigger flowering in late summer.

Larger vegetative plants produce substantially higher yields, so maximising vegetative time without pushing harvest too late into autumn represents the key balancing act. If you’re working with autoflowering cannabis seeds, you can plant multiple successive crops throughout the warmer months, as these varieties don’t depend on photoperiod changes to flower.

Step 3: Prepare for Regional Climate Variations

Australia’s vast geography creates dramatically different growing conditions across regions. Queensland growers in subtropical zones may contend with high humidity during flowering, necessitating careful strain selection and mould prevention strategies. Conversely, inland growers in drier regions like central New South Wales or South Australia enjoy lower humidity but must manage temperature extremes and water availability.

Southern growers in Victoria and Tasmania face shorter growing seasons with earlier autumn arrivals, making gorilla glue’s relatively compact 8-9 week flowering period particularly advantageous. These cooler climates can actually enhance terpene preservation and resin production during late flowering, producing exceptionally aromatic and potent harvests. Understanding your microclimate allows you to leverage regional advantages whilst mitigating specific challenges through strain selection and cultivation techniques.

Week-by-Week Flowering Guide for Gorilla Glue

Understanding what to expect during each week of gorilla glue’s flower cycle enables you to anticipate plant needs and optimise conditions accordingly. This detailed timeline applies to photoperiod varieties grown indoors under 12/12 lighting or outdoors following natural flowering initiation. Autoflowering varieties follow similar patterns but on a slightly compressed timeline.

Weeks 1-2: Flowering Transition and Stretch

The first two weeks after initiating 12/12 lighting represent the flowering transition period, often called the “stretch.” During this phase, gorilla glue plants may increase in height by 50-100% as internodal spacing elongates and the plant redirects energy toward reproductive growth. You’ll notice the first pistils (white hairs) emerging from developing bud sites, signalling successful flowering initiation.

Maintain slightly higher nitrogen levels during this stretch period to support rapid vegetative expansion, then begin transitioning to bloom nutrients as Week 3 approaches. Training techniques applied during early flowering—such as selective defoliation or continued LST (low-stress training) adjustments—should be completed by the end of Week 2, as excessive manipulation later in flowering can stress plants and reduce yields.

Weeks 3-5: Bud Formation and Development

Weeks three through five represent the primary bud formation period, where gorilla glue develops its characteristic dense, resinous flower clusters. Vertical growth substantially slows or stops entirely as the plant channels all energy into reproductive development. Pistil production accelerates, and you’ll notice the first visible trichome development coating emerging buds and surrounding foliage.

Nutrient demands peak during this period, particularly for phosphorus and potassium. Feed consistently according to your chosen nutrient schedule, monitoring runoff EC/PPM levels to prevent salt buildup in your growing medium. Defoliation should be minimal or absent during this critical development window—only remove leaves that are clearly dying or blocking airflow to developing bud sites. The comprehensive gorilla glue strain guide provides additional insights into managing this crucial phase.

Weeks 6-8: Bud Swelling and Maturation

The final weeks of flowering showcase dramatic bud swelling as calyxes multiply and swell with resin. Gorilla glue lives up to its name during this period, developing the sticky, adhesive resin coating that can literally glue trimming scissors together. Pistils begin changing colour from white to orange/brown, though this alone doesn’t indicate harvest readiness—trichome development is the definitive maturity indicator.

Reduce feeding strength gradually during weeks 7-8, with many growers implementing a flush (watering with plain, pH-adjusted water only) during the final 7-14 days before harvest. This practice remains somewhat controversial, but many cultivators believe it improves final flavour by reducing residual nutrients in plant tissues. Monitor trichome colour carefully using a jeweller’s loupe or digital microscope—harvest timing based on trichome maturity determines your final product’s effects profile. For detailed guidance on this crucial decision, consult our article on amber trichomes and cannabis harvest timing.

Week 9+: Extended Maturation for Specific Effects

Whilst most gorilla glue plants reach harvest maturity between weeks 8-9, some phenotypes benefit from extended flowering into week 10. Growers seeking maximum sedative, body-focused effects often allow trichomes to develop higher amber percentages before harvesting. This extended maturation converts more THC to CBN, producing heavier, more narcotic effects ideal for pain relief and sleep assistance.

Monitor your plants closely during any extended flowering period, as environmental stresses and nutrient depletion can cause quality degradation if pushed too far. The goal is to harvest at absolute peak potency and terpene content, which requires balancing trichome maturity against overall plant health and vigour.

Close-up of Gorilla Glue trichomes indicating high THC levels and potency

How to Optimise Conditions Throughout the Flower Cycle

Creating ideal conditions throughout gorilla glue’s flowering period maximises both speed and quality. Environmental optimisation involves managing multiple interconnected variables, each influencing flowering progression and final bud characteristics. Attention to these details separates average harvests from exceptional ones.

Step 1: Perfect Your Lighting Strategy

Light spectrum and intensity profoundly influence flowering speed and bud density. For indoor grows, full-spectrum LED lights or HPS (high-pressure sodium) systems provide optimal flowering performance. Gorilla glue responds exceptionally well to lights with enhanced red spectrum (600-700nm wavelengths), which drives photosynthesis and flowering hormone production during the bloom phase.

Maintain appropriate light intensity throughout flowering—too weak and buds develop loosely with reduced potency; too intense and you risk light stress, bleaching, or heat damage. Most cultivators position quality LED fixtures 30-45cm from canopy tops, adjusting based on manufacturer specifications and plant response. Ensure even light distribution across your entire canopy, as shaded lower growth produces significantly inferior buds.

Step 2: Manage Temperature and Humidity Precisely

Temperature and humidity management becomes increasingly critical as flowering progresses and bud density increases. During early flowering (weeks 1-3), maintain relative humidity around 45-55% with temperatures of 22-26°C during lights-on periods. As buds develop density through weeks 4-6, reduce humidity to 40-45% to minimise mould risks whilst maintaining similar temperatures.

During late flowering (weeks 7 onwards), further reduce humidity to 35-40% and consider slightly cooler temperatures (20-24°C) to enhance resin production and terpene preservation. Some growers implement a final “cold shock” during the last week before harvest, dropping nighttime temperatures to 15-18°C to stress plants into maximising resin production as a protective response. This technique requires careful implementation to avoid causing actual plant damage.

Step 3: Optimise Nutrient Delivery and pH

Nutrient availability directly influences flowering speed and final yields. Gorilla glue performs best with pH levels between 6.0-6.5 in soil-based media or 5.5-6.0 in hydroponic systems. Test and adjust pH consistently, as fluctuations impair nutrient uptake even when feeding appropriate formulations. Many growers discover that seemingly mysterious deficiencies actually stem from pH imbalances rather than insufficient nutrient concentrations.

Implement a consistent feeding schedule based on your growing medium and system. Soil growers typically feed every second or third watering, whilst hydroponic systems require constant nutrient solution availability. Monitor EC/PPM levels to prevent both deficiencies and toxic accumulations. Gorilla glue generally tolerates moderate to high feeding levels during peak flowering, though individual phenotypes vary—always observe plant responses and adjust accordingly.

Troubleshooting Common Flowering Issues

Even experienced growers occasionally encounter challenges during the flowering phase. Identifying and addressing these issues quickly prevents minor problems from compromising your entire harvest. Understanding common flowering complications specific to gorilla glue empowers you to maintain healthy, productive plants throughout the bloom cycle.

Addressing Delayed or Stalled Flowering

If your photoperiod gorilla glue plants fail to show flowering signs within 10-14 days after switching to 12/12 lighting, investigate potential causes immediately. Light leaks during the dark period represent the most common culprit—even small amounts of light penetrating your grow space can prevent flowering initiation. Check your grow tent or room thoroughly during the dark period, sealing any light leaks completely.

Stress from environmental extremes, nutrient imbalances, or recent transplanting can also delay flowering. Ensure your plants were healthy and unstressed before initiating 12/12 lighting. Some growers experience frustration when their photoperiod plants flower at unexpected times, which may indicate environmental issues or genetic factors requiring attention.

Managing Nutrient Deficiencies During Flowering

Nutrient deficiencies manifest differently during flowering compared to vegetative growth. Phosphorus deficiency—common during heavy flowering—appears as dark green or purple leaves with potential leaf curling and slowed bud development. Potassium deficiency causes leaf edges to brown and curl upward, with possible interveinal chlorosis (yellowing between leaf veins).

Address deficiencies promptly by adjusting your nutrient formula and verifying pH levels fall within the optimal range. Gorilla glue’s heavy feeding requirements make deficiencies relatively common when using conservative feeding schedules. However, resist the temptation to dramatically increase nutrient concentrations suddenly—gradual adjustments prevent nutrient burn whilst correcting deficiencies.

Preventing and Treating Bud Rot and Mould

Gorilla glue’s dense bud structure makes it somewhat susceptible to bud rot (botrytis) and powdery mildew, particularly in high-humidity environments. Prevention far exceeds treatment in effectiveness—maintain humidity below 45% during mid-to-late flowering and ensure vigorous air circulation throughout your canopy. Avoid wetting flowers during watering, and never allow moisture to accumulate on buds.

If you discover bud rot, immediately remove affected areas by cutting several centimetres below visible infection to ensure complete removal. Dispose of infected material far from your grow space. Increase air circulation and reduce humidity further if possible. For outdoor Australian growers facing autumn humidity or rain, consider installing temporary rain covers or selecting cultivation locations with excellent drainage and airflow. According to research on Botrytis cinerea, this fungal pathogen thrives in cool, humid conditions—precisely the environment many Australian autumn climates provide.

Determining the Perfect Harvest Window

Identifying the optimal harvest moment represents one of the most critical decisions in cannabis cultivation. Harvesting too early yields underdeveloped buds with reduced potency and yields; harvesting too late allows THC degradation and produces overly sedative effects. Gorilla glue’s relatively short flowering window demands attentive monitoring during the final weeks to capture peak maturity.

Step 1: Monitor Trichome Development

Trichome colour provides the most reliable harvest timing indicator. Using a jeweller’s loupe (30-60x magnification) or digital microscope, examine trichomes on the buds themselves rather than sugar leaves, which mature earlier. During early flowering, trichomes appear clear and glassy. As maturity approaches, they become cloudy or milky white—indicating peak THC content.

For balanced effects typical of gorilla glue’s hybrid nature, harvest when approximately 70-80% of trichomes appear cloudy with 10-20% turning amber. This produces a well-rounded high combining mental clarity with physical relaxation. If you prefer more energetic, cerebral effects, harvest when trichomes are mostly cloudy with minimal amber. For maximum sedative, body-focused effects, allow 30-40% amber development before harvesting.

Step 2: Assess Overall Plant Maturity

Beyond trichomes, evaluate overall plant appearance and vitality. Mature gorilla glue plants display substantial pistil darkening (70-90% brown/orange), though this alone doesn’t determine harvest readiness. Leaves may show natural senescence (yellowing and dying) as the plant redirects all remaining energy into final bud maturation—this is normal during the final weeks, particularly if you’ve reduced feeding or implemented a flush.

Bud density should feel firm when gently squeezed, with calyxes swollen and covered in a thick resin coating. The distinctive gorilla glue aroma intensifies significantly during final maturation, developing complex notes combining earthiness, diesel fuel, and subtle chocolate or coffee undertones inherited from its diverse genetic lineage.

Step 3: Execute Proper Harvest Technique

Once you’ve determined optimal maturity, execute your harvest during the dark period or just before lights-on for indoor grows. Some research suggests terpene and cannabinoid concentrations peak during the dark period, though evidence remains somewhat anecdotal. Outdoor growers should harvest during morning hours before temperatures rise significantly, preserving volatile terpenes that can evaporate in heat.

Use sharp, clean cutting tools to remove plants at the base or selectively harvest individual branches if maturity varies across the canopy. Handle buds gently to preserve the precious trichome coating—excessive touching during harvest can remove significant quantities of resin. Immediately begin your drying process in a controlled environment with temperatures around 18-21°C and humidity at 45-55% for optimal preservation of cannabinoids and terpenes.

Proper post-harvest handling proves just as critical as growing technique in determining final quality. Careful drying over 7-14 days followed by proper curing in sealed containers develops gorilla glue’s full flavour profile whilst preserving maximum potency. This patience during the final stages ensures your months of careful cultivation result in premium-quality buds showcasing everything this legendary strain offers.

holding gorilla glue flowering showing harvest technique

Conclusion: Mastering Gorilla Glue Flowering for Maximum Results

Successfully managing Gorilla Glue’s flowering timeline requires understanding the differences between indoor and outdoor growing, as well as photoperiod and autoflowering genetics.
Whether growing indoors or outdoors in Australia, the principles remain the same. Provide optimal conditions at each stage, monitor plant responses closely, and harvest based on trichome maturity rather than fixed timelines.

The 8–9 week flowering period of photoperiod Gorilla Glue offers a relatively quick turnaround compared to many premium strains. Autoflowering versions deliver even faster results for time-conscious growers.
By applying the strategies in this guide—such as proper light management, environmental control, and accurate harvest timing—you can maximise both yield and quality.

Australian growers possess unique advantages and challenges depending on their specific regions. Coastal cultivators must manage humidity during autumn flowering, whilst inland growers contend with temperature extremes and water management. Understanding your microclimate and adapting these techniques accordingly ensures success regardless of location. For those just beginning their cultivation journey, exploring fundamental growing techniques provides essential foundational knowledge.

Remember that every grow provides learning opportunities. Document your flowering timeline, environmental conditions, and plant responses throughout each cycle. This data becomes invaluable for optimising future grows and developing intuition about your plants’ needs. Whether you’re selecting premium high THC cannabis seeds for your next project or expanding your knowledge through our comprehensive blog resources, continuous learning separates good growers from great ones.

The gorilla glue strain’s legendary status stems from its exceptional potency, generous yields, and relatively forgiving growth characteristics. By mastering its flowering timeline and providing optimal conditions at each stage, you can produce sticky, resinous, and highly potent buds. These qualities are what have made Gorilla Glue a global favourite.
Start with quality genetics from reputable sources. Apply the techniques in this guide, stay consistent, and be patient—the results will follow.

.

Frequently Asked Questions

How long does Gorilla Glue take to flower indoors?

Gorilla Glue typically flowers for 8–9 weeks indoors once the light cycle is switched to 12/12. Some phenotypes may finish slightly earlier or later depending on conditions.

When is Gorilla Glue ready to harvest outdoors in Australia?

Outdoor Gorilla Glue is usually ready to harvest between late March and early April in most Australian regions. Timing depends on climate, latitude, and seasonal weather.

Does Gorilla Glue autoflower have a shorter flowering time?

Yes. Autoflowering Gorilla Glue completes its full lifecycle in 8–10 weeks, with the flowering stage lasting around 6–7 weeks from the first pistils.

What light schedule triggers flowering in Gorilla Glue?

Photoperiod Gorilla Glue plants begin flowering when the light cycle changes to 12 hours of light and 12 hours of darkness. Autoflowering versions do not require light changes.

Can Gorilla Glue flower faster with the right conditions?

Yes. Stable temperatures, proper humidity, strong lighting, and correct nutrients can help Gorilla Glue flower efficiently. However, genetics ultimately determine the final timeline.

Is Gorilla Glue suitable for outdoor growing in Australia?

Yes. Gorilla Glue performs well outdoors in Australia, especially in regions with dry autumns. Its 8–9 week flowering period fits well within most outdoor seasons.

How can I tell when Gorilla Glue is ready to harvest?

The best indicator is trichome colour. Harvest when most trichomes are cloudy with some turning amber for balanced effects and peak potency.

What happens if I harvest Gorilla Glue too early?

Harvesting too early results in lower THC levels, lighter buds, and weaker effects. Clear trichomes indicate the plant has not fully matured.

Can Gorilla Glue flower for more than 9 weeks?

Yes. Some phenotypes may benefit from 9–10 weeks of flowering, especially if you prefer heavier, more sedative effects with higher amber trichomes.

Does indoor or outdoor Gorilla Glue produce better yields?

Indoor grows offer more control and consistency. Outdoor plants often produce larger yields if given enough space and a long vegetative period.


Best Cannabis Strains for Australian Climate: Complete 2026 Guide

Best Cannabis Strains for Australian Climate: Complete 2026 Guide

This guide is for outdoor collectors. If you’re growing indoors with controlled environments, climate doesn’t matter—you can grow any strain. But outdoors? Australia throws everything at you.

From Far North Queensland’s stifling 90% humidity and monsoon rains, to Perth’s relentless 45°C summer days with months of drought, to Tasmania’s short growing season that ends with March frosts. Getting outdoor strain selection wrong means watching months of work rot from bud mould, shrivel from heat stress, or get killed by early cold snaps.

This guide covers over 40 tested strains from our range—each matched to specific Australian outdoor climate zones. Whether you’re battling tropical humidity, desert heat, unpredictable coastal weather, or racing against frost, you’ll find genetics that actually survive (and thrive) in your outdoor conditions.

Australian cannabis climate zones map showing recommended strain types for Queensland, NSW, Victoria, Tasmania, South Australia and Western Australia

Quick Reference: Match Your Climate to the Right Strain

Your Climate Key Challenge Best Strains
🥵 Hot & Humid
QLD, NT
Mould, bud rot Amnesia Haze, Durban Poison, Moby Dick, Special Lime Haze
☀️ Hot & Dry
WA, SA
Heat stress, drought Master Kush Grand, Black Domina, Blue Dream, White Widow
🌦️ Temperate
NSW, VIC coast
Variable weather Gorilla Glue, Runtz, Zkittlez, Bruce Banner
🥶 Cool/Short
TAS, High Country
Frost, short summer Northern Lights, Purple Kush, Granddaddy Purple, Any Autoflower

Hot & Humid Climates (Queensland, Northern Territory)

The problem: High humidity (70-90%) causes bud rot. Dense indica buds will fail.

The solution: Sativa-dominant strains with open, airy bud structure for airflow.

Top Picks

Strain Why It Works Mould Resist Flower Time
Amnesia Haze Legendary Sativa, extreme airflow 9/10 10-11 weeks
Durban Poison South African landrace, coastal humidity genetics 9/10 8-9 weeks
Moby Dick 75% Sativa, massive with natural spacing 8/10 9-11 weeks
Special Lime Haze Pure Sativa, extreme stretch and airflow 9/10 10-12 weeks
Jack Herer Fast Sativa hybrid, semi-airy buds 7/10 8-10 weeks
Pineapple Express Sativa-dom, handles humidity well 7/10 8-9 weeks
Mimosa 70% Sativa, naturally airy, pest resistant 7/10 9-10 weeks

Pro tip: In Far North QLD, harvest before November wet season. Plant July-August for October harvest. Autoflower versions finish even faster (9-11 weeks total).


Comparison of cannabis plant structures for different Australian climates showing Sativa, Indica, hybrid and fast-flowering characteristics

Hot & Dry Climates (Western Australia, South Australia)

The problem: Extreme heat (35-45°C), minimal rainfall, intense UV radiation.

The solution: Indica-dominant strains with thick leaves, deep roots, and resin protection.

Top Picks

Strain Why It Works Heat/Drought Flower Time
Master Kush Grand Pure Hindu Kush, evolved for extreme conditions 10/10 7-8 weeks
Black Domina 95% Indica, extreme drought tolerance 10/10 7-8 weeks
Northern Lights Pure Afghani, compact, wind-resistant 9/10 7-8 weeks
White Widow Thick resin coating = natural UV protection 9/10 8-9 weeks
Blue Dream Balanced hybrid, Sativa heat + Indica drought tolerance 9/10 9-10 weeks
Girl Scout Cookies Durban genetics bring heat tolerance 8/10 9-10 weeks
Superskunk Old-school outdoor resilience 8/10 8-9 weeks

Also excellent for hot/dry:

  • Purple Kush (compact Indica)
  • Gorilla Glue (thick leaves)

Heat protection tips: Use 30-50% shade cloth during peak heat (12pm-4pm). Mulch heavily. Consider fabric pots (45-60L minimum) or plant in ground for better moisture access.


Temperate/Variable Climates (NSW Coast, Victoria Coast)

The problem: Unpredictable weather, potential late-season rains in March-April.

The solution: Fast-flowering hybrids and adaptable modern genetics that finish before autumn.

For coastal and temperate growers after something distinctive, the Zkittlez strain performs well in moderate humidity and finishes before autumn rains set in — full grow data in our Zkittlez strain review.

Top Picks

Strain Why It Works Adaptability Flower Time
Gorilla Glue Extremely robust 50/50, handles everything 10/10 8-9 weeks
Runtz Trending balanced hybrid, climate adaptable 9/10 8-9 weeks
Zkittlez Indica-dom, fast finish, sweet terps 8/10 8-9 weeks
Bruce Banner Sativa-dom with fast finish for a Sativa 8/10 8-10 weeks
Permanent Marker New hype strain, exceptional vigor 9/10 8-9 weeks
Godfather OG Legendary potency, surprisingly resilient 8/10 8-9 weeks
Psychedelic Bred specifically for outdoor resilience 8/10 8-9 weeks

Also excellent for NSW/VIC:

  • Pineapple Express (famous, adaptable)
  • Girl Scout Cookies (proven performer)
  • Mimosa (fruity Sativa-dom)
  • Blue Dream (reliable all-rounder)

Timing: Plant photoperiods in October for March harvest. Consider Fast Version strains (finish 1-2 weeks earlier) for extra insurance against April rains.


Cool & Short Season Climates (Tasmania, Victorian High Country)

The problem: Short summer (Dec-Feb), early frost risk (late March), cool nights.

The solution: Fast-flowering Indicas (7-9 weeks) or autoflowers that complete before frost.

Top Picks

Strain Why It Works Cold Tolerance Flower Time
Northern Lights Lightning-fast 7-8 weeks, #1 for Tasmania 8/10 7-8 weeks
Black Domina 95% Indica, compact, cold-tolerant 8/10 7-8 weeks
Purple Kush Fast Indica, purple expression in cool temps 9/10 7-9 weeks
Granddaddy Purple 80% Indica, beautiful purple colors 9/10 7-9 weeks
Master Kush Grand Mountain genetics, 7-8 week finish 8/10 7-8 weeks
White Widow Reliable, handles temp swings 7/10 8-9 weeks
Zkittlez Fast enough with proper timing 7/10 8-9 weeks

Autoflowers: The Best Option for Short Seasons

Autoflowers complete their entire lifecycle in 8-12 weeks—perfect for Tasmania. They’re not dependent on light cycles, so you can do two harvests per season:

  1. First crop: Plant Dec 1 → Harvest early Feb
  2. Second crop: Plant Feb 1 → Harvest early April (before frost)

Top autos for TAS/High Country:

  • Auto Northern Lights (8-9 weeks, fastest)
  • Auto Purple Kush (8-10 weeks, cold-loving)
  • Auto Granddaddy Purple (8-10 weeks)
  • Auto Blue Dream (9-10 weeks, reliable)
  • Auto White Widow (9-10 weeks)
  • Auto Zkittlez (9-10 weeks, sweet)
  • Auto Gorilla Glue (9-10 weeks, vigorous)
  • Auto Girl Scout Cookies (9-10 weeks, compact)

Fast Version Strains: Get Photoperiod Quality 1-2 Weeks Faster

Fast Versions combine photoperiod quality with near-autoflower speed. Perfect for marginal climates (southern NSW, VIC, TAS) worried about late-season weather.

Strain Standard Time Fast Version Time Time Saved
Fast Gorilla Glue 8-9 weeks 6-7 weeks 2 weeks
Fast Bruce Banner 9-10 weeks 7-8 weeks 2 weeks
Fast OG Kush 8-9 weeks 6-7 weeks 2 weeks
Fast Gelato 8-9 weeks 7 weeks 1-2 weeks
Fast Sour Diesel 10-11 weeks 8-9 weeks 2 weeks

Complete Regional Recommendations

Region Top 5 Strains Avoid
Far North QLD
(Cairns, Darwin)
Amnesia Haze, Durban Poison, Special Lime Haze, Moby Dick, Jack Herer Dense Indicas, OG strains
Brisbane/Gold Coast Durban Poison, Jack Herer, Pineapple Express, Blue Dream, Gorilla Glue Pure Indicas, slow Sativas
Sydney Metro Gorilla Glue, Runtz, Girl Scout Cookies, Bruce Banner, Zkittlez Strains over 10 weeks
Melbourne Coast Gorilla Glue, Northern Lights, Zkittlez, Blue Dream, Fast Bruce Banner Sativas over 10 weeks
Adelaide Metro Blue Dream, Master Kush Grand, White Widow, Girl Scout Cookies, Northern Lights Water-hungry strains
Perth Metro Blue Dream, Master Kush Grand, White Widow, Northern Lights, Black Domina Humidity-loving strains
Hobart & Tasmania Auto Northern Lights, Northern Lights, Black Domina, Purple Kush, Fast Gorilla Glue Anything over 9 weeks
VIC High Country Auto Northern Lights, Northern Lights, Black Domina, Fast Gorilla Glue, Purple Kush Any strain over 9 weeks


Australian cannabis growing season timeline comparing photoperiod, autoflower and fast version flowering times from spring to autumn

Frequently Asked Questions

What are the best trending strains for Australian conditions?

Runtz, Permanent Marker, Zkittlez, and Gelato (Fast version) all handle Australian conditions well while offering modern genetics that collectors want.

What’s the most mould-resistant strain?

Durban Poison and Amnesia Haze are consistently rated highest (9/10) by Queensland/NT collectors. Special Lime Haze is also excellent.

What’s the most underrated strain for Australian conditions?

Black Domina. It’s a 95% Indica with elite drought tolerance, fast finish (7-8 weeks), and works across multiple climates. Master Kush Grand is also overlooked.

Can I grow Sativas in Melbourne or Hobart?

Melbourne: Yes—choose fast Sativa hybrids under 10 weeks (Jack Herer, Blue Dream, Bruce Banner).
Hobart: Risky. Pure Sativas take 12-14 weeks. Use Auto Amnesia Haze for Sativa effects with Tasmania timing.

Should I choose photoperiod, autoflower, or fast version?

Photoperiods: Maximum control and yields (need 4+ months good weather)
Autoflowers: Short seasons, simplicity, multiple crops per year
Fast Versions: Photoperiod quality with 1-2 weeks faster finish (best for marginal climates)

How do I protect plants during extreme heat?

Use 30-50% shade cloth (12pm-4pm), water early morning, mulch heavily (10cm), and use large pots (45-60L minimum). Plant heat-tolerant strains: Master Kush Grand, Blue Dream, White Widow.

What strains work across multiple climates?

These “all-rounders” adapt to varied conditions: Blue Dream, Gorilla Glue, Northern Lights, White Widow.

Does pot size matter in hot climates?

Absolutely. Larger pots provide more water reservoir and better insulation. Minimum 30L, better 45-60L. Fabric pots are best for hot climates—they allow root air-pruning and temperature regulation.


Final Thoughts

Strain selection is the most important factor for Australian outdoor success. Match genetics to your specific challenge:

  • QLD collectors: Prioritize mould resistance (Amnesia Haze, Durban Poison, Special Lime Haze)
  • WA/SA collectors: Prioritize heat/drought tolerance (Master Kush Grand, Black Domina, White Widow)
  • TAS collectors: Prioritize speed (Northern Lights, Black Domina, any autoflower)
  • NSW/VIC collectors: Prioritize adaptability and fast finish (Gorilla Glue, Runtz, Zkittlez)

Browse our complete cannabis seed collection

Need help choosing? Contact our growing support team for personalized recommendations.


Disclaimer: This guide is for educational purposes. Sacred Seeds sells cannabis seeds as collectible souvenirs. Germination and cultivation may not be legal in your jurisdiction. Always check local laws.


Gorilla Glue #4 Strain Review — Grow Guide for Australian Growers

Gorilla Glue #4 Strain Review — Grow Guide for Australian Growers

Gorilla Glue #4 is what I reach for on a Friday afternoon when the week is done and I want to mark the moment properly. Not the end-of-night Northern Lights sedation — that comes later. Not the functional Blue Dream headspace — that’s for when there’s still something to do. GG4 is the in-between: a euphoric, mood-lifting opening that builds into one of the heaviest full-body experiences in the catalogue. The resin production is extraordinary. The terpene profile — diesel, coffee, earth — is immediately recognisable. And the potency is real in a way that demands respect.

This is a complete Gorilla Glue strain review and grow guide — genetics and origin story, the GG4 effect profile with terpene biochemistry, full growing guide with week-by-week table, Australian outdoor timing by state, and comparisons with the strains it’s most often measured against. The Gorilla Glue feminised, Gorilla Glue Fast Version, and Auto Gorilla Glue are all in the catalogue.

Gorilla Glue #4 — Strain Specs

Genetics Chem’s Sister × Sour Dubb × Chocolate Diesel
Also known as GG4, Original Glue, Gorilla Glue
Breeder GG Strains (Colorado) — accidental cross, stabilised 2012
Type 50% Indica / 50% Hybrid — Feminised Photoperiod
THC 24–28% — exceptional runs reaching 30%
CBD <1%
Flowering time 8–9 weeks from 12/12 flip
Indoor yield 450–550 g/m² under optimised conditions
Outdoor yield 600–800 g/plant in full season
Height 100–160 cm — moderate stretch, manageable structure
Outdoor harvest (AU) North: late March • Mid: early April • South: mid April
Terpene profile Caryophyllene (dominant) • Myrcene • Limonene • Pinene
Aroma Diesel, coffee, dark chocolate, earthy pine
Gorilla Glue #4 cannabis buds showing extraordinary resin production and dense trichome coverage

Gorilla Glue Strain Review: Genetics, Origin, and the GG4 Story

The origin of Gorilla Glue #4 is one of the better accidental discovery stories in cannabis breeding. In Colorado around 2012, the breeders at GG Strains were working with Chem’s Sister when an unintended hermaphrodite pollinated a Sour Dubb plant. The resulting seeds were nearly discarded — the cross wasn’t planned and the breeders weren’t expecting much. When they grew the seeds out, what emerged was something they hadn’t anticipated: exceptional resin production, a distinctive terpene profile that nobody had seen quite like this before, and potency figures that put it in a different category to most of what was available.

The genetics that produced this are worth understanding. Chem’s Sister is itself a phenotype of Chemdog — one of the most genetically significant strains in the American cannabis catalogue, with lineage that may trace back to Thai and Pakistani landrace genetics. Chem’s Sister contributes the diesel and chemical terpene character and the high THC ceiling. Sour Dubb — a cross of Sour Diesel and East Coast Sour Diesel — brings additional fuel notes and a sativa-influenced cerebral quality. Chocolate Diesel adds the darker, earthier, almost coffee-like aromatic depth that distinguishes GG4’s terpene profile from other diesel-dominant genetics.

The name comes directly from the grow — the buds were so resinous that scissors and hands became literally stuck with resin during trimming. The glue metaphor extended to the effect: users described feeling glued to whatever surface they were sitting on. GG4 — the fourth phenotype selected from the original cross — became the definitive expression and the one that accumulated the awards and the reputation.

🧠 Jason — On GG4

GG4 is my Friday afternoon strain. The week is done, there’s nothing left that needs doing, and I want to mark that properly. It opens with a genuine euphoric lift — mood elevates, tension drops, and there’s a clarity to the first 20 minutes that belies what’s coming. Then the body effect arrives. Not gradually — it comes in a wave. That’s the caryophyllene and myrcene combination working together and it’s unlike what most other strains produce. I’ve grown a lot of cannabis and GG4 is still one of the ones I look forward to most. The resin production when you’re growing it is extraordinary — if you’ve never trimmed GG4 you’re not prepared for how much resin ends up on your hands and scissors. That’s the first thing that tells you you’ve grown it right.

Gorilla Glue #4 Effects — What the Terpene Profile Produces

GG4’s effect profile is built on one of the more complex terpene combinations in the modern hybrid catalogue — and understanding the terpene chemistry explains why it feels the way it does.

The terpene profile and what it does

Caryophyllene is the dominant terpene — responsible for the spicy, peppery, fuel-adjacent quality in the aroma. Caryophyllene is the only cannabis terpene that directly activates cannabinoid receptors, specifically CB2 — producing anti-inflammatory and analgesic effects through a separate pathway to the THC-CB1 mechanism. In GG4, caryophyllene at high concentrations contributes to the pronounced body effect and the physical pain relief the strain is known for. It also synergises with THC at CB1 to deepen the overall experience beyond what the THC percentage alone would produce.

Myrcene is the secondary terpene, adding the earthy depth to the aroma and — critically — facilitating THC crossing the blood-brain barrier. At 24–28% THC with high myrcene, GG4 hits significantly harder than its raw cannabinoid content would suggest. The myrcene contribution is part of why experienced users who’ve grown GG4 at home from quality genetics consistently report it performing beyond what the percentage on paper implies.

Limonene adds the faint citrus edge in the aroma and contributes mood-elevating effects through serotonin pathway modulation. At GG4’s typical concentrations it’s a supporting note rather than a dominant one — but it’s the reason for the euphoric, mood-lifting opening phase that comes before the indica body effect takes over.

Pinene rounds the profile with the fresh pine note and counteracts some of the short-term memory impairment associated with high-THC strains. It keeps the opening phase of GG4 more functional than pure myrcene-dominant genetics would produce.

Effect progression

Onset (10–20 min): Euphoric cerebral lift — mood elevates clearly and quickly. The limonene contribution is felt here. Clarity and focus initially, a sense of wellbeing that’s immediate and pronounced. This opening phase is what makes GG4 more than a couch-lock strain — it starts somewhere better than where it ends up.

Early phase (20–45 min): The body effect begins. Caryophyllene and myrcene asserting themselves through the CB1 and CB2 pathways simultaneously. Physical tension releases. Muscle ease spreads. At this stage GG4 is still functional but the direction of travel is clear.

Mid-to-late phase (45–120 min): Full body sedation at moderate-to-high doses. The “glue” effect is real — the desire to remain exactly where you are is physiological rather than just psychological. Pain signals diminish significantly. The euphoric quality of the opening settles into a deep, comfortable contentment. Sleep follows naturally at higher doses.

Duration: 2.5–4 hours at typical doses. Long-lasting relative to many hybrids — another reason it suits an end-of-week session rather than a functional daytime use.

Gorilla Glue #4 cannabis plant showing the heavy resin production and dense bud structure the strain is renowned for

GG1, GG3, GG4, GG5 — Understanding the Differences

The GG Phenotype Comparison

GG1 — Sister Glue: The first selected phenotype. Strong pine aroma with the characteristic diesel undertones, THC around 20–25%. Slightly less potent than GG4 with a more pronounced sativa character in the opening phase. A good entry point into GG genetics for those who find GG4’s potency confronting.

GG3 — Sister Glue #3: Fast-acting head high with THC of 25–27%. More cerebral than GG4 in its opening phase — useful for pain management where full sedation isn’t wanted. The most sativa-leaning of the numbered phenotypes.

GG4 — Original Glue: The definitive expression. 24–28% THC with the balanced euphoric opening and full-body sedation the strain is famous for. The terpene profile — diesel, coffee, earth — is most pronounced in #4. The award-winning phenotype and the one most seed banks including Sacred Seeds work from. This is the benchmark.

GG5 — New Glue: Stronger indica influence than GG4. THC 26–28%, more pronounced body sedation from the outset with less of the euphoric cerebral opening. For users who want the heaviest possible body effect and less of the head high, GG5 is the more direct route there — though it sacrifices some of GG4’s nuance in doing so.

Growing Gorilla Glue Seeds — Complete Guide

Gorilla Glue #4 is a rewarding grow that rewards attentive growers with exceptional results — but it’s not a strain that forgives poor humidity management or lazy late-flower attention. The extraordinary resin production that makes GG4 distinctive also creates dense, heavy buds that are more susceptible to botrytis in high-humidity conditions than less resinous genetics. Set the environment up correctly before you start and GG4 will produce some of the most impressive harvests in the catalogue.

Structure and training

GG4 grows to 100–160 cm with moderate stretch in early flower — typically 40–60% height increase from flip. The structure is bushy and multi-branched from the hybrid genetics, with strong lateral development that responds well to training. SCROG suits GG4 well indoors — the branching structure fills a screen efficiently and the technique improves light penetration to the multiple productive bud sites the plant naturally develops. Topping at week three to four of veg produces the multi-cola structure that maximises the yield potential. LST from early veg opens the dense canopy.

Defoliation is important with GG4 specifically because the density of the canopy and the buds creates airflow problems that directly increase botrytis risk. A moderate defoliation pass at week two of flower and again at week four removes shade leaves and opens the bud sites to airflow without stripping the canopy of the leaves driving bud development.

Feeding strategy

Seedling (days 1–14): Plain pH-adjusted water or 1/4 strength. EC below 0.6. GG4 seedlings establish quickly and don’t require pushing.

Early veg (weeks 2–4): Build to full strength by week three. EC 1.0–1.4, nitrogen-forward. GG4 is a vigorous feeder in veg — consistent nitrogen supports the structural development that determines the flowering potential.

Late veg (weeks 4–6): EC 1.2–1.6. CalMag support if running coco or RO water. GG4 shows calcium and magnesium requirements in late veg — interveinal chlorosis on mid-canopy leaves is the first sign.

Early flower / stretch (weeks 1–3 of 12/12): Transition to bloom nutrients. Reduce nitrogen, build phosphorus. EC 1.4–1.8. The stretch in GG4 is moderate — flip when the plant is at 50–60% of available height.

Mid flower (weeks 4–7 of 12/12): Full bloom profile. EC 1.6–2.0. Potassium support from week five significantly improves the resin density and terpene expression that makes GG4 distinctive. The caryophyllene and myrcene profile develops strongly from week five — temperature management below 26°C matters here.

Late flower / pre-flush (weeks 7–8 of 12/12): Taper nutrients as leaf yellowing begins. EC 1.0–1.2.

Flush (final 10–14 days): Plain pH-adjusted water only. GG4’s complex diesel and chocolate terpene profile comes through cleanest after a thorough flush. Don’t shortchange this step — it makes a meaningful difference to the final flavour.

Climate

Temperature: 22–26°C through veg and early flower. Drop to 20–24°C from week five of flower. Cool nights of 18–20°C in the final two weeks improve terpene expression and resin density. GG4 is not as temperature-sensitive as OG-lineage genetics like Godfather OG but the late-flower temperature management still produces noticeably better results.

Humidity: Seedling 65–70% RH. Veg 55–65% RH. Early flower 50–55% RH. Mid-to-late flower 40–50% RH, dropping to 40–45% in final two weeks. This is the most critical environmental variable for GG4 — the dense, resin-heavy buds are botrytis-susceptible from week four of flower. Consistent RH below 50% and strong airflow through the canopy are non-negotiable from mid-flower onward.

Light: 18/6 veg, 12/12 flower. PPFD: 400–600 µmol/m²/s veg, 800–1000 µmol/m²/s flower. GG4 responds well to high light intensity in flower — the resin production and trichome density are directly influenced by PPFD in the flowering phase.

🧠 Jason — On Growing GG4

The thing people underestimate about growing GG4 is the resin. You’ve seen resinous strains before and then you grow GG4 and you realise you haven’t quite seen this. By week six of flower the buds are practically white with trichomes and the smell in the room is extraordinary — diesel, coffee, something almost chocolate underneath. The humidity management is the critical variable. I keep it below 50% from week four of flower with no exceptions. The buds are dense enough that even with good airflow you need to be attentive. Get that right and the harvest is one of the most satisfying you’ll have.

Gorilla Glue #4 Week-by-Week Grow Guide

Phase / Week What’s Happening Key Actions Watch Out For
Weeks 1–2
Seedling
Taproot establishing. First true leaves emerging. Vigorous early growth. Plain water or 1/4 strength. 18/6 light. 65–70% RH. pH 6.0–6.5 soil. Overwatering — water in a ring around the seedling. Wait until top 2 cm is dry.
Weeks 3–4
Early veg
Rapid bushy growth. Multiple lateral branches. Hybrid vigour showing clearly. Build to full strength nutrients. EC 1.0–1.2. Begin LST. Top or FIM at week 3–4. CalMag watch — early interveinal chlorosis indicates Mg deficiency. Supplement if running coco or RO.
Weeks 5–6
Late veg
Dense canopy developing. Multiple productive bud sites. Strong lateral structure. EC 1.2–1.6. Fill SCROG or continue LST. Flip when plant is at 50–60% of available height. Don’t flip too late — moderate stretch ahead. Flipping at 60% height is the safe maximum.
Weeks 1–3 of flower
Stretch
40–60% height increase. Pre-flowers and first trichomes appearing. Diesel aroma beginning. Transition to bloom. EC 1.4–1.8. Reduce nitrogen. Light defoliation of shading fan leaves. Begin airflow management now — the dense structure that’s developing will need consistent ventilation.
Weeks 4–6 of flower
Early-mid flower
Buds stacking rapidly. Heavy trichome production beginning — resin visible on calyx surfaces. Diesel and coffee aroma intensifying. Full bloom nutrients. EC 1.6–2.0. Potassium support from week 5. Carbon filter essential. RH below 50% — non-negotiable. Humidity — this is the highest-risk window for botrytis in GG4. Check the densest bud sites daily from week 4.
Weeks 7–8 of flower
Late flower
Extraordinary resin production — buds approaching white with trichome coverage. Chocolate undertones developing in aroma. Pistils darkening. Check trichomes from day 49. Taper nutrients to EC 1.0–1.2. Drop RH to 40–45%. Cool nights 18–20°C. Don’t harvest early — GG4’s body effect develops in the final week. Wait for 20–25% amber for the full experience.
Week 8–9 of flower
Flush and harvest
Final ripening. Fan leaves yellowing. White trichome-covered colas. Harvest at 20–25% amber. Plain pH-adjusted water for 10–14 days. Harvest at trichome target. Slow dry 15–18°C, 55–60% RH for 10–14 days. Scissors and hands will be covered in resin within minutes of trimming — this is normal and a sign of quality. Have isopropyl alcohol on hand.
Post-harvest
Cure
The diesel and chocolate terpene complexity develops in the jar. GG4 at two weeks of cure is good. At six weeks it’s exceptional. Jar at 60–65% RH. Burp daily for two weeks. 4 weeks minimum. 6–8 weeks for the full terpene expression. Opening too early. The complex terpene profile that makes GG4 distinctive continues developing through the cure — don’t shortcut it.

Indoor Growing — Gorilla Glue #4

  • Flowering time: 8–9 weeks from 12/12 flip
  • Yield: 450–550 g/m² under optimised conditions
  • Container: 15–20 L — strong root development needs space
  • Light schedule: 18/6 veg → 12/12 flower
  • PPFD: 400–600 veg / 800–1000 flower
  • Height: 100–160 cm finished — flip at 50–60% of available height
  • Training: SCROG recommended. Top at week 3–4 veg. LST throughout veg. Defoliate at weeks 2 and 4 of flower.
  • Temperature: 22–26°C veg and early flower; 20–24°C from week 5 flower; 18–20°C nights in final 2 weeks
  • Humidity: Below 50% RH from week 4 of flower — critical for botrytis prevention
  • Resin note: Have isopropyl alcohol available for trimming — the resin production will coat scissors and hands heavily
  • Aroma: Carbon filtration from week 3 of flower — the diesel and coffee profile builds early and is very strong

Growing Gorilla Glue Outdoors in Australia

GG4 suits Australian outdoor conditions well across most climate zones. The 8–9 week flower from flip gives it a more comfortable harvest window than longer-flowering genetics, and the moderate height makes it manageable in outdoor situations where Blue Dream or Amnesia Haze would get unwieldy. The main consideration outdoors — as indoors — is humidity management around the dense, resinous buds from mid-flower onward.

Queensland and Northern NSW

GG4 thrives in the Queensland and Northern NSW climate. Plant from mid-September, target late March harvest. The coastal humidity from February onward is the key management challenge — keep airflow through the canopy and monitor the densest bud sites daily from week four of flower. The resinous structure that makes GG4 exceptional also makes it more vulnerable than less sticky genetics in humid conditions. Harvest: late March to early April.

NSW and VIC — Temperate

The natural sweet spot for GG4 outdoors. Plant late September through early October. The 8–9 week flower from flip means plants triggered by natural day length in mid-February target an early April harvest — comfortably within the window before consistent autumn rains. Drier autumn conditions in inland NSW and VIC suit the dense bud structure well. Harvest: early to mid April.

Tasmania and Southern VIC

GG4’s 8–9 week flower makes it one of the more viable photoperiod choices for southern climates — faster than Blue Dream, comparable to Northern Lights. Plant October, target mid-April hard deadline. The Gorilla Glue Fast Version — flowering in 6–7 weeks — gives photoperiod growers in TAS and southern VIC a meaningful extra buffer on the harvest window. The Auto Gorilla Glue removes the harvest window concern entirely with a fixed 70–75 day timeline. Harvest: mid April maximum.

WA and SA

The drier climate is ideal for GG4’s dense bud structure — lower ambient humidity means botrytis risk is significantly reduced compared to east coast conditions, and the plants handle the warm dry days well. Standard timing: plant September–October, harvest early to mid April. Full sun, 20–30 L containers minimum, good drainage.

Gorilla Glue cannabis grow setup showing healthy plants in flowering stage with dense canopy development

Gorilla Glue #4 vs Other High-THC Strains

Strain THC Flower time How it differs from GG4
Gorilla Glue #4 24–28% 8–9 weeks The reference point — diesel/coffee terpene profile, euphoric opening into heavy body effect, extraordinary resin
GG Fast Version 24–28% 6–7 weeks Same GG4 genetics and terpene profile — 2–3 weeks faster flower. Ideal for southern Australian outdoor growers with tight harvest windows
Godfather OG 22–28% 8–9 weeks OG lineage vs Chem lineage — earthy pine/grape vs diesel/coffee. GFO is more purely sedating, less euphoric opening than GG4
Northern Lights 18–22% 7–9 weeks Lower THC, faster flower, less complex terpenes. More consistent and forgiving grow. Evening strain where GG4 suits late afternoon.
Permanent Marker 25–30% 8–9 weeks Newer genetics, more complex modern terpene profile. Higher ceiling but less consistent phenotype expression than GG4’s decades of stabilisation.
Blue Dream 17–24% 9–10 weeks Significantly lighter — functional daytime hybrid where GG4 is a late-afternoon/evening commitment. Sweet berry vs diesel/coffee.
Girl Scout Cookies 20–25% 9–10 weeks Cookies terpene profile vs Chem/diesel. GSC is more euphoric and less sedating than GG4 at equivalent doses. Longer flower window.

Gorilla Glue #4 — Awards and Recognition

GG4’s award record is one of the most impressive in modern cannabis competition history — particularly given that the strain emerged from an accidental cross rather than a deliberate breeding programme.

2014 High Times Cannabis Cup — Los Angeles: 1st Place. The competition that established GG4 as a national-level strain rather than a Colorado local.

2014 High Times Cannabis Cup — Michigan: 1st Place. Winning two separate regional cups in the same year is rare — it confirmed GG4’s consistency across different grow environments and different judges.

2015 High Times Jamaican World Cup: 1st Place. International recognition extending the GG4 reputation beyond the American domestic market.

Highlife Cannabis Cup: Royal Gorilla (the European version of GG4 genetics) — 1st Place New Strains category, 3rd Place Indica. The European market’s endorsement of the genetics through a different breeding line confirms the quality of the underlying cross rather than any single phenotype selection.

Ready to grow Gorilla Glue #4?

Feminised photoperiod, fast version, and autoflowering seeds shipped from Australia. Batch-tested genetics, express delivery nationwide.

Key Takeaways — Gorilla Glue #4

Chem’s Sister × Sour Dubb × Chocolate Diesel. 24–28% THC. Caryophyllene-dominant terpene profile producing diesel, coffee, and dark chocolate aroma. Euphoric cerebral opening building into heavy full-body sedation — the “glue” effect is physiologically real, driven by the caryophyllene/myrcene combination at CB1 and CB2. Extraordinary resin production that coats scissors and hands in minutes of trimming. 8–9 week flower, moderate stretch, manageable structure indoors and outdoors. Humidity management below 50% RH from week four of flower is the most critical growing variable — the dense resinous buds are more botrytis-susceptible than less resinous genetics. Multiple Cannabis Cup winner with a consistent award record across different regions and competition years. Jason’s Friday afternoon strain. For the product pages see Gorilla Glue feminised and Auto Gorilla Glue.

Gorilla Glue #4 — Frequently Asked Questions

What are the parent strains of Gorilla Glue #4?

GG4 is a three-way cross of Chem’s Sister, Sour Dubb, and Chocolate Diesel — produced accidentally by GG Strains in Colorado around 2012 when an unintended hermaphrodite pollination of a Chem’s Sister plant created seeds that turned out to be exceptional. The fourth phenotype selected from those seeds became GG4 and the benchmark for the entire GG genetics line.

What makes Gorilla Glue #4 so potent?

The combination of high THC (24–28%), a caryophyllene-dominant terpene profile that activates CB2 receptors directly, and high myrcene content that facilitates THC crossing the blood-brain barrier. GG4 hits harder than its THC percentage alone would suggest because the terpene profile amplifies and extends the cannabinoid effect through multiple receptor pathways simultaneously. The extraordinary resin production is also a marker of overall cannabinoid density — the resin is where the THC and terpenes live.

What does Gorilla Glue #4 smell and taste like?

Diesel, coffee, dark chocolate, and earthy pine — a complex, heavy, immediately recognisable profile that comes from the Chem’s Sister and Chocolate Diesel parent genetics. The diesel note is the most prominent, with the coffee and chocolate undertones becoming more apparent with a proper cure of six weeks or more. Properly flushed and cured GG4 is one of the most complex-smelling strains in the catalogue.

How long does Gorilla Glue take to flower?

8–9 weeks from the 12/12 light flip indoors — on the faster end for a strain at this potency level. Check trichomes from week seven. Harvest at 20–25% amber for the full body effect; at mostly milky for a more cerebral, less sedating experience. The body effect that makes GG4 distinctive develops in the final week — don’t harvest early.

Is Gorilla Glue #4 hard to grow?

It’s a rewarding grow that requires attentive humidity management from mid-flower. The dense, resinous buds that make GG4 exceptional are more susceptible to botrytis than less resinous genetics — maintaining RH below 50% with strong airflow from week four of flower is the critical variable. Beyond humidity, GG4 is a vigorous feeder that responds well to training and produces exceptional results under good lighting. The trimming requires isopropyl alcohol nearby — the resin is extraordinary.

Can I grow Gorilla Glue outdoors in Australia?

Yes — GG4 suits most Australian climate zones. In Queensland and Northern NSW, plant mid-September and target late March harvest; manage coastal humidity carefully in the final weeks. In NSW and VIC, plant October and target early April. In Tasmania and southern VIC, the Auto Gorilla Glue is more practical given the shorter season. The Australian climate strain guide covers regional timing in detail.

What is the difference between GG4 and the other GG phenotypes?

GG4 is the definitive expression — the most balanced combination of euphoric cerebral opening and heavy body effect with the most complex terpene profile. GG1 is slightly less potent with stronger pine aromas. GG3 is more cerebral and fast-acting. GG5 has a stronger indica influence with heavier body sedation from the outset. For most users, GG4 is the right choice — it’s the phenotype that accumulated the awards and the reputation.

Does Gorilla Glue have an autoflowering version?

Yes — Auto Gorilla Glue carries the same Chem’s Sister × Sour Dubb × Chocolate Diesel genetics in an autoflowering format, completing seed to harvest in approximately 70–75 days on a fixed timeline. Well-suited to Australian outdoor conditions where multiple runs per season are practical or where the photoperiod harvest window is too tight.

High-THC cannabis seeds — the full range of high-potency genetics including Gorilla Glue, Godfather OG, and Permanent Marker.

Best cannabis strains for Australian conditions — regional strain selection and seasonal timing for outdoor growers across all states.

Reading trichomes for harvest — how to identify the 20–25% amber window that produces GG4’s full body effect.

How to cure cannabis — the 6–8 week cure that develops GG4’s complex diesel and chocolate terpene profile fully.

Browse all cannabis seeds — feminised, autoflower, and photoperiod strains shipped from Australia.

Seeds are sold strictly as novelty collector’s items. They contain no THC or CBD. This page does not constitute medical or legal advice. By purchasing you agree to our terms and conditions. Always check local laws before germinating or cultivating cannabis.

Northern Lights Strain Review — Grow Guide for Australian Growers

Northern Lights Strain Review — Grow Guide for Australian Growers

Northern Lights is one of those strains I keep coming back to. I’ve grown a lot of genetics over the years — chased potency ceilings, run complex modern hybrids, spent time with landrace genetics from places that take weeks to reach. But Northern Lights sits in a different category for me. It’s the strain I reach for when I want to wind down properly at the end of a long day, and it’s one of the most rewarding grows I’ve done consistently. Stable, predictable, fast, and genuinely beautiful to work with.

This is a full strain review and grow guide for the Northern Lights feminised seeds we stock — genetics, effects, terpene profile, complete growing guide with Australian outdoor timing, and a week-by-week table. If you want a fixed-timeline version, we also stock Auto Northern Lights. If you’re considering either for your next grow, this covers everything you need.

Northern Lights — Strain Specs

Genetics Afghani landrace × Thai
Also known as NL, NL#5, Northern Lights #5
Type 90% Indica / 10% Sativa — Feminised Photoperiod
THC 18–22%
CBD <1%
Flowering time 7–9 weeks from 12/12 flip
Indoor yield 450–500 g/m² under optimised conditions
Outdoor yield 500–600 g/plant (full season)
Height Compact — 80–120 cm, minimal stretch
Outdoor harvest (AU) North: late March • Mid: early April • South: mid April
Terpene profile Myrcene (dominant) • Caryophyllene • Pinene
Aroma Sweet earth, pine, faint spice — clean and classic

Northern Lights Strain Review: Genetics, History, and What Makes It Different

The origin story of Northern Lights is one of the more genuinely interesting in cannabis genetics. The most documented account traces it back to a grower known as “The Indian,” who cultivated the original plants from Afghani landrace seeds on an island near Seattle in the 1970s. He produced 11 phenotypes — numbered NL #1 through #11 — of which #5 became the definitive expression: exceptional resin production, fast flowering, compact structure, and a deeply sedative effect profile that set the benchmark for what an indica could be. The identity of “The Indian” has never been definitively confirmed, which is part of why the origin story has remained somewhat mythologised — some accounts suggest the original genetics may have included Thai and other landrace crosses beyond pure Afghani, which would explain the phenotypic variation across the 11 numbered plants.

The reason #5 won out over #1 is worth understanding. NL #1 was the pure Afghani inbred — essentially hashplant genetics with almost no sativa influence. Dense, resinous, fast, but a very one-dimensional stone. #5 carried just enough Thai to give it the euphoric opening phase that made it more versatile and more interesting as a smoke. That distinction is what separated a connoisseur’s strain from a commercially significant one, and it’s why #5 became the global standard while #1 remained a specialist’s choice.

The strain reached a global audience when Australian-born breeder Nevil Schoenmakers transported female clones to the Netherlands in the late 1970s or early 1980s. What Schoenmakers did next is worth noting — he effectively built the modern cannabis seed bank industry from scratch, operating out of what became known as the Cannabis Castle in Den Haag and establishing the first commercial mail-order seed business. Northern Lights was central to that original catalogue. Working with Ben Dronkers at Sensi Seeds from 1985, Schoenmakers stabilised the genetics and produced the variants that went on to win multiple Cannabis Cup awards. Without that combination of the Pacific Northwest genetics and the Dutch breeding infrastructure, Northern Lights would likely have remained a regional strain rather than the global benchmark it became.

What makes the lineage worth understanding is what each parent contributes. The Afghani landrace brings the dense, resinous bud structure, the fast flowering time, the compact indica growth pattern, and the dominant myrcene terpene profile that drives the sedative effect. The Thai sativa influence introduces the subtle euphoric lift that prevents Northern Lights from being a pure couch-lock strain. NL #5 carries just enough Thai to make the experience dynamic rather than simply heavy.

Northern Lights was later used by Sensi Seeds as a parent in Jack Herer — crossed with Shiva Skunk and Haze to produce what became another defining strain of the era. But that’s just the most famous example. NL genetics appear in the lineage of dozens of modern strains where breeders needed a stable, predictable indica foundation. Its genetic stability is the trait professional breeders reach for — it contributes structure, resin production, and flowering speed without introducing unpredictability into the cross. Understanding this explains why Northern Lights remains relevant four decades after it was stabilised, while many of its contemporaries have faded from catalogues.

Jason: I’ve been growing Northern Lights on and off for longer than most of the strains in our current catalogue have existed. There’s something about working with genetics that have been properly stabilised over decades — you know what you’re getting. The phenotype variation is minimal, the grow is predictable, and the end product is consistently what you want it to be. For me that’s as valuable as anything a newer hybrid can offer. The myrcene expression in particular is remarkably consistent across NL #5 plants — where modern hybrids can vary significantly in terpene profile between individual seeds from the same pack, NL delivers the same earthy-sweet profile reliably. That’s the result of forty years of stabilisation work and it’s not something you can replicate quickly.

Northern Lights #5 strain info card — Afghani Thai genetics, 18–22% THC, 7–9 week flowering, myrcene terpene profile

Northern Lights Effects — What the Terpene Profile Produces

Northern Lights is an evening strain. That’s not a limitation — it’s the point. The myrcene-dominant terpene profile drives a deeply physical, sedative effect that builds over 45–90 minutes and lands you exactly where you want to be at the end of the day: comfortable, relaxed, unhurried. This is the strain I reach for when I want to genuinely switch off.

The terpene profile and what it does

Myrcene is dominant and responsible for the characteristic earthy, musky sweetness in the aroma and the sedative body effect. Myrcene facilitates THC crossing the blood-brain barrier — which is part of why Northern Lights hits heavier than its THC percentage alone would suggest. At 18–22% THC with high myrcene, the body load is substantial. What’s notable about Northern Lights specifically is how consistent the myrcene expression is across plants — where modern hybrids can vary significantly in terpene profile between individual seeds from the same pack, NL #5 delivers the same earthy-sweet baseline reliably. This is a direct consequence of the decades of stabilisation work and something growers who’ve run both classic and modern genetics will notice.

Caryophyllene adds the spicy, peppery note to the aroma and activates CB2 receptors directly — the receptors involved in inflammation and pain response. This is what gives Northern Lights its reputation for pain relief and muscle relaxation. The caryophyllene contribution is part of why this strain has remained in medicinal circles for decades.

Pinene is the tertiary terpene and adds the clean pine note that distinguishes Northern Lights from heavier, earthier indicas. Pinene also counteracts some of the short-term cognitive fog associated with high-myrcene strains — it’s what keeps Northern Lights on the functional side of sedating rather than making it disorienting.

Effect progression

Onset (10–20 min): A mild euphoric lift — the Thai sativa influence in NL #5 genetics makes itself felt early. Mood brightens, tension releases. The effect at this stage is warm and pleasant rather than heavy.

Early phase (20–60 min): The indica genetics assert themselves. Body relaxation spreads systematically — muscles ease, physical discomfort recedes. At moderate doses this is still functional. You can hold a conversation, watch something, be present. The experience is comfortable rather than incapacitating.

Mid-to-late phase (60–120 min): Full body sedation at typical doses. The myrcene load comes through completely. Most users at moderate-to-high doses find sleep follows naturally from here. Appetite increases. The mind is quiet.

Duration: 2–3 hours at typical doses. Clean finish — no notable grogginess the following morning at moderate use.

Jason: Northern Lights is what I smoke when I want the day to be over. Not in a negative sense — in the sense that it marks the transition from work to rest better than almost anything else I’ve tried. One session, early evening, and I’m genuinely relaxed in a way that doesn’t happen from just sitting on the couch. The myrcene load is real and it does exactly what you want it to do. This is my go-to for switching off.

Growing Northern Lights Seeds — Complete Guide

Northern Lights is one of the most rewarding grows available — not because it’s complex, but because it performs consistently and generously without demanding much in return. The Afghani landrace genetics produce a plant that handles variation in temperature, humidity, and nutrition better than most indica-dominant hybrids while still producing dense, resinous buds. It’s a strain that rewards growers who set up correctly and manage consistently, without punishing reasonable errors the way some sensitive hybrids do.

Structure and training

Northern Lights grows compact — 80–120 cm finished height with minimal stretch in early flower, typically 20–30% height increase from flip. The Afghani indica structure means bushy, multi-branched plants with tight internodal spacing and dense bud sites. This structure makes NL naturally efficient in small spaces and easy to manage without aggressive training.

LST from week two or three of veg opens the canopy and exposes lateral bud sites meaningfully — the branching structure responds well and the extra light penetration to lower sites improves overall yield. SCROG suits Northern Lights well precisely because the compact structure fills a screen efficiently without the sativa stretch management that taller genetics require. Topping at week three to four of veg produces a well-balanced multi-cola structure that maximises the natural bud density.

Defoliation should be modest — remove fan leaves blocking direct bud sites in early flower, a second light pass at week three. The dense indica canopy benefits from airflow improvement but the leaves are working hard during the fixed flower window. Don’t strip the canopy.

Feeding strategy

Seedling (days 1–14): Plain pH-adjusted water or 1/4 strength maximum. EC below 0.6. Northern Lights is not particularly nutrient-sensitive in seedling but there’s no advantage in pushing it early. Clean start, build slowly.

Veg (weeks 3–6): Build to full strength by week four. EC 1.0–1.4, nitrogen-forward. The compact Afghani structure doesn’t require massive biomass building, but adequate nitrogen in veg supports the dense flowering structure that follows. Watch for glossy dark green leaves — first sign to ease N before toxicity accumulates.

Early flower / stretch (weeks 1–3 of 12/12): Transition to bloom nutrients. Reduce nitrogen, build phosphorus. EC 1.2–1.6. The stretch in Northern Lights is minimal — this phase passes quickly and the plant moves into bud development faster than most indica-dominant strains. CalMag support through early flower if running coco or RO water.

Mid flower (weeks 4–7 of 12/12): Full bloom profile. EC 1.4–1.8. Potassium support from week five improves resin density and terpene expression. The myrcene and pinene profile develops strongly in this window — temperature management matters here. Keep below 26°C to preserve the terpene quality that makes Northern Lights worth growing.

Late flower / pre-flush (weeks 7–8 of 12/12): Begin tapering nutrients as natural leaf yellowing starts. Reduce EC to 1.0–1.2. The plant is in final bud development and resin production.

Flush (final 10–14 days): Plain pH-adjusted water only. The earthy-sweet terpene profile of Northern Lights comes through cleanest after a thorough flush and proper cure. Don’t shortchange this step.

Climate

Temperature: 22–26°C through veg and early flower. Drop to 20–24°C from week five of flower — cooler late-flower conditions improve terpene expression and resin density. Cool nights of 17–20°C in the final two weeks produce noticeably better aromatic depth. Some NL #5 phenotypes develop striking purple colouration in the final two weeks when the day-to-night temperature differential reaches 8–10°C — it’s not universal but it’s a characteristic that surprises growers who weren’t expecting it from what is otherwise a dense green strain. The purple expression doesn’t affect potency or terpene profile but it’s visually impressive and worth knowing to expect.

Harvest timing note: The difference between a week-seven and week-nine harvest on Northern Lights is more significant than with many strains. At week seven, 10–15% amber, the Thai sativa influence is still present in the effect — the euphoric opening phase is more pronounced, the body effect is lighter, and the experience sits somewhere between indica and hybrid. At week nine, 20–25% amber, the indica genetics are fully dominant — deeper sedation, heavier body load, stronger sleep-promoting effect. Neither is wrong; they’re genuinely different experiences from the same plant. Growers who prefer a less sedating NL should harvest earlier. Those who want the full indica body effect should push to the longer end and wait for 20–25% amber trichomes.

Humidity: Seedling 65–70% RH. Veg 55–65% RH. Early flower 50–55% RH. Mid-to-late flower 40–50% RH, dropping to 40–45% in final two weeks. The dense Afghani bud structure is susceptible to botrytis if humidity climbs above 55% once buds are developed — airflow through the canopy and consistent RH management from week four of flower are important.

Light: 18/6 veg, 12/12 flower. PPFD targets: 400–600 µmol/m²/s veg, 700–900 µmol/m²/s flower. Northern Lights responds well to higher light intensity in flower — the dense bud structure and resin production both benefit from adequate PPFD. Outdoors: full sun, minimum six hours direct light.

Jason: The thing I tell people about growing Northern Lights is — set it up right and then trust it. This strain doesn’t need constant intervention. Get the environment dialled, feed it consistently, and it does the work. The most satisfying grows I’ve had with NL have been the ones where I’ve done less rather than more. It’s a complete plant that knows what it’s doing. One thing I do pay attention to is harvest timing — I’ve run NL at week seven and at week nine and they’re genuinely different smokes. If I want something functional for early evening I’ll pull at 10–15% amber. If I want the full indica experience I run it to 20–25% and wait. Most people growing NL want the full body effect, so I’d say push it to the longer end unless you have a specific reason not to.

orthern Lights feminised cannabis plant showing compact Afghani indica structure with multiple bud sites in flower

Northern Lights Week-by-Week Grow Guide

Phase / Week What’s Happening Key Actions Watch Out For
Weeks 1–2
Seedling
Taproot establishing. First true leaves emerging. Compact indica structure apparent early. Plain water or 1/4 strength. 18/6 light. Humidity 65–70% RH. pH 6.0–6.5 soil. Overwatering — the most common early mistake. Water in a ring around the seedling, not over it. Wait until top 2 cm is dry.
Weeks 3–4
Early veg
Rapid bushy growth. Multiple lateral branches developing. Tight internodal spacing characteristic of Afghani genetics. Build to full strength nutrients by week 4. EC 1.0–1.2. Begin gentle LST — tie main stem to open canopy. Top or FIM at week 3–4 if desired. Glossy dark green leaves signal nitrogen excess. NL is efficient with nutrients — don’t overfeed early.
Weeks 5–6
Late veg
Plant filling out. Dense canopy structure. Multiple productive bud sites developing if trained well. EC 1.2–1.4. Continue LST or fill SCROG screen. Flip to 12/12 when plant is at 50–60% of available height — NL stretch is minimal. Unlike sativa-dominant strains, NL won’t double in height after flip — flipping slightly later is fine here.
Weeks 1–2 of flower
Stretch / transition
Minimal stretch — 20–30% height increase. Pre-flowers developing rapidly. First trichome formation on bud sites. Transition to bloom nutrients. EC 1.2–1.6. Reduce nitrogen. Light defoliation of shading fan leaves. The fast transition from stretch to bud development is a characteristic of NL — don’t miss the defoliation window, it closes quickly.
Weeks 3–5 of flower
Early-mid flower
Buds stacking rapidly. Sweet earthy aroma building from week 3. Dense Afghani bud structure forming. Height gain complete. Full bloom nutrients. EC 1.4–1.8. Potassium support from week 5. Carbon filter essential. Drop RH to 45–50%. Keep below 26°C. Humidity management — the dense bud structure is vulnerable from week 4 onward. RH above 55% at this stage raises botrytis risk significantly.
Weeks 6–7 of flower
Late flower
Buds fattening and hardening. Trichome production at peak. Resin coating heavy across all bud surfaces. Pistils darkening. Begin checking trichomes from day 42 (week 6). Taper nutrients to EC 1.0–1.2. Drop RH to 40–45%. Cool nights 17–20°C for terpene expression. Don’t harvest early — the full body effect of NL develops in the final week. Check trichomes, not the calendar. Aim for 20–25% amber.
Weeks 8–9 of flower
Flush and harvest
Final ripening. Natural yellowing of fan leaves. Dense resinous colas. Harvest window opens at week 7. Plain pH-adjusted water for 10–14 days. Week 7–8: harvest at 10–15% amber for lighter, more euphoric effect. Week 8–9: harvest at 20–25% amber for full indica body effect. Deciding too early. Week 7 and week 9 produce meaningfully different experiences — know which you want before you cut.
Post-harvest
Cure
The earthy-sweet myrcene and pinene profile develops in the jar. NL at two weeks of cure is decent. At six weeks it’s the classic strain people know. Jar at 60–65% RH. Burp daily for two weeks. 4 weeks minimum. 6 weeks ideal for full expression. Opening too early. Fresh NL doesn’t represent the genetics. The classic Northern Lights flavour and smooth smoke is earned in the cure, not on the plant.

Indoor Growing — Northern Lights

  • Flowering time: 7–9 weeks from 12/12 flip
  • Yield: 450–500 g/m² under optimised lighting with training
  • Container: 15–20 L — compact root system suits mid-size containers
  • Light schedule: 18/6 veg → 12/12 flower
  • PPFD: 400–600 veg / 700–900 flower
  • Height: 80–120 cm finished — suits tents from 60×60 cm upward
  • Training: LST from week 2–3 veg; SCROG suits the bushy structure; top at week 3–4
  • Temperature: 22–26°C veg and early flower; cool to 20–24°C from week 5 flower
  • Humidity: 65–70% seedling → 55–65% veg → 45–50% early flower → 40–45% late flower
  • Aroma: Carbon filtration from week 3 of flower — the earthy sweetness builds early
  • Cycles per year: 4–5 given the fast 7–9 week flower

orthern Lights cannabis bud showing heavy white trichome coverage and orange pistils in late flower

Growing Northern Lights Outdoors in Australia

Northern Lights suits Australian outdoor growing well — the compact structure, fast flowering time, and Afghani mould resistance make it practical across most climate zones. The 7–9 week flower from flip and the compact height give growers in southern states a meaningful advantage over longer-flowering strains when planning around the autumn harvest window.

Queensland and Northern NSW

Northern Lights performs well in Queensland and Northern NSW, though the dense Afghani bud structure requires humidity management from week four of flower. Plants in the ground by mid-October target a late-March harvest. The compact height and Afghani mould resistance handle the subtropical climate reasonably well — maintain airflow through the canopy and monitor from week five onward. Harvest: late March to early April.

NSW and VIC — Temperate

The natural choice for temperate outdoor growers. Northern Lights’ fast 7–9 week flower from flip means plants in the ground by late October in NSW and VIC can target an early-to-mid April harvest comfortably — within the safe window before autumn rains become consistent. The compact height makes discretion practical. Harvest: early to mid April.

Tasmania and Southern VIC

Northern Lights is one of the better choices for short-season southern climates precisely because of its fast finishing. The compact structure handles the cooler conditions well and the Afghani genetics don’t require the warm long seasons that sativa-dominant strains demand. Target mid-April harvest in TAS and southern VIC. Harvest: mid April.

WA and SA

The drier climate suits the dense Afghani bud structure — mould risk is lower and the plant handles warm dry days well. Standard outdoor timing applies: in the ground by late October, harvest early to mid April. Full sun position, good drainage, 15–20 L containers minimum outdoors.

Northern Lights vs Other Classic and Hybrid Strains

Strain THC Flower time How it differs from NL
Northern Lights 18–22% 7–9 weeks The reference point — earthy-sweet terpene profile, reliable sedation, fast and stable
Godfather OG 22–28% 8–9 weeks Higher THC, heavier sedation, more demanding grow — temperature sensitivity in flower. The choice for maximum potency
Black Domina 20–24% 8–9 weeks 95% indica, heavier and more narcotic than NL, less euphoric. Darker, more complex aroma profile
Gorilla Glue #4 26–28% 8–9 weeks Significantly higher THC, more complex caryophyllene-driven terpene profile, heavier resin. Less euphoric opening phase than NL
Jack Herer 18–22% 8–10 weeks NL is a parent — Jack Herer is the sativa expression of what NL contributes. Uplifting and functional vs NL’s sedating and physical
Northern Lights outdoor cannabis bud showing purple phenotype expression from cool night temperatures in late flower

Ready to grow Northern Lights?

Feminised photoperiod seeds shipped from Australia. Batch-tested genetics, express delivery nationwide.

Buy Northern Lights Seeds →

Northern Lights — Key Takeaways

Afghani × Thai. 18–22% THC. Myrcene-dominant terpene profile producing deeply sedative, body-first relaxation with a mild euphoric opening from the Thai sativa influence. Fast 7–9 week flower, compact structure, excellent mould resistance, stable Afghani genetics with minimal phenotype variation. One of the most rewarding grows in the classic indica catalogue — set it up right and it delivers consistently without demanding constant intervention. The ideal evening strain for growers who value reliability, quality, and a genuinely relaxing experience over chasing the newest genetics. For the full spec breakdown and to order, see the Northern Lights feminised seeds product page.

Northern Lights Strain — Frequently Asked Questions

When should I harvest Northern Lights for maximum body effect vs a lighter experience?

Northern Lights at week seven (10–15% amber trichomes) and week nine (20–25% amber) produce genuinely different experiences. At the earlier harvest the Thai sativa influence is still present — more euphoric opening, lighter body effect, sits closer to a hybrid experience. At the later harvest the indica genetics are fully dominant — deeper sedation, heavier body load, stronger sleep-promoting effect. Most growers running Northern Lights want the full indica body effect, so the week-nine harvest at 20–25% amber is the default recommendation. If you want something more functional for early evening use, harvest at the shorter end.

What are Northern Lights seeds?

Northern Lights is a feminised indica-dominant cannabis strain bred from Afghani landrace and Thai genetics, stabilised by Nevil Schoenmakers and Sensi Seeds in the Netherlands from 1985. NL #5 is the most widely distributed phenotype — the one most seed banks including Sacred Seeds work from. It tests at 18–22% THC with a myrcene-dominant terpene profile, flowers in 7–9 weeks, and produces dense resinous buds with an earthy-sweet aroma. Buy Northern Lights seeds from Sacred Seeds Australia.

What does Northern Lights smell and taste like?

Earthy, sweet pine with a faint spicy note from the caryophyllene and a woody undertone. The myrcene dominance gives it the musky earthiness characteristic of Afghani-lineage genetics. It’s a classic, immediately recognisable profile — not the layered complexity of modern OG-lineage hybrids, but clean and distinct. The full flavour develops best with a six-week minimum cure.

Is Northern Lights good for sleep?

It’s one of the more reliably sedating strains available. The high-myrcene terpene profile facilitates THC uptake and drives a deep physical body effect that builds progressively into sedation at moderate-to-high doses. For growers and users whose primary use case is insomnia or end-of-day relaxation, Northern Lights is consistently effective. It’s an evening strain — not suitable for daytime use where function is required.

How long does Northern Lights take to flower?

7–9 weeks from the 12/12 light flip indoors. This is on the faster end for an indica-dominant strain at this quality level and is one of the practical advantages of Northern Lights over heavier-yielding strains with longer flower windows. Check trichomes from week seven — harvest at 20–25% amber for the full sedative effect.

Is Northern Lights easy to grow?

It’s a rewarding and consistent grow. The Afghani genetics produce a resilient, stable plant with good mould resistance, minimal stretch, and predictable structure. It handles variation in temperature and humidity better than many modern hybrids. That said, no cannabis strain runs itself — proper environment management, consistent feeding, and humidity control in late flower are still required. It rewards growers who set up correctly and let the genetics do the work.

How does Northern Lights compare to Godfather OG?

Godfather OG is heavier, more demanding, and more potent — 22–28% THC versus 18–22% for NL, with a more complex OG terpene profile and greater temperature sensitivity in flower. Northern Lights is the more practical, consistent, and approachable grow with a reliable sedative effect that doesn’t require maximum THC to deliver what you want from an evening indica. If maximum potency is the brief, Godfather OG. If a rewarding, consistent grow with excellent evening effect is the brief, Northern Lights.

Can I grow Northern Lights outdoors in Australia?

Yes — Northern Lights suits Australian outdoor growing particularly well. The fast 7–9 week flower from flip and compact structure make it practical across all climate zones. In southern states (VIC, TAS, SA), it’s one of the more reliable outdoor choices because the fast finish comfortably fits the harvest window before April. In Queensland and NSW, the Afghani mould resistance is an advantage in coastal humidity. Target harvest: late March in QLD, early to mid April in NSW/VIC/SA. The Australian climate strain guide covers regional timing in more detail.

What is Northern Lights #5?

Northern Lights #5 is the most famous and widely distributed phenotype from the original 11 numbered plants grown by “The Indian” near Seattle. It became the definitive expression of Northern Lights through Nevil Schoenmakers and Sensi Seeds’ work in the Netherlands — chosen for its exceptional resin production, fast flowering time, dense bud structure, and balanced effect profile. When a seed bank lists “Northern Lights” without a number, they’re almost always working from #5 genetics.

Does Northern Lights have an autoflowering version?

Yes — Auto Northern Lights carries the same classic genetics in an autoflowering format, completing seed to harvest in approximately 70–75 days on a fixed timeline regardless of light schedule. The auto version is well suited to Australian outdoor conditions where multiple runs per season are practical or where light control isn’t available.

Indica-dominant cannabis seeds — the full range of indica-dominant genetics available from Sacred Seeds Australia.

Best cannabis strains for Australian climates — regional strain selection and seasonal timing for outdoor growers across all Australian states.

Knowing when to harvest cannabis — trichome reading and harvest timing indicators, relevant for the final weeks of a Northern Lights grow.

Autoflower vs photoperiod seeds — if you’re deciding between Northern Lights feminised and Auto Northern Lights, the format differences explained in full.

Browse all cannabis seeds — over 50 feminised, autoflower, and photoperiod strains shipped from Australia.

Seeds are sold strictly as novelty collector’s items. They contain no THC or CBD. This page does not constitute medical or legal advice. By purchasing you agree to our terms and conditions. Always check local laws before germinating or cultivating cannabis.