Understanding how to grow autoflowers successfully transforms the cultivation experience for beginners and experienced growers alike. Autoflowering cannabis plants have revolutionised home growing in Australia by eliminating the complexity of light cycles and dramatically reducing the time from seed to harvest. These robust plants flower automatically based on age rather than light exposure, making them ideal for Australia’s varied climate conditions. Whether you’re cultivating in Sydney’s humid summers or Melbourne’s unpredictable weather, autoflowers offer resilience and reliability that photoperiod varieties simply can’t match.
This is the lifecycle overview. For seed-format comparisons and choosing genetics, see our Australian cannabis seed buyer’s guide or browse the main cannabis seed catalogue, including the autoflower collection.
Autoflower lifecycles are often described in broad week-by-week stages, but individual plants do not follow identical calendars. This guide explains the developmental milestones to look for, how the stages relate to one another and which specialist resources offer more detail. Treat breeder timelines as estimates rather than deadlines.
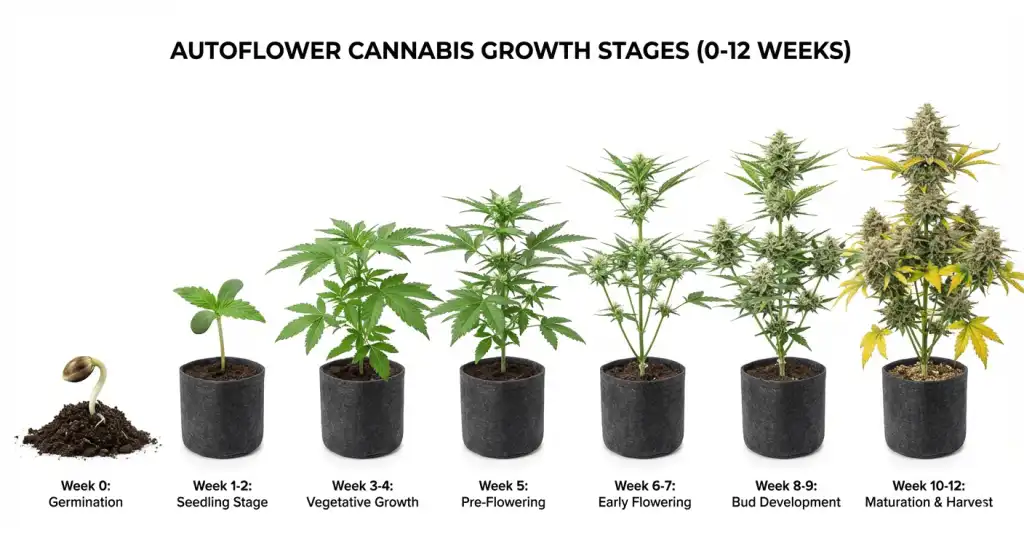
Understanding Autoflowers: What Makes Them Different
Autoflowering cannabis seeds contain genetics from Cannabis ruderalis, a hardy subspecies originating from regions with short growing seasons in Russia and Central Asia. This ruderalis heritage grants autoflowers their signature trait: they begin flowering based on age, typically around 3-4 weeks from germination, rather than responding to changes in light cycles like photoperiod varieties. This fundamental difference means you can grow autoflowers under any light schedule, though most growers opt for 18-20 hours of light throughout the entire grow cycle for maximum yields.
The compact timeline of autoflowers—usually 8-12 weeks from seed to harvest—offers several distinct advantages for Australian growers. You can complete multiple harvests in a single outdoor season, work around unpredictable weather patterns, and maintain discretion with plants that typically remain under 1.2 metres tall. Additionally, autoflowers demonstrate remarkable resilience to temperature fluctuations, pests, and beginner mistakes compared to their photoperiod counterparts. However, this accelerated growth means there’s limited time to correct errors, making it essential to provide optimal conditions from day one.
Modern autoflowering cannabis seeds have evolved significantly since their early iterations. Today’s genetics produce potent, flavourful buds with THC levels rivalling photoperiod strains, whilst maintaining the speed and simplicity that made autoflowers popular initially. Auto Skunk #1 is a clear example of a classic photoperiod line adapted to this faster format. Understanding these unique characteristics helps you tailor your approach throughout each developmental stage, maximising both yield and quality from your autoflower grow.
If you’re new to growing, start with our guide to the 10 best beginner strains for Australian growers to set yourself up for success.
| Week | Stage | Key Focus |
|---|---|---|
| 0 | Germination | Moisture, warmth |
| 1–2 | Seedling | Root development |
| 3–4 | Vegetative | Structure, nitrogen |
| 5 | Pre-flower | Transition nutrients |
| 6–9 | Flowering | Bud development |
| 10–12 | Ripening | Trichome monitoring |
Germination (Week 0): Starting Your Autoflower Journey
Germination is the first stage in the lifecycle. The key milestone is the emergence of a seedling, after which growers commonly begin counting the first week of above-ground development. Our separate paper towel guide covers germination in more depth.
Early root establishment matters because autoflowers transition into flowering according to age. Container choice, growing-medium characteristics and transplanting are related decisions, but no single container size is universally suitable for every variety and setting.
During emergence, observe whether the seedling develops normally and whether the growing medium is excessively wet or dry. Timelines for emergence vary, so a fixed number of hours is not a reliable diagnostic rule.
Seedling Stage (Weeks 1-2): Establishing Strong Foundations
During the seedling stage, cotyledons give way to true leaves while the root system establishes. Leaf development and steady growth are more useful markers than expecting every plant to reach a prescribed size by the end of week two.
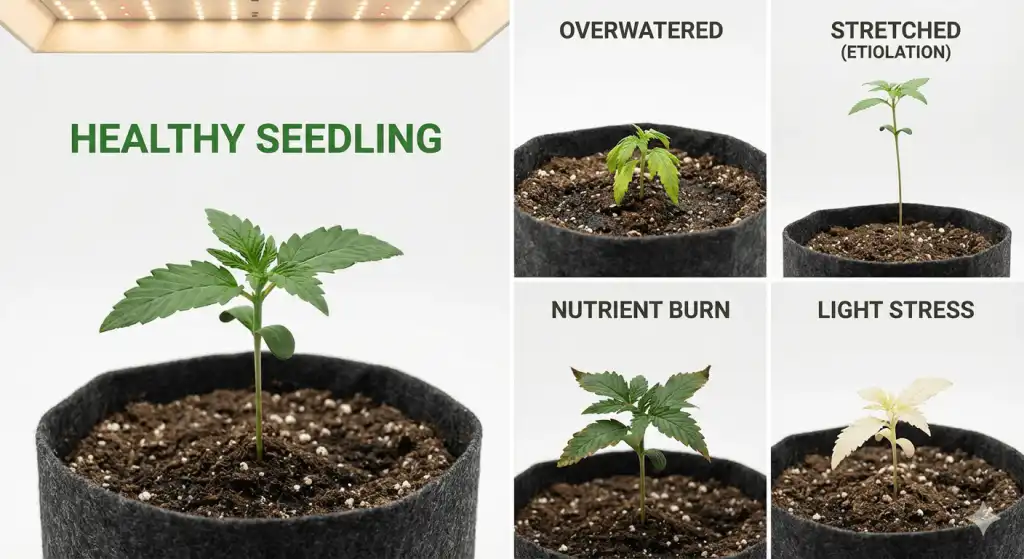
Moisture-related stress can resemble nutrient problems in young plants. The condition of the growing medium, drainage and root health all matter; a rigid watering calendar cannot account for differences in containers and climate.
Nutrient availability during early growth depends strongly on the growing medium. Pre-fertilised soil and coco coir are not interchangeable, and fixed quarter-strength recommendations do not apply universally. The dedicated autoflower nutrients guide explains these differences. Read What Nutrients Should I Give Autoflower Plants? for the detailed nutrition discussion.
Vegetative Growth (Weeks 3-4): Rapid Development Phase
Weeks three and four are commonly associated with more visible vegetative development: additional nodes, branches and leaf area. The exact pace varies by genetics and environment, and some plants show reproductive signs earlier or later.
As leaf area and structure develop, nutrient demand may change. Rather than duplicating a feeding schedule here, refer to the specialist nutrient guide for an explanation of growing media, nutrient balance, EC and PPM.
At this stage, look for healthy new growth and changes in plant structure. Environmental stress can influence development, and the short lifecycle may leave less opportunity for recovery than a photoperiod plant with an extended vegetative phase.
Pre-Flowering (Week 5): The Transition Period
Pre-flowering is marked by the appearance of early reproductive structures and a change in growth pattern. It does not begin on the same calendar day for every autoflower, so use the visible stage rather than week five alone as the reference point.
Nutrition remains important during the transition, but a calendar-based switch to a particular fertiliser is not universally appropriate. The autoflower nutrients guide explains why growing medium, formulation and actual plant condition matter.
As flowering begins, observe changes in canopy density and the growing environment. Different varieties respond differently, so broad stage descriptions should not be mistaken for precise environmental prescriptions.
Flowering Stage (Weeks 6-9): Bud Development
Flowering is the period when reproductive structures become increasingly visible and aromatic characteristics develop. The appearance, density and timing of flower development vary considerably across autoflower genetics.
The nutritional balance of a plant continues to matter during flowering. Avoid assuming that nitrogen becomes unnecessary or that every variety requires the same nutrient formula. Our specialist feeding article covers nutrient availability and common warning signs.
Flowering plants can differ markedly in architecture, branch strength and flower density. Observing structural changes, airflow and signs of damage is more useful than applying a universal training rule to every cultivar.
Late Flowering and Harvest (Weeks 10-12): The Final Stretch
Late flowering is a period of continued maturation, but the timing varies. Some plants mature earlier than a published week-by-week chart, while others take longer. Breeder estimates should be interpreted alongside the actual stage of development.
Claims about pre-harvest flushing and improved flavour remain debated. A universal instruction to stop nutrients for a fixed period is not well supported; readers wanting detailed nutrient context should consult the specialist guide.
During late flowering, plant health and environmental conditions remain relevant. Colour changes alone do not establish maturity or quality, and claims that deliberately stressing plants improves resin production should be treated cautiously.
Common Autoflower Mistakes to Avoid
The short lifecycle makes it useful to distinguish between normal developmental variation and a genuine problem. Common areas of confusion include early growth delays, moisture stress, nutrient symptoms and interpreting breeder timelines too literally.
Moisture and nutrient imbalance can produce overlapping symptoms. It is better to investigate the pattern and context than to assume every yellow leaf indicates a deficiency or every drooping leaf indicates overwatering.
Light exposure affects plant development, but exact fixture distances depend on the equipment and setting. Follow relevant manufacturer information rather than treating a single distance as universally suitable.
Environmental conditions and plant health are closely connected. A useful week-by-week record notes developmental milestones and unusual changes rather than relying only on calendar dates.
For further reading, see our drying guide and curing guide.
Determining the Perfect Autoflower Harvest Time
Maturity assessment involves multiple observations rather than a fixed week number. Trichomes, pistils and overall development can provide clues, but no single amber-trichome percentage guarantees a particular effect or potency.
Popular rules connecting precise trichome colours with specific experiences are often more confident than the evidence supports. Our dedicated amber trichomes article examines what these observations can and cannot tell you.
Secondary indicators such as pistil colour and leaf ageing can add context, but they vary across cultivars and conditions. Avoid relying on unsupported percentage claims or a single visual sign.
Harvest is followed by drying and curing, which deserve their own detailed treatment. For more on post-harvest processes, see our complete drying and curing guides.
What you’re harvesting matters as much as how you harvest it. If you’re growing Auto Zkittlez, the full Zkittlez strain review covers exactly what to expect from the finished product.
Frequently Asked Questions About Growing Autoflowers
How long do autoflowers take from seed to harvest?
Most autoflower strains complete their full life cycle in 8-12 weeks from germination to harvest. Fast-finishing varieties can be ready in as little as 8-9 weeks, whilst some Sativa-dominant autos may extend to 12-13 weeks. The timeline depends on genetics, growing conditions, and environmental factors. Always base harvest timing on trichome development rather than breeder estimates, as individual plants can vary by 1-2 weeks from advertised timelines.
What’s the best light schedule for autoflowers?
Autoflowering is primarily age-triggered rather than dependent on a photoperiod change. Lighting decisions vary with equipment and environment, and no single schedule is universally optimal.
Autoflowers don’t require specific light schedules to flower, but most growers use 18/6 (18 hours light, 6 hours dark) or 20/4 throughout the entire grow cycle. Some cultivators run 24/0 (continuous light) with success, though many prefer giving plants a dark period for metabolic processes. The key advantage is consistency—stick with whichever schedule you choose from seedling to harvest. More light generally means larger yields, but only if your plants can handle the intensity without stress.
Can I grow autoflowers outdoors in Australia?
Autoflowers can be discussed in the context of Australia’s varied climates, but local conditions differ substantially and cultivation laws vary by jurisdiction. See our Australian outdoor growing guide for broader context.
Yes, autoflowers excel in Australian outdoor conditions. Their fast lifecycle (8-12 weeks total) allows multiple harvests per season in most climate zones. In Queensland and Northern NSW, you can grow year-round with careful timing. Southern states work best with spring/summer planting (September-February). Autoflowers handle Australia’s variable weather better than photoperiods because they’re not dependent on light cycles. However, they still need adequate sun exposure—aim for at least 6-8 hours of direct sunlight daily for decent yields.
What size pot do I need for autoflowers?
There is no single ideal pot size for every autoflower. Root space, drainage, available room and growing medium all affect container choice.
Use 11-19 litre (3-5 gallon) containers for autoflowers. Smaller pots (11-15L) work for compact strains or space-limited grows, whilst larger pots (15-19L) allow more root development and potentially larger yields. Always plant germinated seeds directly into their final container—autoflowers respond poorly to transplanting due to their limited vegetative phase. Fabric pots are ideal as they provide excellent drainage and air pruning, promoting healthier root systems.
Should I top or train my autoflowers?
Training choices depend on the plant and context. Because the vegetative period is age-limited, recovery time is a consideration; no single technique is appropriate for every cultivar.
Low-stress training (LST) works well for autoflowers—gently bending and tying branches to create an even canopy increases light exposure and yields. However, avoid high-stress techniques like topping, FIMing, or heavy defoliation. Autoflowers have limited time to recover from stress, and any setback during their brief 3-4 week vegetative phase directly impacts final yield. If you do train your autos, start LST early (week 2-3) and be gentle. When in doubt, it’s better to let autoflowers grow naturally than risk stunting them.
How much water do autoflowers need?
Water requirements vary with the growing medium, container, plant size and environment. Check the condition of the medium rather than relying on a fixed every-few-days rule.
Autoflowers need less water than many beginners expect. During the seedling stage (weeks 1-2), water in a small circle around the plant every 2-3 days. By week 3-4, water the entire pot when the top 5cm of soil feels dry—this is typically every 2-4 days depending on container size, temperature, and humidity. Always water until you see runoff from drainage holes. Overwatering kills more autoflowers than underwatering. If you’re uncertain, wait an extra day—slight underwatering is preferable to waterlogged roots.
What nutrients do autoflowers need?
Autoflowers require the same essential plant nutrients as other cannabis varieties, but the appropriate formulation and concentration depend on the growing medium and circumstances. See our dedicated autoflower nutrients guide for the detailed explanation.
Autoflowers require lighter feeding than photoperiod plants due to their shorter lifecycle and typically smaller size. Use quality soil with nutrients for weeks 1-2, then introduce nutrients at half the recommended strength in week 3. Focus on nitrogen-rich fertilisers during vegetative growth (weeks 3-4), then switch to bloom nutrients higher in phosphorus and potassium from week 5 onward. Watch for nutrient burn (dark leaves, burnt tips) and back off if it occurs. It’s easier to add nutrients than fix overfeeding.
What yields can I expect from autoflowers?
Yield varies widely with genetics and growing conditions. Published per-plant figures are not guarantees and should be treated cautiously.
Indoor autoflowers typically yield 30-100g per plant, with experienced growers occasionally achieving 100-150g under optimal conditions. Outdoor autoflowers in good Australian sun can produce 50-150g per plant, sometimes more with ideal conditions and genetics. Yields depend on genetics, container size, light intensity, growing skill, and environmental conditions. While autoflowers generally produce less than photoperiods, their fast turnaround allows multiple harvests in the time it takes to grow one photoperiod crop.
Can I clone autoflowers?
Technically yes, but it’s not practical. Autoflowers flower based on age, so any clone taken from an autoflower will have the same biological age as the mother plant. By the time roots develop, the clone immediately enters flowering with minimal vegetative growth, producing tiny plants with negligible yields. Unlike photoperiod plants, you cannot keep an autoflower mother plant in vegetative state. If you want to preserve genetics, you must purchase new seeds for each grow.
Why are my autoflower leaves turning yellow?
Yellowing can reflect natural ageing, moisture problems, root stress or nutrient imbalance. See our yellowing leaves guide for a more complete explanation.
Yellowing leaves can indicate several issues depending on timing and location. Lower leaves yellowing during late flowering (weeks 8-10) is normal as plants redirect nutrients to bud development. Early yellowing typically signals nitrogen deficiency (entire leaf yellows), overwatering (lower leaves yellow with drooping), or pH issues preventing nutrient uptake. Yellow tips with burnt edges suggest nutrient burn from overfeeding. Check your watering schedule first, then review your feeding strength and pH levels. Some natural yellowing during the final 1-2 weeks is expected and not concerning.
When should I start counting weeks for my autoflower?
Week 0 is germination. Week 1 begins when the seedling breaks through the soil surface and the first set of round cotyledon leaves open. This standardised timing helps you follow feeding schedules and track development accurately. Some growers count from the day they place seeds in water, but counting from emergence provides more consistent developmental tracking since germination times vary (1-5 days typically).
Are autoflowers less potent than photoperiod strains?
Modern autoflowers rival photoperiod strains in potency, with many varieties testing at 20-25%+ THC. Early autoflower genetics (pre-2010) were notably weaker, which created the persistent myth about lower potency. Today’s breeders have perfected autoflowering genetics by backcrossing with potent photoperiod strains whilst maintaining the ruderalis auto-flowering trait. You can expect equivalent potency, flavour, and effects from quality autoflower genetics. The main trade-off is typically yield per plant rather than potency.
Where to Go Next
This article is the week-by-week lifecycle overview. For specialist topics, use our autoflower nutrients guide, germination troubleshooting, and seed buyer’s guide.