Cannabis Nutrient Deficiencies: How to Diagnose and Fix Them

Cannabis Nutrient Deficiencies: How to Diagnose and Fix Them

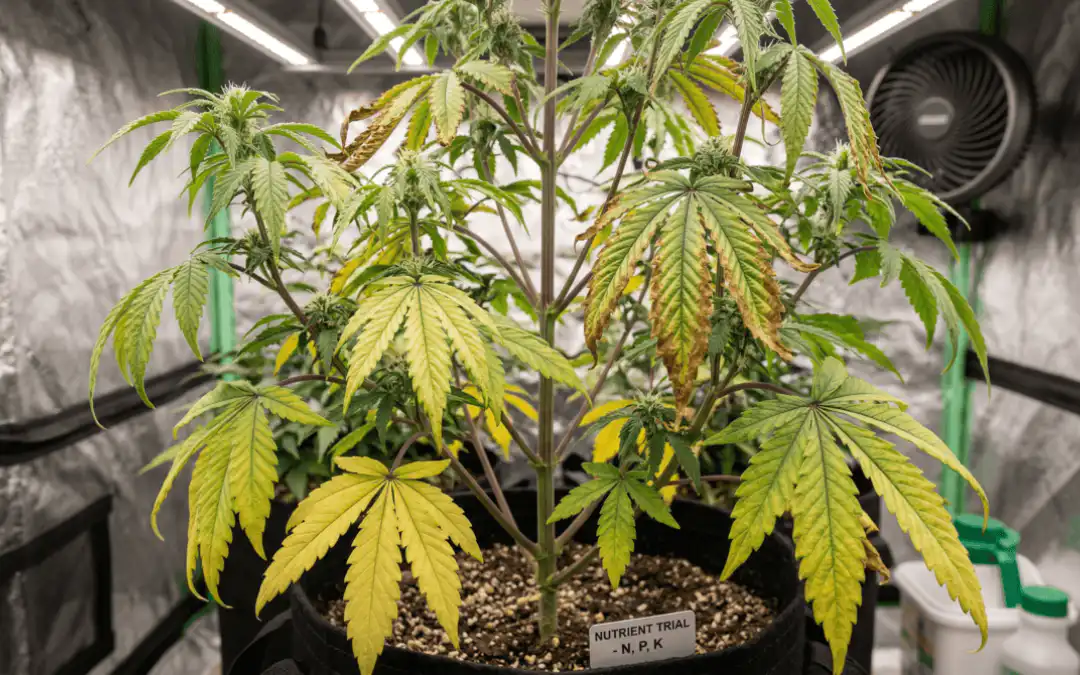
Cannabis leaves are a communication system. When they start yellowing, developing spots, curling, or changing colour in patterns that don’t look right, the plant is telling you something is wrong with its nutrient supply. The problem most growers run into isn’t identifying that something is wrong — it’s knowing which nutrient is missing, why it’s missing, and what to do that will actually fix it rather than making it worse.

This guide gives you the framework to diagnose cannabis nutrient deficiencies correctly and fix them before they cost you yield. The starting point is a concept that most guides skip past too quickly — and it’s the one that makes the difference between systematic diagnosis and guesswork.

The One Concept That Changes Everything: Mobile vs Immobile Nutrients

Before looking at any specific symptom, you need to understand how the plant moves nutrients internally. This is the master key that makes deficiency diagnosis logical rather than guesswork — and most growers either don’t know it or don’t apply it consistently.

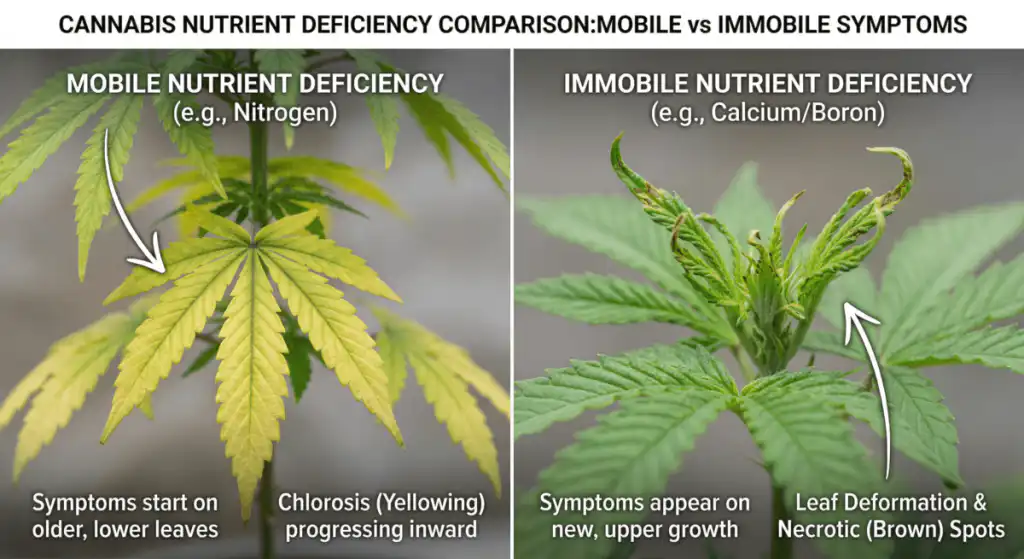
Mobile nutrients — nitrogen, phosphorus, potassium, magnesium — can be relocated by the plant. When supplies run low, the plant cannibalises older, lower leaves to feed new growth at the top. This means mobile deficiencies always show up on the bottom of the plant first, working upward as the deficiency progresses.

Immobile nutrients — calcium, sulphur, iron, manganese, zinc — get locked into plant tissue permanently once delivered. The plant can’t retrieve and relocate them. So when these run short, new growth suffers first because the plant can’t pull from existing tissue to compensate. The problem appears at the top of the plant, on the newest leaves.

Your two-step starting point for any deficiency diagnosis: is the problem on the lower, older leaves? Mobile nutrient deficiency. Is the problem on the upper, newer growth? Immobile nutrient deficiency. That single observation cuts your diagnostic list in half immediately and points you toward the right category of fix.

Mobile vs immobile nutrient deficiencies in cannabis — top leaves affected vs bottom leaves affected

The Mobile Nutrient Deficiencies — What Shows Up on Lower Leaves

Nitrogen Deficiency

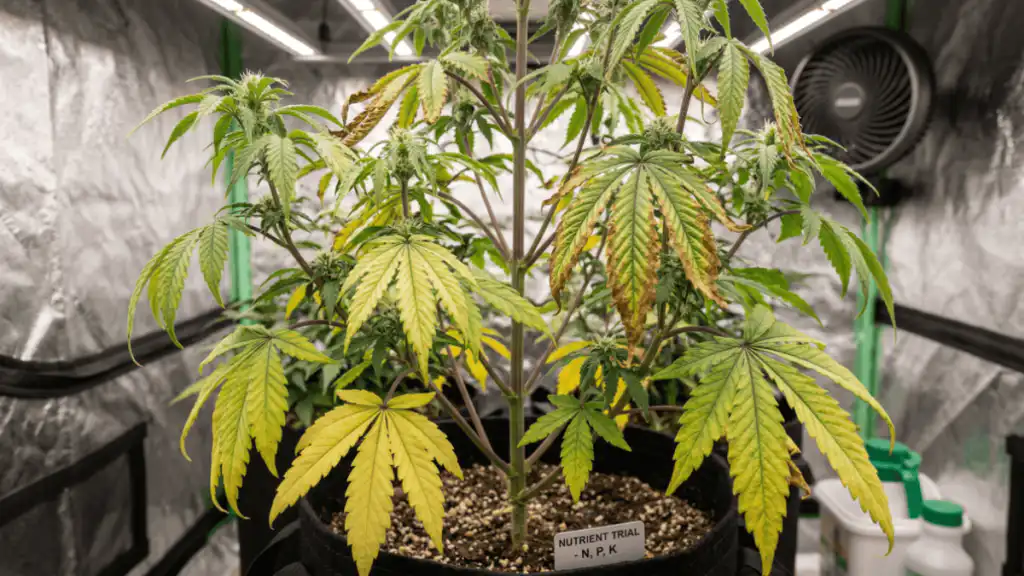
Nitrogen deficiency is the most common deficiency in cannabis and one of the easier ones to identify correctly. It shows as a uniform, pale yellowing across the entire leaf — not patchy, not spotted, just an even fade from green to yellow starting on the oldest, lowest leaves and progressing upward as the plant continues cannibalising lower foliage to feed new growth. Affected leaves will eventually wilt and drop.

It’s most common during the vegetative stage because nitrogen is the primary driver of leaf and stem growth — a fast-growing plant in active veg can burn through available nitrogen quickly. The fix is straightforward: feed with a nitrogen-rich grow formula and the plant will respond visibly within a week.

One important caveat: don’t reach for high-nitrogen nutrients during flowering. Excess nitrogen late in the grow suppresses bud development and affects the final smoke quality. Natural yellowing of lower fan leaves in weeks six to eight of flower is expected and correct — it’s the plant redirecting resources to bud production, not a deficiency that needs correcting.

Phosphorus Deficiency

Phosphorus deficiency is easy to misread because it doesn’t present as straightforward yellowing. Instead, affected leaves develop a dark, bluish-green discolouration. The specific giveaway is the stems and leaf petioles — look closely for a purplish or reddish tint there, which combined with the dark leaf colour is a reliable indicator of phosphorus shortage rather than other causes. Growth slows noticeably and plants look generally stressed without an obvious single cause.

It’s most common in the flowering stage, because phosphorus is critical for bud formation. A phosphorus deficiency during flower will reduce your final yield more significantly than almost any other deficiency because it’s affecting the plant at exactly the moment it’s doing the most important work. Switch to or increase your phosphorus-rich bloom formula. For organic growers, bone meal worked into the medium is an effective longer-term solution.

Note: purple stem colouration also occurs in some genetics as a normal phenotypic expression — particularly in Afghani and Kush-lineage indicas — and from cold temperatures. Don’t confuse this with phosphorus deficiency. The diagnostic check is whether the dark leaf colour and slow growth accompany it.

Potassium Deficiency

Potassium deficiency has a distinctive pattern once you know what to look for: yellowing and browning that starts at the leaf edges and tips while the centre of the leaf stays green. It looks like the margins of the leaf have been lightly scorched. Don’t confuse this with nutrient burn — burn typically affects tips only and presents alongside dark green leaves rather than general yellowing.

Potassium deficiency can strike at any stage but it’s particularly damaging during flowering, when potassium demand spikes alongside phosphorus. A balanced bloom nutrient addresses most potassium shortfalls. Kelp meal is a good organic supplement. If the issue persists after correct feeding, check pH — potassium uptake is sensitive to pH imbalance and the nutrient may be present but unavailable.

Cannabis nutrient deficiencies chart showing yellow leaves purple stems and burnt leaf edges by deficiency type

The Immobile Nutrient Deficiencies — What Shows Up on New Growth

Calcium Deficiency

Calcium deficiency appears as irregularly shaped brown or rust-coloured spots on young leaves. New growth may be stunted, twisted, or come in misshapen. The spots aren’t uniform — they look like random splashes of damage rather than a consistent pattern, which distinguishes them from other deficiency presentations.

The important thing to understand about calcium deficiency is that more often than not, the calcium is already present in the medium — the plant just can’t access it because pH is outside the absorption range. This is especially common in coco coir, which has almost no natural buffering capacity and requires calcium supplementation from day one regardless of what else you’re feeding.

Check pH first before adding calcium. For soil, target 6.0–7.0. For coco and hydro, target 5.5–6.5. Once pH is corrected, supplement with a Cal-Mag product. In coco, Cal-Mag should be a non-negotiable part of every feed from seedling through harvest.

Magnesium Deficiency

Magnesium is technically a mobile nutrient but most often presents on middle to lower leaves and frequently co-occurs with calcium issues — which is why Cal-Mag addresses both simultaneously. The distinctive symptom is interveinal chlorosis: the areas between leaf veins turn yellow while the veins themselves stay green, creating a striped or marbled appearance that’s fairly easy to identify once you’ve seen it. Leaf edges may curl upward.

Cal-Mag covers both calcium and magnesium, which is why it’s such a useful staple. If you want a simple standalone fix for confirmed magnesium deficiency, Epsom salts work well — dissolve one teaspoon per four litres of pH-balanced water and feed as normal. Results are typically visible within five to seven days.

Quick Diagnosis Reference

Symptom Location Likely cause
Uniform yellowing, leaf drop Lower / older leaves Nitrogen (N)
Bluish-green leaves, purple stems Lower / older leaves Phosphorus (P)
Yellowing / browning at leaf edges and tips Lower / older leaves Potassium (K)
Brown spots, stunted or twisted new growth Upper / new growth Calcium (Ca) — check pH first
Yellow between veins, veins stay green Mid to lower leaves Magnesium (Mg)
Dark green leaves, crispy brown tips only Tips throughout Nutrient burn — too much, not too little
Multiple deficiency symptoms at once Anywhere pH lockout — check pH before anything else

The Most Overlooked Cause: Nutrient Lockout

This is where most growers lose weeks of time and a lot of money in unnecessary nutrients. The problem often isn’t a lack of nutrients at all — it’s lockout. Nutrients are physically present in the medium but chemically unavailable to the plant because the pH is outside the absorption window.

Cannabis can only uptake nutrients within a relatively narrow pH range. Stray outside it and no amount of feeding will solve the problem. The plant keeps looking sick, you keep adding nutrients, and you end up with toxic salt buildup on top of everything else. Multiple simultaneous deficiencies are a lockout signature — not a multi-nutrient shortage. When multiple symptoms appear at once, always check pH before adjusting any nutrients.

pH targets by medium: soil targets 6.0–7.0 with the sweet spot around 6.5. Coco coir and hydro target 5.5–6.5. These ranges aren’t suggestions — they’re the windows within which each nutrient becomes chemically accessible. A pH of 7.5 in coco will lock out calcium, magnesium, and iron simultaneously regardless of how much of each is present in your feed.

🧠 Jason — On pH and Nutrient Diagnosis

The number of growers I’ve spoken to who spent weeks trying to fix a calcium or magnesium deficiency that was actually a pH problem is genuinely frustrating. They keep adding Cal-Mag, the symptoms persist, they add more Cal-Mag, and the problem gets worse because the salt load is climbing while the plant still can’t access the nutrients. A quality pH pen is the highest-return investment in any grow kit. Check it before every feed, check it at the root zone if you’re seeing persistent symptoms, and correct it before you start chasing specific deficiencies. Most of what growers diagnose as a deficiency is lockout — and lockout doesn’t respond to more nutrients.

Nutrient Burn — The Opposite Problem

It’s worth addressing nutrient burn here because it’s frequently confused with deficiency, and the treatment is the opposite. Nutrient burn presents as dark green leaves with crispy, brown-burnt tips — the darkness of the green is the first indicator that the plant has excess nutrient salts rather than insufficient ones. The tips brown because the plant is pushing excess salts to the outer extremities.

If you see this: stop feeding immediately, flush with plain pH-balanced water at two to three times the volume of your pot, and let the medium dry slightly before resuming at a significantly reduced feeding rate. Feeding more when you see nutrient burn makes it worse — the instinct to reach for nutrients when the plant looks sick is the most common way growers escalate a manageable problem into a serious one.

Looking for genetics bred for resilience?

Answer six questions and Jess will match you to three strains based on your setup, experience, and goals.

Find Your Strain →

Key Takeaways — Cannabis Nutrient Deficiencies

Mobile nutrients (N, P, K, Mg) deficiencies show on lower, older leaves — the plant cannibalises old growth to feed new. Immobile nutrients (Ca, S, Fe, Mn, Zn) deficiencies show on upper, new growth — the plant can’t relocate these from existing tissue. Multiple symptoms appearing simultaneously almost always indicates pH lockout rather than multiple actual deficiencies — check and correct pH before adding any nutrients. A pH pen is the highest-return tool in any grow kit: check before every feed, correct before diagnosing. Nutrient burn (dark green leaves, crispy tips) is the opposite of deficiency — flush rather than feed. Natural lower-leaf yellowing in weeks six to eight of flower is expected and shouldn’t be treated as a deficiency. When in doubt, stop feeding, check pH, wait and observe before making any changes. The full nutrient requirements by growth stage are covered in the autoflower nutrients guide.

Cannabis Nutrient Deficiencies — Frequently Asked Questions

What’s the difference between nutrient deficiency and nutrient burn?

They’re opposite problems. Nutrient deficiency is a shortage of one or more nutrients — the plant can’t access enough to function correctly. Nutrient burn is excess — too much nutrient salt in the medium, presenting as dark green leaves with crispy brown tips. The treatment for deficiency is corrected feeding; the treatment for burn is flushing and reducing feed. Treating burn as deficiency by adding more nutrients will make it significantly worse.

Should I check pH every feed?

Yes — every feed, without exception. A quality pH pen is the highest-return tool in any grow kit and the check takes thirty seconds. Most stubborn deficiency problems trace back to pH being out of range rather than an actual nutrient shortage. Many growers would have saved weeks of stress by checking pH before reaching for any other solution.

Can I use the same nutrients from seed to harvest?

Not optimally. Vegetative growth demands nitrogen-heavy grow formulas. Flowering demands phosphorus and potassium-heavy bloom formulas. Using a grow formula into flower is one of the most common reasons growers end up with small, airy buds — excess nitrogen suppresses bud development. The transition from grow to bloom nutrients should happen at the flip or shortly after pre-flowers appear.

Are organic nutrients better for avoiding deficiencies?

Organics are more forgiving — the microbial ecosystem in living soil buffers against both deficiencies and overfeeding, releasing nutrients slowly as the plant needs them. Synthetics feed the plant directly and are more precise but less forgiving of errors in either direction. Neither is universally better, but for growers who are still developing feeding discipline, organics offer a wider margin for error.

My plant has several problems at once. Where do I start?

Stop adding nutrients. Check pH. Correct it if it’s out of range. If salt buildup is suspected from overfeeding, flush with plain pH-balanced water at two to three times the pot volume. Wait three to five days and observe before making any further adjustments. Chasing multiple symptoms with multiple simultaneous fixes is how you turn a manageable problem into a dead plant. Multiple deficiency symptoms at once almost always means lockout — fix the pH and most of the symptoms will resolve without any additional intervention.

Why are my lower leaves yellowing in late flower?

This is almost certainly not a deficiency — it’s the plant redirecting resources from fan leaves to bud production as it approaches harvest. Some yellowing of lower fan leaves from week six of flower onward is a normal part of the plant’s senescence process. The diagnostic check: is the yellowing progressing rapidly upward through the canopy, or staying on the lower leaves only? Rapid progression warrants investigation; slow yellowing confined to lower leaves during late flower generally doesn’t.

Why are my cannabis leaves turning yellow? — the full guide to leaf yellowing including causes beyond nutrient deficiency.

Autoflower nutrients guide — feed schedules, EC targets, and nutrient timing by growth phase for autoflowering genetics.

Cannabis seedling care in Australia — the first two weeks after germination including early feeding and overwatering avoidance.

Why aren’t my cannabis seeds germinating? — troubleshooting failed germination before the nutrient stage begins.

Browse all cannabis seeds — feminised, autoflower, and photoperiod strains shipped from Australia.

Seeds are sold strictly as novelty collector’s items. They contain no THC or CBD. This page does not constitute medical or legal advice. By purchasing you agree to our terms and conditions. Always check local laws before germinating or cultivating cannabis.

How to Cure Cannabis in Australia — Complete Guide

How to Cure Cannabis in Australia — Complete Guide

Most growers stop the cure too early. The buds smell decent, they’re dry, they burn cleanly enough — and after weeks of growing and two weeks of drying, the patience runs out. I understand it. But curing cannabis in Australia isn’t a formality you do before the real thing. It’s where the final 20–30% of the quality gets built, and cutting it short at two or three weeks leaves that quality on the table every time.

Jess covered the drying process in her complete drying guide. This picks up where that ends — what’s actually happening inside a sealed jar, why it matters, how to manage the process, and how long you actually need to go before the cure is doing everything it can for your harvest.

Curing at a Glance

Target RH in jar 58–65% RH
Temperature 15–21°C — cool and stable
Light Complete darkness
Container Glass only — wide-mouth mason jars
Jar fill 70–80% — leave air space
Burping — weeks 1–2 Once or twice daily, 5–10 minutes
Burping — weeks 3–4 Every 2–3 days
Burping — week 5+ Once a week or seal long-term
Minimum cure 4 weeks — absolute floor
Good cure 6–8 weeks
Exceptional cure 3–6 months for complex terpene profiles
Cannabis curing timeline showing jar RH, smell indicators and burping schedule across three stages from week one to eight

What Does Curing Cannabis Actually Do — The Science Behind the Jar

Curing is a controlled, slow biological and chemical process. Understanding what’s actually happening helps explain why it can’t be rushed and why cutting it short consistently produces inferior results.

Chlorophyll breakdown continues

Freshly dried cannabis still contains residual chlorophyll — the compound that gives the harsh, green, grassy taste to under-cured material. During curing, enzymes continue breaking down chlorophyll in an anaerobic environment. This process takes time and can’t be accelerated. It’s the primary reason a two-week cure smokes harshly compared to a six-week cure from the same harvest — the chlorophyll hasn’t fully broken down.

Terpene development and preservation

This is the most significant quality factor in curing. The terpene profile of cannabis is not fully expressed at harvest — many terpenes continue developing through complex enzymatic processes in the first four to six weeks of cure. Monoterpenes (lighter, more volatile) are present early but can degrade if conditions aren’t right. Sesquiterpenes (heavier, more complex — the deeper earthy, spicy, and fuel notes) develop more slowly and require adequate curing time to reach their full expression. This is why a properly cured OG Kush or Godfather OG smells and tastes dramatically different at week six of cure compared to week two. The genetics haven’t changed — the cure completed what the grow started.

Moisture redistribution

After drying, moisture distribution within individual buds is uneven — the outer surface is drier than the interior. When buds go into sealed jars, that moisture redistributes gradually and evenly. This is why buds that feel crisp going into the jar feel slightly softer after the first day — the internal moisture has moved to the surface. This redistribution is part of the cure, not a sign that the dry was incomplete. Managing this with the correct RH range and regular burping is the core mechanical task of curing.

What curing doesn’t do — the potency myth

A common claim is that curing increases potency by converting THCA to THC. This is largely inaccurate. The THCA-to-THC decarboxylation reaction requires sustained heat — it’s what happens when you apply flame or vaporise cannabis, not what happens in a sealed jar at room temperature. The decarboxylation rate at 20°C over weeks is negligible. Curing improves the smoking and flavour experience significantly, but it doesn’t meaningfully change the cannabinoid content. The potency ceiling was set in the grow, not the jar.

Jason: I’ve had growers tell me their cure “increased the potency” of their harvest. What they’re experiencing is the improvement in flavour and smoke quality that comes from a proper cure — it’s a noticeably better experience than the same genetics under-cured. Whether the THC percentage changed is a different question, and the answer is: not meaningfully. The cure earns its reputation through what it does to terpenes and chlorophyll, not through cannabinoid chemistry.

What Temperature and Humidity Do You Need to Cure Cannabis?

Relative humidity — the most critical variable

The target RH inside the jar is 58–65%. This range supports the enzymatic processes driving chlorophyll breakdown and terpene development while keeping moisture levels low enough to prevent mould. Below 55% RH the cure effectively stalls — the enzymatic processes slow significantly and buds become too dry for further development. Above 70% RH mould risk becomes serious.

The 62% midpoint is where most experienced growers aim. Boveda and Integra both make two-way humidity control packs at 62% that actively add or remove moisture to maintain this level — they’re the most practical solution for maintaining consistent RH without constant monitoring, particularly in Australian conditions where ambient humidity can swing significantly between seasons.

Temperature

15–21°C is the target range. Cooler temperatures slow the enzymatic processes slightly but also reduce terpene degradation and minimise the risk of mould. In Australian summer, keeping jars in an air-conditioned room or a cool interior space is worth the effort — above 24°C the cure environment starts working against terpene preservation. I keep my curing jars in the same cool dark space I use for storage: a temperature-stable interior room away from external walls.

Light

Complete darkness throughout the cure. UV light degrades THC and terpenes at measurable rates — the same reason you keep seeds and finished product away from light. Store jars in a dark cupboard, drawer, or box. If you’re using clear glass jars in a lit space, wrap them or move them. Amber or UV-resistant glass is worth investing in if you’re curing long-term.

Chart showing recommended cure duration by strain type — indica, hybrid, OG-lineage and Cookies-lineage cannabis strains

What Equipment Do You Need to Cure Cannabis?

Containers — glass only

Wide-mouth mason jars are the standard for good reason — they seal reliably, they’re inert (glass doesn’t off-gas anything into your cure), they’re reusable, and the wide mouth makes loading and burping practical. The size that works for most home growers is the 1 litre (quart) jar — large enough to hold a meaningful harvest quantity, small enough that you’re not opening a single large jar and disturbing the whole cure every time you check one batch.

Plastic containers are not suitable for long cures. Even food-grade plastic is slightly gas-permeable over time and can impart subtle flavour compounds into the cure. For a two-week cure the difference is minor; for a three-month cure it’s noticeable. Glass is not negotiable if you’re taking the cure seriously.

Hygrometers

A small digital hygrometer inside each jar tells you the actual RH your buds are sitting at — not the ambient room humidity, which is a different number. They’re available cheaply and are worth using, particularly in the first two weeks when RH is most variable and you’re making daily adjustments. Once you’re using humidity packs and the RH has stabilised, they become less critical — but they’re useful for confirming the pack is doing its job.

Humidity packs

Boveda 62% and Integra Boost 62% are the two main options. Both work on a two-way mechanism — they release moisture when the jar is too dry and absorb it when too humid. For most Australian growers they’re worth using from the start, particularly in the first two weeks when the residual moisture in buds is still moving around. Replace when the pack feels hard and rigid — it’s exhausted its capacity. One pack per litre jar is the standard ratio.

Jason: I’ve cured without humidity packs and I’ve cured with them. With packs the process is more consistent and requires less daily intervention — you’re confirming rather than adjusting. For a first cure or for anyone in a climate with variable humidity, they remove a significant variable. I use them for the first four weeks, then seal without them once the cure is stable.

How to Burp Cannabis Curing Jars — Schedule and Technique

Burping — opening the jars briefly to exchange the air — serves two purposes. It removes the CO2, ammonia, and other gases produced by the ongoing enzymatic processes inside the jar, and it allows moisture-laden air to escape and be replaced with fresh air. Without burping, gas buildup stalls the cure and excess moisture accumulates, raising mould risk.

Weeks 1–2: Daily burping

Open each jar once or twice daily for five to ten minutes. During this period the buds are still releasing significant moisture and the enzymatic activity is at its highest. Each time you open the jar, check the smell — the aroma tells you more than the hygrometer in these early days. Fresh cannabis developing its characteristic profile is correct. Ammonia smell means too much moisture and bacterial activity — leave the jar open longer and increase burping frequency. Hay smell means the dry was too fast and the cure can only partially recover the situation.

Weeks 3–4: Every two to three days

By week three the enzymatic activity has slowed and moisture levels have stabilised. Burping every two to three days is sufficient. The smell should be developing into the characteristic strain profile — the difference between week two and week four is usually significant for complex terpene profiles. Continue checking RH at each burp and adjusting humidity packs if needed.

Week 5 onward: Weekly or seal

Once the cure is well established — stable RH, full strain aroma developing, no signs of excess moisture — you can move to weekly burping or seal the jars for long-term storage with a humidity pack. At this stage the cure is doing its work slowly and doesn’t require daily intervention. Some growers continue weekly burping indefinitely; others seal and store. Both approaches work.

Jason: The smell during burping is information — use it. I’ve opened jars at week three that still had a faint hay note and known immediately they needed another three weeks minimum. I’ve opened others at week four that smelled fully characteristic of the strain and known the cure was where it needed to be. The nose is faster and more accurate than any timer. Let it guide the schedule rather than treating the calendar as the only indicator.

How Long Should You Cure Cannabis?

Four weeks is the absolute minimum for any strain before the cure is doing meaningful work. At two weeks, chlorophyll breakdown is incomplete and the terpene profile is not representative of the genetics. Smoking at two weeks and judging the strain is like eating bread dough and judging the bread.

Six to eight weeks is where most strains reach a quality plateau — the point at which the incremental improvement from additional curing time becomes less pronounced. For straightforward indica-dominant genetics with myrcene-dominant profiles, six weeks will usually produce excellent results. This is the range I’d recommend as the default target.

Three to six months is where complex terpene profiles — particularly OG-lineage genetics with their diesel, grape, and earthy sesquiterpene profiles — continue to develop noticeably. Godfather OG, Gorilla Glue #4, and the Cookies-lineage strains all benefit from extended cures. The difference between a six-week cure and a four-month cure on Godfather OG is not subtle. If you can set aside a portion of your harvest for extended curing, the genetics that will benefit most are the ones with complex, heavy terpene profiles.

There is a ceiling. Beyond six months most strains start to plateau or very slowly decline in terpene intensity as the more volatile compounds continue to degrade. For long-term preservation beyond six months, the focus shifts to storage conditions rather than continued cure development — cool, dark, stable humidity, minimal oxygen.

Jason: The hardest part of curing is accepting that the timeline is determined by the chemistry, not by your patience. I’ve opened jars at three weeks on a strain I know well and been genuinely surprised by how much further it had to go. The smell at three weeks and the smell at six weeks from the same jar are sometimes dramatically different. Trust the process and set a calendar reminder rather than relying on willpower.

Which Strains Benefit Most from Extended Curing?

Not all strains respond equally to an extended cure. The strains that develop most noticeably beyond the six-week standard are those with complex sesquiterpene-dominant profiles — the heavier, slower-developing compounds that produce diesel, earthy, grape, and spice characteristics. These require time that lighter, more volatile monoterpenes don’t.

Godfather OG — the earthy pine and grape character that defines this strain’s reputation is a sesquiterpene-driven profile. At four weeks it’s decent. At three months it’s recognisably Godfather OG. The cure makes more difference to the final flavour of this strain than almost any other in our range.

Gorilla Glue #4 — the diesel and chocolate notes in GG4 are complex and develop slowly. An eight-week cure versus a four-week cure from the same harvest is a noticeable difference in depth and flavour intensity.

Girl Scout Cookies — the baked goods, earthy spice, and mint profile of GSC is one of the most cure-responsive terpene profiles available. Jess won’t smoke it before four weeks and rates it best at six to eight. The cure is not optional with this strain.

Simpler profiles cure faster. Northern Lights, Purple Kush, and indica-dominant strains with straightforward myrcene-dominant profiles reach their plateau earlier — six weeks is usually where they’re fully expressing. Indica-dominant genetics generally don’t require the extended three to six month cures that OG and Cookies-lineage strains do.

Curing in Australian Conditions

Summer heat

Above 24°C the cure environment works against you — terpene degradation accelerates and mould risk increases. If you’re harvesting in late summer or early autumn and curing through the heat, find the coolest stable space available. Air conditioning is worth running for the cure if you have it. Avoid storing jars in sheds, garages, or any space that gets direct afternoon sun. Interior rooms, particularly those away from external walls, tend to be the most temperature-stable. A small cooler or insulated box in a cool room provides additional temperature buffering without refrigeration.

Coastal humidity

In high ambient humidity — coastal Queensland and NSW through summer — the moisture trying to enter your jars every time you burp is the main challenge. Keep burping brief in these conditions: five minutes maximum in humid weather, less if ambient RH is above 70%. Humidity packs become more important, not less, in high-humidity environments — they’re actively absorbing moisture that would otherwise push the jar RH above the safe range. Consider burping in the early morning when temperatures are lower and humidity is typically more manageable.

Dry inland conditions

In low-humidity inland areas, the risk runs the other direction — jars losing moisture too quickly during burping and buds drying out in the cure. Humidity packs at 62% provide the necessary buffer, actively releasing moisture to maintain the jar at target. Keep burping times brief and consider sealing with a pack earlier than you would in coastal conditions — once the initial high-activity period is past, the pack maintains the environment without daily intervention.

Infographic showing the three processes inside a cannabis curing jar — chlorophyll breakdown, terpene development and moisture redistribution over eight weeks

How to Store Cannabis After Curing

Once the cure is complete — typically six to eight weeks minimum — the goal shifts from active development to preservation. The enemies are the same as the enemies of stored seeds: heat, humidity, light, and oxygen. Sealed glass jars with a 58% humidity pack in a cool dark space will preserve properly cured cannabis for twelve months with minimal quality loss. Beyond twelve months, terpene intensity will gradually decline regardless of conditions — the cannabinoid content is more stable than the terpene profile over time.

For storage beyond twelve months, vacuum-sealing inside glass reduces oxidation and slows terpene degradation meaningfully. Freezing is viable for very long-term preservation — frozen with minimal moisture and oxygen, cannabis can remain stable for years — but the freeze-thaw cycle damages trichomes if repeated. Freeze once, thaw once. The seed storage guide covers the underlying principles in detail — the same variables of temperature, humidity, darkness, and oxygen apply to both.

Common Cannabis Curing Mistakes — and How to Avoid Them

Stopping too early. The most common mistake by a significant margin. Four weeks is the minimum — six to eight weeks is where the genetics express themselves properly. Impatience costs more quality than any other single factor in the post-harvest process.

Using plastic containers. Plastic is gas-permeable and imparts trace compounds into the cure over weeks. Glass is the correct container for any cure longer than two weeks.

Storing in light. UV light degrades THC and terpenes measurably. Dark storage throughout the cure is not optional.

Jarring too wet. Buds that didn’t pass the stem snap test before going in the jar will push RH well above 70% and create mould conditions within days. The dry has to be complete before the cure begins — the jar doesn’t finish what the dry didn’t.

Skipping burping entirely. Leaving jars completely sealed without burping allows gas buildup that stalls the cure and creates an environment that promotes anaerobic bacterial growth. The ammonia smell that results from this is the cure telling you it needs air exchange.

Over-burping in humid conditions. In coastal Australian summer, leaving jars open for 30+ minutes in 75% RH ambient air adds significant moisture to the cure. Keep burping brief in humid conditions and let humidity packs do the management work.

Curing Problems — Mould, Ammonia, and How to Fix Them

Ammonia smell in the jar

Ammonia smell means bacterial activity from excess moisture — the buds were either too wet going in or the jar accumulated too much humidity without adequate burping. Open the jar and check for visible mould. If no mould is present, leave the jar open for one to two hours to allow moisture to escape, then resume the cure with more frequent burping and a 62% humidity pack to stabilise. If the ammonia smell persists after airing out, inspect all buds closely — the bacteria producing that smell will degrade quality significantly if left unchecked.

Mould in the jar

Remove affected buds immediately and discard — mouldy material cannot be salvaged and the mould spores will spread to the rest of the jar if left. Inspect remaining buds under bright light, checking inside dense colas. If mould is isolated to one or two buds, the rest can potentially be saved — air out the jar, allow to dry slightly if RH was above 70%, and resume the cure with more frequent monitoring. If mould is widespread, the batch is compromised. The cause is almost always buds that were too wet going into the jar.

Buds too dry in the jar

If the hygrometer is reading below 55% RH and buds feel brittle, the cure has effectively stalled. Add a 62% humidity pack and seal the jar — the pack will slowly release moisture and bring the RH back into range. It takes 24–48 hours for the pack to do its work. Once RH stabilises at 58–62%, resume normal burping schedule. Terpene development that stalled during the dry period will resume once moisture is restored to the correct range.

Hay smell persisting into the cure

A persistent hay smell beyond week two of cure indicates the dry was too fast and terpenes were lost before the jar went on. The cure will help — chlorophyll will continue to break down and the smoke will smooth out — but the terpene profile that evaporated during a fast dry is gone permanently. A six to eight week cure is the best available recovery option, and it will produce a noticeably better result than giving up at three weeks. The genetics are still there; it’s the top layer of aromatics that was lost. Extend the cure and give the remaining terpenes time to develop as fully as possible.

Planning your next grow?

Answer six questions and Jess will match you to three strains based on your setup, experience, and goals.

Find Your Strain →

Cannabis Curing — Frequently Asked Questions

What is curing and why does it matter?

Curing is a controlled slow process that continues breaking down chlorophyll, develops the terpene profile, and redistributes moisture evenly through dried buds. It’s the difference between cannabis that smokes harshly and tastes green and cannabis that expresses the full flavour and smoothness the genetics are capable of. The cure can’t fix a bad grow, but it completes what a good grow started — and skipping it or rushing it leaves a significant portion of the potential quality unrealised.

How long should I cure cannabis?

Four weeks is the absolute minimum. Six to eight weeks is where most strains reach a quality plateau. Complex terpene profiles — OG-lineage genetics, Cookies-lineage, heavy diesel and earthy strains — benefit from three to six months of curing. The timeline is determined by the chemistry, not by patience. Set a calendar reminder and don’t open the jars to judge early.

What RH should my curing jars be at?

58–65% RH inside the jar. Below 55% the enzymatic processes stall and buds become too dry for further development. Above 70% mould risk becomes serious. The 62% midpoint is the practical target — Boveda and Integra humidity packs at 62% maintain this passively without constant monitoring.

Does curing increase potency?

Not in any meaningful sense. The conversion of THCA to THC through decarboxylation requires sustained heat — it doesn’t happen at room temperature in a sealed jar at rates that matter. What curing does is improve the flavour, aroma, and smoothness of the smoke significantly — which produces a noticeably better experience from the same cannabinoid content. The potency ceiling was set in the grow.

Can I cure in plastic containers?

Not recommended for anything beyond a week or two. Plastic is gas-permeable and can impart trace compounds into the cure over extended periods. Wide-mouth glass mason jars are the correct container. The investment is minimal and the difference over a six-week cure is real.

What does ammonia smell in the jar mean?

Bacterial activity from excess moisture. The buds went in too wet, or the jar accumulated humidity without adequate burping. Open and air out for one to two hours, check for mould, add a 62% humidity pack, and resume with more frequent burping. If the smell persists after airing, inspect all buds carefully.

How often should I burp curing jars?

Once or twice daily for the first two weeks, for five to ten minutes each time. Every two to three days in weeks three and four. Weekly from week five onward, or seal with a humidity pack for long-term storage. In high-humidity Australian conditions, keep burping times brief — five minutes maximum when ambient RH is above 65%.

Can I cure different strains in the same jar?

Technically yes, but there’s no good reason to. Different strains cure at slightly different rates and their terpene profiles will mix in the jar. Keep strains separate — label jars clearly with strain name and harvest date. Mixing makes it impossible to evaluate individual strain quality and harder to identify problems specific to one variety.

What’s the difference between 58% and 62% humidity packs?

The 58% pack targets the lower end of the acceptable cure range — better for strains prone to mould or for storage after the cure is complete. The 62% pack targets the midpoint of the cure range and is better for active curing where you want enzymatic processes running at full capacity. Most growers use 62% for curing and switch to 58% for long-term storage.

How do I know when the cure is finished?

The cure is never truly “finished” in the sense of a definitive endpoint — quality continues to develop slowly for months in well-stored cannabis. The practical answer is that after six to eight weeks, the incremental improvement from additional curing slows significantly for most strains. The aroma should be fully characteristic of the strain, the smoke should be smooth and clean, and the RH should be stable without daily intervention. At that point you can move to long-term storage conditions.

How to dry cannabis in Australia — Jess’s complete drying guide covering environment, methods, the stem snap test, and drying in Australian conditions. Read this before the cure.

Knowing when to harvest cannabis — trichome reading, regional timing, and harvest indicators. The step before the dry.

High-THC cannabis seeds in Australia — the OG-lineage and Cookies-lineage genetics that benefit most from extended curing, including Godfather OG, Gorilla Glue #4, and Girl Scout Cookies.

How to store cannabis seeds in Australia — the same principles of temperature, humidity, darkness, and oxygen control that govern long-term storage of cured cannabis.

Browse all cannabis seeds — over 50 feminised, autoflower, and photoperiod strains shipped from Australia.

Seeds are sold strictly as novelty collector’s items. They contain no THC or CBD. This page does not constitute medical or legal advice. By purchasing you agree to our terms and conditions. Always check local laws before germinating or cultivating cannabis.

Bruce Banner Strain Review & Grow Guide Australia

Bruce Banner Strain Review & Grow Guide Australia

Bruce Banner seeds produce one of the most potent and recognisable hybrids in the modern cannabis catalogue — OG Kush crossed with Strawberry Diesel by Delta9 Labs in the early 2010s, with Bruce Banner #3 becoming the phenotype that put the strain on the map. It tests consistently between 25–30% THC, sits around 60% sativa, and produces the kind of effect that surprises people who think they know what a high-THC indica-leaning hybrid does. It doesn’t do what you expect.

I’ve grown Banner in a few different formats — photoperiod indoor, fast version outdoor — and the genetics perform well in both contexts. The caryophyllene and myrcene terpene combination gives it a depth that you don’t get from a lot of strains in this THC range. This review covers the genetics, what to expect from the grow, how it performs outdoors in Australian conditions, and which of the three available formats suits different situations.

Browse our high-THC cannabis seeds →

Bruce Banner — Strain Specs

Genetics OG Kush × Strawberry Diesel
Type 60% Sativa / 40% Indica — Feminised
THC 25–30%
CBD <1%
Flowering time (photo) 8–10 weeks from flip
Flowering time (fast) 6–8 weeks from flip
Seed to harvest (auto) 10–12 weeks fixed
Indoor yield 500–600 g/m² (photo, optimised)
Outdoor yield 600–900 g/plant (photo, full season)
Height Medium-tall — significant stretch in early flower
Terpene profile Caryophyllene, myrcene, limonene
Aroma Diesel, earthy, spice — sweet fruit undertones from Strawberry Diesel

Bruce Banner feminised cannabis seeds — high-THC OG Kush Strawberry Diesel hybrid

Bruce Banner Strain Review: Genetics, THC, and What to Expect

The lineage is straightforward and explains the strain well. OG Kush brings the dense bud structure, the resin production, and the earthy-diesel terpene foundation that runs through most West Coast hybrid genetics. Strawberry Diesel adds the sativa-dominant growth pattern, the uplifting cerebral character, and the sweet fruity note that softens the diesel baseline. The result leans sativa in growth behaviour and effect onset, with the OG indica influence asserting itself in the mid-to-late phase of the experience.

Bruce Banner #3 is the phenotype most people are referring to when they discuss the strain. Delta9 Labs released several numbered phenotypes and #3 became the one that circulated widely — it’s the highest-THC expression and the most balanced in terms of effect. When you see Bruce Banner in a seed bank catalogue, #3 genetics are usually what’s behind it, though the phenotype hunt involved in growing from seed means individual plants will express the profile slightly differently.

The THC range of 25–30% is real and consistent with what lab testing shows across multiple grows. This puts it in the same bracket as Godfather OG and above most of what you’d find in the general catalogue. The difference from a lot of strains in this range is that the caryophyllene and limonene in the terpene profile prevent the experience from being purely sedative — it’s potent and physical, but the sativa genetics and the limonene component keep it functional in a way that a myrcene-heavy pure indica at equivalent THC wouldn’t be.

Jason: The first time I grew Banner properly I was expecting something closer to a Godfather OG effect given the THC numbers — a heavy indica body lock. What I got was something more complex. The initial phase is genuinely cerebral and energetic, which surprised me for a strain testing at 28%. The indica genetics come through strongly in the second half of the experience. It’s not a strain you use and then do things. But the first hour is functional in a way that very few strains at this potency level are.

Bruce Banner Effects — What the Terpene Profile Does

The caryophyllene dominance is what makes Bruce Banner’s effect profile different to other strains in the same THC range. Caryophyllene activates CB2 receptors directly — the receptors involved in inflammation and pain response — which adds a physical therapeutic depth that sits alongside rather than competing with the cerebral sativa character. The combination of caryophyllene and limonene produces an effect that’s simultaneously physically relaxing and mentally clear in the opening phase, before the myrcene and the raw THC load drive the body effect home in the second phase.

Onset (10–20 min): Clear cerebral lift, mood elevation, energy. The limonene-driven sativa character is front and centre early.

Mid-phase (30–90 min): Physical relaxation builds alongside the mental lift. Pain relief becomes noticeable. Still functional at moderate doses.

Late phase: The myrcene and indica genetics assert themselves. Full body relaxation. Most users at higher doses find sleep follows naturally. Not a strain for late afternoon if you have evening commitments.

Growing Bruce Banner Seeds — Complete Grow Guide

Bruce Banner is an intermediate grow. The genetics are stable and forgiving of reasonable mistakes, but the sativa growth pattern and the high-THC ceiling both reward growers who understand what they’re working with before they start. The most important things to get right: managing the stretch in early flower, keeping temperature below 26°C in mid-to-late flower to preserve the terpene profile, and not rushing the harvest.

Structure and Training

The Strawberry Diesel sativa genetics drive significant stretch — expect 50–80% height increase from the start of the 12/12 flip to when vertical growth stops, typically around week three of flower. This is the single most important thing to plan for indoors. A plant that’s 60 cm at flip will be 90–110 cm before it stops stretching. If your tent ceiling is 120 cm, that’s a problem without early training.

LST from week two of veg is the most effective approach — tie the main stem and lateral branches down progressively to open the canopy and expose bud sites before the flip. SCROG works well with Bruce Banner given the open branching structure: the number of lateral sites is high once the canopy is spread, and a screen channels that energy into multiple productive colas rather than a single dominant top. Top or FIM at week three of veg if height is a serious constraint — the genetics recover well, but allow at least a week before the flip for recovery.

Defoliation in early flower (week one to two of the 12/12 phase) removes shading leaves and improves light penetration to lower bud sites. Keep it moderate — strip fan leaves blocking direct bud sites, not the whole canopy. A second light defoliation at week four of flower removes any leaves that have developed across bud sites as they stack. Don’t defoliate after week five.

Feeding Strategy

Bruce Banner’s yield potential and THC ceiling both require proper nutrition, but the OG Kush genetics carry some sensitivity to overfeeding in the seedling and early veg phase. Start conservative and build.

Seedling (days 1–14): Plain pH-adjusted water or 1/4 strength maximum. EC below 0.6. No CalMag unless using RO water. The most common mistake with this strain is feeding full strength in the first two weeks — tip burn in week two costs early development time.

Veg (weeks 3–6): Build to full strength by week four. EC range 1.0–1.4. Nitrogen-forward profile — Banner puts on significant biomass in veg and needs the nitrogen to support it. Watch for deep green leaves going glossy — that’s the first sign to back off N before toxicity sets in.

Early flower / stretch (weeks 1–3 of 12/12): Transition to bloom nutrients — reduce nitrogen, begin building phosphorus. EC range 1.2–1.6. The stretch phase is metabolically demanding; don’t drop nutrients during this period. CalMag support through early flower if running coco or RO water.

Mid flower (weeks 4–7 of 12/12): Full bloom profile. EC range 1.4–1.8. Potassium support from week five improves resin density and terpene expression — this is where the caryophyllene and diesel terpene profile develops. Keep temperature below 26°C from week five; above this, terpene evaporation accelerates visibly.

Late flower / pre-flush (weeks 8–9 of 12/12): Begin tapering nutrients as natural leaf yellowing starts. Reduce EC to 1.0–1.2. The plant is directing energy into bud development and resin production, not leaf maintenance — yellowing fan leaves at this stage are normal and expected.

Flush (final 10–14 days): Plain pH-adjusted water only. Important for OG-lineage terpene expression — the diesel and earthy notes are cleaner after a proper flush. Don’t skip or shorten this; the flavour difference in cured material is noticeable.

Climate

Temperature: 22–26°C through veg and early flower. Drop to 20–24°C from week five of flower — the diesel and caryophyllene terpene expression in Bruce Banner is noticeably better in cooler late-flower conditions. Cool nights (17–20°C) in the final two weeks improve both terpene intensity and resin density. Some phenotypes will show purple colouration with the temperature differential.

Humidity: Seedling 65–70% RH. Veg 55–65% RH. Early flower 50–55% RH. Mid-to-late flower 40–50% RH, dropping to 40–45% in the final two weeks. The OG Kush-derived bud density makes Banner susceptible to botrytis if RH creeps above 55% once buds are developed — airflow through the canopy and consistent RH management from week four of flower are non-negotiable.

Light: 18/6 standard veg schedule. 12/12 to trigger flower. PPFD targets: 400–600 µmol/m²/s in veg, 700–900 µmol/m²/s in flower. Banner responds well to higher light intensity in flower — if your setup can push into the 800–900 range during peak flower, yield and resin production both improve. Outdoors: full sun position, minimum 6 hours direct light.

Jason: The indoor run I did with the fast version was the most straightforward. Six weeks of flower, density that rivals the standard photoperiod, and the terpene expression was actually stronger than my first photoperiod run — I think because the faster finish meant less time at elevated late-flower temperatures. If you’re running indoor and the timeline flexibility doesn’t matter to you, the fast version is worth considering over the standard photo. The terpene ceiling is higher when you’re not managing heat through a longer flower.

Bruce Banner Week-by-Week Grow Guide (Photoperiod)

The following covers the photoperiod version. Fast version timing is two to three weeks shorter in the flower phase — compress weeks 5–10 accordingly.

Phase / Week What’s Happening Key Actions Watch Out For
Weeks 1–2
Seedling
Taproot establishing. First true leaves emerging. Sativa leaf structure visible early. Plain water or 1/4 strength. 18/6 light. Humidity 65–70% RH. pH 6.0–6.5 soil, 5.8–6.2 coco. Overfeeding. EC above 0.6 at this stage causes tip burn that costs the plant development time it won’t recover in early veg.
Weeks 3–4
Early veg
Rapid vegetative growth. Sativa internode spacing developing. Plant is structuring itself for the stretch ahead. Build to full strength nutrients by week 4. EC 1.0–1.2. Begin gentle LST — tie main stem to open structure. Top or FIM at week 3–4 if height management required. Glossy dark green leaves signal nitrogen toxicity — back off N before damage accumulates. Allow minimum one week post-topping before flip.
Weeks 5–6
Late veg
Plant reaching target size before flip. Multiple lateral branches developing. LST anchors setting canopy position. EC 1.2–1.4. Continue LST to maintain even canopy. Flip to 12/12 when plant is at 40–50% of your available height — it will double. Flipping too late is the most common indoor mistake with Banner. If the plant looks too small at 18/6, it will look right-sized after the stretch. Flip early.
Weeks 1–3 of flower
Stretch / transition
Significant height increase — 50–80% typical. Pre-flowers developing into early bud sites. First trichome formation. Transition to bloom nutrients. EC 1.2–1.6. Continue LST to manage stretch and keep canopy even. Light defoliation of shading leaves at week 2. Don’t stop feeding during stretch — the plant is metabolically demanding in this phase. Monitor canopy-to-light distance daily during rapid height gain.
Weeks 4–6 of flower
Early-mid flower
Buds stacking. The diesel and spice aroma building strongly from week 5. Height gain mostly complete by week 4. Full bloom nutrients. EC 1.4–1.8. Carbon filtration essential from week 5. Drop RH to 45–50%. Temperature management critical — keep below 26°C. Second light defoliation at week 4 if canopy needs opening. Heat above 26°C visibly degrades terpene expression. This is the most important environmental variable to manage for Banner specifically. Monitor RH — botrytis risk increases as bud density builds.
Weeks 7–8 of flower
Late flower
Buds fattening and hardening. Trichome production at peak. Pistils darkening. Diesel and earthy aroma at full intensity. Check trichomes from week 7. Taper nutrients — EC 1.0–1.2. Drop RH to 40–45%. Cool nights 17–20°C to maximise terpene and resin expression. Begin flush when 10–15% amber visible. Don’t harvest early. The OG-derived resin and terpene development continues into the final week. Harvesting at mostly cloudy trichomes misses the full flavour and potency the genetics produce.
Weeks 9–10 of flower
Flush and harvest
Final ripening. Natural leaf yellowing accelerates. Dense resinous colas. Harvest at 20–30% amber for the full caryophyllene-driven physical effect. Plain pH-adjusted water for 10–14 days. Harvest at 20–30% amber. Slow dry at 15–18°C, 55–60% RH for 10–14 days. Rushing the dry. The diesel and earthy terpene profile is volatile — fast drying at high temperature destroys it. Slow and cool is not optional with OG genetics.
Post-harvest
Cure
The full diesel and earthy OG terpene character develops during the cure, not on the plant. Fresh material is decent. Properly cured material is recognisably Bruce Banner. Jar at 60–65% RH. Burp daily for two weeks. 4 weeks minimum. 6–8 weeks noticeably better for terpene expression. Opening the jars too early. The caryophyllene-driven spice and the diesel character deepen significantly over weeks three and four of cure. Don’t smoke it fresh and judge the genetics.

Indoor Growing — Bruce Banner (Australia)

  • Flowering time: 8–10 weeks (photo) / 6–8 weeks (fast version)
  • Yield: 500–600 g/m² under optimised lighting with training
  • Container: 15–20 L for photoperiod; 10–15 L acceptable for fast version shorter flower
  • Light schedule: 18/6 veg → 12/12 flower
  • PPFD: 400–600 veg / 700–900 flower
  • Height: Flip at 40–50% of available ceiling height — expect 50–80% stretch
  • Training: LST from week 2–3 veg; SCROG suits the branching structure; top/FIM at week 3–4 if needed
  • Temperature: 22–26°C veg and early flower; below 26°C strictly from week 5 flower
  • Humidity: 65–70% seedling → 55–65% veg → 45–50% flower → 40–45% late flower
  • Aroma management: Carbon filtration from week 5 — the diesel terpene output is strong and early
  • Cycles per year: 3–4 (photo) / 4–5 (fast version)

Common Problems with Bruce Banner

Overfeeding in seedling phase: The OG genetics carry some nutrient sensitivity into the seedling stage. EC above 0.6 in the first two weeks produces tip burn that slows early development. Always start at 1/4 strength and watch the tips — any browning signals to drop back before damage accumulates.

Underestimating the stretch: The single most common indoor problem. Growers flip at full ceiling height and end up with plants pushing into the light by week three of flower. Flip when the plant is at 40–50% of available canopy height and let the stretch do the work.

Heat in mid-to-late flower: Above 26°C from week five of flower, the diesel and caryophyllene terpene expression degrades visibly in the final product. If your grow space runs warm in summer, either run Banner in cooler months or address temperature management before starting. This is the most impactful single variable for terpene quality with OG-lineage genetics.

Botrytis from humidity: The OG-derived dense bud structure is vulnerable once buds reach full size. Keep RH below 50% from week four of flower, maintain airflow through the canopy, and check bud sites in the lower canopy weekly from week six. Botrytis spreads fast in dense buds — catch it early or lose the affected colas.

Harvesting at cloudy trichomes: Banner’s physical effect and terpene depth both develop in the final week of flower. Harvesting at mostly cloudy trichomes produces a lighter, more cerebral effect that doesn’t represent the genetics. Wait for 20–30% amber under a loupe — then harvest.

Growing Bruce Banner Seeds Outdoors in Australia

The sativa-dominant structure makes Bruce Banner well-suited to outdoor growing in warmer Australian climates, with some important caveats around timing and humidity management.

Queensland and Northern NSW: The open bud structure from the sativa genetics is an advantage in humid coastal conditions — better airflow than dense indica-dominant strains. Plant by mid-October for a March harvest before the autumn rain window. The photoperiod version gives you the full yield potential here; the fast version gives you a February finish and more buffer before the weather turns.

NSW and VIC (temperate): Standard outdoor timing applies — in the ground by late October, harvest late March to April. Bruce Banner’s 8–10 week flower fits this window well. The fast version is worth considering in VIC specifically to target a late-March harvest and avoid the April risk period. The dense bud structure is vulnerable to botrytis if autumn rains arrive early — monitor from week six of flower.

SA and WA: The drier climate suits the OG Kush bud density — mould risk is lower, and the plant handles warm days well. Standard outdoor season timing applies.

Bruce Banner Photoperiod vs Fast Version vs Auto — Which One?

The photoperiod version is the right choice when you want maximum control — over veg time, plant size, and the ability to take clones from a phenotype worth keeping. If you find an exceptional expression in a photoperiod run, you can preserve it indefinitely as a mother plant. Indoor yield potential tops out higher with the photoperiod (500–600 g/m² under optimised conditions) than either the fast version or auto.

The fast version is the most practical choice for most Australian outdoor growers. It flowers two to three weeks faster than the photoperiod, which meaningfully shifts the harvest window in southern states and provides more buffer against April rain in NSW and VIC. It retains photoperiod characteristics — still requires a 12/12 light flip, still responds to training, still achieves close to photoperiod yield potential — while finishing earlier. For outdoor season management, this is the format I’d recommend as the default.

The autoflowering version trades yield and potency ceiling for the fixed 10–12 week timeline and season independence. THC will be somewhat lower than the photoperiod and yield per plant is reduced. If the timeline flexibility or the inability to manage light cycles makes the photoperiod impractical, the auto is a legitimate option — just go in with accurate expectations about what the Ruderalis cross costs relative to the full photoperiod expression.

Bruce Banner cannabis buds showing dense resin coverage and high-THC trichome production

Bruce Banner vs Gorilla Glue #4 vs Godfather OG

Bruce Banner vs Gorilla Glue #4: Similar THC range (GG4 typically 26–28%). GG4 is caryophyllene-dominant with myrcene — more physically sedating and less cerebral than Banner in the early phase. Banner’s limonene component gives it a more energetic opening that GG4 doesn’t have. If you want functional potency, Banner. If you want deep body effect, GG4.

Bruce Banner vs Godfather OG: Godfather OG is myrcene-dominant with a 22–28% THC range — pure sedative indica-dominant effect from the OG Cup-winning genetics. Banner at equivalent doses is noticeably more functional and cerebral. Godfather OG is the choice for insomnia and heavy pain management. Banner is the choice when you want the potency but need more range in the effect.

Bruce Banner vs Girl Scout Cookies: GSC sits lower in THC (20–25%) and its caryophyllene-dominant profile produces a more balanced, sociable effect. Banner is more potent and more diesel-forward in aroma. GSC is the better choice for a lower-intensity evening hybrid experience. Banner is for growers specifically after maximum THC with sativa character.

Not sure Bruce Banner is right for your grow?

Answer six questions and Jess will match you to three strains based on your setup, experience, and goals.

Find Your Strain →

Bruce Banner Seeds — Key Takeaways

OG Kush × Strawberry Diesel. 25–30% THC. Caryophyllene and limonene dominant terpene profile that produces a more functional, cerebral-opening effect than most strains in this potency range. Significant stretch in early flower — plan for it indoors. Dense OG-derived bud structure requires humidity management from week five outdoors. Fast version is the practical default for Australian outdoor growing, particularly in southern states where the two-to-three week earlier finish meaningfully shifts the harvest window. Not an entry-level genetics choice at this THC level — approach with accurate expectations about what you’re working with.

Bruce Banner Seeds — Frequently Asked Questions

What are Bruce Banner seeds?

Bruce Banner is a feminised cannabis strain bred from OG Kush and Strawberry Diesel by Delta9 Labs, with Bruce Banner #3 being the most widely distributed phenotype. It tests consistently at 25–30% THC with a caryophyllene, myrcene, and limonene terpene profile. Available as photoperiod, fast version, and autoflowering feminised seeds.

How long does Bruce Banner take to flower?

The photoperiod version flowers in 8–10 weeks from the 12/12 light flip. The fast version reduces this to 6–8 weeks — two to three weeks faster — making it better suited to outdoor growing in southern Australian states where the harvest window is tighter. The autoflowering version runs a fixed 10–12 week seed-to-harvest timeline regardless of light schedule.

How does Bruce Banner compare to Gorilla Glue #4?

Both sit in the 25–30% THC range. GG4 is more heavily sedating and body-dominant — its myrcene and caryophyllene profile produces a deep physical effect with less cerebral character. Bruce Banner’s limonene component gives it a more energetic, functional opening phase before the indica genetics assert themselves. If maximum body effect is the brief, GG4. If you want high potency with more sativa character, Banner.

What is Bruce Banner best suited to outdoors in Australia?

Queensland and Northern NSW suit the sativa-dominant open structure — good airflow through the canopy in humid conditions. In NSW and VIC, the fast version is worth considering over the standard photoperiod to target a late-March harvest before autumn rains. The dense OG bud structure requires humidity monitoring from week five of flower in coastal climates. The full Australian climate strain guide covers regional timing in detail.

Is Bruce Banner difficult to grow?

Intermediate. The genetics are reasonably stable and respond well to standard training. The main considerations are managing the significant stretch in early flower, maintaining humidity below 50% from week five as buds develop density, and not overfeeding in the seedling phase. It’s not a punishing grow but the high-THC genetics and the sativa growth pattern both reward growers who’ve run a few cycles before attempting Banner.

When should I harvest Bruce Banner?

Check trichomes from week seven of the 12/12 flower phase. Harvest at 20–30% amber trichomes for the full physical effect the OG genetics produce — caryophyllene-driven body relaxation and the diesel terpene depth both develop in the final week. Harvesting at mostly cloudy trichomes produces a lighter, more cerebral experience that doesn’t represent the full potential of the genetics. Use a loupe or jeweller’s scope, not the pistil colour — pistils turning orange is not a reliable harvest indicator.

How should I feed Bruce Banner through the grow?

Start at 1/4 strength in the seedling phase — EC below 0.6 for the first two weeks. Build to full strength in veg by week four (EC 1.0–1.4, nitrogen-forward). Transition to bloom nutrients at the flip — reduce nitrogen, build phosphorus. EC 1.2–1.6 through early flower, 1.4–1.8 in mid-flower. Potassium support from week five improves resin and terpene production. Taper to EC 1.0–1.2 in late flower, then flush with plain pH-adjusted water for 10–14 days before harvest. The flush matters with OG genetics — it makes a noticeable difference to the diesel flavour in cured material.

Photoperiod for maximum yield and the ability to preserve mother plants from exceptional phenotypes. Fast version for outdoor Australian growing where the earlier finish matters — this is the practical default for most growers. Auto for season independence and fixed timeline, with reduced yield and slightly lower THC as the trade-off.

High-THC cannabis seeds in Australia — the full range of strains testing above 25% THC available from Sacred Seeds.

Autoflower vs photoperiod seeds — the format differences in full, relevant if you’re deciding between the three Bruce Banner variants.

Best cannabis strains for Australian climates — regional outdoor strain selection and seasonal timing guides.

Browse all cannabis seeds — the full Sacred Seeds catalogue, shipped from Australia in 3–6 days.

Seeds are sold strictly as novelty collector’s items. They contain no THC or CBD. This page does not constitute medical or legal advice. By purchasing you agree to our terms and conditions. Always check local laws before germinating or cultivating cannabis.

Fat Bastard Strain Review — The Blimburn Original Behind 30%+ THC Done Right

Fat Bastard Strain Review — The Blimburn Original Behind 30%+ THC Done Right

Fat Bastard is a Blimburn original, and that matters more than the name suggests. Jess and I met the Blimburn team at a cannabis conference in the States a few years back and came away with a lot of respect for how seriously they approach their breeding work. These aren’t marketing-first genetics dressed up with a provocative name — the stability, the resin density, the flavour complexity all trace back to a programme that genuinely gives a damn. When we started Sacred Seeds Australia, Fat Bastard was one of the first strains we knew we wanted to stock.

The shorthand version of what this strain delivers: Goldmember crossed with Monkey Spunk, true 50/50 hybrid, 30–38% THC verified across multiple breeder lab tests. Those numbers put it among the most potent feminised photoperiod genetics available anywhere — not just in Australia. Most strains at this potency ceiling sit firmly in indica territory and hit in one direction. Fat Bastard opens with a clear euphoric rush from its sativa side before the indica weight settles in. A more complete effect arc than most of the heavy hitters at the top end of the THC range.

This article is the strain story — genetics, terpene science, effect profile, flavour, and why Australia’s climate suits Blimburn’s dry-climate breeding intentions better than most growing regions Fat Bastard ends up in. For the full grow guide — week-by-week timeline, EC targets, training approach, harvest timing — head to the Fat Bastard product page. The two pieces are designed to work together.

Fat Bastard feminised cannabis plant grown outdoors in Australian conditions — Blimburn Seeds genetics finishing under late afternoon sun

🧬 Fat Bastard Genetics — Where the Potency Comes From

The Fat Bastard cross — Goldmember × Monkey Spunk — reads like a name designed to test a customer’s commitment to the strain before they reach checkout. Look past the names and the parent genetics tell a serious story.

Goldmember is OG Kush crossed with Gold Leaf. The OG Kush half is one of the most documented and influential strains in modern cannabis breeding, contributing dense calyx structure, the unmistakable fuel and earth aroma, and the deep physical body effect that defines the indica side of Fat Bastard’s profile. Gold Leaf is a Robert Bergman creation — a hybrid bred specifically for high THC and balanced effects, contributing yield potential and resin density. Goldmember on its own is a heavy, pungent strain with serious commercial credentials. As a parent, it’s the source of Fat Bastard’s body weight and its aromatic foundation.

Monkey Spunk is Gorilla Glue #4 crossed with Lilac Diesel. GG#4 needs no introduction — Cup-winning, 25%+ THC, the strain that defined American hype genetics in the mid-2010s and remains one of the most consistently potent feminised genetics available. Lilac Diesel is the more interesting half: a complex polyhybrid bred for its terpene complexity, contributing the floral and berry undertones that lift Fat Bastard’s flavour profile out of straight Kush territory. Monkey Spunk inherits GG#4’s potency ceiling and Lilac Diesel’s terpene diversity. As a parent, it’s where Fat Bastard’s cerebral onset and complex flavour profile come from.

Crossed together: a true 50/50 hybrid that combines Kush body weight with GG#4 potency, anchored by a terpene profile neither parent quite delivers on its own. The 30–38% THC range isn’t a marketing inflation — Blimburn’s lab work is documented and consistent. What’s worth understanding is that hitting the upper end of that range requires the genetics to express fully, which means real growing skill and conditions that suit the strain. Most home grows land in the 24–30% range, which is still extraordinary. The 38% ceiling is what’s possible, not what’s typical.

The Terpene Science Behind the Fat Bastard High

Fat Bastard’s dominant terpene is caryophyllene — and this matters more than most growers realise. Caryophyllene is the only terpene currently understood to directly bind to cannabinoid receptors, specifically CB2 receptors in the peripheral nervous system. CB2 activation is what produces the body-relaxing, anti-inflammatory component of Fat Bastard’s effect profile, and it’s part of why the strain’s body weight feels different from a pure myrcene-driven indica. The peppery, spicy note on the exhale is caryophyllene announcing itself directly.

Myrcene — the secondary terpene — does the work most casual cannabis users credit to THC alone. Research indicates myrcene enhances the permeability of biological membranes including the blood-brain barrier, which facilitates faster and more complete cannabinoid uptake. In practical terms: at equivalent THC percentages, a myrcene-rich strain like Fat Bastard hits harder and faster than a strain with a different terpene profile. This is why Fat Bastard’s 30%+ THC numbers feel like 30%+ THC numbers — the terpene profile is amplifying delivery, not just contributing flavour.

Humulene — the tertiary terpene — is responsible for the woody, hoppy character (the same terpene prominent in many craft beers and a major component of cannabis’s relationship with hop genetics). What makes humulene interesting in Fat Bastard’s profile is that it’s been demonstrated to have appetite-suppressing properties, which is unusual for a high-THC strain. The combination is part of why experienced users describe Fat Bastard’s effect as “heavy without the munchies hangover” — humulene is doing real work in modulating the appetite response that high-THC strains usually trigger.

Fat Bastard feminised cannabis cola showing dense bud structure and resin coverage characteristic of Blimburn's Goldmember × Monkey Spunk genetics

🌍 Fat Bastard — Five Things Most Growers Don’t Know

The strain has been on the market long enough now that grower communities have built up a body of practical knowledge that doesn’t make it into seed bank descriptions. These are the details worth knowing before you commit.

1. The 50/50 split actually behaves like a 50/50 split. Most strains marketed as “balanced hybrids” lean clearly one way once you know what you’re looking for. Fat Bastard genuinely doesn’t. The growth pattern shows it — more branching activity than a pure indica, tighter internodal spacing than a pure sativa, a canopy that responds to training without the structural quirks of either parent type. The effect shows it too. The cerebral onset isn’t a brief sativa note before the indica takes over — it’s a sustained component that runs alongside the body relaxation through the entire experience.

2. The name is honest in a way most strain names aren’t. Fat Bastard is a Blimburn original, and the breeder team chose the name deliberately to reference both the dense, weighty bud structure and the unapologetic potency. Most modern strain names lean toward dessert imagery and aspirational marketing language. Fat Bastard goes the other direction — and the strain’s commercial success despite the name is a quiet endorsement of what it actually delivers. Customers don’t keep buying a strain on its name alone.

3. It’s one of the best concentrate strains in the catalogue. The trichome density on properly grown Fat Bastard is exceptional even by 30%+ THC standards. The trichome heads are large and well-formed, the stalks are robust, and the resin remains stable through extraction. Hash makers working with the strain consistently report excellent rosin returns and a flavour profile that translates well to concentrates — the caryophyllene and humulene profile holds up through extraction better than more volatile terpene profiles. Scissor hash at trim alone is significant.

4. Anthocyanin expression is pheno-dependent. A subset of Fat Bastard phenotypes will produce purple hues in the buds and leaves during late flower if exposed to a deliberate temperature differential — daytime around 20–22°C, nighttime dropping to 14–16°C. This isn’t every plant. The genetics carry the anthocyanin pathway through the OG Kush lineage, but expression depends on the specific phenotype. Don’t expect every Fat Bastard plant to purple up. Roughly one in three to one in four phenotypes in our experience expresses noticeable colour shift under the right conditions.

5. Australia’s dry climate is closer to its breeding intent than Europe’s. Blimburn classify Fat Bastard as a dry-climate strain, and that classification is meaningful rather than throwaway. The dense bud structure is high-risk in humid conditions — botrytis establishes at the cola’s core before becoming visible on the surface, and once established it spreads fast. Most outdoor Fat Bastard grows in northern Europe finish under conditions the strain wasn’t bred for. Inland temperate Australia, semi-arid South Australia, much of Western Australia — these regions actually match the dry-finish conditions the breeder programme was selecting for.

🧠 Fat Bastard Effects — What to Actually Expect

Onset (5–15 minutes): Faster than the THC numbers alone would suggest, and that’s the myrcene profile doing its work. The first signal is cerebral — a clean, expansive lift that arrives without the racing edge that pure sativas can carry. Within fifteen minutes the cerebral component is fully present and the body relaxation is beginning to layer in underneath.

Early phase (15–45 minutes): The 50/50 split establishes itself fully. Mood is elevated, conversation flows easily, focus sharpens on whatever you direct it toward. The body relaxation is present but not dominant yet — the cerebral effect is still leading. At moderate doses this is the most functional window. Inexperienced users should pay attention here: at 30%+ THC the effect is genuinely present, and “feeling fine” at the 30-minute mark is not a signal to consume more.

Mid-phase (45–90 minutes): This is where Fat Bastard’s full character expresses. The body weight from the OG Kush lineage settles in fully, the cerebral effect deepens rather than fades, and experienced users find this the most interesting window. Less experienced users at higher doses will find the couch firmly in play. The duration is longer than most high-THC strains — the indica genetics aren’t producing a sharp peak followed by a crash, they’re producing a sustained plateau.

Late phase (90–180+ minutes): The transition is gradual. Cerebral activity fades first, body relaxation persists longer, and the comedown is unusually smooth for a strain at this potency. Appetite increases — though humulene moderates this more than most high-THC strains. No notable crash. The duration at typical doses is genuinely 3–4 hours, longer at higher doses.

Potency note: 30–38% THC with this terpene profile is not equivalent to 30% THC with a different terpene profile. The myrcene amplification means Fat Bastard hits noticeably harder than the raw percentage suggests. Newer consumers should approach with serious respect — start with a fraction of what you’d normally use and wait the full 30 minutes before considering more. This is one of the strongest strains in our catalogue. Treat it accordingly.

Fat Bastard Flavour Profile — What the Cure Develops

Open a jar of properly cured Fat Bastard and the room knows about it. The dominant note is fruity-skunk — exotic fruit on the front end, a sweet pungent skunk character beneath, with a distinctive fuel quality on the exhale that signals the resin density. The flavour develops significantly during the cure — fresh-harvested material reads as one-dimensional skunk with a fuel edge. Six weeks in glass and the complexity opens up.

On the inhale: fruity and pungent, with the OG Kush earthiness sitting beneath the brighter Lilac Diesel-derived fruit notes. Caryophyllene contributes a peppery edge that’s most noticeable on the back of the tongue. On the exhale: fuel-forward, the GG#4 lineage announcing itself, fading into a clean finish that doesn’t linger uncomfortably.

Some phenotypes express berry or grape undertones in the final two weeks if they’ve seen cooler late-flower temperatures — the same anthocyanin response that triggers purple expression also tends to deepen the flavour profile. Not every plant. The phenotypes that purple up are usually the ones that develop the most complex final flavour. A proper cure is non-negotiable with this strain — pulled at two weeks, you’re not experiencing what Fat Bastard is actually capable of.

🌏 The Australian Angle — Why This Strain Suits This Country

Blimburn’s dry-climate classification for Fat Bastard maps onto Australian growing regions better than it maps onto most of the European and North American markets the strain is sold into. The genetics were selected under Mediterranean and dry-continental conditions — long warm seasons, dry finishes, low ambient humidity through the back end of flower. Inland New South Wales, Victoria’s drier zones, most of South Australia, and much of Western Australia genuinely match those conditions.

The dense bud structure that makes Fat Bastard a high-risk strain in humid northern European autumns becomes an asset in dry Australian autumns. Resin development holds, terpene complexity expresses, and the botrytis pressure that forces European outdoor growers to compromise on harvest timing simply isn’t the same constraint here. Coastal subtropical growers — northern NSW, Queensland, the wetter parts of WA’s southwest — can absolutely work with the strain, but site selection for airflow becomes more critical than sun exposure. Inland and arid growers have it easier with this one than they realise.

The other Australian advantage is the autumn temperature differential in the southern states. Cool nights through April in Victoria, Tasmania, and the Adelaide Hills trigger the anthocyanin response in receptive phenotypes more reliably than the milder European autumns the strain was originally photographed under. Some of the most visually striking Fat Bastard grows we’ve seen have come out of southern Australian outdoor seasons.

Ready to Grow Fat Bastard?

The complete grow guide — week-by-week timeline, EC targets, training approach, climate management, and harvest timing — is on the product pages.

Fat Bastard Feminised Seeds →  |  Auto Fat Bastard Feminised Seeds →


❓ Frequently Asked Questions — Fat Bastard

What is Fat Bastard?

Fat Bastard is a Blimburn Seeds original — a true 50/50 hybrid bred from Goldmember (OG Kush × Gold Leaf) and Monkey Spunk (Gorilla Glue #4 × Lilac Diesel). It carries verified THC of 30–38%, putting it among the most potent feminised photoperiod strains available. The terpene profile is caryophyllene-dominant with significant myrcene and humulene contributions, producing a balanced cerebral and physical effect rather than the one-directional couchlock typical of most strains at this potency level.

Where does Fat Bastard come from?

Fat Bastard is a Blimburn Seeds original. Blimburn is a Spanish-American breeding house with a serious reputation for stable, well-documented genetics rather than marketing-led releases. The Goldmember × Monkey Spunk cross was developed specifically to combine OG Kush body weight with GG#4 potency on a 50/50 sativa/indica framework — a more complete effect arc than most heavy-hitting indica strains deliver.

What does Fat Bastard taste and smell like?

Dominant fruity-skunk on the front, with a distinctive fuel quality on the exhale that signals the resin density. Caryophyllene adds a peppery, spicy note. The flavour profile develops significantly during the cure — fresh-harvested material reads as one-dimensional. Six weeks in glass opens up the complexity. Some phenotypes express berry or grape undertones if exposed to cooler late-flower temperatures.

How potent is Fat Bastard really?

Verified 30–38% THC across Blimburn’s lab analysis. The 38% ceiling is what’s achievable under optimal conditions, not what’s typical — most home grows land in the 24–30% range, which is still extraordinary. The myrcene-enhanced terpene profile means Fat Bastard hits harder than the raw percentage suggests. New consumers should treat this strain with serious respect.

Is Fat Bastard good for outdoor growing in Australia?

Australia’s dry climate suits Fat Bastard’s breeding intent better than most of the European and North American markets where it’s typically grown. Inland New South Wales, Victoria, South Australia, and most of Western Australia provide the dry-finish conditions the strain was selected under. Coastal subtropical regions can work with it but require careful site selection for airflow. Southern Australian autumns also trigger anthocyanin response (purple expression) in receptive phenotypes more reliably than European conditions.

How does Fat Bastard compare to the auto version?

The Auto Fat Bastard delivers the same Blimburn genetic foundation on a fixed 56–70 day timeline with no light flip required. The trade-offs are lower THC (typically 20–25% rather than 30%+), reduced terpene intensity, and significantly smaller yields. The auto is a strong choice when the photoperiod timeline isn’t workable. For the full Fat Bastard expression, the feminised photoperiod is the definitive version.

Why is Fat Bastard one of Sacred Seeds’ top strains?

Three things. The breeder credibility — Blimburn’s lab documentation backs the THC claims, which most breeders can’t say honestly. The terpene profile — caryophyllene-dominant rather than the more common limonene or myrcene leads, which produces a genuinely different effect from most high-THC strains. And the 50/50 hybrid balance — most strains at this potency are pure indica, and the cerebral component Fat Bastard retains makes it more versatile than its potency would suggest.

Where can I buy Fat Bastard seeds in Australia?

Sacred Seeds Australia stocks both Fat Bastard Feminised Seeds and Auto Fat Bastard Feminised Seeds, with express Australian shipping and batch-tested seed quality. Sold strictly as novelty collector’s items in accordance with local laws.

When to Harvest Cannabis in Australia: Reading Your Plant’s Signals (Not Just Trichomes)

When to Harvest Cannabis in Australia: Reading Your Plant’s Signals (Not Just Trichomes)

The most persistent piece of harvest advice in cannabis is wrong, and it’s costing growers potency every single run.

“Wait for 30% amber trichomes.” You’ve probably read it a dozen times across forums, YouTube comments, and grow guides that all cite each other. The problem is that amber trichomes don’t signal ripeness. They signal that THC has already begun degrading into CBN — a sedative cannabinoid with significantly lower psychoactive potency. By the time you’re at 30% amber across the plant, roughly 30% of your THC is gone. You grew it, you just didn’t keep it.

I spent years watching experienced growers follow this advice and wonder why their harvests felt flat. Once I understood the actual biochemistry — and started harvesting accordingly — the difference was immediate and consistent. That’s what this guide covers: how to read what your plant is actually telling you, not what the forums think it’s saying.

Cannabis trichomes showing clear, cloudy, and amber stages for harvest timing

What Trichome Colour Actually Tells You

Trichomes progress through three distinct phases. Only one of them represents peak harvest quality — and it’s not the one most guides tell you to wait for.

Clear or transparent trichomes mean cannabinoids are still developing. Buds harvested here taste weak, feel racy, and often trigger anxiety. You’re not even close.

Cloudy or milky white trichomes indicate peak THC. The cannabinoid profile is complete, terpenes are at full expression, and the effect is potent and clear-headed. This is your target window.

Amber trichomes mean THC is actively degrading into CBN. The effect becomes heavier and more sedative — which suits some applications — but past 30% amber you’re not harvesting at peak, you’re harvesting past it. That’s a choice, not a recommendation.

The harvest window: 70–90% cloudy trichomes, with the remainder still clear or just beginning to shift. Check the bud calyxes directly — not the sugar leaves, which mature 5–7 days earlier and will send you to the scissors too soon.

Trichome colour

Cannabinoid status

Effect profile

Harvest call

Clear

Immature

Weak, racy, anxious

Too early — wait

Cloudy/milky (70–90%)

Peak THC

Potent, clear-headed

Optimal window

Amber (10–30%)

THC degrading to CBN

Heavier, more sedative

Personal preference only

Amber (50%+)

Significant THC loss

Heavy sedation, reduced potency

Too late — quality gone

On equipment: a 60x jeweller’s loupe does the job for around $15. A USB digital microscope is worth the $40 if you grow regularly — the image clarity removes all doubt. A phone camera in macro mode can work in good light but struggles with the clear-to-cloudy distinction. You’ll second-guess yourself every time, which usually means waiting too long.

One note on sedative effects: if you’re growing specifically for sleep or pain management, pushing to 20–30% amber is a legitimate call. Just understand the trade-off — you’re exchanging THC potency for CBN sedation. There’s no free lunch in cannabis chemistry.

Comparison of clear cloudy and amber cannabis trichomes for harvest readiness

The Five Signals to Read Together

Trichome colour is the most precise indicator, but reading it in isolation causes mistakes. A plant can show 80% cloudy trichomes and still not be ready. These are the five signals I check simultaneously — and all five need to align before I cut.

1. Trichome colour and density

Covered above, but density matters alongside colour. Trichome heads should be swollen and mushroom-shaped. Flat or deflated heads on an otherwise cloudy plant mean the buds need more time — the structure isn’t there yet even if the colour is. Check multiple bud sites at different heights. Top colas mature faster than lower growth, sometimes by a full week.

2. Pistil colour and recession

Pistils — the hair-like structures covering the buds — shift from white to orange or brown as the plant matures, then pull back into the bud. This is your macro-level read, visible without a loupe.

At 50–60% brown pistils, the plant is still building. At 70–80% brown, start checking trichomes closely — you’re entering the window. At 90% brown, don’t wait much longer.

Colour alone isn’t enough. Pistils should also be receding into the bud. If 80% have turned brown but are still protruding outward, the calyxes are still swelling. Give it a few more days.

3. Bud structure and the final swell

In the last week or two before harvest, buds put on a noticeable final swell — 10–20% additional mass as the calyxes stack and fill in. Mature buds feel dense and firm when gently squeezed, not airy or spongy. If you’re still seeing new white pistils emerging, growth hasn’t finished.

This is where patience directly translates to yield. Harvesting before the final swell completes is one of the most common ways growers leave weight on the plant.

4. Breeder’s flowering time

Breeder estimates tell you when to start looking, not when to harvest. Start checking trichomes about a week before the minimum stated flowering time. Expect the actual harvest to fall somewhere in the middle of the stated range — sativa-dominant strains often run a week or two beyond breeder estimates, while indica-dominant strains are generally more accurate.

For bag seed or unknown genetics, you don’t have this reference point. It’s one of the practical reasons documented genetics from a reputable source are worth the investment.

5. Leaf fade

In the final weeks, fan leaves naturally yellow and drop as the plant redirects remaining nutrients into the buds. Lower leaves go first, progressing upward. This is healthy — it means the plant is finishing rather than continuing to grow.

Sudden yellowing across the whole plant is a different problem entirely. Gradual fade from the bottom up is what you want to see.

If you’re still running nitrogen-heavy nutrients at this stage, you’ll delay the fade and risk harsh-tasting buds. Stop nitrogen-heavy feeds two to three weeks before expected harvest.

Harvesting in Australia: What Changes

Growing outdoors in Australia adds a variable that most cannabis guides — written for Northern Hemisphere growers — don’t account for: autumn rain arriving before the crop is ready.

Late February through April is when most outdoor harvests happen on the east coast. It’s also when humidity and extended rain events create serious bud rot risk. The decision calculus shifts. A plant at 65% cloudy trichomes with 75% brown pistils and three days of solid rain incoming is a fundamentally different situation to the same plant with a clear fortnight ahead.

My general rule: if sustained rain — three or more consecutive days — is forecast and the plant is past 60% cloudy with pistils mostly brown, harvest before it arrives. You’ll sacrifice some potency relative to peak harvest, but that’s recoverable through careful drying and curing. Bud rot at harvest is not.

Regional timing to plan around

Queensland and northern NSW growers should treat mid-April as a hard deadline for outdoor harvests — earlier in wet years. Victoria and Tasmania growers often need to be done by late March to stay ahead of the weather. WA’s drier climate gives more flexibility, but coastal humidity in the southwest still requires attention in late autumn.

Strain selection for outdoor Australian grows

You’re best off reading this full guide to growing in Australia. But Autoflowering indica strains  (7–8 week flower time) and Fast Version strains are great outdoor choices if you have a limited grow window — they’re done before the worst of the autumn rain window. Sativa-dominant strains with 10–12 week flowering times are a genuine gamble outdoors in most of Australia and are best reserved for greenhouse or indoor grows. Autoflowers offer a clean solution: planted in October or November, they finish well before the high-humidity period arrives.

Australian summer heat and false amber

Temperatures above 35°C can cause premature trichome ambering on exposed top colas. This is heat stress, not ripeness. If top colas are showing heavy amber while mid-plant buds still look cloudy and white, read the middle of the plant. That’s your actual harvest indicator.

The Decision Framework

When I’m standing in front of a plant making the call, this is the sequence I run through. Work through it in order — if a step says wait, wait.

  1. Flowering time check. Are we within the breeder’s stated range? If we’re more than a week short of the minimum, put the loupe away and come back.

  2. Pistil check. Are 70% or more brown and pulling back into the bud? If not, wait.

  3. Bud structure. Dense, firm, swollen calyxes with no new white pistils? If buds still feel light or airy, they’re not done.

  4. Trichome check across three to five bud sites at different heights. Are 70–90% cloudy on the actual bud calyxes? If yes, the window is open.

  5. Weather and preference. Rain incoming? Do you want maximum potency or more sedative effects? That determines whether you harvest today or push a few more days.

If all five align, harvest in the morning. Terpene content is highest before heat and light exposure build through the day — the difference is measurable even if it’s subtle.

The Most Costly Mistakes

Checking sugar leaves instead of buds. Worth repeating because it’s endemic. Sugar leaves mature 5–7 days ahead of bud material. Reading them sends you to harvest too soon, every time.

Harvesting the whole plant at once. Top colas and lower buds often differ by a week in maturity. Cut the tops when they’re ready, leave the lower buds for another five to seven days. Better quality across the whole plant.

The “one more week” loop. Indecision is its own mistake. Once you’re past 50% amber across the plant, THC is declining. Check your indicators, make the call, commit to it.

Misreading weather risk. A brief shower is not three days of humidity. Don’t harvest at 40% cloudy trichomes because light rain is forecast. Read the actual forecast and make a proportionate decision.

After the Harvest

Everything you’ve done to reach peak harvest quality can unravel in the first 24 hours if the transition isn’t handled carefully.

Handle branches gently — trichome heads shear off easily and don’t grow back. Get plants into a dark, temperature-controlled drying environment immediately. Don’t leave harvested material sitting in warmth or light while you finish cutting. Aim for 15–18°C and 55–60% relative humidity with steady airflow, targeting a 10–14 day dry. The slow dry is not optional — it’s where terpene complexity develops and chlorophyll breaks down. Rushing it is how months of careful growing produces a mediocre smoke.

The full drying and curing process has its own guide. Read it before you hang your first branch.

Growing next season? Start with genetics you can time.

Documented flowering times, stable genetics, discreet shipping across Australia.

Browse cannabis seeds Australia →

Cannabis plant showing harvest signals including brown pistils dense buds and leaf fade

Frequently Asked Questions

Can I harvest different parts of the plant at different times?

Yes, and for most plants it produces better results than a single harvest. Top colas receive more light and mature faster. Cut them when trichomes are 80% cloudy, then give lower buds another five to seven days. Keep watering the plant until the final cut.

What if trichomes look ready but pistils are still 50% white?

Wait. This usually means the plant experienced some stress — heat, nutrients, or water — that accelerated trichome development while bud growth stalled. Check again in five to seven days. Pistils should catch up.

Do autoflowers follow the same harvest indicators?

The same indicators apply but the timeline is compressed. Start checking at week seven from seed. The harvest window on autos is narrower — three to five days rather than a week or more — so once you’re close, check daily.

What if I’m forced to harvest early due to weather?

At 60–70% cloudy trichomes you’re looking at roughly 10–15% less potency than peak, and the effect will be slightly more cerebral and less full-bodied. It’s not ideal, but it’s far better than losing the crop to bud rot. Prioritise a slow, careful dry to preserve what’s there.

When is the best time of day to harvest?

Early morning — just after lights on indoors, or just after sunrise outdoors. Terpenes are volatile and evaporate through the day with heat and light exposure. The difference is subtle but consistent.

Should I flush before harvest and does it affect timing?

Start flushing with plain pH-balanced water when trichomes are 50–60% cloudy. That gives you one to two weeks to flush while the plant finishes. Waiting until trichomes are 90% cloudy before you start means you’ll be forced to harvest before the flush is complete.

How do I know which strains finish fastest outdoors in Australia?

Documented genetics with verified flowering times are the most reliable guide. Indica-dominant strains in the 7–9 week range are your safest outdoor bet for beating the autumn rain window. Browse our range of cannabis seeds Australia — all strains include breeder-verified flowering time data.