When to Start Feeding Cannabis Seedlings

When to Start Feeding Cannabis Seedlings

The most consistent mistake I see from growers who’ve had reasonable success elsewhere — in the veggie garden, with other plants, even with cannabis at the later stages — is feeding cannabis seedlings too early. It’s not laziness or carelessness. It usually comes from a logical place: the plant is growing, nutrients help plants grow, so nutrients should help now. That logic breaks down completely at the seedling stage, and understanding why is the whole point of this article.

A cannabis seedling in its first two to three weeks has almost no root mass. What’s down there is a taproot and the earliest hints of lateral branching — a structure with very limited surface area for uptake and almost no capacity to buffer excess salt. When you feed that plant, most of what you’re putting in sits in the medium and accumulates. The seedling can’t flush it, can’t process it, and can’t grow through it. It just sits there building salinity until the symptoms show up on the leaves.

The good news is that a seedling in a properly prepared medium doesn’t need anything from you for the first two to three weeks. What a good seedling medium provides is covered in the soil guide. Your job in that window is to water correctly, maintain stable temperature and humidity, and watch — not feed.

What Good Seedling Medium Already Provides

If you’re running coco coir that’s been properly buffered with a Cal-Mag solution before use, the cation exchange sites are saturated — the coco isn’t going to rob calcium and magnesium from your seedling before it can access them. That’s all you need at this stage. The seedling isn’t asking for nitrogen, phosphorus, or potassium in week one. It’s asking for stable moisture, oxygen at the root zone, and light.

If you’re using a quality organic seedling mix or a light cannabis-specific base soil, there’s typically enough slow-releasing organic matter present to carry the plant comfortably through weeks one and two without any additions. The EC of good seedling medium — if you test a slurry sample — should read 0.5–0.8. That’s a small but real amount of available nutrition. It’s exactly what the plant needs at that stage and not significantly more.

Where growers run into trouble is using a potting mix that reads 1.5–2.0 EC in a slurry test and then adding nutrients on top of it. The medium is already hot by seedling standards, and anything added on top pushes it into territory where tip burn is essentially guaranteed within the first two weeks. Check your medium before you germinate. It saves a lot of headaches later.

The Trigger — When the Plant Is Ready

I don’t use days as the trigger for first feed. I use the plant. The indicator I watch for is the third node — the third pair of true leaves developing clearly — combined with a root system that’s visibly active. In coco you can sometimes see the first roots at the drainage holes by this point. In soil it’s less visible, but the medium drying down at a reasonable rate (rather than staying wet for days) tells you the roots are working.

In practice this usually falls somewhere between days 14 and 21 from germination, but I’ve seen it as late as day 28 in slower-developing phenotypes or cooler environments. The calendar is a rough guide. The plant is the actual benchmark.

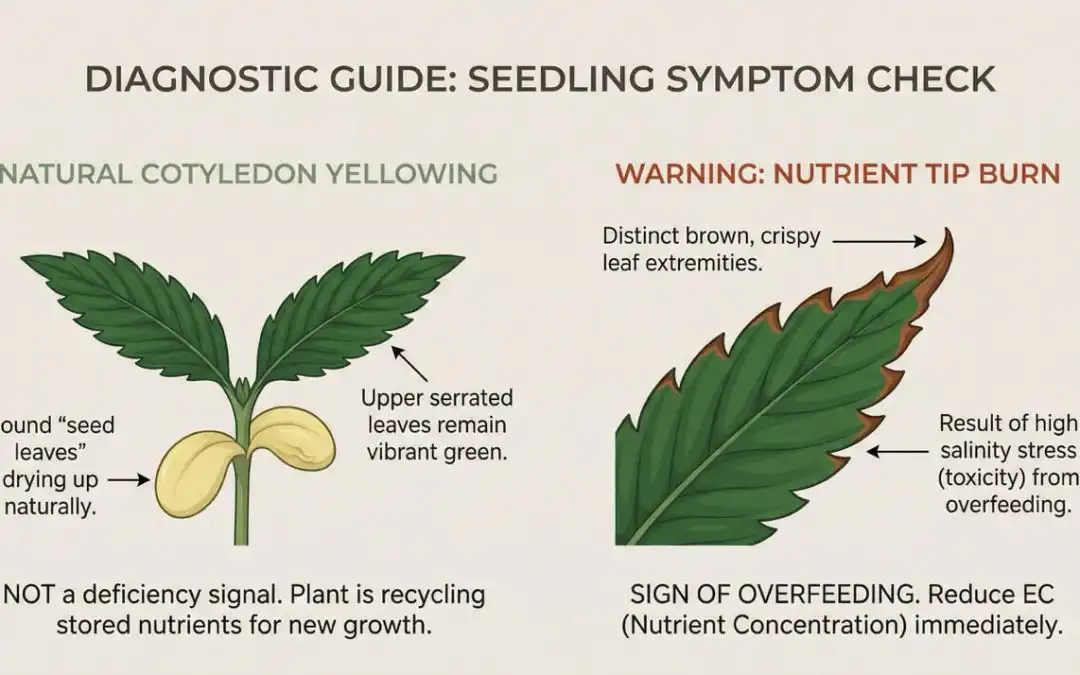
A useful secondary check before the first feed: look at the cotyledons — the round first leaves that emerge with the seedling. In a healthy seedling with no nutrient needs, they’ll be pale green and beginning to yellow naturally as the plant draws on them and moves nutrients upward. That natural yellowing of cotyledons is not a deficiency signal — it’s the plant doing exactly what it should. If the cotyledons are yellowing heavily and the true leaves are also pale or showing symptoms, that’s a different situation and worth investigating before feeding.

Diagram showing cannabis seedling development from cotyledons through to node 3 — the third node with roots visible at drainage holes is the trigger for first feed

What to Start With — and What EC to Target

My preference for first feeds is a biostimulant or organic liquid before anything resembling a standard nutrient solution. Seasol — the straight seaweed extract, not the Seasol PowerFeed blend — at well below label rate is something most Australian growers already have on hand and it’s a genuinely good first feed for seedlings. It introduces beneficial compounds and gentle root stimulation without the salt load of a conventional nutrient feed. If you’re running a purpose-built organic line through the whole grow — Aptus, Gaia Green, Dr Greenthumbs — follow the seedling rate on the product and halve it for the first application.

For growers who want to stay in the Bunnings ecosystem entirely, Nitrosol at 1ml per litre is a well-tested starting point that Australian growers have used for years. It’s a fish and kelp liquid fertiliser — organic, low salt, and forgiving enough that it won’t burn a seedling at that dilution. Switch to PowerFeed (the red bottle) once the plant is in early flower. It’s not sophisticated, but it works, and that’s worth saying plainly.

EC targets: First feed should land at 0.4–0.6 EC in the final solution going in. That’s well below what most nutrient calculators recommend for “seedling stage” — and deliberately so. You’re not trying to push growth at this point, you’re introducing the root system to the concept of nutrient solution without stressing it. By the end of week three, building toward 0.8–1.0 EC is reasonable as the plant establishes. Don’t chase the numbers on the nutrient label — those are written for established plants, not seedlings.

One practical note: always pH your feed solution after adding nutrients, not before. Nutrient additions change pH, sometimes significantly. Target 6.2 at the point of application for soil and coco grows. Why 6.2 and how to hit it consistently is explained in the seedling soil guide.

What Overfeeding Looks Like — and Why It’s Easy to Miss Early

The first sign of overfeeding in a cannabis seedling is tip burn — the very tips of the serrated leaf edges turn brown and curl slightly. It looks minor. Most growers see it and assume it’s a one-off or a handling mark. It isn’t. Tip burn on a seedling is the plant telling you the salt concentration at the root zone is higher than it can manage, and the damage is being expressed at the extremity of the leaf where water delivery is weakest.
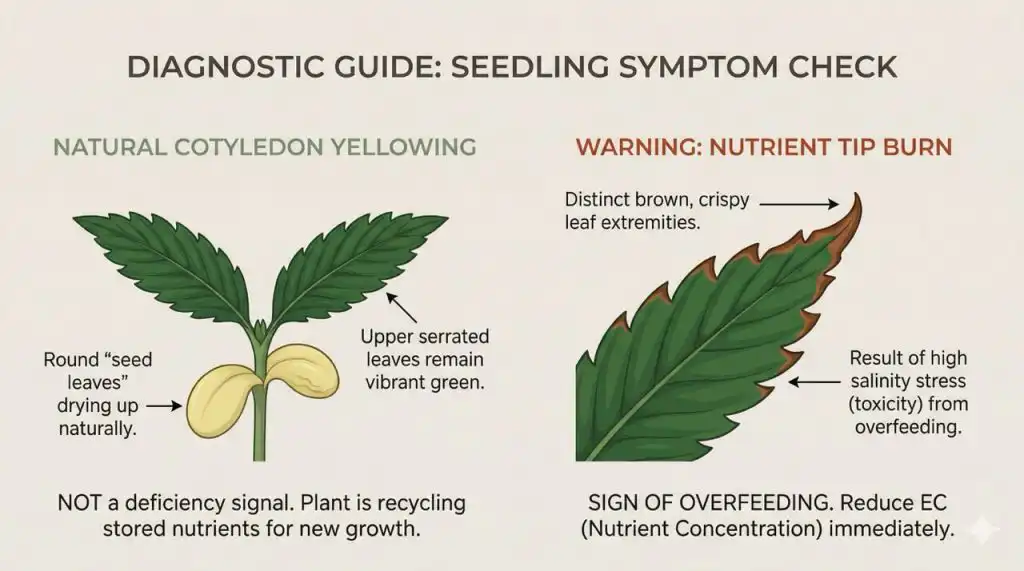
Diagnostic guide comparing natural cotyledon yellowing versus nutrient tip burn in cannabis seedlings — cotyledon yellowing is normal, brown crispy leaf tips indicate overfeeding

The instinct when you see tip burn is sometimes to water more, thinking the plant is dry. In an overfed seedling this makes it worse — you’re adding more solution to a root zone that’s already carrying excess salt. The correct response is to water with plain pH-adjusted water for the next one or two waterings and let the root zone flush through naturally before reintroducing nutrients at a lower rate.

Beyond tip burn, other overfeeding symptoms that show up slightly later include: leaf edges cupping downward (a classic sign of nitrogen toxicity — the leaf is trying to reduce surface area exposed to excess nutrient uptake), deep, almost blue-green colouration in the leaves (again, nitrogen excess), and in more severe cases, leaf clawing where the tips hook downward sharply. By the time you’re seeing clawing in a seedling, the root zone has been under significant salt stress for a while and recovery will take time the plant — particularly an auto — doesn’t have.

What makes early overfeeding easy to miss is that the plant often looks healthy for a few days after the damage is done. The tip burn appears 3–5 days after the overfeed event, not immediately. Growers who feed on a schedule sometimes don’t connect the symptom to the feed because there’s a delay between cause and effect. This is why watching the plant — rather than following a fixed feeding schedule — matters at this stage.

Autoflowers — Why the Feeding Rules Are Stricter

Everything above applies to both autoflowering and photoperiod seedlings, but the stakes are higher for autos. A photoperiod plant that gets overfed in week two loses time recovering — you can hold it in veg while it rights itself and the overall impact on the final plant is manageable. An auto that gets overfed in week two loses days from a fixed timeline it cannot extend. The damage carries through to harvest.

For autoflowering seeds specifically, I’d push the no-feed window to three full weeks rather than two, and I’d start even lower — 0.3–0.4 EC for the first application, building slowly. The genetics that carry through in auto crosses — OG, Cookies, Haze — tend to carry the nutrient sensitivity of their photoperiod parents alongside the ruderalis autoflowering trait. An Auto OG or Auto GSC will show tip burn from overfeeding just as readily as the photoperiod version, and it has less time to recover.

The growers who do best with autos in the seedling stage are the ones who understand that restraint at this point isn’t timid growing — it’s the setup for everything that follows. A seedling with an undisturbed, healthy root system entering week three is in a fundamentally better position than one that spent its first two weeks fighting salt stress.

Building From the First Feed

Once you’ve introduced the first feed at 0.4–0.6 EC and the plant has responded well — no tip burn, continued new leaf development, healthy colour — you build from there. Week three to four: 0.8–1.0 EC. Week four into early veg: 1.0–1.2 EC. These are gradual steps, not jumps. Each increment gives the root system time to adapt before the next increase.

Watch the tips at every stage. They’re the early warning system. A bit of tip discolouration tells you to hold the current EC rather than increase it. Clear, clean leaf edges tell you the plant is handling what it’s receiving. That feedback loop — feed, observe, adjust — is how experienced growers dial in a feeding programme. Not by following the nutrient label, and not by guessing.

How you feed connects directly to the containers you’re running and whether you’ve transplanted. The container sizing and transplanting guide covers how medium volume and root development affect feeding readiness. A seedling that’s just been transplanted needs a hold on nutrients for 5–7 days regardless of where it was in the feeding cycle — the root system needs to re-establish before it can process anything.

The full range of cannabis seeds available from Sacred Seeds Australia spans genetics with varying nutrient sensitivities — from robust ruderalis-heavy autos to finicky OG and Haze crosses. Whichever you’re running, the seedling feeding principles are the same. Start later than you think you need to, start lower than the label suggests, and let the plant tell you when to move forward.


Frequently Asked Questions — Feeding Cannabis Seedlings

When should I start feeding cannabis seedlings?

When the third node is clearly developing — the third pair of true leaves showing — and the root system is visibly active. In practice this is usually days 14–21 from germination, but the plant is the benchmark rather than the calendar. A seedling in good medium doesn’t need nutrients before this point and overfeeding early causes more damage than holding off does.

What EC should I use for the first feed?

0.4–0.6 EC in the final solution. That’s deliberately conservative — below most nutrient label recommendations for seedling stage, which are written for established plants. The goal at first feed is to introduce the root system to nutrient solution without stressing it. Build toward 0.8–1.0 EC by the end of week three as the plant establishes, then continue increasing gradually from there.

What nutrients should I use for cannabis seedlings?

A biostimulant or dilute organic liquid before anything resembling a full nutrient feed. Seasol (straight seaweed extract, not PowerFeed) at well below label rate is a solid starting point that’s widely available in Australia. If you’re running a full organic programme — Aptus, Gaia Green, Dr Greenthumbs — halve the seedling rate for the first application. For growers sticking to Bunnings products, Nitrosol at 1ml per litre is a proven low-risk starting feed. Start conservative regardless of the line you’re running.

What does overfeeding a cannabis seedling look like?

Tip burn first — the very tips of the leaf edges browning and curling slightly, appearing 3–5 days after the overfeed event. Later signs include leaves cupping downward, deep blue-green colouration indicating nitrogen excess, and in severe cases, leaf clawing where tips hook sharply downward. If you see tip burn, water with plain pH-adjusted water for the next couple of sessions before reintroducing nutrients at a lower rate.

Do cannabis seedlings need Cal-Mag?

Not as a nutrient feed, but as a buffer if you’re using raw coco coir. Coco has a natural affinity for calcium and magnesium — it will pull them from your feed water and bind them before the plant can access them unless the cation exchange sites are pre-saturated. Buffer raw coco with a Cal-Mag solution before use (water through to runoff, wait 30 minutes, water through again) and this issue is resolved. Pre-treated coco from quality brands handles this before bagging. In soil, Cal-Mag supplementation at the seedling stage is rarely needed unless you’re using reverse osmosis water with no mineral content.

Should I feed autoflower seedlings differently to photoperiod seedlings?

Same principles, stricter application. The no-feed window for autos should extend to three full weeks rather than two, and the first feed EC should start at 0.3–0.4 rather than 0.4–0.6. Autoflowers have a fixed timeline — damage done in week two carries to harvest without a recovery window. Many popular auto genetics also carry the nutrient sensitivity of their photoperiod parents. An Auto OG or Auto GSC will show tip burn from overfeeding as readily as the full photoperiod version, with less time to recover from it.

Why do my seedling leaves look yellow even though I haven’t fed yet?

Check which leaves are yellowing. Natural yellowing of the cotyledons — the round first leaves — is normal and expected. The plant is drawing the nutrition stored in them upward as it develops true leaves, and they’ll yellow and drop off in the first two to three weeks. This is not a deficiency. If the true leaves — the serrated ones that develop after the cotyledons — are yellowing or pale, that’s a different issue and worth investigating: check pH, check medium EC, and check watering frequency before reaching for a nutrient bottle.

How quickly should I increase EC after the first feed?

Gradually, over one to two weeks. First feed at 0.4–0.6 EC, then build toward 0.8–1.0 EC by the end of week three, and 1.0–1.2 EC into early veg. Watch the leaf tips at each stage — they’re the most reliable indicator of whether the plant is handling the current level. Any tip discolouration means hold the current EC rather than increasing. Clean, crisp leaf edges mean you can move forward. Never jump EC based on the calendar alone.

What Soil to Use for Cannabis Seedlings

What Soil to Use for Cannabis Seedlings

The seedling stage is where more grows go wrong than at any other point, and most of the damage happens before the seed even germinates. Growers spend money on good genetics, get the germination right, and then pot into whatever mix they have on hand — often something too rich, too dense, or too wet-retaining for a seedling that has no root mass yet to draw on. I’ve seen it enough times to know it’s worth writing about properly.

This covers what I use, what the seedling actually needs in its first few weeks, and what to avoid. Whether you’re running autoflowering seeds or photoperiods, the seedling stage requirements are the same — but for auto growers especially, getting the medium right from the start matters more, because there’s no recovery window if something goes wrong in week one.

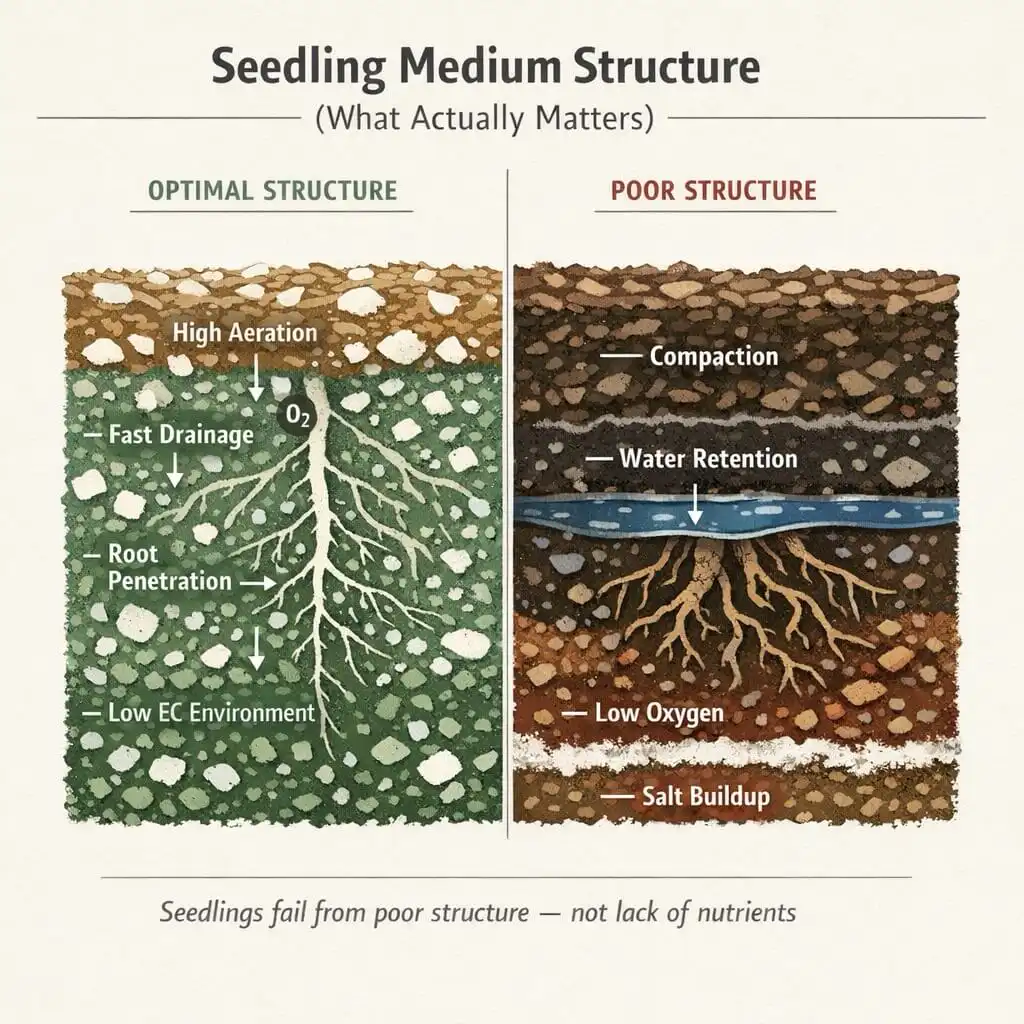
Cross-section diagram comparing optimal vs poor cannabis seedling medium structure — aeration, drainage, root penetration, salt buildup

What a Cannabis Seedling Actually Needs From Its Medium

A seedling’s root system is minimal for the first two to three weeks. It cannot access nutrients the way a mature plant can, and it has almost no tolerance for salt build-up. What it needs from a growing medium is not nutrition — it’s structure. Specifically: good drainage so water moves through rather than sitting, aeration so the roots can access oxygen, and a light enough texture that the taproot can push through without resistance.

The nutrition comes later. The soil or coco mix you start in should provide almost nothing in the way of available nutrients. A seedling in a rich, hot mix will show tip burn and early nitrogen toxicity before it has its third set of leaves. Correcting that in an auto is difficult. Correcting it in a photoperiod costs you time. Better to start light and introduce nutrients deliberately once the plant is established.

pH sits at 6.2 for soil grows. That’s the target at the root zone, not just in the water going in. A consistent 6.2 keeps all the major and minor nutrients available without locking any out. Drift higher toward 7.0 and you start seeing iron and manganese deficiencies. Drop below 6.0 and calcium and magnesium uptake suffers. Get a decent pH pen and use it every time.

Why I Prefer Coco Coir for Seedlings

My preference for seedlings is coco coir or cocopeat — not a soil-based mix. I’ll explain why, because I know it’s not what most people start with.

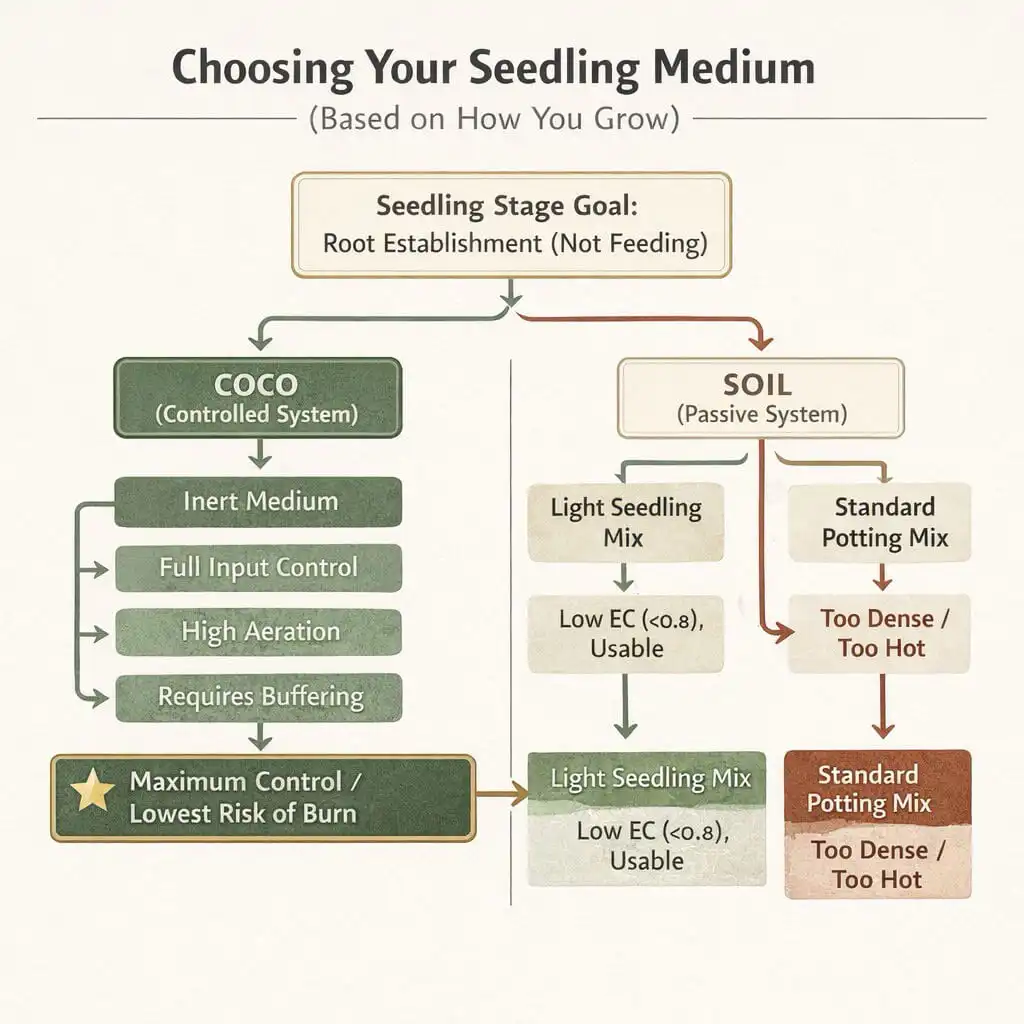
Coco is inert. It contains no nutrients of its own, which sounds like a disadvantage but is exactly what you want for seedlings. You control what goes in. There’s no guessing what the mix already contains, no risk of a hot base soil burning roots that can’t yet handle it. Coco also has a naturally high air-to-water ratio — it retains moisture well enough that you’re not watering every day, but it drains freely enough that roots aren’t sitting in saturation. For a seedling with minimal root mass, that balance is hard to beat.

The other advantage is consistency. Soil mixes vary batch to batch and brand to brand. Coco is predictable. Once you know how it behaves, you can dial in your watering and feeding routine and trust it will respond the same way every time.

What to add to coco for seedlings: Run coco at roughly 70–80% with 20–30% perlite. The perlite improves drainage and aeration further, which matters most in the seedling stage when overwatering is the biggest risk. For seedlings I go toward the higher end of perlite — 30% — and reduce it slightly for the established plant in its final container.

Pre-treating coco: If you’re using raw coco coir bricks or loose coco, rinse and buffer before use. Coco naturally contains high levels of sodium and potassium, and it has a strong cation exchange affinity for calcium and magnesium — meaning it will pull Cal-Mag out of your feed water and bind it before the plant can access it. Buffering with a Cal-Mag solution (follow the product rate, water to runoff, leave 30 minutes, water through again) saturates the cation exchange sites so they don’t rob your seedlings. Pre-treated coco from reputable brands handles this before bagging, but it’s worth knowing.

If You’re Using Soil — What to Look For

Not everyone wants to run coco, and that’s fine. Soil works well for seedlings when it’s the right mix. The key is choosing something light and airy rather than a heavy potting mix designed for vegetables or flowering plants. Standard potting mixes from hardware stores are typically too dense, too nutrient-rich, and too water-retentive for cannabis seedlings. They’re formulated to hold moisture and deliver nutrition — two things that will cause problems at the seedling stage.

What you want is something marketed as a seedling mix or propagation mix, or a quality cannabis-specific base soil. Look for perlite already in the mix, or add it yourself to bring it up to 20–30%. Peat-based mixes work, though they tend to become hydrophobic once dry — water carefully and evenly. Cocopeat-based mixes (which is essentially the same thing as coco coir in compressed form) are my preference if you’re going soil-adjacent rather than full coco.

What to avoid: Slow-release fertiliser granules in the base mix — these are common in Australian potting mixes and will overfeed seedlings regardless of what you’re adding in water. The Osmocote range at Bunnings is a good example: the seed raising mix is reasonable for seedlings, but the premium potting mixes contain slow-release fertiliser that makes them too hot at the seedling stage. Heavy, bark-based mixes that compact when wet. Anything described as “premium” or “enriched” for established plants. Water-crystals or gel additives that hold moisture.

The Scotts Osmocote seed raising mix — the plain one, not the potting mix — comes up regularly in Australian grower forums as a workable seedling medium when you’re not running full coco. It’s light, drains reasonably well, and the nutrient load is low enough for the seedling stage. Mix in 20–30% perlite and it’s a solid starting point.

A useful test before you commit to a soil: check the EC of a slurry sample (1:1 soil to pH-neutral water, stir, let settle, test the water). Seedling-appropriate soil should read 0.5–0.8 EC. Anything above 1.2 is too hot for a seedling and will cause problems within the first two weeks.

Flowchart showing how to choose cannabis seedling medium — coco coir vs soil options, EC levels and burn risk for Australian growers

Container Size and the Seedling Stage

The medium you start in and the container you start in are related decisions. Getting both right is covered in the companion guide to container sizing and transplanting. For now, the short version: seedlings do not benefit from large volumes of medium. A small container — 0.5 to 1 litre — dries out at a rate the seedling can manage, which makes overwatering much less likely. A seedling in a 10-litre pot of coco is sitting in a large volume of wet medium it has no roots in yet, and root rot risk goes up significantly.

The exception is autoflowering seeds, where you start in the final container from day one. This is a non-negotiable rule for autos — transplanting at any stage disrupts the fixed timeline and costs yield that the plant cannot recover. For auto growers, that means choosing a medium with seedling-appropriate properties that also suits the established plant: coco with 20–25% perlite handles both stages well.

When Feeding Starts

Not at the seedling stage. A seedling in good coco or a light seedling mix does not need nutrients for the first two to three weeks. When to start feeding cannabis seedlings covers the timing and EC targets in detail. The short answer: watch the plant, not the calendar, and don’t reach for the nutrient bottle because a week has passed.

The most consistent mistake I see in growers who’ve had success with outdoor vegetable gardens is applying the same feeding logic to cannabis seedlings. Garden plants in established beds have mature root systems buffered by soil biology. A cannabis seedling in week one has almost nothing — a short taproot and the first hints of lateral growth. Feed it like a hungry teenager and you’ll burn it.

What to Use — The Short Version

My preference: Coco coir or cocopeat mixed with 20–30% perlite. Pre-buffered if using raw coco. pH your water to 6.2 before it goes in. Feed nothing for the first two to three weeks. Simple and repeatable.

If using soil: Light propagation or seedling mix, or a quality cannabis-specific base soil. Check EC before using — below 0.8 is appropriate. Add perlite to 20–30% if not already present. Avoid anything with slow-release nutrients, heavy bark content, or moisture crystals.

What matters most: Good drainage, aeration, low initial nutrient load, and pH at 6.2. The genetics you’re growing will take care of the rest if the foundation is right. Browse the full range of cannabis seeds available from Sacred Seeds Australia — auto, photoperiod, and fast version — and match your medium setup to the format you’re running.


Frequently Asked Questions — Soil for Cannabis Seedlings

Can I use regular potting mix for cannabis seedlings?

Most standard potting mixes sold in Australian hardware stores and nurseries are not suitable for cannabis seedlings. They’re typically too dense, hold too much moisture, and contain slow-release fertilisers that will overfeed a plant with no root mass to handle it. If potting mix is what you have, cut it heavily with perlite (at least 30%) and check the EC before use. A seedling-appropriate medium reads below 0.8 EC in a slurry test. Anything significantly above that is going to cause tip burn within the first two weeks.

Is coco coir better than soil for seedlings?

For most setups, yes — and specifically because it’s inert. There’s no pre-loaded nutrient content to manage, no variability between batches, and the drainage and aeration properties are better suited to the seedling’s minimal root system. The trade-off is that you’re responsible for everything the plant gets from day one, which means a more attentive watering and feeding routine as the plant establishes. For growers who want less active management, a good quality light soil or seedling mix with added perlite is a reasonable alternative.

What pH should my water be for cannabis seedlings in soil or coco?

6.2 is my target for soil and coco-based grows. Not a range — a target. Consistent pH at 6.2 keeps all the major nutrients available at the root zone without locking anything out. Check your pH every time before watering, especially in coco where pH drift can happen quickly if you’re not monitoring it.

Do I need to add perlite to my seedling mix?

Almost certainly, yes. Most commercial seedling mixes and base soils benefit from added perlite, and for coco grows it’s essentially non-negotiable. 20–30% perlite by volume improves drainage and oxygen availability at the root zone significantly. Without it, the medium holds too much water for the seedling’s root system to manage, and overwatering becomes the path of least resistance.

Why shouldn’t I feed cannabis seedlings straight away?

Because the root system at week one has almost no capacity to process nutrients, and any excess sits in the medium and builds salinity. The seedling’s job in the first two to three weeks is to establish its root network — and it can do that from the small amount of nutrition present in a good seedling mix or buffered coco without any additional input from you. Adding fertiliser to a seedling that’s not ready for it causes tip burn, root stress, and slowed development. The full guide to when to start feeding cannabis seedlings covers first feed timing and EC targets.

Can I use the same medium for autoflowers and photoperiods?

Yes — the seedling medium requirements are the same. The key difference is what you do at transplant time. Photoperiod plants move from a small seedling container to a larger vegetative container to their final pot as they develop. Autoflowering seeds start in their final container from day one and do not get transplanted. This means your coco or soil mix needs to work for the full lifecycle of the auto plant from the first day — which is another reason I prefer coco with perlite for autos specifically. It performs well at the seedling stage and scales into the established plant without any changes.

Cannabis Nutrient Deficiencies: How to Diagnose and Fix Them

Cannabis Nutrient Deficiencies: How to Diagnose and Fix Them

Cannabis leaves are a communication system. When they start yellowing, developing spots, curling, or changing colour in patterns that don’t look right, the plant is telling you something is wrong with its nutrient supply. The problem most growers run into isn’t identifying that something is wrong — it’s knowing which nutrient is missing, why it’s missing, and what to do that will actually fix it rather than making it worse.

This guide gives you the framework to diagnose cannabis nutrient deficiencies correctly and fix them before they cost you yield. The starting point is a concept that most guides skip past too quickly — and it’s the one that makes the difference between systematic diagnosis and guesswork.

The One Concept That Changes Everything: Mobile vs Immobile Nutrients

Before looking at any specific symptom, you need to understand how the plant moves nutrients internally. This is the master key that makes deficiency diagnosis logical rather than guesswork — and most growers either don’t know it or don’t apply it consistently.

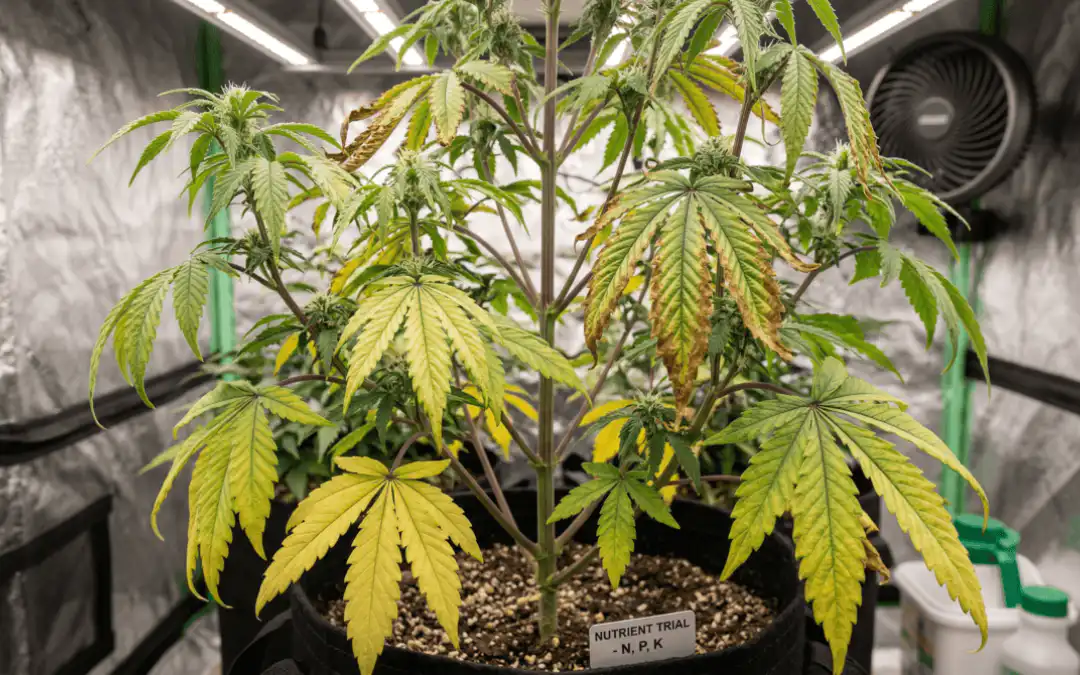
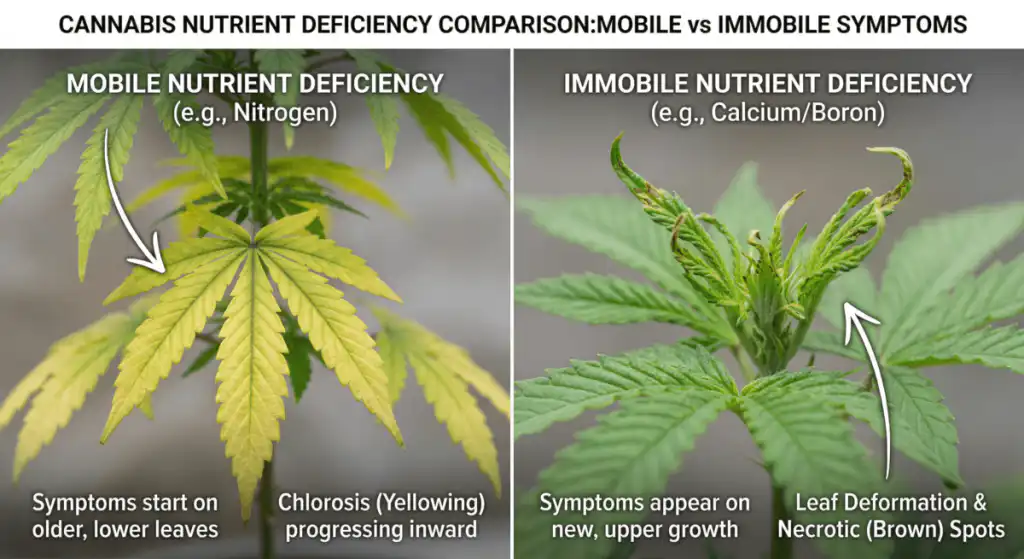
Mobile nutrients — nitrogen, phosphorus, potassium, magnesium — can be relocated by the plant. When supplies run low, the plant cannibalises older, lower leaves to feed new growth at the top. This means mobile deficiencies always show up on the bottom of the plant first, working upward as the deficiency progresses.

Immobile nutrients — calcium, sulphur, iron, manganese, zinc — get locked into plant tissue permanently once delivered. The plant can’t retrieve and relocate them. So when these run short, new growth suffers first because the plant can’t pull from existing tissue to compensate. The problem appears at the top of the plant, on the newest leaves.

Your two-step starting point for any deficiency diagnosis: is the problem on the lower, older leaves? Mobile nutrient deficiency. Is the problem on the upper, newer growth? Immobile nutrient deficiency. That single observation cuts your diagnostic list in half immediately and points you toward the right category of fix.

Mobile vs immobile nutrient deficiencies in cannabis — top leaves affected vs bottom leaves affected

The Mobile Nutrient Deficiencies — What Shows Up on Lower Leaves

Nitrogen Deficiency

Nitrogen deficiency is the most common deficiency in cannabis and one of the easier ones to identify correctly. It shows as a uniform, pale yellowing across the entire leaf — not patchy, not spotted, just an even fade from green to yellow starting on the oldest, lowest leaves and progressing upward as the plant continues cannibalising lower foliage to feed new growth. Affected leaves will eventually wilt and drop.

It’s most common during the vegetative stage because nitrogen is the primary driver of leaf and stem growth — a fast-growing plant in active veg can burn through available nitrogen quickly. The fix is straightforward: feed with a nitrogen-rich grow formula and the plant will respond visibly within a week.

One important caveat: don’t reach for high-nitrogen nutrients during flowering. Excess nitrogen late in the grow suppresses bud development and affects the final smoke quality. Natural yellowing of lower fan leaves in weeks six to eight of flower is expected and correct — it’s the plant redirecting resources to bud production, not a deficiency that needs correcting.

Phosphorus Deficiency

Phosphorus deficiency is easy to misread because it doesn’t present as straightforward yellowing. Instead, affected leaves develop a dark, bluish-green discolouration. The specific giveaway is the stems and leaf petioles — look closely for a purplish or reddish tint there, which combined with the dark leaf colour is a reliable indicator of phosphorus shortage rather than other causes. Growth slows noticeably and plants look generally stressed without an obvious single cause.

It’s most common in the flowering stage, because phosphorus is critical for bud formation. A phosphorus deficiency during flower will reduce your final yield more significantly than almost any other deficiency because it’s affecting the plant at exactly the moment it’s doing the most important work. Switch to or increase your phosphorus-rich bloom formula. For organic growers, bone meal worked into the medium is an effective longer-term solution.

Note: purple stem colouration also occurs in some genetics as a normal phenotypic expression — particularly in Afghani and Kush-lineage indicas — and from cold temperatures. Don’t confuse this with phosphorus deficiency. The diagnostic check is whether the dark leaf colour and slow growth accompany it.

Potassium Deficiency

Potassium deficiency has a distinctive pattern once you know what to look for: yellowing and browning that starts at the leaf edges and tips while the centre of the leaf stays green. It looks like the margins of the leaf have been lightly scorched. Don’t confuse this with nutrient burn — burn typically affects tips only and presents alongside dark green leaves rather than general yellowing.

Potassium deficiency can strike at any stage but it’s particularly damaging during flowering, when potassium demand spikes alongside phosphorus. A balanced bloom nutrient addresses most potassium shortfalls. Kelp meal is a good organic supplement. If the issue persists after correct feeding, check pH — potassium uptake is sensitive to pH imbalance and the nutrient may be present but unavailable.

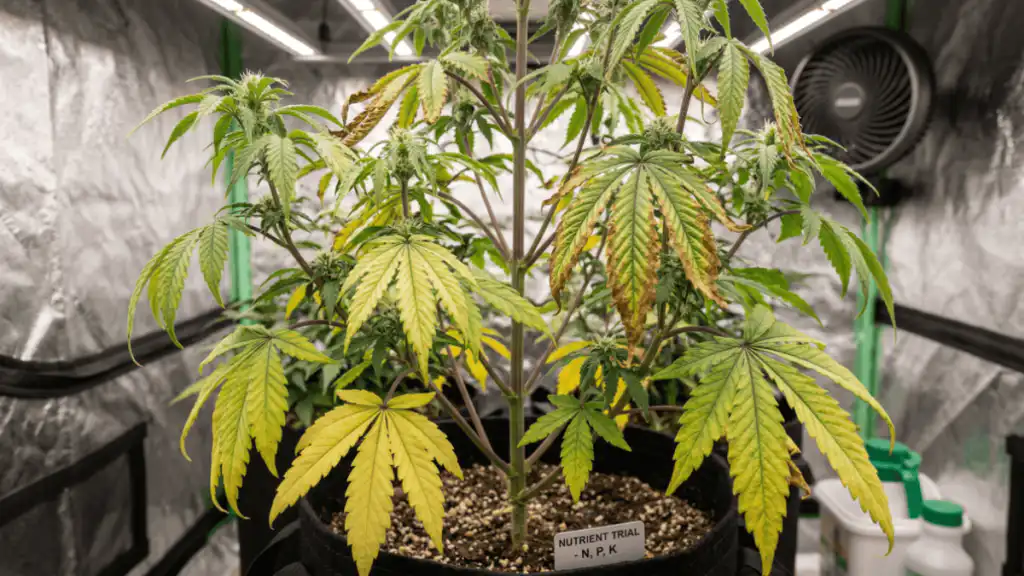
Cannabis nutrient deficiencies chart showing yellow leaves purple stems and burnt leaf edges by deficiency type

The Immobile Nutrient Deficiencies — What Shows Up on New Growth

Calcium Deficiency

Calcium deficiency appears as irregularly shaped brown or rust-coloured spots on young leaves. New growth may be stunted, twisted, or come in misshapen. The spots aren’t uniform — they look like random splashes of damage rather than a consistent pattern, which distinguishes them from other deficiency presentations.

The important thing to understand about calcium deficiency is that more often than not, the calcium is already present in the medium — the plant just can’t access it because pH is outside the absorption range. This is especially common in coco coir, which has almost no natural buffering capacity and requires calcium supplementation from day one regardless of what else you’re feeding.

Check pH first before adding calcium. For soil, target 6.0–7.0. For coco and hydro, target 5.5–6.5. Once pH is corrected, supplement with a Cal-Mag product. In coco, Cal-Mag should be a non-negotiable part of every feed from seedling through harvest.

Magnesium Deficiency

Magnesium is technically a mobile nutrient but most often presents on middle to lower leaves and frequently co-occurs with calcium issues — which is why Cal-Mag addresses both simultaneously. The distinctive symptom is interveinal chlorosis: the areas between leaf veins turn yellow while the veins themselves stay green, creating a striped or marbled appearance that’s fairly easy to identify once you’ve seen it. Leaf edges may curl upward.

Cal-Mag covers both calcium and magnesium, which is why it’s such a useful staple. If you want a simple standalone fix for confirmed magnesium deficiency, Epsom salts work well — dissolve one teaspoon per four litres of pH-balanced water and feed as normal. Results are typically visible within five to seven days.

Quick Diagnosis Reference

Symptom Location Likely cause
Uniform yellowing, leaf drop Lower / older leaves Nitrogen (N)
Bluish-green leaves, purple stems Lower / older leaves Phosphorus (P)
Yellowing / browning at leaf edges and tips Lower / older leaves Potassium (K)
Brown spots, stunted or twisted new growth Upper / new growth Calcium (Ca) — check pH first
Yellow between veins, veins stay green Mid to lower leaves Magnesium (Mg)
Dark green leaves, crispy brown tips only Tips throughout Nutrient burn — too much, not too little
Multiple deficiency symptoms at once Anywhere pH lockout — check pH before anything else

The Most Overlooked Cause: Nutrient Lockout

This is where most growers lose weeks of time and a lot of money in unnecessary nutrients. The problem often isn’t a lack of nutrients at all — it’s lockout. Nutrients are physically present in the medium but chemically unavailable to the plant because the pH is outside the absorption window.

Cannabis can only uptake nutrients within a relatively narrow pH range. Stray outside it and no amount of feeding will solve the problem. The plant keeps looking sick, you keep adding nutrients, and you end up with toxic salt buildup on top of everything else. Multiple simultaneous deficiencies are a lockout signature — not a multi-nutrient shortage. When multiple symptoms appear at once, always check pH before adjusting any nutrients.

pH targets by medium: soil targets 6.0–7.0 with the sweet spot around 6.5. Coco coir and hydro target 5.5–6.5. These ranges aren’t suggestions — they’re the windows within which each nutrient becomes chemically accessible. A pH of 7.5 in coco will lock out calcium, magnesium, and iron simultaneously regardless of how much of each is present in your feed.

🧠 Jason — On pH and Nutrient Diagnosis

The number of growers I’ve spoken to who spent weeks trying to fix a calcium or magnesium deficiency that was actually a pH problem is genuinely frustrating. They keep adding Cal-Mag, the symptoms persist, they add more Cal-Mag, and the problem gets worse because the salt load is climbing while the plant still can’t access the nutrients. A quality pH pen is the highest-return investment in any grow kit. Check it before every feed, check it at the root zone if you’re seeing persistent symptoms, and correct it before you start chasing specific deficiencies. Most of what growers diagnose as a deficiency is lockout — and lockout doesn’t respond to more nutrients.

Nutrient Burn — The Opposite Problem

It’s worth addressing nutrient burn here because it’s frequently confused with deficiency, and the treatment is the opposite. Nutrient burn presents as dark green leaves with crispy, brown-burnt tips — the darkness of the green is the first indicator that the plant has excess nutrient salts rather than insufficient ones. The tips brown because the plant is pushing excess salts to the outer extremities.

If you see this: stop feeding immediately, flush with plain pH-balanced water at two to three times the volume of your pot, and let the medium dry slightly before resuming at a significantly reduced feeding rate. Feeding more when you see nutrient burn makes it worse — the instinct to reach for nutrients when the plant looks sick is the most common way growers escalate a manageable problem into a serious one.

Looking for genetics bred for resilience?

Answer six questions and Jess will match you to three strains based on your setup, experience, and goals.

Find Your Strain →

Key Takeaways — Cannabis Nutrient Deficiencies

Mobile nutrients (N, P, K, Mg) deficiencies show on lower, older leaves — the plant cannibalises old growth to feed new. Immobile nutrients (Ca, S, Fe, Mn, Zn) deficiencies show on upper, new growth — the plant can’t relocate these from existing tissue. Multiple symptoms appearing simultaneously almost always indicates pH lockout rather than multiple actual deficiencies — check and correct pH before adding any nutrients. A pH pen is the highest-return tool in any grow kit: check before every feed, correct before diagnosing. Nutrient burn (dark green leaves, crispy tips) is the opposite of deficiency — flush rather than feed. Natural lower-leaf yellowing in weeks six to eight of flower is expected and shouldn’t be treated as a deficiency. When in doubt, stop feeding, check pH, wait and observe before making any changes. The full nutrient requirements by growth stage are covered in the autoflower nutrients guide.

Cannabis Nutrient Deficiencies — Frequently Asked Questions

What’s the difference between nutrient deficiency and nutrient burn?

They’re opposite problems. Nutrient deficiency is a shortage of one or more nutrients — the plant can’t access enough to function correctly. Nutrient burn is excess — too much nutrient salt in the medium, presenting as dark green leaves with crispy brown tips. The treatment for deficiency is corrected feeding; the treatment for burn is flushing and reducing feed. Treating burn as deficiency by adding more nutrients will make it significantly worse.

Should I check pH every feed?

Yes — every feed, without exception. A quality pH pen is the highest-return tool in any grow kit and the check takes thirty seconds. Most stubborn deficiency problems trace back to pH being out of range rather than an actual nutrient shortage. Many growers would have saved weeks of stress by checking pH before reaching for any other solution.

Can I use the same nutrients from seed to harvest?

Not optimally. Vegetative growth demands nitrogen-heavy grow formulas. Flowering demands phosphorus and potassium-heavy bloom formulas. Using a grow formula into flower is one of the most common reasons growers end up with small, airy buds — excess nitrogen suppresses bud development. The transition from grow to bloom nutrients should happen at the flip or shortly after pre-flowers appear.

Are organic nutrients better for avoiding deficiencies?

Organics are more forgiving — the microbial ecosystem in living soil buffers against both deficiencies and overfeeding, releasing nutrients slowly as the plant needs them. Synthetics feed the plant directly and are more precise but less forgiving of errors in either direction. Neither is universally better, but for growers who are still developing feeding discipline, organics offer a wider margin for error.

My plant has several problems at once. Where do I start?

Stop adding nutrients. Check pH. Correct it if it’s out of range. If salt buildup is suspected from overfeeding, flush with plain pH-balanced water at two to three times the pot volume. Wait three to five days and observe before making any further adjustments. Chasing multiple symptoms with multiple simultaneous fixes is how you turn a manageable problem into a dead plant. Multiple deficiency symptoms at once almost always means lockout — fix the pH and most of the symptoms will resolve without any additional intervention.

Why are my lower leaves yellowing in late flower?

This is almost certainly not a deficiency — it’s the plant redirecting resources from fan leaves to bud production as it approaches harvest. Some yellowing of lower fan leaves from week six of flower onward is a normal part of the plant’s senescence process. The diagnostic check: is the yellowing progressing rapidly upward through the canopy, or staying on the lower leaves only? Rapid progression warrants investigation; slow yellowing confined to lower leaves during late flower generally doesn’t.

Related Reading

Why are my cannabis leaves turning yellow? — the full guide to leaf yellowing including causes beyond nutrient deficiency.

Autoflower nutrients guide — feed schedules, EC targets, and nutrient timing by growth phase for autoflowering genetics.

Cannabis seedling care in Australia — the first two weeks after germination including early feeding and overwatering avoidance.

Why aren’t my cannabis seeds germinating? — troubleshooting failed germination before the nutrient stage begins.

Browse all cannabis seeds — feminised, autoflower, and photoperiod strains shipped from Australia.

Seeds are sold strictly as novelty collector’s items. They contain no THC or CBD. This page does not constitute medical or legal advice. By purchasing you agree to our terms and conditions. Always check local laws before germinating or cultivating cannabis.

10 Best Beginner Strains for Australian Growers

10 Best Beginner Strains for Australian Growers

The best cannabis strains for beginners in Australia aren’t the ones marketed as foolproof. They’re the ones with enough genetic resilience to survive the mistakes every first-time grower makes. Every grower overfeeds, overwaters, or manages temperature badly at some point in their first grow. The question isn’t whether mistakes will happen. It’s whether the genetics can handle them while you learn what you’re doing.

This guide covers the strains I recommend to first-time growers, the same ones I point people toward when they come through the strain finder quiz not quite knowing where to start. The honest framing is this: these strains are forgiving, not foolproof. They’ll tolerate more variation in feeding, watering, and environment than more demanding genetics. That tolerance gives you room to learn. It doesn’t eliminate the need to learn.

Strain choice is only half the picture on a first grow. The other half is the calendar, and if you’re growing outside, Jason’s guide to growing cannabis outdoors in Australia covers when to plant, how your region changes the plan, and the autumn harvest window that catches out more first-season growers than any feeding mistake. If you’re starting from scratch on equipment and method, our new grower guide is the place to begin. You can browse the full range of cannabis seeds Australia while you read.

Please note: this guide is written for growers in the ACT where personal cultivation is permitted, and for growers in legal jurisdictions overseas. Seeds sold by Sacred Seeds Australia are sold strictly as souvenir and collectable items in accordance with Australian law.

What Makes a Strain Forgiving for First-Time Growers

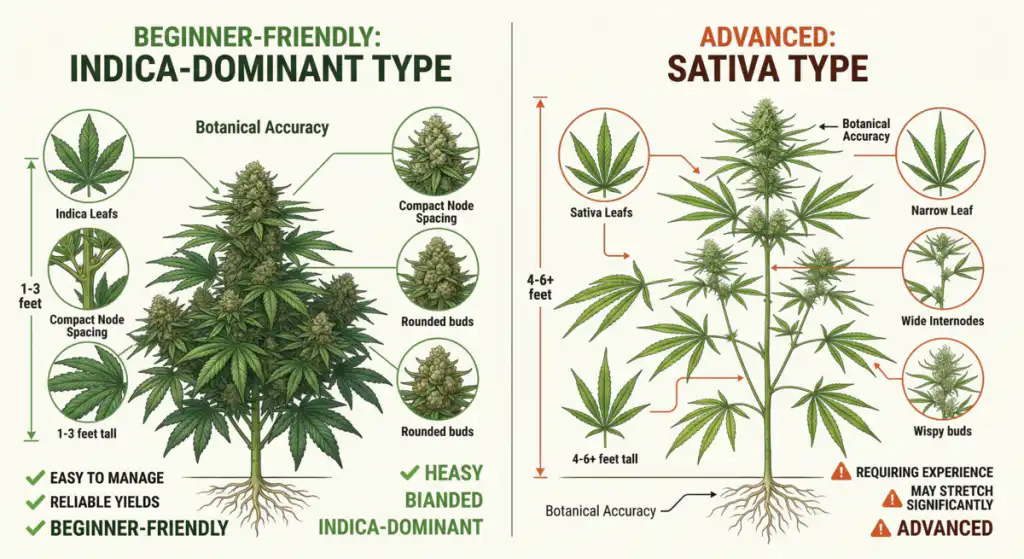
Indica-dominant genetics Generally more compact, faster flowering, and more tolerant of environmental variation than sativa-dominant genetics
Established genetic stability Strains with decades of breeding history produce more consistent phenotypes, meaning less variation between plants from the same batch
Autoflowering format Fixed timeline removes light schedule management, one fewer variable to get wrong on a first grow. Our autoflower versus photoperiod comparison covers the trade-off
Mould resistance Particularly relevant in Australian coastal climates where autumn humidity creates bud rot risk, which the climate strain guide breaks down by region
Shorter flowering time 7 to 9 week flowers give fewer opportunities for late-grow mistakes than 10 to 12 week genetics
Avoid for first grows Pure sativa landraces, experimental genetics, OG Kush cuts, anything described as “demanding” or “for experienced growers”

Autoflower or Photoperiod: Which to Start With

The most significant decision a first-time grower makes is format, autoflower or photoperiod. It’s worth getting this right before choosing a specific strain, and our autoflower versus photoperiod comparison covers the full trade-off.

Photoperiod cannabis requires a change in light cycle to trigger flowering: 18 hours of light in vegetative growth, 12 hours to initiate and maintain flower. This gives growers control over when the plant flowers and how large it gets before flowering begins, but it introduces a failure point that doesn’t exist for autoflowers. Get the light schedule wrong and the plant either won’t flower or will re-veg. For indoor growers, light leaks during the dark period can cause the same problem, and our guide on why photoperiod plants flower early walks through the usual causes. Managing light schedules correctly is a learned skill.

Autoflowers flower on a fixed timeline from germination regardless of light cycle. They remove the light schedule variable entirely. The trade-off is that you can’t extend the vegetative phase to compensate for a slow start, because the clock runs from germination and doesn’t stop. Early mistakes can’t be recovered by holding the plant in veg longer. If you go this way, the week-by-week autoflower guide covers the whole cycle from seed to jar, and the full autoflower seed range is worth a browse.

🌿 My Take: Auto or Photoperiod First?

For a first indoor grow, I’d lean toward autoflowers, not because they’re easier in any absolute sense, but because managing a 12/12 light schedule correctly while also learning feeding, watering, training, and environment is a lot to handle at once. Removing the light schedule variable lets you focus on the fundamentals first. Once you’ve got one grow behind you and understand what the plant actually needs, photoperiods give you significantly more control and yield potential. Start simple, then build from there. For outdoor first grows in most Australian states, the natural day length handles the photoperiod question automatically. Plant at the right time of year and the season does the work for you.

Indoor vs Outdoor for First-Time Growers in Australia

Indoor vs Outdoor: Honest Assessment

Indoor advantages: Complete control over light, temperature, and humidity. Year-round growing regardless of season. Learning the fundamentals without weather variables. The controlled environment means fewer unexpected problems, because what goes wrong indoors is almost always something the grower controlled.

Indoor disadvantages: Upfront equipment cost, since a basic tent, LED light, and fan is a meaningful investment. Temperature management in Australian summer can be challenging without air conditioning. Running costs for electricity.

Outdoor advantages: Free sunlight eliminates the biggest indoor running cost. Plants can get significantly larger with more root volume, producing more per plant. The growing experience is closer to what cannabis evolved to do.

Outdoor disadvantages: Seasonal constraints, so you can’t plant whenever you want. Weather events outside your control. In Australia specifically, autumn rain risk on the east coast creates bud rot pressure in the final weeks of flower for most strains. Pest management without a controlled environment requires more attention, which our organic pest control guide covers in full.

For most Australian first-time growers, the recommendation depends on the situation. If you have the budget for a basic indoor setup and want to learn in a controlled environment, start indoors, and if space is tight our guide to growing cannabis in small spaces covers what’s realistic in a compact tent. If you’re in a suitable climate with outdoor space and want to start without equipment investment, outdoor autoflowers planted in the right seasonal window are a practical first grow.

Growing outside brings the calendar into play in a way indoor growing doesn’t, and getting the timing wrong costs more first seasons than any feeding mistake. Jason’s guide to growing cannabis outdoors in Australia sets out when to plant, how your region changes the plan, and the autumn harvest deadlines that decide whether a crop comes in clean. The Australian climate strain guide covers regional timing and strain selection in detail alongside it.

The Strains I Recommend to First-Time Growers

These strains share a common characteristic: established genetics with proven resilience across a range of growing conditions. None of them are foolproof, because every strain can fail in a badly managed environment. What they offer is a wider tolerance band than more demanding genetics, which gives first-time growers more room to make the inevitable early mistakes and still produce a result worth harvesting.

1. Northern Lights: Afghani Indica Backbone

Northern Lights is the strain I point first-time growers toward more than any other, not because it’s foolproof, but because the Afghani indica genetics give it a structural and environmental resilience that most modern hybrids don’t match. The compact bushy structure manages itself without aggressive training. The 7 to 9 week flower is fast enough that problems don’t have time to compound. The myrcene-dominant terpene profile produces a consistent, predictable effect that’s genuinely rewarding to harvest.

The key limitation to understand: Northern Lights rewards attentive growing significantly more than it forgives neglect. A well-grown Northern Lights is exceptional. A neglected one will survive but won’t produce at its potential. The genetics are forgiving, which doesn’t mean the plant doesn’t benefit from care. Jason’s Northern Lights review and grow guide covers the Sensi Seeds history and the grow in depth.

Available as Northern Lights Feminised and Auto Northern Lights. For a first indoor grow the auto version removes the light schedule variable. For outdoor grows in most Australian states, the photoperiod version triggered by natural autumn day length is a viable and rewarding first-season option.

2. Blue Dream: My Go-To, Genuinely Versatile

Blue Dream is my second favourite strain, and the one I would most readily recommend to someone on their first grow. The Blueberry × Haze cross produces a plant with exceptional hybrid vigour: fast growth, good recovery from stress, and a structural resilience that makes it one of the more forgiving sativa-dominant genetics in the catalogue. It’s not an easy strain in any absolute sense, since the significant stretch in early flower requires height management and the dense buds need humidity attention from week four of flower, but within those requirements it’s more tolerant of variation than most.

The practical advantage of Blue Dream as a first strain is that it produces a large, rewarding harvest with a balanced effect profile that suits a wide range of users. That combination makes the first grow feel genuinely worthwhile rather than just educational. The Blue Dream strain review goes further on the lineage and what to expect from the grow. Available as Blue Dream Feminised and Auto Blue Dream.

3. Girl Scout Cookies: Compact and Reliable

GSC sits in a useful position for first-time growers: compact enough to manage in limited indoor space, indica-dominant enough to flower relatively quickly, and with a terpene profile of caryophyllene, limonene and linalool that produces a complex, rewarding result worth all the effort of a first grow. The Cookie Fam genetics have been extensively stabilised across decades of breeding, which means the phenotype expression is more consistent than newer, less established genetics. The full story of where those genetics came from sits in our Girl Scout Cookies strain review.

The one caveat: GSC carries the nutrient sensitivity of its OG Kush lineage. Overfeeding in the first three weeks is the most common way first-time growers damage this strain, so start at quarter strength and build slowly. Jason’s autoflower EC and feeding guide gives GSC its own section and covers exactly where the nitrogen sensitivity bites. Both GSC Feminised and Auto GSC are in the catalogue.

Auto Girl Scout Cookies feminised cannabis seeds Australia

Auto Girl Scout Cookies Feminised Seeds

From $75.00

4. Gorilla Glue: Vigorous Genetics, Needs Humidity Attention

GG4 is Jason’s Friday afternoon strain, and I am happy to recommend it to a first-time grower with one caveat stated clearly: the extraordinary resin production that makes GG4 exceptional also creates dense, heavy buds that are more susceptible to botrytis in high-humidity conditions than less resinous genetics. In Australian coastal summer conditions that’s a meaningful consideration. In drier climates or with adequate airflow and humidity management, GG4 is one of the most vigorous and rewarding genetics in the catalogue.

What makes GG4 relatively tolerant for a first grow is the hybrid vigour from the Chem’s Sister × Sour Dubb × Chocolate Diesel cross. The plant grows with real energy and recovers from feeding and watering errors faster than more sensitive genetics. The auto version is the more practical first-grow format given the fixed 70 to 75 day timeline. The Gorilla Glue review and grow guide covers the humidity management in detail. Available as Gorilla Glue Feminised and Auto Gorilla Glue.

Auto Gorilla Glue feminised cannabis seeds Australia

Auto Gorilla Glue Feminised Seeds

From $75.00

5. White Widow: Dutch Classic, Earned Reputation

White Widow won the Cannabis Cup in 1995 and has been in continuous production since. That longevity is the most reliable indicator of genuine genetic quality, because a strain that remains in demand for three decades is doing something right. The Brazilian sativa and South Indian indica cross produces a balanced hybrid with exceptional trichome production, good resistance to temperature variation, and a relatively compact structure that manages itself without aggressive training.

White Widow is not the most exciting recommendation, but it’s one of the most honest. The genetics are well understood, the phenotype expression is consistent, and the result of heavy resin coverage, balanced effect and a familiar profile is rewarding for a first grow. The White Widow strain review covers the Shantibaba story and what three decades of continuous production actually buys you. Available as White Widow Feminised and Auto White Widow.

Auto White Widow feminised cannabis seeds Australia

Auto White Widow Feminised Seeds

From $75.00

6. Purple Kush: Compact, Fast, Hindu Kush Resilience

Purple Kush brings Hindu Kush × Purple Afghani genetics, a near-pure indica with the structural and environmental resilience that Afghani landrace genetics encode. It stays compact at 60 to 90 cm, flowers in 7 to 9 weeks, and the cool-night purple phenotype expression gives first-time growers a visually rewarding harvest that’s distinctly different from green-only genetics. The myrcene-dominant terpene profile produces deep body relaxation, a genuinely good evening indica from straightforward, well-understood genetics.

Particularly well-suited to Australian growers in cooler climates where the temperature differential in autumn encourages the purple expression and the shorter season suits the faster finishing genetics. Available as Auto Purple Kush, with the rest of the heavy end of the catalogue on the indica seed page.

Auto Purple Kush feminised cannabis seeds Australia

Auto Purple Kush Feminised Seeds

From $75.00

7. Granddaddy Purple: Myrcene and Linalool, Good Outdoor Option

Granddaddy Purple, a Purple Urkle × Big Bud cross, adds linalool to the myrcene foundation, producing one of the more pronounced sedative terpene combinations in the indica catalogue. The purple phenotype expression is reliable across growing conditions rather than requiring specific temperature triggers, the bud structure is dense and resinous, and the Big Bud parentage contributes yield potential that exceeds what the compact plant size suggests.

For Australian outdoor growers GDP is a practical choice. It handles the autumn harvest window well and the coloration develops noticeably as night temperatures drop in March and April, which the Granddaddy Purple strain review covers alongside Ken Estes and the breeding story. Available as Granddaddy Purple Feminised and Auto Granddaddy Purple.

Auto Granddaddy Purple feminised cannabis seeds Australia

Auto Granddaddy Purple Feminised Seeds

From $75.00

8. Super Skunk: Old-School Genetics, Genuine Outdoor Resilience

Super Skunk is Skunk #1 × Afghani, old-school genetics bred at a time when resilience and outdoor performance were the primary breeding objectives rather than THC maximisation or flavour complexity. The Afghani indica backbone gives it genuine structural robustness. It handles temperature variation, pest pressure, and feeding inconsistency better than most modern genetics precisely because it was bred for exactly those conditions. It doesn’t produce the most sophisticated effect profile or the most complex terpene expression, but it produces reliably, finishes fast, and gives first-time outdoor growers a result they can be satisfied with. Available as Super Skunk Feminised and Auto Super Skunk.

Auto Super Skunk feminised cannabis seeds Australia

Auto Super Skunk Feminised Seeds

From $75.00

Strains to Avoid on Your First Grow

The strains worth avoiding on a first grow share a common characteristic: they require consistent precision that first-time growers are still developing. That’s not a criticism of the strains, it’s an honest assessment of the match between strain requirements and first-grow skill levels.

Pure sativa landraces such as Durban Poison, pure Thai genetics and pure Haze have flowering periods of 12 to 14 weeks and significant height that demands active management. More time in flower means more opportunities for late-grow mistakes to compound. The longer you’re managing a plant the more that can go wrong, and a first-time grower managing a 14-week flower for the first time is carrying a lot of risk into harvest. Worth saying that these are excellent strains in the right hands, and the regional sativa guide covers which ones actually finish where. Durban Poison in particular is the most forgiving of the pure sativas, so it’s a reasonable second grow rather than a first.

OG Kush cuts and nutrient-sensitive genetics. Many OG Kush phenotypes and some Cookies variants require precise feeding at lower EC ranges than robust indica genetics. First-time growers consistently overfeed, and OG-lineage genetics show stress from overfeeding faster than most. Godfather OG, for example, is an exceptional strain, but it’s not the place to learn feeding discipline.

Experimental or recently released genetics with less than five years of widespread growing history have less documented phenotype variation and fewer community-tested growing parameters. Established genetics with decades of growing data behind them are more predictable because more is known about how they behave across a range of conditions.

Any strain described as “demanding,” “for experienced growers,” or “requires precise conditions” in its description. Believe it. Those descriptors exist for a reason.

Common First-Grow Mistakes and Which Genetics Handle Them Better

Overwatering is the most common first-grow mistake. New growers water too frequently and keep the root zone saturated rather than allowing the wet-dry cycle that drives healthy root development. Northern Lights, Purple Kush, and Super Skunk handle overwatering better than most because the Afghani indica genetics are adapted to soil conditions that vary considerably. GSC and OG-lineage genetics are more sensitive. The fix is simple once understood: water when the top 2 to 3 cm of medium is dry, not on a schedule. Most of the damage happens in the first fortnight, which our cannabis seedling care guide covers stage by stage.

Overfeeding is the second most common mistake. Nutrient manufacturers recommend doses designed to sell nutrients, not to produce healthy plants. First-time growers following bottle recommendations consistently produce nutrient-burned plants. Start at quarter strength of whatever the manufacturer recommends and build from there based on what the plant shows you, and our guide on when to start feeding seedlings covers the first few weeks specifically. Blue Dream, White Widow, and Super Skunk handle overfeeding better than GSC or OG-lineage genetics. When something does go wrong, the nutrient deficiency guide and our answer to why cannabis leaves turn yellow will help you read the leaves.

Temperature fluctuation is particularly relevant in Australia where the difference between day and night temperatures can be significant, and where summer indoor grows can push ambient temperatures above 30°C. Blue Dream and White Widow handle temperature variation better than most. Purple strains and some Cookies genetics are more sensitive to heat. If your grow space gets above 28°C in summer, choose genetics that tolerate heat or manage the timing to avoid growing through the hottest months.

Light schedule errors on photoperiod grows, meaning light leaks, inconsistent timing, or accidental re-vegging, are problems that don’t exist with autoflowers. For indoor first grows where light schedule management hasn’t been tested, autoflowers remove this failure point entirely.

Basic Setup for a First Indoor Grow

The equipment required for a first indoor grow is less than most beginners assume. A basic functional setup covers everything you need to produce a first harvest successfully.

What you need: A grow tent or dedicated space with light control. An LED grow light, where 100 to 150W is adequate for one to two plants in a small tent. A fan for airflow, which is critical for stem strength and humidity management. A quality potting mix or coco coir, and our guide on what soil to use covers what actually matters in the mix. Fabric pots, minimum 11 L and better at 20 L, with container sizing and transplant timing covered separately. A pH test kit, where cheap ones work for a first grow. Basic nutrients are optional if using quality potting soil for the first four weeks.

What you don’t need on a first grow: Hydroponic systems. CO2 supplementation. Complex multi-part nutrient lines. Multiple fans and environmental controllers. These things add value as skill increases, but they add complexity that doesn’t improve outcomes at the first-grow stage.

Budget realistically: A functional basic indoor setup in Australia runs $300 to $500 AUD. You can spend more and it will improve results somewhat, but the genetics and the grower’s attentiveness to the plant’s needs matter more than equipment beyond the basics.

One thing worth adding that costs almost nothing: pay attention to your water. Tap water is a more common cause of failed germination and struggling seedlings than most first-time growers realise, and our guide to water quality and seed germination explains why.

Not sure which strain suits your first grow?

Answer six questions and I will match you to three strains based on your setup, experience, and goals.

Find Your Strain →

If you take nothing else from this guide, take these five points into your first season.

Key Takeaways: Best Cannabis Strains for First-Time Growers

Forgiving genetics are not foolproof genetics. They tolerate more variation in feeding, watering, and environment than demanding strains, which gives first-time growers room to learn without losing the plant.

Autoflowers are the practical recommendation for most indoor first grows, because removing the light schedule variable lets you focus on the fundamentals.

Indica-dominant genetics with established breeding history, meaning Northern Lights, Purple Kush, White Widow and Super Skunk, are more tolerant of first-grow conditions than pure sativas, OG Kush cuts, or experimental genetics.

Overwatering and overfeeding are the two mistakes that end most first grows. Water when the top 2 to 3 cm is dry, and start nutrients at quarter strength.

Keep the first grow simple: one or two plants, straightforward genetics, basic equipment. Complexity can come later. The strain finder quiz matches you to specific genetics based on your setup, climate zone, and experience level.

First-Time Cannabis Grower: Frequently Asked Questions

Should I start with an autoflower or a photoperiod seed?

For a first indoor grow, autoflowers are the more practical starting point, because they remove light schedule management as a variable while you focus on learning feeding, watering, and environment. For outdoor first grows in most Australian states, the natural day length handles the photoperiod question automatically, so plant at the right time of year and the seasonal light cycle triggers flowering without any intervention. Once you have one grow completed and understand what the plant actually needs, photoperiods give you more control over plant size and timing. The autoflower versus photoperiod guide covers the full comparison.

How many plants should I grow on my first grow?

One to two plants. Managing one plant attentively produces better results than managing four plants poorly. The temptation to maximise the first grow is understandable but misplaced, because the first grow is about learning what the plant needs, not maximising yield. One successful harvest teaches you more than a complicated multi-plant setup that goes partially wrong.

Is it better to start indoors or outdoors?

Indoors gives complete control over the environment, which makes learning more systematic, because when something goes wrong you can identify the cause. Outdoor growing is lower cost and produces larger plants, but introduces weather, pest, and seasonal variables that are harder to manage while simultaneously learning the fundamentals. Both work, and the right choice depends on your situation, budget, and what’s legal in your state. If you’re leaning outdoors, read the Australian outdoor growing guide first, since the planting calendar and the autumn harvest deadline are the two things that decide a first outdoor season.

What is the most common mistake first-time growers make?

Overwatering and overfeeding, usually both simultaneously. New growers consistently water too frequently, keeping the root zone saturated rather than allowing the wet-dry cycle that drives root development. And nutrient manufacturers’ recommended doses are calibrated to sell nutrients, not to produce healthy plants, so first-time growers following bottle recommendations consistently overfeed. Start nutrients at quarter strength and water only when the top 2 to 3 cm of medium is dry. If seedlings are collapsing at the stem base, our guide to damping off and stem rot covers the most common early killer.

Do I need expensive equipment for a first grow?

No. A functional basic indoor setup of grow tent, LED light at 100 to 150W, fan, quality potting mix, fabric pots and pH kit runs $300 to $500 AUD and covers everything needed for a first harvest. Hydroponic systems, CO2 supplementation, and complex nutrient lines add value as skill increases. They don’t improve outcomes at the first-grow stage and add complexity that makes it harder to identify what’s causing problems when things go wrong.

What’s the best germination method for a first-time grower?

The paper towel method, meaning seeds between damp paper towels, kept at 22 to 25°C in a warm dark location, checked every 12 to 24 hours. Most viable seeds show a taproot within 48 to 72 hours. The visibility advantage is valuable for first-time growers, since you can confirm germination has happened before the seed contacts soil. The full step-by-step is in the paper towel germination guide, with the wider method comparison in our complete germination guide.

Are feminised seeds worth it for a first grow?

Yes. Feminised seeds guarantee female plants that produce the harvest you’re growing for. Regular seeds produce roughly half male plants that need to be identified and removed before they pollinate the females. Managing male identification correctly while learning everything else about growing is an unnecessary complication for a first grow. All the strains recommended in this guide are feminised or auto-feminised, and our explainer on what feminised cannabis seeds are covers how they’re made.

What should I do if my first grow fails?

Identify what went wrong, since overwatering and overfeeding are responsible for the majority of first-grow failures, and try again with that specific knowledge. Most experienced growers have had failed first grows. The failure is valuable precisely because it teaches you something concrete about what the plant needs. Try again with simpler genetics, better water quality, and a more restrained feeding and watering schedule. If the seeds never sprouted in the first place, our guide on why cannabis seeds aren’t germinating works through the causes, and every batch we ship is covered by our germination guarantee.

When should I harvest?

Check trichomes rather than relying on the flowering time listed on the seed packet, because those are guides, not guarantees. Harvest when trichomes are mostly milky white with 10 to 20% amber. A jeweller’s loupe or USB microscope is the tool for this, and without one you’re guessing. The trichome harvest timing guide covers the full process, and our guide to reading the whole plant at harvest covers the signals beyond trichome colour.

Related Reading

How to grow cannabis outdoors in Australia, the season calendar, regional harvest deadlines, and the autumn finish.

Best cannabis strains for Australian conditions, regional strain selection and seasonal timing across all Australian climate zones.

Autoflower vs photoperiod seeds, the full format comparison to help decide which suits your first grow setup.

How to germinate cannabis seeds, the complete germination guide for first-time growers.

Cannabis seedling care in Australia, the first two weeks after germination covered in full.

Drying cannabis properly and the complete guide to curing, the two stages that decide what your first harvest actually tastes like.

Browse all cannabis seeds, feminised, autoflower, and photoperiod strains shipped from Australia.

Seeds are sold strictly as novelty collector’s items. They contain no THC or CBD. This page does not constitute medical or legal advice. By purchasing you agree to our terms and conditions. Always check local laws before germinating or cultivating cannabis.

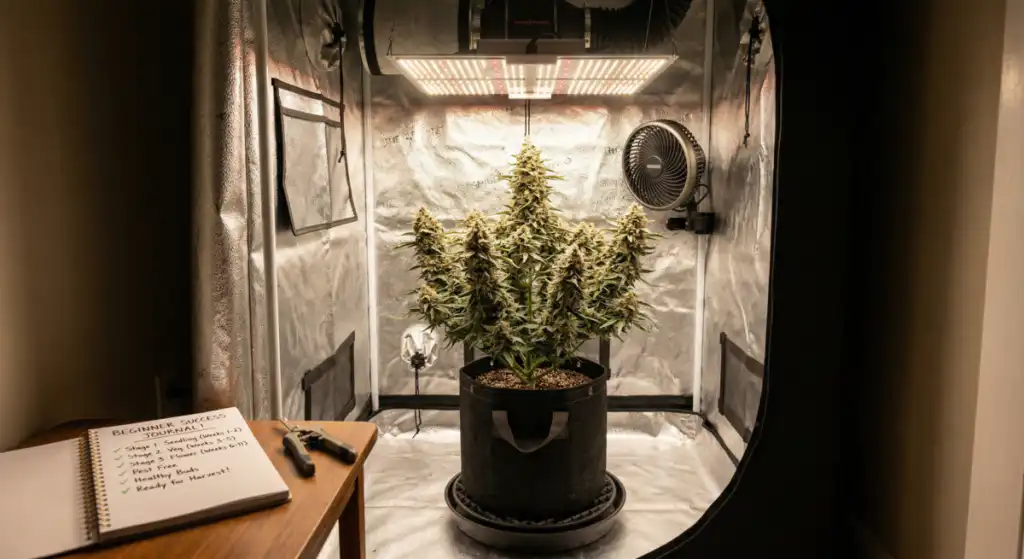
Best beginner cannabis strains for Australian growers shown in an easy indoor grow setup with compact healthy plants under LED lights

Autoflower or Photoperiod: Which to Start With

The most significant decision a first-time grower makes is format, autoflower or photoperiod. It’s worth getting this right before choosing a specific strain, and our autoflower versus photoperiod comparison covers the full trade-off.

Photoperiod cannabis requires a change in light cycle to trigger flowering: 18 hours of light in vegetative growth, 12 hours to initiate and maintain flower. This gives growers control over when the plant flowers and how large it gets before flowering begins, but it introduces a failure point that doesn’t exist for autoflowers. Get the light schedule wrong and the plant either won’t flower or will re-veg. For indoor growers, light leaks during the dark period can cause the same problem, and our guide on why photoperiod plants flower early walks through the usual causes. Managing light schedules correctly is a learned skill.

Autoflowers flower on a fixed timeline from germination regardless of light cycle. They remove the light schedule variable entirely. The trade-off is that you can’t extend the vegetative phase to compensate for a slow start, because the clock runs from germination and doesn’t stop. Early mistakes can’t be recovered by holding the plant in veg longer. If you go this way, the week-by-week autoflower guide covers the whole cycle from seed to jar, and the full autoflower seed range is worth a browse.

🌿 Jess: Auto or Photoperiod First?

For a first indoor grow, I’d lean toward autoflowers, not because they’re easier in any absolute sense, but because managing a 12/12 light schedule correctly while also learning feeding, watering, training, and environment is a lot to handle at once. Removing the light schedule variable lets you focus on the fundamentals first. Once you’ve got one grow behind you and understand what the plant actually needs, photoperiods give you significantly more control and yield potential. Start simple, then build from there. For outdoor first grows in most Australian states, the natural day length handles the photoperiod question automatically. Plant at the right time of year and the season does the work for you.

Indoor vs Outdoor for First-Time Growers in Australia

Indoor vs Outdoor: Honest Assessment

Indoor advantages: Complete control over light, temperature, and humidity. Year-round growing regardless of season. Learning the fundamentals without weather variables. The controlled environment means fewer unexpected problems, because what goes wrong indoors is almost always something the grower controlled.

Indoor disadvantages: Upfront equipment cost, since a basic tent, LED light, and fan is a meaningful investment. Temperature management in Australian summer can be challenging without air conditioning. Running costs for electricity.

Outdoor advantages: Free sunlight eliminates the biggest indoor running cost. Plants can get significantly larger with more root volume, producing more per plant. The growing experience is closer to what cannabis evolved to do.

Outdoor disadvantages: Seasonal constraints, so you can’t plant whenever you want. Weather events outside your control. In Australia specifically, autumn rain risk on the east coast creates bud rot pressure in the final weeks of flower for most strains. Pest management without a controlled environment requires more attention, which our organic pest control guide covers in full.

For most Australian first-time growers, the recommendation depends on the situation. If you have the budget for a basic indoor setup and want to learn in a controlled environment, start indoors, and if space is tight our guide to growing cannabis in small spaces covers what’s realistic in a compact tent. If you’re in a suitable climate with outdoor space and want to start without equipment investment, outdoor autoflowers planted in the right seasonal window are a practical first grow.

Growing outside brings the calendar into play in a way indoor growing doesn’t, and getting the timing wrong costs more first seasons than any feeding mistake. Jason’s guide to growing cannabis outdoors in Australia sets out when to plant, how your region changes the plan, and the autumn harvest deadlines that decide whether a crop comes in clean. The Australian climate strain guide covers regional timing and strain selection in detail alongside it.

Indica vs sativa cannabis plant comparison showing compact beginner-friendly growth versus tall difficult sativa structure

Jess’s Strain Recommendations for First-Time Growers

These strains share a common characteristic: established genetics with proven resilience across a range of growing conditions. None of them are foolproof, because every strain can fail in a badly managed environment. What they offer is a wider tolerance band than more demanding genetics, which gives first-time growers more room to make the inevitable early mistakes and still produce a result worth harvesting.

1. Northern Lights: Afghani Indica Backbone

Northern Lights is the strain Jess most consistently points first-time growers toward, not because it’s foolproof, but because the Afghani indica genetics give it a structural and environmental resilience that most modern hybrids don’t match. The compact bushy structure manages itself without aggressive training. The 7 to 9 week flower is fast enough that problems don’t have time to compound. The myrcene-dominant terpene profile produces a consistent, predictable effect that’s genuinely rewarding to harvest.

The key limitation to understand: Northern Lights rewards attentive growing significantly more than it forgives neglect. A well-grown Northern Lights is exceptional. A neglected one will survive but won’t produce at its potential. The genetics are forgiving, which doesn’t mean the plant doesn’t benefit from care. Jason’s Northern Lights review and grow guide covers the Sensi Seeds history and the grow in depth.

Available as Northern Lights Feminised and Auto Northern Lights. For a first indoor grow the auto version removes the light schedule variable. For outdoor grows in most Australian states, the photoperiod version triggered by natural autumn day length is a viable and rewarding first-season option.

2. Blue Dream: Jess’s Go-To, Genuinely Versatile

Blue Dream is Jess’s second favourite strain, and the one she’d most readily recommend to someone on their first grow. The Blueberry × Haze cross produces a plant with exceptional hybrid vigour: fast growth, good recovery from stress, and a structural resilience that makes it one of the more forgiving sativa-dominant genetics in the catalogue. It’s not an easy strain in any absolute sense, since the significant stretch in early flower requires height management and the dense buds need humidity attention from week four of flower, but within those requirements it’s more tolerant of variation than most.

The practical advantage of Blue Dream as a first strain is that it produces a large, rewarding harvest with a balanced effect profile that suits a wide range of users. That combination makes the first grow feel genuinely worthwhile rather than just educational. The Blue Dream strain review goes further on the lineage and what to expect from the grow. Available as Blue Dream Feminised and Auto Blue Dream.

3. Girl Scout Cookies: Compact and Reliable

GSC sits in a useful position for first-time growers: compact enough to manage in limited indoor space, indica-dominant enough to flower relatively quickly, and with a terpene profile of caryophyllene, limonene and linalool that produces a complex, rewarding result worth all the effort of a first grow. The Cookie Fam genetics have been extensively stabilised across decades of breeding, which means the phenotype expression is more consistent than newer, less established genetics.

The one caveat: GSC carries the nutrient sensitivity of its OG Kush lineage. Overfeeding in the first three weeks is the most common way first-time growers damage this strain, so start at quarter strength and build slowly. Jason’s autoflower EC and feeding guide gives GSC its own section and covers exactly where the nitrogen sensitivity bites. Both GSC Feminised and Auto GSC are in the catalogue.

Auto Girl Scout Cookies feminised cannabis seeds Australia

Auto Girl Scout Cookies Feminised Seeds

From $75.00

4. Gorilla Glue: Vigorous Genetics, Needs Humidity Attention

GG4 is Jason’s Friday afternoon strain, and Jess is happy to recommend it to a first-time grower with one caveat stated clearly: the extraordinary resin production that makes GG4 exceptional also creates dense, heavy buds that are more susceptible to botrytis in high-humidity conditions than less resinous genetics. In Australian coastal summer conditions that’s a meaningful consideration. In drier climates or with adequate airflow and humidity management, GG4 is one of the most vigorous and rewarding genetics in the catalogue.

What makes GG4 relatively tolerant for a first grow is the hybrid vigour from the Chem’s Sister × Sour Dubb × Chocolate Diesel cross. The plant grows with real energy and recovers from feeding and watering errors faster than more sensitive genetics. The auto version is the more practical first-grow format given the fixed 70 to 75 day timeline. The Gorilla Glue review and grow guide covers the humidity management in detail. Available as Gorilla Glue Feminised and Auto Gorilla Glue.

Auto Gorilla Glue feminised cannabis seeds Australia

Auto Gorilla Glue Feminised Seeds

From $75.00

5. White Widow: Dutch Classic, Earned Reputation

White Widow won the Cannabis Cup in 1995 and has been in continuous production since. That longevity is the most reliable indicator of genuine genetic quality, because a strain that remains in demand for three decades is doing something right. The Brazilian sativa and South Indian indica cross produces a balanced hybrid with exceptional trichome production, good resistance to temperature variation, and a relatively compact structure that manages itself without aggressive training.

White Widow is not the most exciting recommendation, but it’s one of the most honest. The genetics are well understood, the phenotype expression is consistent, and the result of heavy resin coverage, balanced effect and a familiar profile is rewarding for a first grow. Available as White Widow Feminised and Auto White Widow.

Auto White Widow feminised cannabis seeds Australia

Auto White Widow Feminised Seeds

From $75.00

6. Purple Kush: Compact, Fast, Hindu Kush Resilience

Purple Kush brings Hindu Kush × Purple Afghani genetics, a near-pure indica with the structural and environmental resilience that Afghani landrace genetics encode. It stays compact at 60 to 90 cm, flowers in 7 to 9 weeks, and the cool-night purple phenotype expression gives first-time growers a visually rewarding harvest that’s distinctly different from green-only genetics. The myrcene-dominant terpene profile produces deep body relaxation, a genuinely good evening indica from straightforward, well-understood genetics.

Particularly well-suited to Australian growers in cooler climates where the temperature differential in autumn encourages the purple expression and the shorter season suits the faster finishing genetics. Available as Auto Purple Kush, with the rest of the heavy end of the catalogue on the indica seed page.

Auto Purple Kush feminised cannabis seeds Australia

Auto Purple Kush Feminised Seeds

From $75.00

7. Granddaddy Purple: Myrcene and Linalool, Good Outdoor Option

Granddaddy Purple, a Purple Urkle × Big Bud cross, adds linalool to the myrcene foundation, producing one of the more pronounced sedative terpene combinations in the indica catalogue. The purple phenotype expression is reliable across growing conditions rather than requiring specific temperature triggers, the bud structure is dense and resinous, and the Big Bud parentage contributes yield potential that exceeds what the compact plant size suggests.

For Australian outdoor growers GDP is a practical choice. It handles the autumn harvest window well and the coloration develops noticeably as night temperatures drop in March and April, which the Granddaddy Purple strain review covers alongside Ken Estes and the breeding story. Available as Granddaddy Purple Feminised and Auto Granddaddy Purple.

Auto Granddaddy Purple feminised cannabis seeds Australia

Auto Granddaddy Purple Feminised Seeds

From $75.00

8. Super Skunk: Old-School Genetics, Genuine Outdoor Resilience

Super Skunk is Skunk #1 × Afghani, old-school genetics bred at a time when resilience and outdoor performance were the primary breeding objectives rather than THC maximisation or flavour complexity. The Afghani indica backbone gives it genuine structural robustness. It handles temperature variation, pest pressure, and feeding inconsistency better than most modern genetics precisely because it was bred for exactly those conditions. It doesn’t produce the most sophisticated effect profile or the most complex terpene expression, but it produces reliably, finishes fast, and gives first-time outdoor growers a result they can be satisfied with. Available as Super Skunk Feminised and Auto Super Skunk.

Auto Super Skunk feminised cannabis seeds Australia

Auto Super Skunk Feminised Seeds

From $75.00

Strains to Avoid on Your First Grow

The strains worth avoiding on a first grow share a common characteristic: they require consistent precision that first-time growers are still developing. That’s not a criticism of the strains, it’s an honest assessment of the match between strain requirements and first-grow skill levels.

Pure sativa landraces such as Durban Poison, pure Thai genetics and pure Haze have flowering periods of 12 to 14 weeks and significant height that demands active management. More time in flower means more opportunities for late-grow mistakes to compound. The longer you’re managing a plant the more that can go wrong, and a first-time grower managing a 14-week flower for the first time is carrying a lot of risk into harvest. Worth saying that these are excellent strains in the right hands, and the regional sativa guide covers which ones actually finish where. Durban Poison in particular is the most forgiving of the pure sativas, so it’s a reasonable second grow rather than a first.

OG Kush cuts and nutrient-sensitive genetics. Many OG Kush phenotypes and some Cookies variants require precise feeding at lower EC ranges than robust indica genetics. First-time growers consistently overfeed, and OG-lineage genetics show stress from overfeeding faster than most. Godfather OG, for example, is an exceptional strain, but it’s not the place to learn feeding discipline.

Experimental or recently released genetics with less than five years of widespread growing history have less documented phenotype variation and fewer community-tested growing parameters. Established genetics with decades of growing data behind them are more predictable because more is known about how they behave across a range of conditions.

Any strain described as “demanding,” “for experienced growers,” or “requires precise conditions” in its description. Believe it. Those descriptors exist for a reason.

Common First-Grow Mistakes and Which Genetics Handle Them Better

Overwatering is the most common first-grow mistake. New growers water too frequently and keep the root zone saturated rather than allowing the wet-dry cycle that drives healthy root development. Northern Lights, Purple Kush, and Super Skunk handle overwatering better than most because the Afghani indica genetics are adapted to soil conditions that vary considerably. GSC and OG-lineage genetics are more sensitive. The fix is simple once understood: water when the top 2 to 3 cm of medium is dry, not on a schedule. Most of the damage happens in the first fortnight, which our cannabis seedling care guide covers stage by stage.

Overfeeding is the second most common mistake. Nutrient manufacturers recommend doses designed to sell nutrients, not to produce healthy plants. First-time growers following bottle recommendations consistently produce nutrient-burned plants. Start at quarter strength of whatever the manufacturer recommends and build from there based on what the plant shows you, and our guide on when to start feeding seedlings covers the first few weeks specifically. Blue Dream, White Widow, and Super Skunk handle overfeeding better than GSC or OG-lineage genetics. When something does go wrong, the nutrient deficiency guide and our answer to why cannabis leaves turn yellow will help you read the leaves.

Temperature fluctuation is particularly relevant in Australia where the difference between day and night temperatures can be significant, and where summer indoor grows can push ambient temperatures above 30°C. Blue Dream and White Widow handle temperature variation better than most. Purple strains and some Cookies genetics are more sensitive to heat. If your grow space gets above 28°C in summer, choose genetics that tolerate heat or manage the timing to avoid growing through the hottest months.

Light schedule errors on photoperiod grows, meaning light leaks, inconsistent timing, or accidental re-vegging, are problems that don’t exist with autoflowers. For indoor first grows where light schedule management hasn’t been tested, autoflowers remove this failure point entirely.

Successful beginner cannabis grow with small indoor setup showing healthy plants ready for harvest in a simple grow environment

Basic Setup for a First Indoor Grow

The equipment required for a first indoor grow is less than most beginners assume. A basic functional setup covers everything you need to produce a first harvest successfully.

What you need: A grow tent or dedicated space with light control. An LED grow light, where 100 to 150W is adequate for one to two plants in a small tent. A fan for airflow, which is critical for stem strength and humidity management. A quality potting mix or coco coir, and our guide on what soil to use covers what actually matters in the mix. Fabric pots, minimum 11 L and better at 20 L, with container sizing and transplant timing covered separately. A pH test kit, where cheap ones work for a first grow. Basic nutrients are optional if using quality potting soil for the first four weeks.

What you don’t need on a first grow: Hydroponic systems. CO2 supplementation. Complex multi-part nutrient lines. Multiple fans and environmental controllers. These things add value as skill increases, but they add complexity that doesn’t improve outcomes at the first-grow stage.

Budget realistically: A functional basic indoor setup in Australia runs $300 to $500 AUD. You can spend more and it will improve results somewhat, but the genetics and the grower’s attentiveness to the plant’s needs matter more than equipment beyond the basics.

One thing worth adding that costs almost nothing: pay attention to your water. Tap water is a more common cause of failed germination and struggling seedlings than most first-time growers realise, and our guide to water quality and seed germination explains why.

Not sure which strain suits your first grow?

Answer six questions and Jess will match you to three strains based on your setup, experience, and goals.

Find Your Strain →

If you take nothing else from this guide, take these five points into your first season.

Key Takeaways: Best Cannabis Strains for First-Time Growers

Forgiving genetics are not foolproof genetics. They tolerate more variation in feeding, watering, and environment than demanding strains, which gives first-time growers room to learn without losing the plant.

Autoflowers are the practical recommendation for most indoor first grows, because removing the light schedule variable lets you focus on the fundamentals.

Indica-dominant genetics with established breeding history, meaning Northern Lights, Purple Kush, White Widow and Super Skunk, are more tolerant of first-grow conditions than pure sativas, OG Kush cuts, or experimental genetics.

Overwatering and overfeeding are the two mistakes that end most first grows. Water when the top 2 to 3 cm is dry, and start nutrients at quarter strength.

Keep the first grow simple: one or two plants, straightforward genetics, basic equipment. Complexity can come later. The strain finder quiz matches you to specific genetics based on your setup, climate zone, and experience level.

First-Time Cannabis Grower: Frequently Asked Questions

Should I start with an autoflower or a photoperiod seed?

For a first indoor grow, autoflowers are the more practical starting point, because they remove light schedule management as a variable while you focus on learning feeding, watering, and environment. For outdoor first grows in most Australian states, the natural day length handles the photoperiod question automatically, so plant at the right time of year and the seasonal light cycle triggers flowering without any intervention. Once you have one grow completed and understand what the plant actually needs, photoperiods give you more control over plant size and timing. The autoflower versus photoperiod guide covers the full comparison.

How many plants should I grow on my first grow?

One to two plants. Managing one plant attentively produces better results than managing four plants poorly. The temptation to maximise the first grow is understandable but misplaced, because the first grow is about learning what the plant needs, not maximising yield. One successful harvest teaches you more than a complicated multi-plant setup that goes partially wrong.

Is it better to start indoors or outdoors?

Indoors gives complete control over the environment, which makes learning more systematic, because when something goes wrong you can identify the cause. Outdoor growing is lower cost and produces larger plants, but introduces weather, pest, and seasonal variables that are harder to manage while simultaneously learning the fundamentals. Both work, and the right choice depends on your situation, budget, and what’s legal in your state. If you’re leaning outdoors, read the Australian outdoor growing guide first, since the planting calendar and the autumn harvest deadline are the two things that decide a first outdoor season.

What is the most common mistake first-time growers make?

Overwatering and overfeeding, usually both simultaneously. New growers consistently water too frequently, keeping the root zone saturated rather than allowing the wet-dry cycle that drives root development. And nutrient manufacturers’ recommended doses are calibrated to sell nutrients, not to produce healthy plants, so first-time growers following bottle recommendations consistently overfeed. Start nutrients at quarter strength and water only when the top 2 to 3 cm of medium is dry. If seedlings are collapsing at the stem base, our guide to damping off and stem rot covers the most common early killer.

Do I need expensive equipment for a first grow?

No. A functional basic indoor setup of grow tent, LED light at 100 to 150W, fan, quality potting mix, fabric pots and pH kit runs $300 to $500 AUD and covers everything needed for a first harvest. Hydroponic systems, CO2 supplementation, and complex nutrient lines add value as skill increases. They don’t improve outcomes at the first-grow stage and add complexity that makes it harder to identify what’s causing problems when things go wrong.

What’s the best germination method for a first-time grower?

The paper towel method, meaning seeds between damp paper towels, kept at 22 to 25°C in a warm dark location, checked every 12 to 24 hours. Most viable seeds show a taproot within 48 to 72 hours. The visibility advantage is valuable for first-time growers, since you can confirm germination has happened before the seed contacts soil. The full step-by-step is in the paper towel germination guide, with the wider method comparison in our complete germination guide.

Are feminised seeds worth it for a first grow?

Yes. Feminised seeds guarantee female plants that produce the harvest you’re growing for. Regular seeds produce roughly half male plants that need to be identified and removed before they pollinate the females. Managing male identification correctly while learning everything else about growing is an unnecessary complication for a first grow. All the strains recommended in this guide are feminised or auto-feminised, and our explainer on what feminised cannabis seeds are covers how they’re made.

What should I do if my first grow fails?

Identify what went wrong, since overwatering and overfeeding are responsible for the majority of first-grow failures, and try again with that specific knowledge. Most experienced growers have had failed first grows. The failure is valuable precisely because it teaches you something concrete about what the plant needs. Try again with simpler genetics, better water quality, and a more restrained feeding and watering schedule. If the seeds never sprouted in the first place, our guide on why cannabis seeds aren’t germinating works through the causes, and every batch we ship is covered by our germination guarantee.

When should I harvest?

Check trichomes rather than relying on the flowering time listed on the seed packet, because those are guides, not guarantees. Harvest when trichomes are mostly milky white with 10 to 20% amber. A jeweller’s loupe or USB microscope is the tool for this, and without one you’re guessing. The trichome harvest timing guide covers the full process, and our guide to reading the whole plant at harvest covers the signals beyond trichome colour.

Related Reading

How to grow cannabis outdoors in Australia, the season calendar, regional harvest deadlines, and the autumn finish.

Best cannabis strains for Australian conditions, regional strain selection and seasonal timing across all Australian climate zones.

Autoflower vs photoperiod seeds, the full format comparison to help decide which suits your first grow setup.

How to germinate cannabis seeds, the complete germination guide for first-time growers.

Cannabis seedling care in Australia, the first two weeks after germination covered in full.

Drying cannabis properly and the complete guide to curing, the two stages that decide what your first harvest actually tastes like.

Browse all cannabis seeds, feminised, autoflower, and photoperiod strains shipped from Australia.

Seeds are sold strictly as novelty collector’s items. They contain no THC or CBD. This page does not constitute medical or legal advice. By purchasing you agree to our terms and conditions. Always check local laws before germinating or cultivating cannabis.

How to Cure Cannabis in Australia — Complete Guide

How to Cure Cannabis in Australia — Complete Guide

Most growers stop the cure too early. The buds smell decent, they’re dry, they burn cleanly enough — and after weeks of growing and two weeks of drying, the patience runs out. I understand it. But curing cannabis in Australia isn’t a formality you do before the real thing. It’s where the final 20–30% of the quality gets built, and cutting it short at two or three weeks leaves that quality on the table every time.

Jess covered the drying process in her complete drying guide. This picks up where that ends — what’s actually happening inside a sealed jar, why it matters, how to manage the process, and how long you actually need to go before the cure is doing everything it can for your harvest.

Curing at a Glance

Target RH in jar 58–65% RH
Temperature 15–21°C — cool and stable
Light Complete darkness
Container Glass only — wide-mouth mason jars
Jar fill 70–80% — leave air space
Burping — weeks 1–2 Once or twice daily, 5–10 minutes
Burping — weeks 3–4 Every 2–3 days
Burping — week 5+ Once a week or seal long-term
Minimum cure 4 weeks — absolute floor
Good cure 6–8 weeks
Exceptional cure 3–6 months for complex terpene profiles
Cannabis curing timeline showing jar RH, smell indicators and burping schedule across three stages from week one to eight

What Does Curing Cannabis Actually Do — The Science Behind the Jar

Curing is a controlled, slow biological and chemical process. Understanding what’s actually happening helps explain why it can’t be rushed and why cutting it short consistently produces inferior results.

Chlorophyll breakdown continues

Freshly dried cannabis still contains residual chlorophyll — the compound that gives the harsh, green, grassy taste to under-cured material. During curing, enzymes continue breaking down chlorophyll in an anaerobic environment. This process takes time and can’t be accelerated. It’s the primary reason a two-week cure smokes harshly compared to a six-week cure from the same harvest — the chlorophyll hasn’t fully broken down.

Terpene development and preservation

This is the most significant quality factor in curing. The terpene profile of cannabis is not fully expressed at harvest — many terpenes continue developing through complex enzymatic processes in the first four to six weeks of cure. Monoterpenes (lighter, more volatile) are present early but can degrade if conditions aren’t right. Sesquiterpenes (heavier, more complex — the deeper earthy, spicy, and fuel notes) develop more slowly and require adequate curing time to reach their full expression. This is why a properly cured OG Kush or Godfather OG smells and tastes dramatically different at week six of cure compared to week two. The genetics haven’t changed — the cure completed what the grow started.

Moisture redistribution

After drying, moisture distribution within individual buds is uneven — the outer surface is drier than the interior. When buds go into sealed jars, that moisture redistributes gradually and evenly. This is why buds that feel crisp going into the jar feel slightly softer after the first day — the internal moisture has moved to the surface. This redistribution is part of the cure, not a sign that the dry was incomplete. Managing this with the correct RH range and regular burping is the core mechanical task of curing.

What curing doesn’t do — the potency myth

A common claim is that curing increases potency by converting THCA to THC. This is largely inaccurate. The THCA-to-THC decarboxylation reaction requires sustained heat — it’s what happens when you apply flame or vaporise cannabis, not what happens in a sealed jar at room temperature. The decarboxylation rate at 20°C over weeks is negligible. Curing improves the smoking and flavour experience significantly, but it doesn’t meaningfully change the cannabinoid content. The potency ceiling was set in the grow, not the jar.

Jason: I’ve had growers tell me their cure “increased the potency” of their harvest. What they’re experiencing is the improvement in flavour and smoke quality that comes from a proper cure — it’s a noticeably better experience than the same genetics under-cured. Whether the THC percentage changed is a different question, and the answer is: not meaningfully. The cure earns its reputation through what it does to terpenes and chlorophyll, not through cannabinoid chemistry.

What Temperature and Humidity Do You Need to Cure Cannabis?

Relative humidity — the most critical variable

The target RH inside the jar is 58–65%. This range supports the enzymatic processes driving chlorophyll breakdown and terpene development while keeping moisture levels low enough to prevent mould. Below 55% RH the cure effectively stalls — the enzymatic processes slow significantly and buds become too dry for further development. Above 70% RH mould risk becomes serious.

The 62% midpoint is where most experienced growers aim. Boveda and Integra both make two-way humidity control packs at 62% that actively add or remove moisture to maintain this level — they’re the most practical solution for maintaining consistent RH without constant monitoring, particularly in Australian conditions where ambient humidity can swing significantly between seasons.

Temperature

15–21°C is the target range. Cooler temperatures slow the enzymatic processes slightly but also reduce terpene degradation and minimise the risk of mould. In Australian summer, keeping jars in an air-conditioned room or a cool interior space is worth the effort — above 24°C the cure environment starts working against terpene preservation. I keep my curing jars in the same cool dark space I use for storage: a temperature-stable interior room away from external walls.

Light

Complete darkness throughout the cure. UV light degrades THC and terpenes at measurable rates — the same reason you keep seeds and finished product away from light. Store jars in a dark cupboard, drawer, or box. If you’re using clear glass jars in a lit space, wrap them or move them. Amber or UV-resistant glass is worth investing in if you’re curing long-term.

Chart showing recommended cure duration by strain type — indica, hybrid, OG-lineage and Cookies-lineage cannabis strains

What Equipment Do You Need to Cure Cannabis?

Containers — glass only

Wide-mouth mason jars are the standard for good reason — they seal reliably, they’re inert (glass doesn’t off-gas anything into your cure), they’re reusable, and the wide mouth makes loading and burping practical. The size that works for most home growers is the 1 litre (quart) jar — large enough to hold a meaningful harvest quantity, small enough that you’re not opening a single large jar and disturbing the whole cure every time you check one batch.

Plastic containers are not suitable for long cures. Even food-grade plastic is slightly gas-permeable over time and can impart subtle flavour compounds into the cure. For a two-week cure the difference is minor; for a three-month cure it’s noticeable. Glass is not negotiable if you’re taking the cure seriously.

Hygrometers

A small digital hygrometer inside each jar tells you the actual RH your buds are sitting at — not the ambient room humidity, which is a different number. They’re available cheaply and are worth using, particularly in the first two weeks when RH is most variable and you’re making daily adjustments. Once you’re using humidity packs and the RH has stabilised, they become less critical — but they’re useful for confirming the pack is doing its job.

Humidity packs

Boveda 62% and Integra Boost 62% are the two main options. Both work on a two-way mechanism — they release moisture when the jar is too dry and absorb it when too humid. For most Australian growers they’re worth using from the start, particularly in the first two weeks when the residual moisture in buds is still moving around. Replace when the pack feels hard and rigid — it’s exhausted its capacity. One pack per litre jar is the standard ratio.

Jason: I’ve cured without humidity packs and I’ve cured with them. With packs the process is more consistent and requires less daily intervention — you’re confirming rather than adjusting. For a first cure or for anyone in a climate with variable humidity, they remove a significant variable. I use them for the first four weeks, then seal without them once the cure is stable.

How to Burp Cannabis Curing Jars — Schedule and Technique

Burping — opening the jars briefly to exchange the air — serves two purposes. It removes the CO2, ammonia, and other gases produced by the ongoing enzymatic processes inside the jar, and it allows moisture-laden air to escape and be replaced with fresh air. Without burping, gas buildup stalls the cure and excess moisture accumulates, raising mould risk.

Weeks 1–2: Daily burping

Open each jar once or twice daily for five to ten minutes. During this period the buds are still releasing significant moisture and the enzymatic activity is at its highest. Each time you open the jar, check the smell — the aroma tells you more than the hygrometer in these early days. Fresh cannabis developing its characteristic profile is correct. Ammonia smell means too much moisture and bacterial activity — leave the jar open longer and increase burping frequency. Hay smell means the dry was too fast and the cure can only partially recover the situation.

Weeks 3–4: Every two to three days

By week three the enzymatic activity has slowed and moisture levels have stabilised. Burping every two to three days is sufficient. The smell should be developing into the characteristic strain profile — the difference between week two and week four is usually significant for complex terpene profiles. Continue checking RH at each burp and adjusting humidity packs if needed.

Week 5 onward: Weekly or seal

Once the cure is well established — stable RH, full strain aroma developing, no signs of excess moisture — you can move to weekly burping or seal the jars for long-term storage with a humidity pack. At this stage the cure is doing its work slowly and doesn’t require daily intervention. Some growers continue weekly burping indefinitely; others seal and store. Both approaches work.

Jason: The smell during burping is information — use it. I’ve opened jars at week three that still had a faint hay note and known immediately they needed another three weeks minimum. I’ve opened others at week four that smelled fully characteristic of the strain and known the cure was where it needed to be. The nose is faster and more accurate than any timer. Let it guide the schedule rather than treating the calendar as the only indicator.

How Long Should You Cure Cannabis?

Four weeks is the absolute minimum for any strain before the cure is doing meaningful work. At two weeks, chlorophyll breakdown is incomplete and the terpene profile is not representative of the genetics. Smoking at two weeks and judging the strain is like eating bread dough and judging the bread.

Six to eight weeks is where most strains reach a quality plateau — the point at which the incremental improvement from additional curing time becomes less pronounced. For straightforward indica-dominant genetics with myrcene-dominant profiles, six weeks will usually produce excellent results. This is the range I’d recommend as the default target.

Three to six months is where complex terpene profiles — particularly OG-lineage genetics with their diesel, grape, and earthy sesquiterpene profiles — continue to develop noticeably. Godfather OG, Gorilla Glue #4, and the Cookies-lineage strains all benefit from extended cures. The difference between a six-week cure and a four-month cure on Godfather OG is not subtle. If you can set aside a portion of your harvest for extended curing, the genetics that will benefit most are the ones with complex, heavy terpene profiles.

There is a ceiling. Beyond six months most strains start to plateau or very slowly decline in terpene intensity as the more volatile compounds continue to degrade. For long-term preservation beyond six months, the focus shifts to storage conditions rather than continued cure development — cool, dark, stable humidity, minimal oxygen.

Jason: The hardest part of curing is accepting that the timeline is determined by the chemistry, not by your patience. I’ve opened jars at three weeks on a strain I know well and been genuinely surprised by how much further it had to go. The smell at three weeks and the smell at six weeks from the same jar are sometimes dramatically different. Trust the process and set a calendar reminder rather than relying on willpower.

Which Strains Benefit Most from Extended Curing?

Not all strains respond equally to an extended cure. The strains that develop most noticeably beyond the six-week standard are those with complex sesquiterpene-dominant profiles — the heavier, slower-developing compounds that produce diesel, earthy, grape, and spice characteristics. These require time that lighter, more volatile monoterpenes don’t.

Godfather OG — the earthy pine and grape character that defines this strain’s reputation is a sesquiterpene-driven profile. At four weeks it’s decent. At three months it’s recognisably Godfather OG. The cure makes more difference to the final flavour of this strain than almost any other in our range.

Gorilla Glue #4 — the diesel and chocolate notes in GG4 are complex and develop slowly. An eight-week cure versus a four-week cure from the same harvest is a noticeable difference in depth and flavour intensity.

Girl Scout Cookies — the baked goods, earthy spice, and mint profile of GSC is one of the most cure-responsive terpene profiles available. Jess won’t smoke it before four weeks and rates it best at six to eight. The cure is not optional with this strain.

Simpler profiles cure faster. Northern Lights, Purple Kush, and indica-dominant strains with straightforward myrcene-dominant profiles reach their plateau earlier — six weeks is usually where they’re fully expressing. Indica-dominant genetics generally don’t require the extended three to six month cures that OG and Cookies-lineage strains do.

Curing in Australian Conditions

Summer heat

Above 24°C the cure environment works against you — terpene degradation accelerates and mould risk increases. If you’re harvesting in late summer or early autumn and curing through the heat, find the coolest stable space available. Air conditioning is worth running for the cure if you have it. Avoid storing jars in sheds, garages, or any space that gets direct afternoon sun. Interior rooms, particularly those away from external walls, tend to be the most temperature-stable. A small cooler or insulated box in a cool room provides additional temperature buffering without refrigeration.

Coastal humidity

In high ambient humidity — coastal Queensland and NSW through summer — the moisture trying to enter your jars every time you burp is the main challenge. Keep burping brief in these conditions: five minutes maximum in humid weather, less if ambient RH is above 70%. Humidity packs become more important, not less, in high-humidity environments — they’re actively absorbing moisture that would otherwise push the jar RH above the safe range. Consider burping in the early morning when temperatures are lower and humidity is typically more manageable.

Dry inland conditions

In low-humidity inland areas, the risk runs the other direction — jars losing moisture too quickly during burping and buds drying out in the cure. Humidity packs at 62% provide the necessary buffer, actively releasing moisture to maintain the jar at target. Keep burping times brief and consider sealing with a pack earlier than you would in coastal conditions — once the initial high-activity period is past, the pack maintains the environment without daily intervention.

Infographic showing the three processes inside a cannabis curing jar — chlorophyll breakdown, terpene development and moisture redistribution over eight weeks

How to Store Cannabis After Curing

Once the cure is complete — typically six to eight weeks minimum — the goal shifts from active development to preservation. The enemies are the same as the enemies of stored seeds: heat, humidity, light, and oxygen. Sealed glass jars with a 58% humidity pack in a cool dark space will preserve properly cured cannabis for twelve months with minimal quality loss. Beyond twelve months, terpene intensity will gradually decline regardless of conditions — the cannabinoid content is more stable than the terpene profile over time.

For storage beyond twelve months, vacuum-sealing inside glass reduces oxidation and slows terpene degradation meaningfully. Freezing is viable for very long-term preservation — frozen with minimal moisture and oxygen, cannabis can remain stable for years — but the freeze-thaw cycle damages trichomes if repeated. Freeze once, thaw once. The seed storage guide covers the underlying principles in detail — the same variables of temperature, humidity, darkness, and oxygen apply to both.

Common Cannabis Curing Mistakes — and How to Avoid Them

Stopping too early. The most common mistake by a significant margin. Four weeks is the minimum — six to eight weeks is where the genetics express themselves properly. Impatience costs more quality than any other single factor in the post-harvest process.

Using plastic containers. Plastic is gas-permeable and imparts trace compounds into the cure over weeks. Glass is the correct container for any cure longer than two weeks.

Storing in light. UV light degrades THC and terpenes measurably. Dark storage throughout the cure is not optional.

Jarring too wet. Buds that didn’t pass the stem snap test before going in the jar will push RH well above 70% and create mould conditions within days. The dry has to be complete before the cure begins — the jar doesn’t finish what the dry didn’t.

Skipping burping entirely. Leaving jars completely sealed without burping allows gas buildup that stalls the cure and creates an environment that promotes anaerobic bacterial growth. The ammonia smell that results from this is the cure telling you it needs air exchange.

Over-burping in humid conditions. In coastal Australian summer, leaving jars open for 30+ minutes in 75% RH ambient air adds significant moisture to the cure. Keep burping brief in humid conditions and let humidity packs do the management work.

Curing Problems — Mould, Ammonia, and How to Fix Them

Ammonia smell in the jar

Ammonia smell means bacterial activity from excess moisture — the buds were either too wet going in or the jar accumulated too much humidity without adequate burping. Open the jar and check for visible mould. If no mould is present, leave the jar open for one to two hours to allow moisture to escape, then resume the cure with more frequent burping and a 62% humidity pack to stabilise. If the ammonia smell persists after airing out, inspect all buds closely — the bacteria producing that smell will degrade quality significantly if left unchecked.

Mould in the jar

Remove affected buds immediately and discard — mouldy material cannot be salvaged and the mould spores will spread to the rest of the jar if left. Inspect remaining buds under bright light, checking inside dense colas. If mould is isolated to one or two buds, the rest can potentially be saved — air out the jar, allow to dry slightly if RH was above 70%, and resume the cure with more frequent monitoring. If mould is widespread, the batch is compromised. The cause is almost always buds that were too wet going into the jar.

Buds too dry in the jar

If the hygrometer is reading below 55% RH and buds feel brittle, the cure has effectively stalled. Add a 62% humidity pack and seal the jar — the pack will slowly release moisture and bring the RH back into range. It takes 24–48 hours for the pack to do its work. Once RH stabilises at 58–62%, resume normal burping schedule. Terpene development that stalled during the dry period will resume once moisture is restored to the correct range.

Hay smell persisting into the cure

A persistent hay smell beyond week two of cure indicates the dry was too fast and terpenes were lost before the jar went on. The cure will help — chlorophyll will continue to break down and the smoke will smooth out — but the terpene profile that evaporated during a fast dry is gone permanently. A six to eight week cure is the best available recovery option, and it will produce a noticeably better result than giving up at three weeks. The genetics are still there; it’s the top layer of aromatics that was lost. Extend the cure and give the remaining terpenes time to develop as fully as possible.

Planning your next grow?

Answer six questions and Jess will match you to three strains based on your setup, experience, and goals.

Find Your Strain →

Cannabis Curing — Frequently Asked Questions

What is curing and why does it matter?

Curing is a controlled slow process that continues breaking down chlorophyll, develops the terpene profile, and redistributes moisture evenly through dried buds. It’s the difference between cannabis that smokes harshly and tastes green and cannabis that expresses the full flavour and smoothness the genetics are capable of. The cure can’t fix a bad grow, but it completes what a good grow started — and skipping it or rushing it leaves a significant portion of the potential quality unrealised.

How long should I cure cannabis?

Four weeks is the absolute minimum. Six to eight weeks is where most strains reach a quality plateau. Complex terpene profiles — OG-lineage genetics, Cookies-lineage, heavy diesel and earthy strains — benefit from three to six months of curing. The timeline is determined by the chemistry, not by patience. Set a calendar reminder and don’t open the jars to judge early.

What RH should my curing jars be at?

58–65% RH inside the jar. Below 55% the enzymatic processes stall and buds become too dry for further development. Above 70% mould risk becomes serious. The 62% midpoint is the practical target — Boveda and Integra humidity packs at 62% maintain this passively without constant monitoring.

Does curing increase potency?

Not in any meaningful sense. The conversion of THCA to THC through decarboxylation requires sustained heat — it doesn’t happen at room temperature in a sealed jar at rates that matter. What curing does is improve the flavour, aroma, and smoothness of the smoke significantly — which produces a noticeably better experience from the same cannabinoid content. The potency ceiling was set in the grow.

Can I cure in plastic containers?

Not recommended for anything beyond a week or two. Plastic is gas-permeable and can impart trace compounds into the cure over extended periods. Wide-mouth glass mason jars are the correct container. The investment is minimal and the difference over a six-week cure is real.

What does ammonia smell in the jar mean?

Bacterial activity from excess moisture. The buds went in too wet, or the jar accumulated humidity without adequate burping. Open and air out for one to two hours, check for mould, add a 62% humidity pack, and resume with more frequent burping. If the smell persists after airing, inspect all buds carefully.

How often should I burp curing jars?

Once or twice daily for the first two weeks, for five to ten minutes each time. Every two to three days in weeks three and four. Weekly from week five onward, or seal with a humidity pack for long-term storage. In high-humidity Australian conditions, keep burping times brief — five minutes maximum when ambient RH is above 65%.

Can I cure different strains in the same jar?

Technically yes, but there’s no good reason to. Different strains cure at slightly different rates and their terpene profiles will mix in the jar. Keep strains separate — label jars clearly with strain name and harvest date. Mixing makes it impossible to evaluate individual strain quality and harder to identify problems specific to one variety.

What’s the difference between 58% and 62% humidity packs?

The 58% pack targets the lower end of the acceptable cure range — better for strains prone to mould or for storage after the cure is complete. The 62% pack targets the midpoint of the cure range and is better for active curing where you want enzymatic processes running at full capacity. Most growers use 62% for curing and switch to 58% for long-term storage.

How do I know when the cure is finished?

The cure is never truly “finished” in the sense of a definitive endpoint — quality continues to develop slowly for months in well-stored cannabis. The practical answer is that after six to eight weeks, the incremental improvement from additional curing slows significantly for most strains. The aroma should be fully characteristic of the strain, the smoke should be smooth and clean, and the RH should be stable without daily intervention. At that point you can move to long-term storage conditions.

Related Reading

How to dry cannabis in Australia — Jess’s complete drying guide covering environment, methods, the stem snap test, and drying in Australian conditions. Read this before the cure.

Knowing when to harvest cannabis — trichome reading, regional timing, and harvest indicators. The step before the dry.

High-THC cannabis seeds in Australia — the OG-lineage and Cookies-lineage genetics that benefit most from extended curing, including Godfather OG, Gorilla Glue #4, and Girl Scout Cookies.

How to store cannabis seeds in Australia — the same principles of temperature, humidity, darkness, and oxygen control that govern long-term storage of cured cannabis.

Browse all cannabis seeds — over 50 feminised, autoflower, and photoperiod strains shipped from Australia.

Seeds are sold strictly as novelty collector’s items. They contain no THC or CBD. This page does not constitute medical or legal advice. By purchasing you agree to our terms and conditions. Always check local laws before germinating or cultivating cannabis.

The Complete Guide to Drying Cannabis: Avoiding the #1 Mistake Australian Growers Make

The Complete Guide to Drying Cannabis: Avoiding the #1 Mistake Australian Growers Make

Drying is where months of careful growing either pays off or gets quietly ruined. You’ve harvested your cannabis — now the question is whether the terpenes, the flavour, and the potency you’ve spent that time building will make it through to the jar. Get the drying right and they will. Rush it, and the best genetics in the world won’t save the result.

This guide covers everything you need: the right environment, the three drying methods and when to use each, a step-by-step process, how to handle the specific challenges Australian conditions throw at you, and what to do when things go wrong. Slow is the theme throughout.

Cannabis buds hanging upside down to dry in a dark, temperature-controlled drying room with proper airflow.

Why Drying Matters More Than Most Growers Realise

When Jason and I started Sacred Seeds, one of the first things we noticed was how many growers would do everything right during the grow — proper nutrition, good training, knowing when to harvest — and then lose the quality in the dry. It broke our hearts, because we knew how much work they’d put in. The buds looked fine. They just smelled like grass clippings and tasted harsh. Between us, we did more harvesting and drying in California in our younger days than we’d care to count — enough to last three lifetimes, as Jason likes to say. We learned what a bad dry costs the hard way, long before we brought those lessons back to Australia.

The terpenes responsible for a strain’s aroma and flavour are volatile compounds. They evaporate readily under heat and dry out quickly without adequate humidity. Dry too fast and they’re gone — permanently. Dry too slow and mould takes over. The window is real and it rewards patience and attention, not speed.

The other thing happening during a slow dry is chlorophyll breakdown. Fresh-cut cannabis contains high levels of chlorophyll that contribute to the harsh, green taste of uncured material. A 10–14 day dry at the right temperature and humidity allows those compounds to break down naturally. Rush to 4–5 days and they don’t. The cure can help but it can’t fully fix what a bad dry destroys.

The Biggest Mistake: Drying Too Fast

If there’s one thing I’d change about how most Australian growers approach the dry, it’s the timeline. The excitement of harvest, the anxiety about mould, the lack of a dedicated space — all of it pushes people toward a 4–5 day dry in a warm room. The result is always the same: buds that smell like hay, smoke that catches in the throat, and a flavour profile that doesn’t come close to what the genetics can produce.

A 3–5 day dry produces buds where terpenes have largely evaporated, chlorophyll hasn’t broken down, the outer surface feels crispy while moisture is still trapped in the centre — a false dry that causes problems when the jar goes on — and the characteristic hay smell that no amount of curing will fully reverse. The terpenes that left during a fast dry do not come back.

The fix is straightforward: aim for 10–14 days. It requires patience and some environment management, but the difference in the final product is not subtle. Strains bred for complex terpene expression in Australian conditions particularly reward a slow dry — the full profile only comes through if the dry preserves what the plant produced.

The Ideal Drying Environment

The standard reference point is 15°C and 60% RH — the so-called 60/60 rule. In practice, achieving 15°C in an Australian summer is difficult without air conditioning, and coastal humidity can push well above 60% without intervention. The table below gives the ideal targets alongside what’s acceptable and what starts causing problems.

Factor Ideal Acceptable Danger Zone
Temperature 15–18°C 13–21°C Below 10°C or above 24°C
Humidity 55–60% RH 50–65% RH Below 45% or above 70%
Airflow Gentle, indirect circulation Light movement, not directly on buds No airflow or direct fan on buds
Light Complete darkness Minimal ambient light Direct sunlight or bright light

Temperature: Cooler preserves terpenes. Every 10°C increase roughly doubles the rate of terpene evaporation. If 15°C isn’t achievable, aim for 18–20°C. Above 24°C the losses accelerate quickly.

Humidity: This is the harder variable to manage in Australia. Summer humidity on the coast can sit at 70%+ RH; inland areas in winter can drop to 30% RH. Both extremes require intervention — a dehumidifier for high humidity, a humidifier or wet towels in an enclosed space for low humidity. A $15 digital hygrometer placed at bud height is the most useful piece of equipment you can add to a drying setup.

Airflow: The goal is gentle circulation — air moving through the space, not wind across the buds. Point a small oscillating fan at the wall or ceiling, not at the branches. This prevents stagnant pockets where mould develops without accelerating the dry unevenly.

Light: Complete darkness. Light degrades THC and terpenes during drying. Cover windows with blackout curtains or cardboard if your drying space has natural light.

Comparison between over-dried cannabis buds and properly dried buds showing quality differences

Drying Methods — Whole Plant, Branch Hang, Wet Trim

There are three main approaches and the right one depends on your space, your climate, and your priorities.

Whole Plant Hang

Cut the entire plant at the base and hang it upside down intact. This is the slowest method — 12–16 days — and produces the best terpene preservation because moisture moves gradually from the thick stems through to the buds rather than evaporating directly from bud surfaces. Minimal handling means minimal trichome damage. The downside is the space requirement — you need significant vertical clearance and horizontal spread. In high humidity environments, the slower dry also increases mould risk. This is the method to use when you have the space, can control the environment, and want maximum quality.

Branch Hang

Cut the plant into individual branches and hang each one separately. Moderate dry time — 10–14 days — with more flexibility than the whole plant method. Easier to check individual branches for readiness and remove them as they finish rather than waiting for the entire plant. Slightly more handling means marginally more trichome exposure, but in practice the difference is minor. This is the practical default for most home growers — the balance between quality and manageability is right.

Wet Trim and Hang

Trim all leaves immediately after harvest, then hang individual buds or small sections. Faster dry — 7–10 days — because the moisture-holding leaf material is removed upfront. Trimming is easier when the plant is fresh. The trade-off is more terpene loss from the faster dry and significantly more handling. In high-humidity coastal environments where the slower whole-plant and branch methods raise mould risk, wet trimming is often the right call despite the quality trade-off. Mould on finished buds is worse than some terpene loss.

Jess: My default is branch hang when conditions allow. If I’m harvesting in coastal Queensland in February and the humidity is sitting at 75% RH, I wet trim — the mould risk isn’t worth the terpene difference. For autumn harvests in more controlled conditions, branch hang every time.

Step-by-Step: How to Dry Cannabis

Step 1 — Prepare the Drying Space Before Harvest

Have the space ready before you cut anything. Setting up after harvest while holding freshly cut plants is avoidable stress. You need: a dark room or closet, string or wire for hanging, a thermometer and hygrometer at bud height, a small oscillating fan, and a dehumidifier or humidifier depending on your ambient conditions. Run the setup for 24 hours before harvest to confirm you can hold your target temperature and humidity range.

Step 2 — Harvest and Initial Prep

Harvest in the early morning before heat and light exposure — terpene content is at its highest then. If you’re unsure whether your plants are ready, the trichome harvest guide covers exactly what to look for. Cut and remove large fan leaves immediately; they hold moisture and slow drying without adding value. Leave sugar leaves on for now — they protect trichomes during the dry and are easier to trim once the plant has dried. Inspect everything for mould or pest damage and discard affected material before it goes into the drying space. Handle gently throughout — trichomes break off with rough treatment.

Step 3 — Hang and Monitor

Hang branches upside down with space between them — branches touching each other restricts airflow and creates mould conditions. Check temperature and humidity twice daily for the first week. Smell the space each time: fresh cannabis throughout is correct; hay smell means drying too fast; musty smell means humidity is too high. Rotate branches if some areas of the room are drying faster than others. Resist the urge to handle buds more than necessary.

Step 4 — The Stem Snap Test

From day seven onwards, check readiness daily using the stem snap test. Small stems — pencil thickness or less — should snap with a clean crisp sound when bent. Larger stems will bend but start to crack rather than flex smoothly. If stems bend without resistance and feel rubbery, keep drying. If all stems snap easily and buds feel brittle and crumbly, you’ve gone slightly too far — but this is recoverable in the cure with humidity packs.

Additional readiness indicators: buds feel dry on the outside with slight give when gently squeezed; smaller buds are fully dry while larger ones retain slight moisture; aroma is strong and characteristic of the strain, not hay-like. When in doubt, err slightly moist — jars can continue the process, but you can’t reverse over-drying.

Step 5 — Trim and Move to Cure

Once the stem snap test is positive, trim remaining sugar leaves — save them for edibles or hash — and move buds to glass jars filled 70–80% full with a small hygrometer if you have one. If you’ve been running a flush in the final week (which makes a noticeable difference to flavour — the nutrients guide covers flush timing in detail), your buds should be clean and ready for the jar. Seal and begin curing. Jason covers the curing process in detail in his complete guide to curing cannabis.

Home cannabis drying setup with hanging branches, hygrometer, and proper airflow

Drying in Australian Conditions — Common Challenges

High humidity — coastal areas and summer

70–80% RH slows drying and raises mould risk significantly. A dehumidifier is the effective solution — desiccant packs around the space help but won’t manage coastal summer humidity on their own. Increase airflow, consider wet trimming to remove moisture-holding leaf material, check buds twice daily for mould, and dry in smaller batches to reduce the moisture load in the space.

Low humidity — inland areas and winter

30–40% RH causes a 5–7 day dry that destroys terpenes. Use a humidifier to bring RH up to 55–60%. Reduce airflow to the minimum needed for circulation. Dry whole plant rather than branches to slow the process. Wet towels in an enclosed space provide a low-cost humidity boost — bowls of water help but require close monitoring.

High temperature — summer heat

Above 24°C terpene loss accelerates. Dry in the coolest room available — interior rooms and bathrooms tend to be cooler than rooms with external walls. Air conditioning is worth running for the 10–14 day dry if it’s available. Avoid drying in sheds, garages, or any outdoor structure in summer. If no air conditioning: dry at night when temperatures drop and keep the space closed during the warmest part of the day.

Limited space

A wardrobe or closet works well — hang clothes elsewhere temporarily and set up string for branches. A 60×60 cm grow tent is a practical dedicated drying space for small to medium harvests with full environment control. Drying racks are more space-efficient than hanging for very limited spaces. Dry in batches if necessary rather than crowding the space and restricting airflow.

Common Drying Mistakes

Pointing the fan directly at buds. Causes uneven drying — buds closest to the fan over-dry while others are still moist. Point the fan at the wall or ceiling for indirect circulation.

Drying in light. Light degrades THC and terpenes during the dry. Complete darkness is the target. Cover windows, use a dark room or tent.

Handling buds too often. Every time you open the drying space you disrupt temperature and humidity. Every time you touch buds you knock off trichomes. Check once in the morning and once in the evening — no more.

Using the feel test instead of the stem snap test. Buds feel dry on the outside after 5–7 days but moisture is still in the stems and centre. The stem snap test is the reliable indicator, not surface texture. Jarring too early redistributes internal moisture back to the outer bud and creates mould conditions.

Ignoring the smell. Your nose is the most useful early warning system in the drying space. Hay smell means drying too fast — increase humidity, lower temperature, reduce airflow. Musty smell means mould is developing — increase airflow, decrease humidity, inspect all buds immediately.

When Things Go Wrong

Dried too fast — hay smell

The terpenes that evaporated during a fast dry are gone and won’t return. The situation is partially recoverable: place buds in jars with 62% Boveda or Integra humidity packs, seal for 24 hours to rehydrate slightly, then proceed with a long cure of six to eight weeks minimum. The hay smell will fade somewhat and the smoke will smooth out, but the full terpene profile the genetics were capable of is not coming back. The cure is the best tool available at this point — use it thoroughly.

Mould found during drying

Remove affected buds immediately and discard them — don’t try to salvage mouldy material. Inspect all remaining buds carefully under bright light, checking inside dense colas where mould typically starts. If mould is isolated to one or two buds the rest can usually be saved. Immediately increase airflow, decrease humidity, and space out remaining branches. Consider wet trimming remaining buds to remove the moisture-holding leaf material that contributed to the problem. Monitor twice daily until dry.

Over-dried — crispy buds

Partially recoverable. Place buds in jars with 62% Boveda packs, seal for 48–72 hours. Buds will reabsorb moisture from the pack and become less brittle. Proceed with normal curing. The texture improves and the smoke becomes less harsh, but terpenes lost to over-drying don’t return. The cure will still improve what’s there — don’t skip it.

Planning your next grow?

Answer six questions and Jess will match you to three strains based on your setup, experience, and goals.

Find Your Strain →

Cannabis Drying — Frequently Asked Questions

Can I speed up drying with a dehydrator or oven?

No. Heat destroys terpenes and degrades THC — you’ll end up with harsh, flat-tasting buds regardless of how good the genetics were. If you need a quick sample, the paper bag method (a small bud in a paper bag for 3–4 days) is the least-damaging fast option. For your main harvest, the 10–14 day dry is not optional if quality matters to you.

Should I trim before or after drying?

Both methods work and the right choice depends on your conditions. Wet trimming before drying is easier — leaves are pliable and the work is faster — but it speeds up the dry and reduces terpene preservation. Dry trimming after drying is more tedious because leaves are brittle, but it slows the dry and preserves terpenes better. In high humidity where mould risk is real, wet trimming is often the safer call despite the quality trade-off.

How do I know if my buds have mould?

Mould appears as white, grey, or black fuzzy growth, usually starting inside dense colas where moisture is trapped. The smell is musty or like mildew — distinctly different from cannabis. If you suspect mould, break open the densest buds and check inside under bright light. Any fuzzy growth means discard that bud immediately and inspect everything else.

Can I dry in a cardboard box?

It works for a small harvest in a pinch — punch holes for airflow, place in a cool dark space, and monitor closely. The limitation is environment control: you’re at the mercy of ambient conditions. A dedicated closet or small tent is significantly better, but a cardboard box beats drying in a warm bright room.

What if I don’t have a hygrometer?

A digital hygrometer costs $10–15 and is the most useful piece of kit for drying and curing — worth getting. Without one, rely on the stem snap test and your nose. Stems should snap cleanly, buds should feel dry on the outside but not crumbly, and the smell should be strong and pleasant throughout the dry. It’s less precise but experienced growers managed without hygrometers for decades.

How long can I leave buds hanging before they over-dry?

In ideal conditions (15–18°C, 55–60% RH), you can safely dry for 14–16 days. In drier conditions (50% RH or lower), over-drying can happen by day 10–12. Check daily from day seven using the stem snap test. Once smaller stems snap cleanly, move to jars.

Can I dry different strains together?

Yes, but different strains — and different plants of the same strain — dry at different rates. Denser buds take longer than airy ones. Check each branch individually and remove as they finish rather than waiting for everything to be done at the same time. Label branches if you’re drying multiple strains.

What should I do with trim and sugar leaves?

Keep them. Sugar leaves covered in trichomes are valuable for edibles, cannabutter, hash, or concentrates. Dry them alongside your buds and store separately. Even fan leaves can go into low-potency edibles or compost — nothing from a good harvest needs to go in the bin.

Is it normal for buds to smell different during drying?

Yes. Fresh-cut plants have a strong green smell. From days 3–5 the smell may soften or develop a mild hay note — this is normal if it’s mild and temporary. By days 7–10 the characteristic strain aroma should reassert itself and strengthen. A persistent strong hay smell or any musty note indicates a problem that needs to be addressed.

Can I dry in a grow tent?

A grow tent is an ideal drying space — remove lights, set up hanging lines, add a small fan and hygrometer, and you have a controllable dark environment. Clean the tent before use to remove any pests or mould spores from the growing cycle. Many growers use the same tent for both growing and drying, cycling between them.

What if buds feel dry outside but stems won’t snap?

Keep drying. Moisture is still in the stems and the centre of the buds — the outer material dries first. Jarring now will redistribute that internal moisture back to the bud surface, which leads to mould in the jar. The stem snap test is the correct indicator, not surface feel.

Should I remove stems before curing?

Remove large stems and cure buds on smaller stems — they fit better in jars and are easier to handle. Some growers cure with all stems intact, which slightly slows moisture loss during the cure. Either approach works as long as the dry is complete before anything goes in the jar. Never jar wet stems.

Can I use a non-oscillating fan?

Yes — point it at the wall or ceiling rather than at the buds. The goal is air movement through the space, not airflow across bud surfaces. A stationary fan aimed at the wall keeps air circulating and prevents the stagnant pockets where mould develops.

A proper dry takes 10–14 days and rewards patience with buds that smell, taste, and smoke the way the genetics are capable of. The environment management isn’t complicated — temperature, humidity, darkness, and gentle airflow — but it does require daily attention. Get those conditions right and hold them, and the cure that follows has something worth working with.

Jason covers the curing process in the next guide — how to dial in the cure for maximum quality, the science behind what’s happening in the jar, and why most growers stop the cure too early.

— Jess

Related Reading

When to harvest cannabis in Australia — reading trichomes, regional timing, and harvest indicators beyond pistil colour.

Autoflowering cannabis seeds — if you’re planning your next grow, the auto range suits multiple harvests per season.

How to grow autoflowers week by week — the full grow guide from seed to harvest, covering everything before the dry.

Browse all cannabis seeds — over 50 feminised, autoflower, and photoperiod strains shipped from Australia.

Seeds are sold strictly as novelty collector’s items. They contain no THC or CBD. This page does not constitute medical or legal advice. By purchasing you agree to our terms and conditions. Always check local laws before germinating or cultivating cannabis.