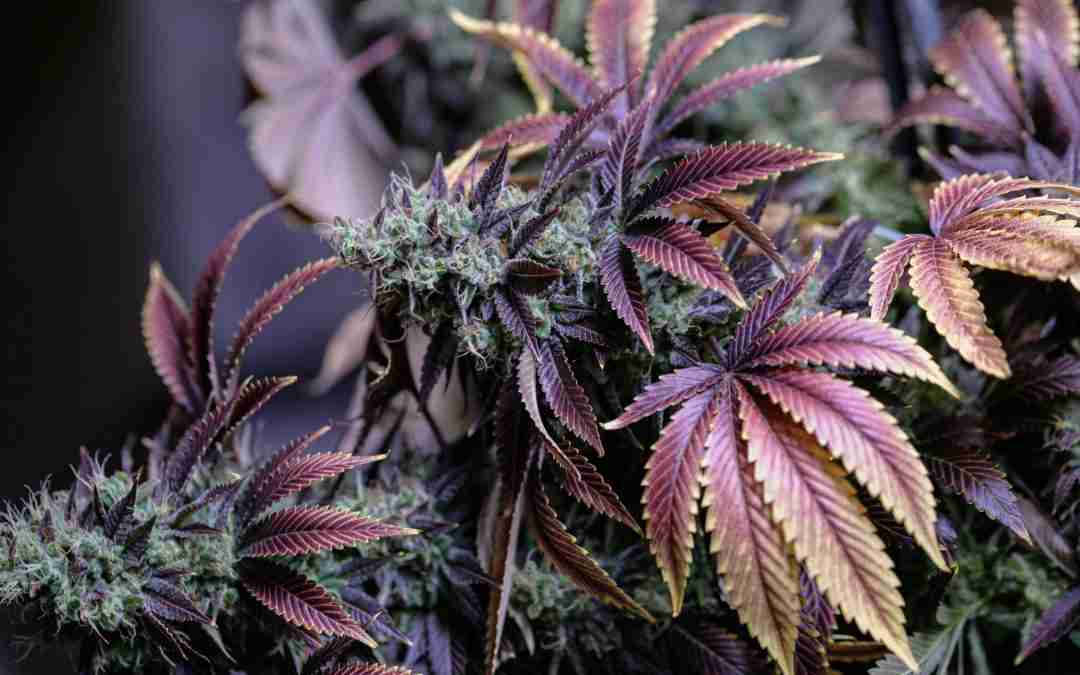
This guide is for outdoor collectors. If you’re growing indoors with controlled environments, climate doesn’t matter—you can grow any strain. But outdoors? Australia throws everything at you.
From Far North Queensland’s stifling 90% humidity and monsoon rains, to Perth’s relentless 45°C summer days with months of drought, to Tasmania’s short growing season that ends with March frosts. Getting outdoor strain selection wrong means watching months of work rot from bud mould, shrivel from heat stress, or get killed by early cold snaps.
This guide covers over 40 tested strains from our range—each matched to specific Australian outdoor climate zones. Whether you’re battling tropical humidity, desert heat, unpredictable coastal weather, or racing against frost, you’ll find genetics that actually survive (and thrive) in your outdoor conditions.
Quick Reference: Match Your Climate to the Right Strain
Your Climate
Key Challenge
Best Strains
🥵 Hot & Humid QLD, NT
Mould, bud rot
Amnesia Haze, Durban Poison, Moby Dick, Special Lime Haze
☀️ Hot & Dry WA, SA
Heat stress, drought
Master Kush Grand, Black Domina, Blue Dream, White Widow
🌦️ Temperate NSW, VIC coast
Variable weather
Gorilla Glue, Runtz, Zkittlez, Bruce Banner
🥶 Cool/Short TAS, High Country
Frost, short summer
Northern Lights, Purple Kush, Granddaddy Purple, Any Autoflower
Hot & Humid Climates (Queensland, Northern Territory)
The problem: High humidity (70-90%) causes bud rot. Dense indica buds will fail.
The solution: Sativa-dominant strains with open, airy bud structure for airflow.
Pro tip: In Far North QLD, harvest before November wet season. Plant July-August for October harvest. Autoflower versions finish even faster (9-11 weeks total).
Hot & Dry Climates (Western Australia, South Australia)
The problem: Extreme heat (35-45°C), minimal rainfall, intense UV radiation.
Timing: Plant photoperiods in October for March harvest. Consider Fast Version strains (finish 1-2 weeks earlier) for extra insurance against April rains.
Cool & Short Season Climates (Tasmania, Victorian High Country)
The problem: Short summer (Dec-Feb), early frost risk (late March), cool nights.
The solution: Fast-flowering Indicas (7-9 weeks) or autoflowers that complete before frost.
Autoflowers complete their entire lifecycle in 8-12 weeks—perfect for Tasmania. They’re not dependent on light cycles, so you can dotwo harvests per season:
First crop: Plant Dec 1 → Harvest early Feb
Second crop: Plant Feb 1 → Harvest early April (before frost)
Top autos for TAS/High Country:
Auto Northern Lights (8-9 weeks, fastest)
Auto Purple Kush (8-10 weeks, cold-loving)
Auto Granddaddy Purple (8-10 weeks)
Auto Blue Dream (9-10 weeks, reliable)
Auto White Widow (9-10 weeks)
Auto Zkittlez (9-10 weeks, sweet)
Auto Gorilla Glue (9-10 weeks, vigorous)
Auto Girl Scout Cookies (9-10 weeks, compact)
Fast Version Strains: Get Photoperiod Quality 1-2 Weeks Faster
Fast Versions combine photoperiod quality with near-autoflower speed. Perfect for marginal climates (southern NSW, VIC, TAS) worried about late-season weather.
Strain
Standard Time
Fast Version Time
Time Saved
Fast Gorilla Glue
8-9 weeks
6-7 weeks
2 weeks
Fast Bruce Banner
9-10 weeks
7-8 weeks
2 weeks
Fast OG Kush
8-9 weeks
6-7 weeks
2 weeks
Fast Gelato
8-9 weeks
7 weeks
1-2 weeks
Fast Sour Diesel
10-11 weeks
8-9 weeks
2 weeks
Complete Regional Recommendations
Region
Top 5 Strains
Avoid
Far North QLD (Cairns, Darwin)
Amnesia Haze, Durban Poison, Special Lime Haze, Moby Dick, Jack Herer
Dense Indicas, OG strains
Brisbane/Gold Coast
Durban Poison, Jack Herer, Pineapple Express, Blue Dream, Gorilla Glue
Pure Indicas, slow Sativas
Sydney Metro
Gorilla Glue, Runtz, Girl Scout Cookies, Bruce Banner, Zkittlez
Strains over 10 weeks
Melbourne Coast
Gorilla Glue, Northern Lights, Zkittlez, Blue Dream, Fast Bruce Banner
Sativas over 10 weeks
Adelaide Metro
Blue Dream, Master Kush Grand, White Widow, Girl Scout Cookies, Northern Lights
Water-hungry strains
Perth Metro
Blue Dream, Master Kush Grand, White Widow, Northern Lights, Black Domina
Humidity-loving strains
Hobart & Tasmania
Auto Northern Lights, Northern Lights, Black Domina, Purple Kush, Fast Gorilla Glue
Anything over 9 weeks
VIC High Country
Auto Northern Lights, Northern Lights, Black Domina, Fast Gorilla Glue, Purple Kush
Any strain over 9 weeks
Frequently Asked Questions
What are the best trending strains for Australian conditions?
Runtz, Permanent Marker, Zkittlez, and Gelato (Fast version) all handle Australian conditions well while offering modern genetics that collectors want.
What’s the most mould-resistant strain?
Durban Poison and Amnesia Haze are consistently rated highest (9/10) by Queensland/NT collectors. Special Lime Haze is also excellent.
What’s the most underrated strain for Australian conditions?
Black Domina. It’s a 95% Indica with elite drought tolerance, fast finish (7-8 weeks), and works across multiple climates. Master Kush Grand is also overlooked.
Can I grow Sativas in Melbourne or Hobart?
Melbourne: Yes—choose fast Sativa hybrids under 10 weeks (Jack Herer, Blue Dream, Bruce Banner). Hobart: Risky. Pure Sativas take 12-14 weeks. Use Auto Amnesia Haze for Sativa effects with Tasmania timing.
Should I choose photoperiod, autoflower, or fast version?
Photoperiods: Maximum control and yields (need 4+ months good weather) Autoflowers: Short seasons, simplicity, multiple crops per year Fast Versions: Photoperiod quality with 1-2 weeks faster finish (best for marginal climates)
How do I protect plants during extreme heat?
Use 30-50% shade cloth (12pm-4pm), water early morning, mulch heavily (10cm), and use large pots (45-60L minimum). Plant heat-tolerant strains: Master Kush Grand, Blue Dream, White Widow.
What strains work across multiple climates?
These “all-rounders” adapt to varied conditions: Blue Dream, Gorilla Glue, Northern Lights, White Widow.
Does pot size matter in hot climates?
Absolutely. Larger pots provide more water reservoir and better insulation. Minimum 30L, better 45-60L. Fabric pots are best for hot climates—they allow root air-pruning and temperature regulation.
Final Thoughts
Strain selection is the most important factor for Australian outdoor success. Match genetics to your specific challenge:
Disclaimer: This guide is for educational purposes. Sacred Seeds sells cannabis seeds as collectible souvenirs. Germination and cultivation may not be legal in your jurisdiction. Always check local laws.
Understanding Autoflowers: What Makes Them Different
Autoflowering cannabis plants draw their genetics from Cannabis ruderalis, a subspecies that evolved in the harsh, short-season climates of Russia and Central Asia. That heritage produced something genuinely distinct: plants that flower based on age rather than light cycle, progressing from seedling to harvest in approximately 8-12 weeks regardless of photoperiod. The practical implication is that you can run an 18-20 hour light schedule throughout the entire grow, simplifying the light management side of cultivation.
What this accelerated timeline actually demands, though, is a higher standard of attentiveness from the outset.
The compressed growth window that makes autoflowers appealing is the same thing that makes them unforgiving. A mistake in week two of a photoperiod grow can be absorbed across an extended vegetative phase — that same mistake in an autoflower costs you directly in final yield and quality. There’s no corrective buffer.
This makes the cultivation of quality autoflowering genetics a genuine skill exercise: getting the most from these plants requires dialling in your environment, your watering discipline, and your feeding programme precisely, because the plants won’t wait for you to catch up.
Modern autoflower genetics have also fundamentally changed what’s achievable. Contemporary varieties from serious breeders routinely produce potency, terpene complexity, and bud structure that rivals well-grown photoperiod strains. The ceiling has risen considerably, and reaching it requires the same craft focus that premium photoperiod cultivation demands. Understanding that autoflowers are fast-moving, not forgiving, shapes everything that follows in this guide.
Jason’s Key Lesson
With autoflowers, the clock starts the moment the seed cracks — and it never stops.
A photoperiod plant will sit in veg for as long as you need it to. Made a mistake? Fix it, let the plant recover, carry on. Autoflowers don’t work that way. They’re moving through their lifecycle on their own schedule, and they’re not waiting for you to catch up. Every week you lose to a problem — overwatering, a nutrient issue, a transplant stress — is a week that was already allocated to bud production. You can’t get it back.
The simplicity people talk about with autos is real: no light schedule management, faster turnaround, smaller plants. But that simplicity is about logistics, not about craft. The actual growing demands more precision, not less — because the margin for error is so much smaller.
Understanding Autoflowers: What Makes Them Different
Autoflowering cannabis seeds contain genetics from Cannabis ruderalis, a hardy subspecies originating from regions with short growing seasons in Russia and Central Asia. This ruderalis heritage grants autoflowers their signature trait: they begin flowering based on age, typically around 3-4 weeks from germination, rather than responding to changes in light cycles like photoperiod varieties. This fundamental difference means you can grow autoflowers under any light schedule, though most growers opt for 18-20 hours of light throughout the entire grow cycle for maximum yields.
The compact timeline of autoflowers—usually 8-12 weeks from seed to harvest—offers several distinct advantages for Australian growers. You can complete multiple harvests in a single outdoor season, work around unpredictable weather patterns, and maintain discretion with plants that typically remain under 1.2 metres tall. Additionally, autoflowers demonstrate remarkable resilience to temperature fluctuations, pests, and beginner mistakes compared to their photoperiod counterparts. However, this accelerated growth means there’s limited time to correct errors, making it essential to provide optimal conditions from day one.
Modern autoflowering cannabis seeds have evolved significantly since their early iterations. Today’s genetics produce potent, flavourful buds with THC levels rivalling photoperiod strains, whilst maintaining the speed and simplicity that made autoflowers popular initially. Understanding these unique characteristics helps you tailor your approach throughout each developmental stage, maximising both yield and quality from your autoflower grow.
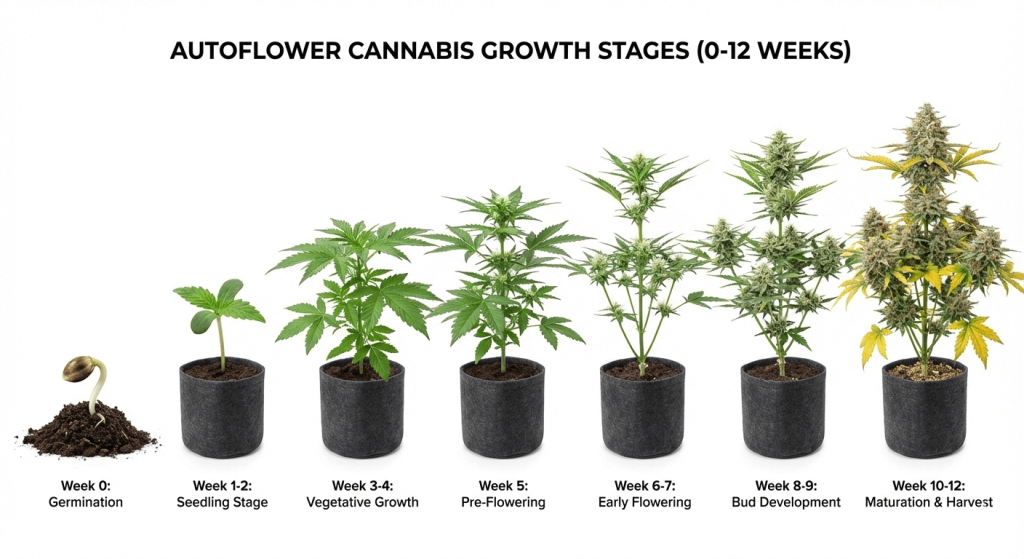
Week
Stage
Key Focus
0
Germination
Moisture, warmth
1–2
Seedling
Root development
3–4
Vegetative
Structure, nitrogen
5
Pre-flower
Transition nutrients
6–9
Flowering
Bud development
10–12
Ripening
Trichome monitoring
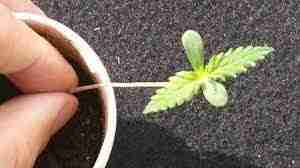
Germination (Week 0): Starting Your Autoflower Journey
Successful germination sets the foundation for your entire autoflower grow. The most reliable method involves the paper towel technique, where seeds are placed between dampened paper towels inside a sealed container or plastic bag. Store this setup in a warm, dark location maintaining temperatures between 22-25°C. Within 24-72 hours, you should observe the seed shell cracking and a white taproot emerging. Once the taproot reaches approximately 1-2 centimetres, your seed is ready for planting.
Plant germinated seeds directly into their final container—this is crucial for autoflowers. Unlike photoperiod plants, autoflowers have limited vegetative time and respond poorly to transplanting stress. Any setback during their brief vegetative phase directly impacts final yield. Choose containers between 11-19 litres capacity with excellent drainage. Fill with a light, airy growing medium such as a quality soil mix with 30% perlite, or a coco coir blend. Plant the germinated seed approximately 1-1.5 centimetres deep with the taproot facing downward, then gently cover with soil.
Maintain consistent moisture without waterlogging during this critical phase. The growing medium should feel damp but not saturated. Place a humidity dome or clear plastic cup over the planting site to retain moisture and create a microclimate that encourages the seedling to break through the soil surface. Within 24-48 hours of planting, you should see the seedling emerge. Once visible, remove any covering and position your light source approximately 60-75 centimetres above the seedling to prevent stretching whilst avoiding light stress.
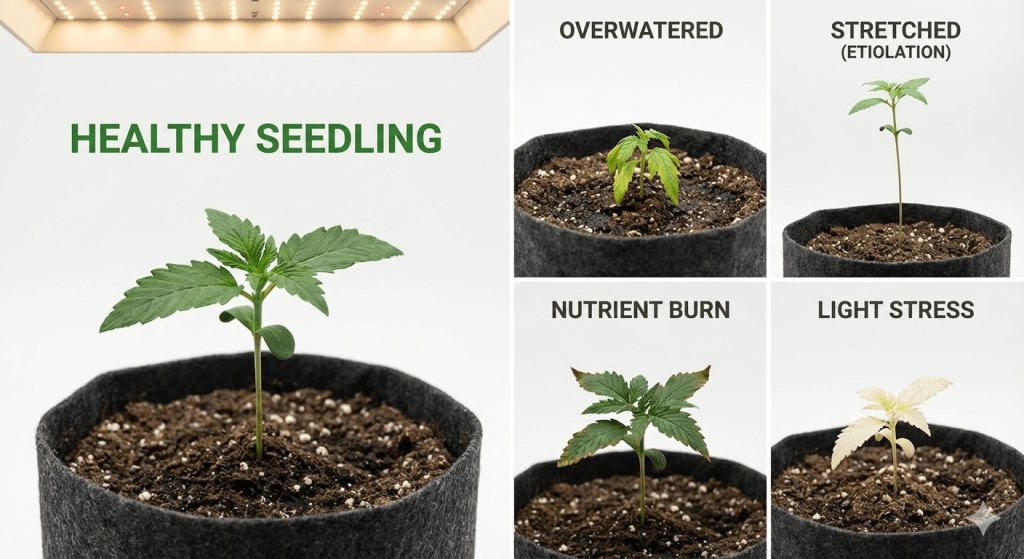
The seedling stage represents your autoflower’s most vulnerable period, requiring careful attention to environmental conditions. Your young plant will display its first set of true leaves (after the initial round cotyledon leaves) and begin establishing its root system. Temperature should remain between 20-25°C with relative humidity around 65-70%. Lighting can be relatively gentle during this phase—LED fixtures should be positioned 60-90 centimetres away, whilst HPS or MH lights require greater distance to prevent heat stress.
Watering discipline during the seedling stage proves critical. Overwatering remains the primary killer of cannabis seedlings, as their small root systems cannot process excess moisture, leading to oxygen deprivation and root rot. Water in a small circle around the seedling rather than saturating the entire container. Allow the top 2-3 centimetres of growing medium to dry before watering again. As roots develop, gradually increase the watering zone radius. By week two, roots should be spreading throughout the container, and you can begin watering the full pot whilst still maintaining dry periods between waterings.
Nutrition requirements remain minimal during the seedling phase. Quality soil contains sufficient nutrients for the first 2-3 weeks, so avoid introducing additional fertilisers that can overwhelm delicate roots. If using an inert medium like coco coir, introduce nutrients at quarter strength during week two. Monitor your seedlings for any signs of stress: yellowing leaves may indicate nutrient deficiency or overwatering, whilst burnt leaf tips suggest nutrient excess. Healthy seedlings display vibrant green leaves, steady upward growth, and develop new leaf sets every few days.
Vegetative Growth (Weeks 3-4): Rapid Development Phase
Weeks three and four mark the explosive vegetative growth period where your autoflower establishes the structure that will support future bud production. During this phase, plants develop rapidly, producing new leaf sets and branches daily. Node spacing, leaf size, and overall plant structure become established. Provide 18-24 hours of light daily—many experienced growers prefer an 18/6 or 20/4 schedule to balance growth with plant rest periods, though some cultivators report excellent results with continuous 24-hour lighting.
Nutritional demands increase significantly during vegetative growth. Your plants require nitrogen-rich fertilisers to support leaf and stem development. If using bottled nutrients, follow the manufacturer’s feeding schedule but consider starting at half strength and gradually increasing based on plant response. Organic growers should ensure their soil contains adequate nitrogen sources such as worm castings, blood meal, or composted manure. Water when the top layer of soil feels dry, and always water until you observe runoff from drainage holes—this prevents salt buildup that can lock out nutrients.
Environmental conditions should remain stable with temperatures between 22-28°C and humidity around 50-60%. Adequate airflow prevents mould and strengthens stems—oscillating fans that gently rustle leaves without causing excessive movement work ideally. By week four, many autoflowers begin showing pre-flowers at node sites, indicating the transition to flowering is imminent. Resist the temptation to perform heavy training techniques during this stage. Whilst low-stress training (LST) can be beneficial, high-stress methods like topping or FIMing often reduce autoflower yields due to recovery time eating into the flowering window.
Pre-Flowering (Week 5): The Transition Period
Week five typically marks the pre-flowering phase where your autoflower transitions from vegetative growth to flower production. You’ll notice pistils (white hairs) emerging from calyxes at node sites, confirming the plant’s sex and flowering initiation. Feminised autoflower seeds eliminate concerns about male plants, but it’s still worth examining your plants closely during this phase. Growth patterns shift as vertical stretching accelerates—expect plants to gain 50-100% of their vegetative height during the next few weeks.
Adjust your nutrient regimen to reflect changing plant needs. Begin reducing nitrogen whilst increasing phosphorus and potassium, which support flower formation and bud development. Most nutrient lines offer specific “bloom” formulations designed for this transition. Additionally, consider introducing supplements containing beneficial microbes, carbohydrates, or bloom boosters that enhance flower production. However, exercise caution with additives—more is not better, and overfeeding can harm yields more than underfeeding.
Environmental adjustments become important as flowering commences. Lower humidity to 40-50% to reduce mould risk as buds begin forming. Maintain temperatures between 20-26°C—slightly cooler than vegetative stage temperatures. Some strains display enhanced colour and resin production when experiencing a 5-8°C temperature drop between lights-on and lights-off periods. Ensure your lighting remains consistent without interruption during the dark period if you’re using a schedule with darkness, though autoflowers tolerate light interruptions better than photoperiod plants.
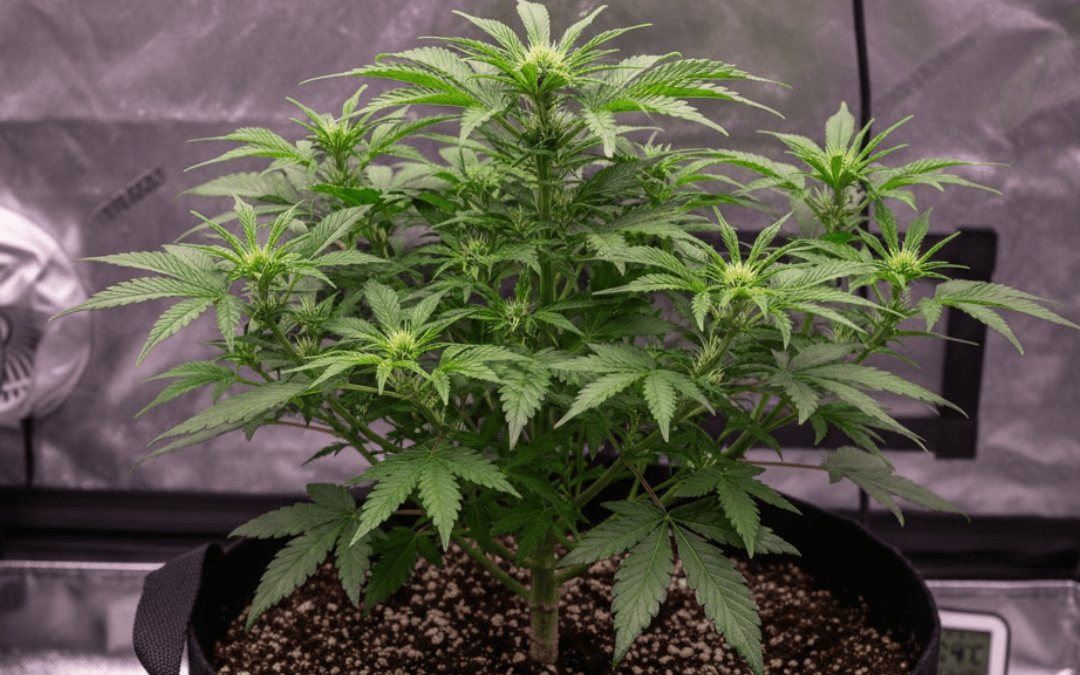
Flowering Stage (Weeks 6-9): Bud Development
The flowering stage represents the most exciting phase of your autoflower grow as buds swell and resin production intensifies. During weeks six through nine, flowers develop rapidly, transitioning from loose clusters of pistils to dense, resinous formations. Your plants’ distinctive aroma strengthens significantly—ensure adequate odour control measures are in place if discretion is required. Different strains display varying flowering patterns; sativa-dominant autoflowers typically produce longer, more airy buds, whilst indica-dominant varieties form tight, compact colas.
Nutritional management during flowering focuses on phosphorus and potassium whilst minimising nitrogen, which is no longer needed in large quantities. Continue feeding according to your nutrient schedule, but monitor plants for signs of nutrient burn (dark leaves with burnt tips) or deficiencies (yellowing leaves, purple stems). Some leaf yellowing in lower growth is normal as plants redirect energy to flower production. Maintain consistent watering practices, but be mindful that dense canopies and increased plant mass mean faster water uptake. Check soil moisture more frequently than during earlier stages.
Support structures may become necessary as buds gain weight. Bamboo stakes, plant ties, or trellis netting prevent branches from bending or breaking under the burden of heavy flowers. Defoliation should be approached cautiously during flowering—remove only leaves blocking light penetration to lower bud sites or those showing disease. Excessive defoliation stresses plants during this critical period. Monitor closely for pests or mould, which are attracted to flowering plants. Implement preventative measures rather than waiting for problems to emerge, as treatment options become limited once dense flowers form.
Late Flowering and Harvest (Weeks 10-12): The Final Stretch
The final weeks of your autoflower grow determine ultimate potency and yield. During weeks 10-12, bud development reaches its peak, with calyxes swelling and trichome production maximising. Pistils begin changing colour from white to orange, brown, or red, depending on genetics. This visual transformation often tempts growers to harvest prematurely, but patience during these final weeks significantly impacts quality and potency. Most autoflowers require the full 10-12 weeks, with some sativa-dominant varieties extending slightly longer.
Flushing—the practice of providing only plain water for the final 1-2 weeks before harvest—remains debated amongst growers. Proponents argue flushing improves flavour by removing residual nutrients from plant tissue, whilst critics suggest it unnecessarily stresses plants during their final production phase. If you choose to flush, begin approximately 10-14 days before your anticipated harvest date. Provide pH-adjusted water without nutrients until runoff appears clear. Plants may display rapid leaf yellowing during flushing as they consume remaining internal nutrient stores.
Environmental conditions during late flowering should emphasise mould prevention and resin production. Maintain humidity below 45% if possible, particularly during the final two weeks. Some growers reduce temperatures slightly (18-24°C) to stress plants beneficially, potentially increasing resin production and enhancing colour development in purple-tinged varieties. However, avoid drastic temperature swings that could shock plants. Lighting remains crucial through harvest day—any reduction in light intensity or duration can signal the plant to slow production.
Common Autoflower Mistakes to Avoid
Successfully growing autoflowers requires avoiding several common pitfalls that particularly impact these fast-flowering plants. The most frequent mistake involves transplanting, which stresses autoflowers during their limited vegetative window. Always germinate seeds directly in their final containers to maximise growth potential. Similarly, overtraining through techniques like topping or heavy defoliation often reduces yields rather than improving them. Autoflowers lack sufficient recovery time to compensate for the stress these methods create.
Overwatering and overfeeding account for numerous autoflower failures, particularly amongst new growers. Cannabis plants generally thrive with less water and fewer nutrients than beginners expect. Establish a watering schedule based on container weight and soil dryness rather than arbitrary timing. When introducing nutrients, start conservatively at half the recommended strength and increase gradually based on plant response. It’s far easier to add more nutrients than to correct nutrient burn or lockout.
Light-related issues frequently compromise autoflower potential. Insufficient lighting produces stretched, weak plants with minimal bud development, whilst excessive light intensity causes bleaching, heat stress, and reduced yields. Position lights according to manufacturer recommendations for your specific fixture and growth stage. Additionally, avoiding these common mistakes becomes easier by consulting comprehensive resources about successful cannabis cultivation practices that apply across various growing methods.
Environmental neglect represents another category of common errors. Temperature extremes, humidity issues, and poor airflow create conditions where pests, diseases, and stress thrive. Invest in basic environmental monitoring equipment—a thermometer, hygrometer, and timer cost relatively little but provide crucial data for maintaining optimal conditions. Finally, harvesting prematurely based on breeders’ timelines rather than actual plant indicators consistently disappoints growers. Every phenotype varies slightly in maturation speed, and environmental factors influence development rates significantly.
Determining the Perfect Autoflower Harvest Time
Identifying the optimal harvest window requires examining trichomes—the tiny, mushroom-shaped glands covering flowers and surrounding leaves. Invest in a jeweller’s loupe or digital microscope with at least 30x magnification. Trichomes progress through three distinct stages: clear (immature), cloudy/milky (peak THC), and amber (THC degrading to CBN). Most growers target harvest when 70-90% of trichomes appear cloudy with 10-30% turning amber, depending on desired effects.
Clear trichomes indicate immaturity and will produce less potent, potentially anxiety-inducing effects if harvested prematurely. Cloudy trichomes represent peak THC content and produce the most cerebral, energetic effects. Amber trichomes indicate THC converting to CBN, producing more sedative, body-focused effects. Understanding these stages allows you to customise your harvest timing based on preferences. Sativa enthusiasts might harvest earlier (mostly cloudy, minimal amber), whilst indica lovers often wait for increased amber percentage. For detailed guidance on this critical aspect, review information about amber trichomes and harvest timing.
Additional harvest indicators complement trichome examination. Most pistils should have darkened and curled inward, though some fresh white pistils may remain on the uppermost flowers. Leaves often display autumn colours as the plant senesces naturally. However, don’t rely solely on these secondary indicators—trichome development remains the most reliable harvest metric. According to research from Cannabis cultivation studies, harvest timing can influence cannabinoid profiles by up to 20-30%, making proper assessment essential for achieving your desired outcome.
Once you’ve determined harvest readiness, plan your post-harvest process. Prepare your drying space, trimming tools, and storage containers before cutting plants. Most growers harvest in the morning when resin production peaks and before lights warm the grow space. Cut entire plants at the base or harvest individual branches, depending on your drying setup and whether different parts of the plant display varying maturity. Remember that proper drying and curing significantly impact final quality, so view harvest as the beginning of the finishing process rather than the end of cultivation.
Frequently Asked Questions About Growing Autoflowers
How long do autoflowers take from seed to harvest?
Most autoflower strains complete their full cycle in 8-12 weeks from germination. Fast-finishing varieties can be ready closer to 8-9 weeks; some sativa-leaning autos extend to 12-13 weeks. Breeder timelines are useful estimates, not guarantees — individual phenotypes and environmental conditions influence development meaningfully. Always base harvest decisions on trichome development rather than calendar dates.
What’s the best light schedule for autoflowers?
Most experienced growers run 18/6 or 20/4 throughout the entire cycle. Some use 24/0 with success; others find that a dark period supports healthier metabolic function and slightly better terpene development. The more important variable is light quality and intensity — a consistent, high-output spectrum will do more for your results than the precise split between light and dark hours.
Can I grow autoflowers outdoors in Australia?
Yes, and Australian conditions can produce excellent results with the right timing. The fast lifecycle allows multiple harvests per season in most climate zones. Queensland and northern NSW can produce year-round with careful planning; southern states are best suited to spring and summer runs (September through February). Autoflowers aren’t dependent on photoperiod changes, which gives you scheduling flexibility — though they still require substantial direct sun, ideally 6-8 hours daily minimum for quality outcomes.
What size pot do I need for autoflowers?
Eleven to nineteen litres is the practical range, with larger containers generally supporting better root development and yield potential. The critical rule is to plant your germinated seed directly into the final container — autoflowers respond poorly to transplanting. The stress and recovery time eat into the vegetative window you can’t afford to lose. Fabric pots are worth considering for the air pruning effect and the drainage they provide.
Should I top or train my autoflowers?
Low-stress training — gently bending and tying branches to open the canopy and distribute light — works well when started early, around weeks 2-3. High-stress techniques like topping or FIMing are a different matter. The recovery time required cuts into a vegetative phase that’s already brief, and the yield trade-off is rarely worth it. If you’re going to train, do it early and keep it gentle. If there’s any doubt, growing naturally will outperform a stressed and stunted plant.
How much water do autoflowers need?
Less than most new growers assume, and the consequences of overwatering are serious. During the seedling stage, water in a small radius around the plant every couple of days. From weeks 3-4 onward, water the full container when the top 5cm of soil has dried out — typically every 2-4 days depending on container size, temperature, and humidity. Water thoroughly until runoff appears at the drain holes. Consistent wet-dry cycles are what you’re aiming for; saturated root zones restrict oxygen and create the conditions for root problems.
What nutrients do autoflowers need?
Quality genetics in a well-prepared medium won’t need supplemental feeding for the first 2-3 weeks. From week 3, introduce nitrogen-dominant nutrients at half the manufacturer’s recommended strength and adjust based on plant response. From week 5 onward, transition toward bloom formulations — higher phosphorus and potassium, reduced nitrogen. Watch the leaves: burnt tips indicate overfeeding; lighter overall colouration in new growth suggests deficiency. The instinct to push nutrients harder rarely improves outcomes with autoflowers.
What yields can I expect from autoflowers?
Indoor autoflowers in well-managed conditions typically produce 30-100g per plant, with experienced growers achieving more under optimised lighting and environmental control. Outdoor plants in good Australian sun can yield 50-150g or beyond with ideal conditions and strong genetics. The more useful framing is that yield is a product of every decision made throughout the grow — genetics, environment, feeding, and timing all compound. Strong genetics give you the ceiling; your cultivation skill determines how close you get to it.
Can I clone autoflowers?
Technically yes, but it’s not practical. Autoflowers flower based on age, so any clone taken from an autoflower will have the same biological age as the mother plant. By the time roots develop, the clone immediately enters flowering with minimal vegetative growth, producing tiny plants with negligible yields. Unlike photoperiod plants, you cannot keep an autoflower mother plant in vegetative state. If you want to preserve genetics, you must purchase new seeds for each grow.
Why are my autoflower leaves turning yellow?
Yellowing leaves can indicate several issues depending on timing and location. Lower leaves yellowing during late flowering (weeks 8-10) is normal as plants redirect nutrients to bud development. Early yellowing typically signals nitrogen deficiency (entire leaf yellows), overwatering (lower leaves yellow with drooping), or pH issues preventing nutrient uptake. Yellow tips with burnt edges suggest nutrient burn from overfeeding. Check your watering schedule first, then review your feeding strength and pH levels. Some natural yellowing during the final 1-2 weeks is expected and not concerning.
When should I start counting weeks for my autoflower?
Week 0 is germination. Week 1 begins when the seedling breaks through the soil surface and the first set of round cotyledon leaves open. This standardised timing helps you follow feeding schedules and track development accurately. Some growers count from the day they place seeds in water, but counting from emergence provides more consistent developmental tracking since germination times vary (1-5 days typically).
Are autoflowers less potent than photoperiod strains?
That reputation belongs to early-generation genetics and is no longer accurate. Modern autoflower breeding has closed the gap substantially, with many varieties testing at 20-25%+ THC and producing complex, developed terpene profiles. The relevant variable now is genetics quality and cultivation execution — a well-grown autoflower from a serious breeder will outperform a poorly grown photoperiod plant in every meaningful measure.
👉 Read: What nutrients should I give autos?
👉 Read next: Best strains for the Aussie Climate
Stem rot and damping off are common yet frequently misunderstood problems that plague cultivators, leading to seedlings dying, particularly those new to growing. These issues are primary reasons why seedlings die, yet they often get misattributed to “bad genetics” or seed quality, when in reality they’re primarily environmental problems that can be prevented with proper knowledge and technique.
Understanding Why Seedling Death Occurs
Many growers experience the frustration of “seedling died” situations without knowing why. Before assuming “bad genetics” is the cause of your “floppy seedling” problems, it’s important to understand the two most common culprits behind why seedlings die: stem rot and damping off. Affected seedlings often exhibit shriveled stem bases and a tendency to flop over quickly.
Understanding Seedling Vulnerabilities
Seedlings are delicate and face numerous challenges that can hinder their growth and survival. One of the primary threats to young plants is soil-borne fungi, which can lead to damping off and other fungal diseases. These pathogens thrive in overly moist conditions and can quickly devastate a batch of seedlings. Additionally, leggy seedlings, which result from inadequate light, are more prone to disease and pest attacks due to their weakened state.
Temperature fluctuations, whether too hot or too cold, can also stress seedlings, making them more susceptible to disease and potentially leading to seedling death. Overwatering and underwatering are common pitfalls that can either drown the roots or deprive them of essential moisture, further stressing the seedlings and increasing the risk of them dying. Understanding these vulnerabilities is crucial for providing the optimal care needed to nurture healthy seedlings.
What is Stem Rot?
Stem rot in seedlings is a fungal disease that occurs when the tender stem tissue becomes infected and begins to decay. The stem typically develops a pinched, discolored appearance at soil level, and the seedling eventually topples over and dies. This condition is most common in overly wet growing media, where the seedling’s stem remains saturated for too long.
What is Damping Off?
Damping off is a disease of seedlings caused by pathogenic fungi and water molds, primarily Pythium spp., Rhizoctonia spp., and Fusarium spp. The symptoms closely resemble stem rot – seedlings fail to emerge from soil, or the seedling’s stem thins and becomes water-soaked near the soil surface, the plant wilts, and eventually collapses.
Identifying Why Seedlings Die: Damping Off Symptoms
Seedlings fail to emerge from the soil
Cotyledons (first seedling leaves) and stems appear water-soaked, soft, mushy, and may show gray to brown discoloration
Stems become thin, almost thread-like where infected
Young leaves wilt and turn green-gray to brown
Roots are absent, stunted, or have grayish-brown sunken spots
Fluffy white cobweb-like growth may appear on infected plant parts under high humidity conditions
Protecting seedlings from these symptoms involves maintaining proper environmental conditions and practicing good sanitation.
Common Causes
When you find yourself dealing with a “floppy seedling” that eventually falls over or a “seedling died” situation, don’t rush to blame “bad genetics.” Instead, consider these common environmental causes:
Excessively wet media – Overwatering is the primary culprit behind stem rot and damping off
Poor drainage – Growing media that doesn’t allow proper water drainage keeps roots and stems wet
Inadequate air circulation – Stagnant, humid air creates perfect conditions for pathogens
Contaminated growing media – Low-quality or reused soil may already contain harmful pathogens
Planting too deep – Burying the seed too far below the surface forces the seedling to struggle through dense, wet media
Cool temperatures – Soil that’s too cool for optimal germination slows growth and increases disease susceptibility
Low light conditions – Insufficient lighting weakens seedlings and makes them more vulnerable
High salt levels – Over-fertilization can stress young seedlings
Lack of compost tea – Using compost tea can enhance soil health by promoting a balanced microbial environment, which helps prevent damping off and other fungal diseases
How Soil Borne Fungi and Other Pathogens Spread
The fungi and water molds responsible for damping off persist in soil and plant debris. They can be introduced into seedling trays through:
Previously used pots, tools, and growing media that weren’t properly sterilized
Airborne spores (particularly Fusarium)
Insect vectors like fungus gnats
Contaminated hands and tools
Hose ends that have contacted soil or debris
Splashing irrigation water
Once introduced, these pathogens easily move from plant to plant by growing through the potting media or in shared irrigation water.
Environmental Factors
The environment in which seedlings grow plays a pivotal role in their development and overall health. Adequate light is essential for photosynthesis, enabling seedlings to grow strong and robust. However, too much light can cause stress, while too little can result in leggy seedlings that are more vulnerable to disease. Temperature is another critical factor; most seedlings thrive in daytime temperatures between 65-75°F (18-24°C) and nighttime temperatures around 55-65°F (13-18°C). Maintaining consistent moisture levels is equally important. Overwatering can lead to root rot and fungal diseases, while underwatering can cause the seedlings to dry out and die. Proper air circulation is also vital to prevent the buildup of humidity, which can create a breeding ground for pathogens. By carefully managing these environmental factors, you can ensure healthy seedling growth and reduce the risk of disease.
Prevention Strategies: Stop Wondering Why Seedlings Die
Proper Growing Media
Use high-quality growing media specifically formulated for seedlings or create your own mix with:
Organic potting soil with no additives
Sterilized coco coir (see sterilization methods below)
Perlite (10-20%) to improve drainage and aeration
For tiny seeds like basil, mustard, and carrots, sow them on the soil’s surface and lightly cover with a layer of vermiculite or fine granite to prevent fungal diseases.
Importantly, avoid garden soil for seedlings, as it often contains damping off pathogens.
Proper Planting Depth
One of the most common mistakes is planting germinated seeds too deeply. Follow these guidelines:
Plant germinated seeds no deeper than 1 cm (about ⅜ inch)
Position the tap root pointing downward
Gently cover with a thin layer of growing medium
Ideal Environment
Create optimal conditions for seedling development:
Maintain temperature between 70-80°F (21-27°C)
Use a heating pad under trays to warm soil to optimal germination temperature
Keep humidity at 70-80% during early seedling stage
Use a humidity dome or clear cover with slight ventilation
Provide gentle airflow once seedlings emerge
Ensure 12-16 hours of proper lighting (fluorescent or grow lights, not just window light)
Watering Protocol
Proper watering is critical for preventing stem rot and damping off:
Start with pre-moistened (not wet) growing media
In a properly humidified environment, additional watering may be unnecessary for the first 3-5 days
When watering becomes necessary, water gently around the perimeter of the container, not directly at the stem
Use clean, warm water (68-77°F/20-25°C) – cold water (50°F/10°C) slows growth and increases infection risk
Allow the top layer of medium to become slightly dry before watering again
Ensure pots have drainage holes to prevent water accumulation
Sterilizing Equipment and Media
Proper sterilization is essential for prevention:
Sterilizing Pots and Tools:
Soak used pots, trays and tools in 10% household bleach solution (1 part bleach to 9 parts water) for 30 minutes
Rinse thoroughly and allow to dry
Store tools in clean locations when not in use
Hydrogen Peroxide Method for Media:
Mix 3% hydrogen peroxide with water (1 part H₂O₂ to 9 parts water)
Thoroughly soak the growing medium
Allow to drain completely
Use after medium has reached appropriate moisture level
Heat Sterilization Method for Media:
Spread growing medium on a baking sheet
Bake at 180°F (82°C) for 30 minutes
Allow to cool completely before use
Fertilization Guidelines: Using Diluted Liquid Fertilizer
Do not apply fertilizer to seedlings until several true leaves have developed
When starting fertilization, use only ¼ strength of standard soluble fertilizer
Be aware that many potting mixes already contain slow-release fertilizers and may not require additional feeding
Treatment Options
If you notice early signs of stem rot or damping off:
Improve air circulation – Remove humidity domes or increase ventilation
Reduce moisture – Allow growing medium to dry slightly
Apply fungicide – Organic options include:
Neem oil solution (diluted as per manufacturer instructions)
Cinnamon powder sprinkled lightly around the stem (has natural antifungal properties)
Chamomile tea spray (cooled, diluted 1:1 with water)
Transplant Shock and Recovery
Transplant shock is a common issue that occurs when seedlings are moved from one environment to another, causing stress that can stunt growth, yellow leaves, or even lead to seedling death. To minimize transplant shock, it’s essential to harden off seedlings by gradually exposing them to outdoor conditions before transplanting. Using a well-draining seed starting mix can help prevent waterlogging and root rot. After transplanting, providing adequate light and water is crucial for helping seedlings recover. Additional care, such as pruning damaged leaves, applying a diluted liquid fertilizer, and monitoring for pests and diseases, can support the seedlings’ recovery. With proper attention and care, seedlings can overcome transplant shock and continue to grow into healthy, productive plants.
Signs of Healthy Seedlings
Healthy seedlings will:
Maintain a robust, straight stem
Develop vibrant green color
Produce symmetrical cotyledons (seed leaves)
Develop true leaves with serrated edges
Show steady growth progress
Conclusion
Stem rot and damping off in seedlings are preventable with proper techniques, reducing the risk of seedlings dying. By maintaining appropriate moisture levels, using quality growing media, creating optimal environmental conditions, and practicing good sanitation, cultivators can dramatically increase seedling survival rates.
When you experience “floppy seedling” issues or find your “seedling died” suddenly, resist the urge to blame “bad genetics.” In most cases, these problems are the result of environmental factors that can be controlled with the methods outlined in this article.
Remember that once plants have developed mature leaves and a well-established root system, they become naturally more resistant to the pathogens that cause damping off. There is a critical period between germination and early growth when seedlings are most vulnerable and require special attention.
By focusing on prevention rather than treatment, growers can achieve consistently successful germination and seedling development, setting the foundation for healthy, productive plants throughout the entire growth cycle.
Get Top-Genetics & fresh seeds delivered fast!
We offer top-quality heirloom, herb and cannabis seeds for souvenir purchases. We offer genuine domestic Australia shipping and support, and ship our seeds using 100% Earth-friendly and compostable packaging.
Get fresh Australia cannabis seeds delivered to your door in less than a week from payment.