Gorilla Glue Flowering Time (Indoor vs Outdoor)
Understanding the flowering timeline of your gorilla glue cannabis plants is essential for maximising yields and achieving the potent, resinous buds this legendary strain is famous for. Whether you’re cultivating indoors under controlled conditions or harnessing the natural Australian climate outdoors, knowing precisely when your plants will flower and how long the process takes empowers you to plan your grow cycles, optimise environmental conditions, and harvest at peak potency. This comprehensive guide will walk you through every aspect of gorilla glue flowering time, providing actionable insights for Australian cultivators.
The gorilla glue flowering time typically ranges from 8 to 9 weeks for indoor grows using photoperiod feminised seeds, whilst outdoor cultivators in Australia can expect harvest around late March to early April when growing photoperiod varieties. Autoflowering gorilla glue variants complete their entire lifecycle in approximately 8-10 weeks from germination, with the flowering phase occupying roughly 6-7 weeks of that timeframe. These timelines can vary slightly depending on environmental conditions, phenotype variations, and your specific growing techniques. Understanding these parameters allows you to create optimal conditions throughout the flower cycle, ensuring you harvest dense, trichome-laden buds at their absolute peak.
Understanding Gorilla Glue Genetics and Flowering Characteristics
Gorilla glue, also known as GG4 or Original Glue, represents a balanced hybrid strain with indica-leaning tendencies, typically expressing a 60/40 indica to sativa ratio. This genetic makeup significantly influences its flowering behaviour and timeline. The strain’s parentage—combining Chem’s Sister, Sour Dubb, and Chocolate Diesel—contributes to its relatively compact flowering period and exceptional resin production.
The strain exhibits classic photoperiod characteristics when grown from standard feminised seeds, meaning it requires specific light cycle changes to initiate flowering. Indoor growers trigger flowering by switching from an 18/6 vegetative light schedule to a 12/12 flowering schedule. This mimics the natural reduction in daylight hours that outdoor plants experience as seasons change. Additionally, understanding the differences between feminised photoperiod seeds and their autoflowering counterparts is crucial for planning your grow timeline.
Autoflowering gorilla glue varieties contain ruderalis genetics, which allows them to flower based on age rather than light cycle changes. These plants typically begin flowering automatically around 3-4 weeks from germination, regardless of photoperiod. This characteristic makes autoflowering versions particularly appealing for Australian growers seeking multiple harvests per year or cultivating in regions with less predictable seasonal patterns.
Photoperiod vs Autoflowering Flowering Timelines
When selecting between photoperiod and autoflowering gorilla glue seeds, the flowering timeline represents one of the most significant differences. Photoperiod varieties offer growers complete control over vegetative duration, allowing you to grow plants to your desired size before initiating flowering. Once you flip to 12/12 lighting, expect 8-9 weeks until harvest readiness.
Autoflowering gorilla glue completes its entire lifecycle in 8-10 weeks total, with flowering occupying approximately 6-7 weeks of that period. Whilst you sacrifice some control over plant size, you gain speed and simplicity. For Australian growers working within specific seasonal windows or seeking discreet, fast-turnaround grows, the autoflowering option presents compelling advantages.
How to Manage Indoor Gorilla Glue Flowering Time
Indoor cultivation provides maximum control over gorilla glue flowering time through precise environmental manipulation. Successfully managing this timeline requires understanding the key factors that influence flowering speed and implementing best practices throughout each phase. The controlled environment allows you to optimise every variable, potentially shortening flowering time slightly whilst maximising quality.
Step 1: Initiate Flowering with Proper Light Cycle Changes
For photoperiod gorilla glue plants, flowering begins when you switch your lighting schedule from 18/6 (18 hours light, 6 hours darkness) to 12/12. This dramatic reduction in daylight hours signals the plant that autumn is approaching, triggering hormonal changes that initiate flower development. Ensure your dark period remains completely uninterrupted—even brief light leaks can stress plants and delay flowering or cause hermaphroditism.
Maintain consistent timing for your light cycles, as irregular schedules stress plants and extend flowering duration. Use quality timers to ensure precision, and never manually adjust cycles once flowering has commenced. The plant’s internal clock is remarkably sensitive during this transition period, and consistency produces the fastest, most uniform flowering response.
Step 2: Adjust Environmental Parameters for Flowering
Temperature and humidity requirements shift as gorilla glue enters flowering. During the vegetative stage, you may have maintained temperatures around 24-28°C with relative humidity of 60-70%. As flowering commences, gradually reduce humidity to 40-50% to prevent bud rot and mould whilst maintaining temperatures between 20-26°C. Lower nighttime temperatures (around 18-22°C) can enhance resin production and bring out purple hues in susceptible phenotypes.
Air circulation becomes increasingly critical as dense buds develop. Position oscillating fans to maintain gentle, constant airflow throughout the canopy without directly blasting flowers. This prevents stagnant microclimates where moisture accumulates, reducing pathogen risks. Monitor your grow space’s VPD (vapour pressure deficit) to optimise transpiration rates, which directly influence nutrient uptake and flowering speed.
Step 3: Transition to Flowering Nutrients
As flowering initiates, gorilla glue’s nutritional requirements shift dramatically from nitrogen-heavy vegetative formulas to phosphorus and potassium-dominant flowering nutrients. Begin transitioning your nutrient regimen during the first week after switching to 12/12 lighting. Reduce nitrogen levels gradually whilst increasing phosphorus and potassium to support bud development and resin production.
Most quality cannabis nutrient lines offer specific flowering formulations designed for this phase. Follow manufacturer guidelines but remain attentive to your plants’ responses. Gorilla glue typically exhibits moderate to heavy feeding requirements during flowering, though individual phenotypes may vary. Monitor leaf colour and growth patterns to fine-tune your feeding schedule, avoiding both deficiencies and nutrient burn that can extend flowering time.
For growers seeking premium genetics with proven flowering characteristics, the Gorilla Glue Feminized Seeds from our catalogue offer reliable, consistent performance with the classic 8-9 week flowering timeline. Alternatively, the Auto Gorilla Glue Feminized Seeds provide the same potent genetics in a faster, more forgiving autoflowering format perfect for beginners or time-conscious cultivators.


Mastering Outdoor Gorilla Glue Flowering Time in Australia
Outdoor gorilla glue cultivation in Australia follows natural photoperiod changes, with flowering typically initiating as daylight hours decrease through late summer and autumn. Understanding your specific region’s latitude and seasonal light patterns is essential for predicting flowering onset and harvest timing. Australian growers benefit from diverse climate zones, but this also means flowering times vary significantly between regions.
Step 1: Determine Your Region’s Natural Flowering Timeline
In most Australian regions, photoperiod cannabis plants including gorilla glue begin flowering naturally when daylight hours drop below approximately 14 hours per day. This typically occurs in late February to early March across most of southern Australia, though timing varies with latitude. Northern tropical regions may experience later flowering initiation due to less dramatic photoperiod changes.
Once flowering commences naturally outdoors, gorilla glue follows the same 8-9 week flowering timeline as indoor plants. This positions harvest in late March through April for most Australian growers, aligning perfectly with autumn’s cooler temperatures and lower humidity—ideal conditions for final bud maturation. Coastal growers should monitor weather forecasts carefully during this period, as autumn rains can threaten nearly-mature crops with mould and bud rot.
Step 2: Plant at the Right Time for Optimal Flowering
Timing your outdoor gorilla glue grow requires working backwards from your region’s expected first frost date and natural flowering initiation period. Most Australian growers plant outdoors in spring (September-October) after the last frost risk has passed. This provides 4-5 months of vegetative growth before natural photoperiod changes trigger flowering in late summer.
Larger vegetative plants produce substantially higher yields, so maximising vegetative time without pushing harvest too late into autumn represents the key balancing act. If you’re working with autoflowering cannabis seeds, you can plant multiple successive crops throughout the warmer months, as these varieties don’t depend on photoperiod changes to flower.
Step 3: Prepare for Regional Climate Variations
Australia’s vast geography creates dramatically different growing conditions across regions. Queensland growers in subtropical zones may contend with high humidity during flowering, necessitating careful strain selection and mould prevention strategies. Conversely, inland growers in drier regions like central New South Wales or South Australia enjoy lower humidity but must manage temperature extremes and water availability.
Southern growers in Victoria and Tasmania face shorter growing seasons with earlier autumn arrivals, making gorilla glue’s relatively compact 8-9 week flowering period particularly advantageous. These cooler climates can actually enhance terpene preservation and resin production during late flowering, producing exceptionally aromatic and potent harvests. Understanding your microclimate allows you to leverage regional advantages whilst mitigating specific challenges through strain selection and cultivation techniques.
Week-by-Week Flowering Guide for Gorilla Glue
Understanding what to expect during each week of gorilla glue’s flower cycle enables you to anticipate plant needs and optimise conditions accordingly. This detailed timeline applies to photoperiod varieties grown indoors under 12/12 lighting or outdoors following natural flowering initiation. Autoflowering varieties follow similar patterns but on a slightly compressed timeline.
Weeks 1-2: Flowering Transition and Stretch
The first two weeks after initiating 12/12 lighting represent the flowering transition period, often called the “stretch.” During this phase, gorilla glue plants may increase in height by 50-100% as internodal spacing elongates and the plant redirects energy toward reproductive growth. You’ll notice the first pistils (white hairs) emerging from developing bud sites, signalling successful flowering initiation.
Maintain slightly higher nitrogen levels during this stretch period to support rapid vegetative expansion, then begin transitioning to bloom nutrients as Week 3 approaches. Training techniques applied during early flowering—such as selective defoliation or continued LST (low-stress training) adjustments—should be completed by the end of Week 2, as excessive manipulation later in flowering can stress plants and reduce yields.
Weeks 3-5: Bud Formation and Development
Weeks three through five represent the primary bud formation period, where gorilla glue develops its characteristic dense, resinous flower clusters. Vertical growth substantially slows or stops entirely as the plant channels all energy into reproductive development. Pistil production accelerates, and you’ll notice the first visible trichome development coating emerging buds and surrounding foliage.
Nutrient demands peak during this period, particularly for phosphorus and potassium. Feed consistently according to your chosen nutrient schedule, monitoring runoff EC/PPM levels to prevent salt buildup in your growing medium. Defoliation should be minimal or absent during this critical development window—only remove leaves that are clearly dying or blocking airflow to developing bud sites. The comprehensive gorilla glue strain guide provides additional insights into managing this crucial phase.
Weeks 6-8: Bud Swelling and Maturation
The final weeks of flowering showcase dramatic bud swelling as calyxes multiply and swell with resin. Gorilla glue lives up to its name during this period, developing the sticky, adhesive resin coating that can literally glue trimming scissors together. Pistils begin changing colour from white to orange/brown, though this alone doesn’t indicate harvest readiness—trichome development is the definitive maturity indicator.
Reduce feeding strength gradually during weeks 7-8, with many growers implementing a flush (watering with plain, pH-adjusted water only) during the final 7-14 days before harvest. This practice remains somewhat controversial, but many cultivators believe it improves final flavour by reducing residual nutrients in plant tissues. Monitor trichome colour carefully using a jeweller’s loupe or digital microscope—harvest timing based on trichome maturity determines your final product’s effects profile. For detailed guidance on this crucial decision, consult our article on amber trichomes and cannabis harvest timing.
Week 9+: Extended Maturation for Specific Effects
Whilst most gorilla glue plants reach harvest maturity between weeks 8-9, some phenotypes benefit from extended flowering into week 10. Growers seeking maximum sedative, body-focused effects often allow trichomes to develop higher amber percentages before harvesting. This extended maturation converts more THC to CBN, producing heavier, more narcotic effects ideal for pain relief and sleep assistance.
Monitor your plants closely during any extended flowering period, as environmental stresses and nutrient depletion can cause quality degradation if pushed too far. The goal is to harvest at absolute peak potency and terpene content, which requires balancing trichome maturity against overall plant health and vigour.
How to Optimise Conditions Throughout the Flower Cycle
Creating ideal conditions throughout gorilla glue’s flowering period maximises both speed and quality. Environmental optimisation involves managing multiple interconnected variables, each influencing flowering progression and final bud characteristics. Attention to these details separates average harvests from exceptional ones.
Step 1: Perfect Your Lighting Strategy
Light spectrum and intensity profoundly influence flowering speed and bud density. For indoor grows, full-spectrum LED lights or HPS (high-pressure sodium) systems provide optimal flowering performance. Gorilla glue responds exceptionally well to lights with enhanced red spectrum (600-700nm wavelengths), which drives photosynthesis and flowering hormone production during the bloom phase.
Maintain appropriate light intensity throughout flowering—too weak and buds develop loosely with reduced potency; too intense and you risk light stress, bleaching, or heat damage. Most cultivators position quality LED fixtures 30-45cm from canopy tops, adjusting based on manufacturer specifications and plant response. Ensure even light distribution across your entire canopy, as shaded lower growth produces significantly inferior buds.
Step 2: Manage Temperature and Humidity Precisely
Temperature and humidity management becomes increasingly critical as flowering progresses and bud density increases. During early flowering (weeks 1-3), maintain relative humidity around 45-55% with temperatures of 22-26°C during lights-on periods. As buds develop density through weeks 4-6, reduce humidity to 40-45% to minimise mould risks whilst maintaining similar temperatures.
During late flowering (weeks 7 onwards), further reduce humidity to 35-40% and consider slightly cooler temperatures (20-24°C) to enhance resin production and terpene preservation. Some growers implement a final “cold shock” during the last week before harvest, dropping nighttime temperatures to 15-18°C to stress plants into maximising resin production as a protective response. This technique requires careful implementation to avoid causing actual plant damage.
Step 3: Optimise Nutrient Delivery and pH
Nutrient availability directly influences flowering speed and final yields. Gorilla glue performs best with pH levels between 6.0-6.5 in soil-based media or 5.5-6.0 in hydroponic systems. Test and adjust pH consistently, as fluctuations impair nutrient uptake even when feeding appropriate formulations. Many growers discover that seemingly mysterious deficiencies actually stem from pH imbalances rather than insufficient nutrient concentrations.
Implement a consistent feeding schedule based on your growing medium and system. Soil growers typically feed every second or third watering, whilst hydroponic systems require constant nutrient solution availability. Monitor EC/PPM levels to prevent both deficiencies and toxic accumulations. Gorilla glue generally tolerates moderate to high feeding levels during peak flowering, though individual phenotypes vary—always observe plant responses and adjust accordingly.
Troubleshooting Common Flowering Issues
Even experienced growers occasionally encounter challenges during the flowering phase. Identifying and addressing these issues quickly prevents minor problems from compromising your entire harvest. Understanding common flowering complications specific to gorilla glue empowers you to maintain healthy, productive plants throughout the bloom cycle.
Addressing Delayed or Stalled Flowering
If your photoperiod gorilla glue plants fail to show flowering signs within 10-14 days after switching to 12/12 lighting, investigate potential causes immediately. Light leaks during the dark period represent the most common culprit—even small amounts of light penetrating your grow space can prevent flowering initiation. Check your grow tent or room thoroughly during the dark period, sealing any light leaks completely.
Stress from environmental extremes, nutrient imbalances, or recent transplanting can also delay flowering. Ensure your plants were healthy and unstressed before initiating 12/12 lighting. Some growers experience frustration when their photoperiod plants flower at unexpected times, which may indicate environmental issues or genetic factors requiring attention.
Managing Nutrient Deficiencies During Flowering
Nutrient deficiencies manifest differently during flowering compared to vegetative growth. Phosphorus deficiency—common during heavy flowering—appears as dark green or purple leaves with potential leaf curling and slowed bud development. Potassium deficiency causes leaf edges to brown and curl upward, with possible interveinal chlorosis (yellowing between leaf veins).
Address deficiencies promptly by adjusting your nutrient formula and verifying pH levels fall within the optimal range. Gorilla glue’s heavy feeding requirements make deficiencies relatively common when using conservative feeding schedules. However, resist the temptation to dramatically increase nutrient concentrations suddenly—gradual adjustments prevent nutrient burn whilst correcting deficiencies.
Preventing and Treating Bud Rot and Mould
Gorilla glue’s dense bud structure makes it somewhat susceptible to bud rot (botrytis) and powdery mildew, particularly in high-humidity environments. Prevention far exceeds treatment in effectiveness—maintain humidity below 45% during mid-to-late flowering and ensure vigorous air circulation throughout your canopy. Avoid wetting flowers during watering, and never allow moisture to accumulate on buds.
If you discover bud rot, immediately remove affected areas by cutting several centimetres below visible infection to ensure complete removal. Dispose of infected material far from your grow space. Increase air circulation and reduce humidity further if possible. For outdoor Australian growers facing autumn humidity or rain, consider installing temporary rain covers or selecting cultivation locations with excellent drainage and airflow. According to research on Botrytis cinerea, this fungal pathogen thrives in cool, humid conditions—precisely the environment many Australian autumn climates provide.
Determining the Perfect Harvest Window
Identifying the optimal harvest moment represents one of the most critical decisions in cannabis cultivation. Harvesting too early yields underdeveloped buds with reduced potency and yields; harvesting too late allows THC degradation and produces overly sedative effects. Gorilla glue’s relatively short flowering window demands attentive monitoring during the final weeks to capture peak maturity.
Step 1: Monitor Trichome Development
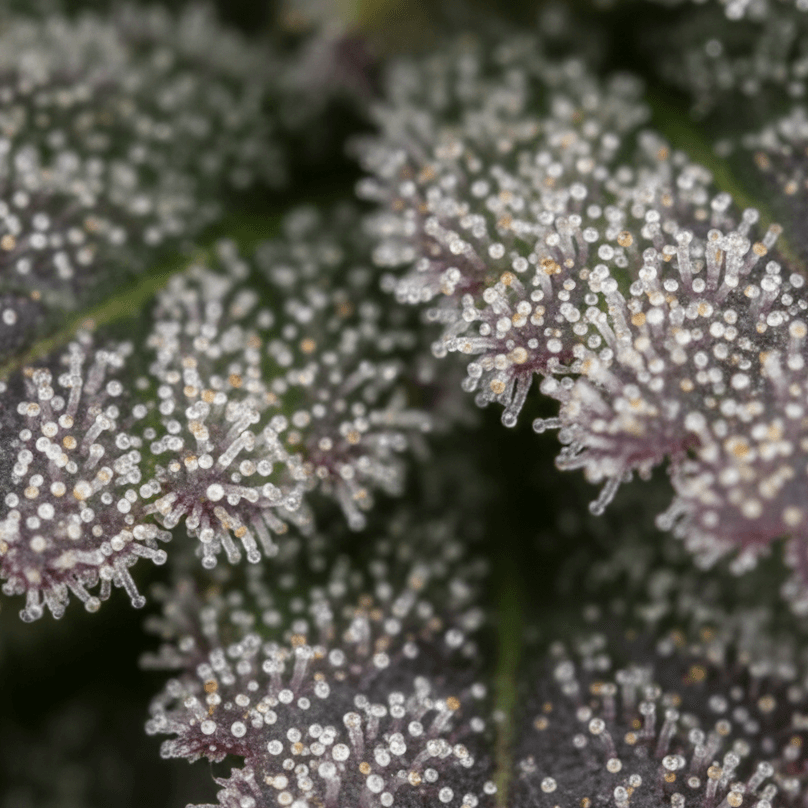
Trichome colour provides the most reliable harvest timing indicator. Using a jeweller’s loupe (30-60x magnification) or digital microscope, examine trichomes on the buds themselves rather than sugar leaves, which mature earlier. During early flowering, trichomes appear clear and glassy. As maturity approaches, they become cloudy or milky white—indicating peak THC content.
For balanced effects typical of gorilla glue’s hybrid nature, harvest when approximately 70-80% of trichomes appear cloudy with 10-20% turning amber. This produces a well-rounded high combining mental clarity with physical relaxation. If you prefer more energetic, cerebral effects, harvest when trichomes are mostly cloudy with minimal amber. For maximum sedative, body-focused effects, allow 30-40% amber development before harvesting.
Step 2: Assess Overall Plant Maturity
Beyond trichomes, evaluate overall plant appearance and vitality. Mature gorilla glue plants display substantial pistil darkening (70-90% brown/orange), though this alone doesn’t determine harvest readiness. Leaves may show natural senescence (yellowing and dying) as the plant redirects all remaining energy into final bud maturation—this is normal during the final weeks, particularly if you’ve reduced feeding or implemented a flush.
Bud density should feel firm when gently squeezed, with calyxes swollen and covered in a thick resin coating. The distinctive gorilla glue aroma intensifies significantly during final maturation, developing complex notes combining earthiness, diesel fuel, and subtle chocolate or coffee undertones inherited from its diverse genetic lineage.
Step 3: Execute Proper Harvest Technique
Once you’ve determined optimal maturity, execute your harvest during the dark period or just before lights-on for indoor grows. Some research suggests terpene and cannabinoid concentrations peak during the dark period, though evidence remains somewhat anecdotal. Outdoor growers should harvest during morning hours before temperatures rise significantly, preserving volatile terpenes that can evaporate in heat.
Use sharp, clean cutting tools to remove plants at the base or selectively harvest individual branches if maturity varies across the canopy. Handle buds gently to preserve the precious trichome coating—excessive touching during harvest can remove significant quantities of resin. Immediately begin your drying process in a controlled environment with temperatures around 18-21°C and humidity at 45-55% for optimal preservation of cannabinoids and terpenes.
Proper post-harvest handling proves just as critical as growing technique in determining final quality. Careful drying over 7-14 days followed by proper curing in sealed containers develops gorilla glue’s full flavour profile whilst preserving maximum potency. This patience during the final stages ensures your months of careful cultivation result in premium-quality buds showcasing everything this legendary strain offers.
Conclusion: Mastering Gorilla Glue Flowering for Maximum Results
Successfully managing Gorilla Glue’s flowering timeline requires understanding the differences between indoor and outdoor growing, as well as photoperiod and autoflowering genetics.
Whether growing indoors or outdoors in Australia, the principles remain the same. Provide optimal conditions at each stage, monitor plant responses closely, and harvest based on trichome maturity rather than fixed timelines.
The 8–9 week flowering period of photoperiod Gorilla Glue offers a relatively quick turnaround compared to many premium strains. Autoflowering versions deliver even faster results for time-conscious growers.
By applying the strategies in this guide—such as proper light management, environmental control, and accurate harvest timing—you can maximise both yield and quality.
Australian growers possess unique advantages and challenges depending on their specific regions. Coastal cultivators must manage humidity during autumn flowering, whilst inland growers contend with temperature extremes and water management. Understanding your microclimate and adapting these techniques accordingly ensures success regardless of location. For those just beginning their cultivation journey, exploring fundamental growing techniques provides essential foundational knowledge.
Remember that every grow provides learning opportunities. Document your flowering timeline, environmental conditions, and plant responses throughout each cycle. This data becomes invaluable for optimising future grows and developing intuition about your plants’ needs. Whether you’re selecting premium high THC cannabis seeds for your next project or expanding your knowledge through our comprehensive blog resources, continuous learning separates good growers from great ones.
The gorilla glue strain’s legendary status stems from its exceptional potency, generous yields, and relatively forgiving growth characteristics. By mastering its flowering timeline and providing optimal conditions at each stage, you can produce sticky, resinous, and highly potent buds. These qualities are what have made Gorilla Glue a global favourite.
Start with quality genetics from reputable sources. Apply the techniques in this guide, stay consistent, and be patient—the results will follow.
.
Frequently Asked Questions
How long does Gorilla Glue take to flower indoors?
Gorilla Glue typically flowers for 8–9 weeks indoors once the light cycle is switched to 12/12. Some phenotypes may finish slightly earlier or later depending on conditions.
When is Gorilla Glue ready to harvest outdoors in Australia?
Outdoor Gorilla Glue is usually ready to harvest between late March and early April in most Australian regions. Timing depends on climate, latitude, and seasonal weather.
Does Gorilla Glue autoflower have a shorter flowering time?
Yes. Autoflowering Gorilla Glue completes its full lifecycle in 8–10 weeks, with the flowering stage lasting around 6–7 weeks from the first pistils.
What light schedule triggers flowering in Gorilla Glue?
Photoperiod Gorilla Glue plants begin flowering when the light cycle changes to 12 hours of light and 12 hours of darkness. Autoflowering versions do not require light changes.
Can Gorilla Glue flower faster with the right conditions?
Yes. Stable temperatures, proper humidity, strong lighting, and correct nutrients can help Gorilla Glue flower efficiently. However, genetics ultimately determine the final timeline.
Is Gorilla Glue suitable for outdoor growing in Australia?
Yes. Gorilla Glue performs well outdoors in Australia, especially in regions with dry autumns. Its 8–9 week flowering period fits well within most outdoor seasons.
How can I tell when Gorilla Glue is ready to harvest?
The best indicator is trichome colour. Harvest when most trichomes are cloudy with some turning amber for balanced effects and peak potency.
What happens if I harvest Gorilla Glue too early?
Harvesting too early results in lower THC levels, lighter buds, and weaker effects. Clear trichomes indicate the plant has not fully matured.
Can Gorilla Glue flower for more than 9 weeks?
Yes. Some phenotypes may benefit from 9–10 weeks of flowering, especially if you prefer heavier, more sedative effects with higher amber trichomes.
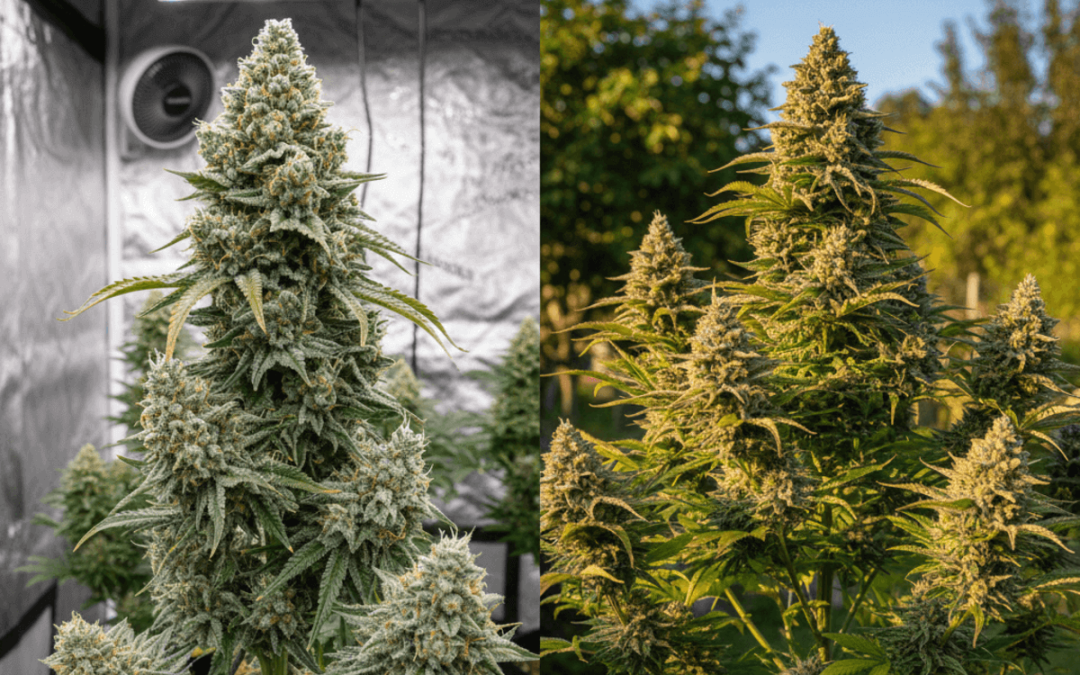
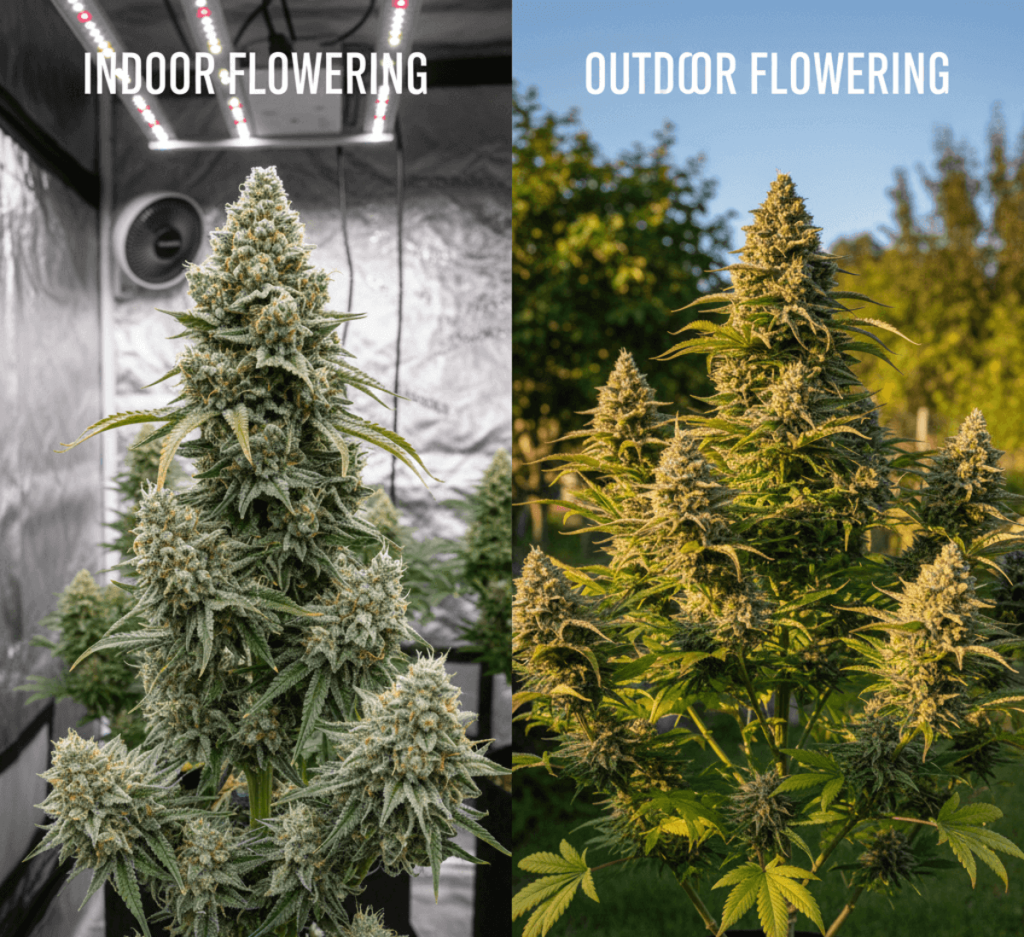
Does indoor or outdoor Gorilla Glue produce better yields?
Indoor grows offer more control and consistency. Outdoor plants often produce larger yields if given enough space and a long vegetative period.