The most consistent mistake I see from growers who’ve had reasonable success elsewhere — in the veggie garden, with other plants, even with cannabis at the later stages — is feeding cannabis seedlings too early. It’s not laziness or carelessness. It usually comes from a logical place: the plant is growing, nutrients help plants grow, so nutrients should help now. That logic breaks down completely at the seedling stage, and understanding why is the whole point of this article.
A cannabis seedling in its first two to three weeks has almost no root mass. What’s down there is a taproot and the earliest hints of lateral branching — a structure with very limited surface area for uptake and almost no capacity to buffer excess salt. When you feed that plant, most of what you’re putting in sits in the medium and accumulates. The seedling can’t flush it, can’t process it, and can’t grow through it. It just sits there building salinity until the symptoms show up on the leaves.
The good news is that a seedling in a properly prepared medium doesn’t need anything from you for the first two to three weeks. What a good seedling medium provides is covered in the soil guide. Your job in that window is to water correctly, maintain stable temperature and humidity, and watch — not feed.
What Good Seedling Medium Already Provides
If you’re running coco coir that’s been properly buffered with a Cal-Mag solution before use, the cation exchange sites are saturated — the coco isn’t going to rob calcium and magnesium from your seedling before it can access them. That’s all you need at this stage. The seedling isn’t asking for nitrogen, phosphorus, or potassium in week one. It’s asking for stable moisture, oxygen at the root zone, and light.
If you’re using a quality organic seedling mix or a light cannabis-specific base soil, there’s typically enough slow-releasing organic matter present to carry the plant comfortably through weeks one and two without any additions. The EC of good seedling medium — if you test a slurry sample — should read 0.5–0.8. That’s a small but real amount of available nutrition. It’s exactly what the plant needs at that stage and not significantly more.
Where growers run into trouble is using a potting mix that reads 1.5–2.0 EC in a slurry test and then adding nutrients on top of it. The medium is already hot by seedling standards, and anything added on top pushes it into territory where tip burn is essentially guaranteed within the first two weeks. Check your medium before you germinate. It saves a lot of headaches later.
The Trigger — When the Plant Is Ready
I don’t use days as the trigger for first feed. I use the plant. The indicator I watch for is the third node — the third pair of true leaves developing clearly — combined with a root system that’s visibly active. In coco you can sometimes see the first roots at the drainage holes by this point. In soil it’s less visible, but the medium drying down at a reasonable rate (rather than staying wet for days) tells you the roots are working.
In practice this usually falls somewhere between days 14 and 21 from germination, but I’ve seen it as late as day 28 in slower-developing phenotypes or cooler environments. The calendar is a rough guide. The plant is the actual benchmark.
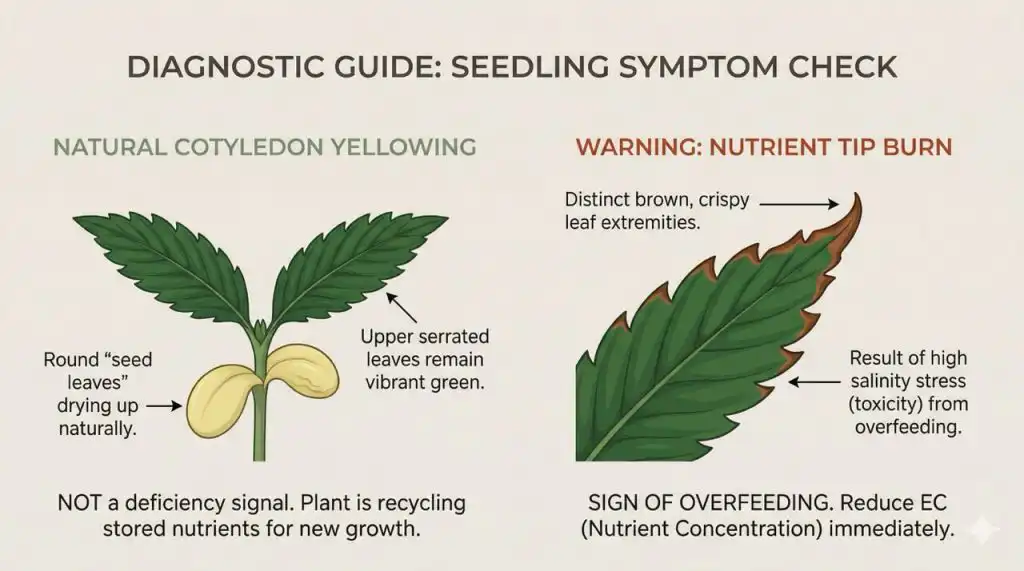
A useful secondary check before the first feed: look at the cotyledons — the round first leaves that emerge with the seedling. In a healthy seedling with no nutrient needs, they’ll be pale green and beginning to yellow naturally as the plant draws on them and moves nutrients upward. That natural yellowing of cotyledons is not a deficiency signal — it’s the plant doing exactly what it should. If the cotyledons are yellowing heavily and the true leaves are also pale or showing symptoms, that’s a different situation and worth investigating before feeding.

What to Start With — and What EC to Target
My preference for first feeds is a biostimulant or organic liquid before anything resembling a standard nutrient solution. Seasol — the straight seaweed extract, not the Seasol PowerFeed blend — at well below label rate is something most Australian growers already have on hand and it’s a genuinely good first feed for seedlings. It introduces beneficial compounds and gentle root stimulation without the salt load of a conventional nutrient feed. If you’re running a purpose-built organic line through the whole grow — Aptus, Gaia Green, Dr Greenthumbs — follow the seedling rate on the product and halve it for the first application.
For growers who want to stay in the Bunnings ecosystem entirely, Nitrosol at 1ml per litre is a well-tested starting point that Australian growers have used for years. It’s a fish and kelp liquid fertiliser — organic, low salt, and forgiving enough that it won’t burn a seedling at that dilution. Switch to PowerFeed (the red bottle) once the plant is in early flower. It’s not sophisticated, but it works, and that’s worth saying plainly.
EC targets: First feed should land at 0.4–0.6 EC in the final solution going in. That’s well below what most nutrient calculators recommend for “seedling stage” — and deliberately so. You’re not trying to push growth at this point, you’re introducing the root system to the concept of nutrient solution without stressing it. By the end of week three, building toward 0.8–1.0 EC is reasonable as the plant establishes. Don’t chase the numbers on the nutrient label — those are written for established plants, not seedlings.
One practical note: always pH your feed solution after adding nutrients, not before. Nutrient additions change pH, sometimes significantly. Target 6.2 at the point of application for soil and coco grows. Why 6.2 and how to hit it consistently is explained in the seedling soil guide.
What Overfeeding Looks Like — and Why It’s Easy to Miss Early
The first sign of overfeeding in a cannabis seedling is tip burn — the very tips of the serrated leaf edges turn brown and curl slightly. It looks minor. Most growers see it and assume it’s a one-off or a handling mark. It isn’t. Tip burn on a seedling is the plant telling you the salt concentration at the root zone is higher than it can manage, and the damage is being expressed at the extremity of the leaf where water delivery is weakest.
The instinct when you see tip burn is sometimes to water more, thinking the plant is dry. In an overfed seedling this makes it worse — you’re adding more solution to a root zone that’s already carrying excess salt. The correct response is to water with plain pH-adjusted water for the next one or two waterings and let the root zone flush through naturally before reintroducing nutrients at a lower rate.
Beyond tip burn, other overfeeding symptoms that show up slightly later include: leaf edges cupping downward (a classic sign of nitrogen toxicity — the leaf is trying to reduce surface area exposed to excess nutrient uptake), deep, almost blue-green colouration in the leaves (again, nitrogen excess), and in more severe cases, leaf clawing where the tips hook downward sharply. By the time you’re seeing clawing in a seedling, the root zone has been under significant salt stress for a while and recovery will take time the plant — particularly an auto — doesn’t have.
What makes early overfeeding easy to miss is that the plant often looks healthy for a few days after the damage is done. The tip burn appears 3–5 days after the overfeed event, not immediately. Growers who feed on a schedule sometimes don’t connect the symptom to the feed because there’s a delay between cause and effect. This is why watching the plant — rather than following a fixed feeding schedule — matters at this stage.
Autoflowers — Why the Feeding Rules Are Stricter
Everything above applies to both autoflowering and photoperiod seedlings, but the stakes are higher for autos. A photoperiod plant that gets overfed in week two loses time recovering — you can hold it in veg while it rights itself and the overall impact on the final plant is manageable. An auto that gets overfed in week two loses days from a fixed timeline it cannot extend. The damage carries through to harvest.
For autoflowering seeds specifically, I’d push the no-feed window to three full weeks rather than two, and I’d start even lower — 0.3–0.4 EC for the first application, building slowly. The genetics that carry through in auto crosses — OG, Cookies, Haze — tend to carry the nutrient sensitivity of their photoperiod parents alongside the ruderalis autoflowering trait. An Auto OG or Auto GSC will show tip burn from overfeeding just as readily as the photoperiod version, and it has less time to recover.
The growers who do best with autos in the seedling stage are the ones who understand that restraint at this point isn’t timid growing — it’s the setup for everything that follows. A seedling with an undisturbed, healthy root system entering week three is in a fundamentally better position than one that spent its first two weeks fighting salt stress.
Building From the First Feed
Once you’ve introduced the first feed at 0.4–0.6 EC and the plant has responded well — no tip burn, continued new leaf development, healthy colour — you build from there. Week three to four: 0.8–1.0 EC. Week four into early veg: 1.0–1.2 EC. These are gradual steps, not jumps. Each increment gives the root system time to adapt before the next increase.
Watch the tips at every stage. They’re the early warning system. A bit of tip discolouration tells you to hold the current EC rather than increase it. Clear, clean leaf edges tell you the plant is handling what it’s receiving. That feedback loop — feed, observe, adjust — is how experienced growers dial in a feeding programme. Not by following the nutrient label, and not by guessing.
How you feed connects directly to the containers you’re running and whether you’ve transplanted. The container sizing and transplanting guide covers how medium volume and root development affect feeding readiness. A seedling that’s just been transplanted needs a hold on nutrients for 5–7 days regardless of where it was in the feeding cycle — the root system needs to re-establish before it can process anything.
The full range of cannabis seeds available from Sacred Seeds Australia spans genetics with varying nutrient sensitivities — from robust ruderalis-heavy autos to finicky OG and Haze crosses. Whichever you’re running, the seedling feeding principles are the same. Start later than you think you need to, start lower than the label suggests, and let the plant tell you when to move forward.
Frequently Asked Questions — Feeding Cannabis Seedlings
When should I start feeding cannabis seedlings?
When the third node is clearly developing — the third pair of true leaves showing — and the root system is visibly active. In practice this is usually days 14–21 from germination, but the plant is the benchmark rather than the calendar. A seedling in good medium doesn’t need nutrients before this point and overfeeding early causes more damage than holding off does.
What EC should I use for the first feed?
0.4–0.6 EC in the final solution. That’s deliberately conservative — below most nutrient label recommendations for seedling stage, which are written for established plants. The goal at first feed is to introduce the root system to nutrient solution without stressing it. Build toward 0.8–1.0 EC by the end of week three as the plant establishes, then continue increasing gradually from there.
What nutrients should I use for cannabis seedlings?
A biostimulant or dilute organic liquid before anything resembling a full nutrient feed. Seasol (straight seaweed extract, not PowerFeed) at well below label rate is a solid starting point that’s widely available in Australia. If you’re running a full organic programme — Aptus, Gaia Green, Dr Greenthumbs — halve the seedling rate for the first application. For growers sticking to Bunnings products, Nitrosol at 1ml per litre is a proven low-risk starting feed. Start conservative regardless of the line you’re running.
What does overfeeding a cannabis seedling look like?
Tip burn first — the very tips of the leaf edges browning and curling slightly, appearing 3–5 days after the overfeed event. Later signs include leaves cupping downward, deep blue-green colouration indicating nitrogen excess, and in severe cases, leaf clawing where tips hook sharply downward. If you see tip burn, water with plain pH-adjusted water for the next couple of sessions before reintroducing nutrients at a lower rate.
Do cannabis seedlings need Cal-Mag?
Not as a nutrient feed, but as a buffer if you’re using raw coco coir. Coco has a natural affinity for calcium and magnesium — it will pull them from your feed water and bind them before the plant can access them unless the cation exchange sites are pre-saturated. Buffer raw coco with a Cal-Mag solution before use (water through to runoff, wait 30 minutes, water through again) and this issue is resolved. Pre-treated coco from quality brands handles this before bagging. In soil, Cal-Mag supplementation at the seedling stage is rarely needed unless you’re using reverse osmosis water with no mineral content.
Should I feed autoflower seedlings differently to photoperiod seedlings?
Same principles, stricter application. The no-feed window for autos should extend to three full weeks rather than two, and the first feed EC should start at 0.3–0.4 rather than 0.4–0.6. Autoflowers have a fixed timeline — damage done in week two carries to harvest without a recovery window. Many popular auto genetics also carry the nutrient sensitivity of their photoperiod parents. An Auto OG or Auto GSC will show tip burn from overfeeding as readily as the full photoperiod version, with less time to recover from it.
Why do my seedling leaves look yellow even though I haven’t fed yet?
Check which leaves are yellowing. Natural yellowing of the cotyledons — the round first leaves — is normal and expected. The plant is drawing the nutrition stored in them upward as it develops true leaves, and they’ll yellow and drop off in the first two to three weeks. This is not a deficiency. If the true leaves — the serrated ones that develop after the cotyledons — are yellowing or pale, that’s a different issue and worth investigating: check pH, check medium EC, and check watering frequency before reaching for a nutrient bottle.
How quickly should I increase EC after the first feed?
Gradually, over one to two weeks. First feed at 0.4–0.6 EC, then build toward 0.8–1.0 EC by the end of week three, and 1.0–1.2 EC into early veg. Watch the leaf tips at each stage — they’re the most reliable indicator of whether the plant is handling the current level. Any tip discolouration means hold the current EC rather than increasing. Clean, crisp leaf edges mean you can move forward. Never jump EC based on the calendar alone.